1/72 Albatros CII

3 years 9 months ago #406
by Stevef
1/72 Albatros CII was created by Stevef
Evening All,
I am going off at a bit of a tangent at the moment because I am taking part in a GB on another site - prototypes, etc. I have been a bit stuck with the BE for a number of reasons and need something to get my motivation moving. In addition I am having problems sanding and filing because I have a shoulder problem which is being diagnosed, (probably arthritis). I have managed to mould the halves for the upper wing of the BE at last but they will need quite a lot of filing and filling, followed by sanding and I can only cope with short periods of that. Progress is inevitably slow and a bit demoralising as after several sessions there is little to show for the effort. I decided that I needed a small side project which would not take so long and get some faster results. I am continuing with the BE and hope to post something in the not-too-distant future.
In the meantime I have started an Albatros CII: a pusher (of course) of which only one prototype was built. There are no drawings that I can find but there are 5 photos of the type at flyingmachines.ru/Site2/Crafts/Craft25754.htm
Basically the wings were taken from a CI and the forward fuselage was reversed and shortened so that the engine was at the rear and the pilot's cockpit was in the nose. In the CII the pilot was placed in the rear cockpit and observer in front. The undercarriage was from a CI but the booms and tail unit were new. I have the dimensions of the CII and I have drawn my own plans from existing CI plans and the published CII dimensions: it is the best anyone can do.
I have cut wing blanks from 30 thou card which has been bent in a pipe and added the ribs from 10 x 20 thou Evergreen strip. In the image below the three stages of wing construction are shown:
top - complete with ribs sanded and trailing edge scalloped;
bottom right - ribs attached and trimmed but not sanded;
bottom left - ribs added but not trimmed.

Thanks for looking.
Stevef.
I am going off at a bit of a tangent at the moment because I am taking part in a GB on another site - prototypes, etc. I have been a bit stuck with the BE for a number of reasons and need something to get my motivation moving. In addition I am having problems sanding and filing because I have a shoulder problem which is being diagnosed, (probably arthritis). I have managed to mould the halves for the upper wing of the BE at last but they will need quite a lot of filing and filling, followed by sanding and I can only cope with short periods of that. Progress is inevitably slow and a bit demoralising as after several sessions there is little to show for the effort. I decided that I needed a small side project which would not take so long and get some faster results. I am continuing with the BE and hope to post something in the not-too-distant future.
In the meantime I have started an Albatros CII: a pusher (of course) of which only one prototype was built. There are no drawings that I can find but there are 5 photos of the type at flyingmachines.ru/Site2/Crafts/Craft25754.htm
Basically the wings were taken from a CI and the forward fuselage was reversed and shortened so that the engine was at the rear and the pilot's cockpit was in the nose. In the CII the pilot was placed in the rear cockpit and observer in front. The undercarriage was from a CI but the booms and tail unit were new. I have the dimensions of the CII and I have drawn my own plans from existing CI plans and the published CII dimensions: it is the best anyone can do.
I have cut wing blanks from 30 thou card which has been bent in a pipe and added the ribs from 10 x 20 thou Evergreen strip. In the image below the three stages of wing construction are shown:
top - complete with ribs sanded and trailing edge scalloped;
bottom right - ribs attached and trimmed but not sanded;
bottom left - ribs added but not trimmed.
Thanks for looking.
Stevef.
Please Log in to join the conversation.
3 years 8 months ago #408
by Stevef
Replied by Stevef on topic 1/72 Albatros CII
Evening All,
The wings are now pretty much finished - the ribs have been rubbed down and primed to make sure that all is ready for painting later. I have not taken pictures as there is little to show.
I have carved a male mould for the fuselage nacelle from balsa. I used plywood for the female mould (basically a hole cut to the shape of the side profile), and made the nacelle halves from 30 thou Evergreen sheet styrene:

As the shape is simple it did not hurt my shoulder too much! In the above image I have cut one half of the fuselage from the sheet - the other has still to be cut out. You can see that it is very much like a vacuform and requires similar techniques to cut out. After sanding the edges of the halves I was able to achieve an acceptable pair of nacelle halves:


The second image shows that the joint underneath is good enough and will only need a small amount of filling and filing. The cockpit interior was basic as I have no details of what it was like - it is loosely based on an Albatros CI from which the nacelle was probably derived. Everything was made from card. The interior of the cockpits was painted in brown as the nacelle was made from wood, the rear was black because the engine will occupy that space and nothing much will be seen. The cockpit openings were cut with a knife and finished with a round file. The small pieces of plastic on the bottom are to help join the nacelle halves and fill the minor gap in that area:

I have also scratch built the cylinders for the engine and added a valve cover on the top, and cut an exhaust mainfold from card:

The next steps will be to assemble the nacelle and clean it up, instal the engine and fit the lower wings to the nacelle.
Thanks for looking.
Stevef.
The wings are now pretty much finished - the ribs have been rubbed down and primed to make sure that all is ready for painting later. I have not taken pictures as there is little to show.
I have carved a male mould for the fuselage nacelle from balsa. I used plywood for the female mould (basically a hole cut to the shape of the side profile), and made the nacelle halves from 30 thou Evergreen sheet styrene:
As the shape is simple it did not hurt my shoulder too much! In the above image I have cut one half of the fuselage from the sheet - the other has still to be cut out. You can see that it is very much like a vacuform and requires similar techniques to cut out. After sanding the edges of the halves I was able to achieve an acceptable pair of nacelle halves:
The second image shows that the joint underneath is good enough and will only need a small amount of filling and filing. The cockpit interior was basic as I have no details of what it was like - it is loosely based on an Albatros CI from which the nacelle was probably derived. Everything was made from card. The interior of the cockpits was painted in brown as the nacelle was made from wood, the rear was black because the engine will occupy that space and nothing much will be seen. The cockpit openings were cut with a knife and finished with a round file. The small pieces of plastic on the bottom are to help join the nacelle halves and fill the minor gap in that area:
I have also scratch built the cylinders for the engine and added a valve cover on the top, and cut an exhaust mainfold from card:
The next steps will be to assemble the nacelle and clean it up, instal the engine and fit the lower wings to the nacelle.
Thanks for looking.
Stevef.
Please Log in to join the conversation.
3 years 8 months ago #411
by Stevef
Replied by Stevef on topic 1/72 Albatros CII
Evening All,
One of the minor problems which resulted from moulding the fuselage was the rounded corners on the lower sides. These corners should be square. To remedy this deficiency is simple: I glued some stretched sprue around the edges which need to be squared off. When this was dry I applied a liberal coat of plastic putty over the sprue, waited for that to set and then sanded the corners until they were square:


I learned this from another modeller who makes vacuforms where the same problem frequently arises.
The lower wings were cemented to the nacelle one at a time. The first was attached, supported with a sophisticated jig, and allowed to set overnight:

Next day I repeated the process with the other lower wing.
With the wings in place and any small imperfections filled I was ready to fix the booms to the lower and upper wings. I have made many pushers and developed a simple technique which requires the same level of sophistication of jig manufacture as that required to fix the lower wings in place. First I use the side elevation to draw a line under the wing which touches the leading and trailing edges and continues to the rear beyond the leading edge of the horizontal stabilizer. Now measure the vertical distance on the plan from the new line to the leading edge of the rear horizontal stabilizer (distance a).
I use florists wire for the booms on my True Scale models and attach it to the wings by using the end of a round file to make a groove in the top or bottom surface of the rear of the wing. To locate where to file the groove, I place the nacelle and lower wing, or top wing, over the plans and trace the line of the booms on to the rear surfaces of the relevant wings. I measure how far forward the booms fit on to the wing - that marks the forward and deepest point of the groove. The florists wire is placed on the plans and four suitable lengths cut, two for each wing. (I know that this method is not 100% accurate but it is close enough in this scale that it does not matter if a boom is a couple of mm too long or short). The front ends of the booms are filed to make them flatter and thinner to achieve a larger surface in contact with the wing and allow the boom to taper forwards. The rear ends of the booms are filed to make a neat V when viewed from above and make a better mating surface.
Now make the jig. First lay the nacelle and wings over a copy of the plans so that the wings align with the plans exactly and lie flat on the bench. Take some scrap plastic/wood/card and make a support which is the same thickness as the vertical height (a) and place it so that the leading edge sits directly over the leading edge of the horizontal stabilizer on the plan. I use two part epoxy to attach the booms to the wings as this gives me a bit of wriggle time. When I am happy that the booms are properly set and aligned on the wing and are resting on the rear support I apply a small drop of CA to the V joint at the rear. This helps to stabilize the structure while the epoxy cures overnight.


Repeat the above operation with the top wing.

The booms should now be at the correct angle in relation to the wings. The upper and lower parts of the aeroplane are now ready for painting.
I have made the wheels using another simple process. Cut the wheel discs from circles of 60 thou card: I cut out squares, trim the corners and finish with a file. I also file down the edges until they are about half the thickness of the card. Take a length of 60 thou rod, wind it around a paintbrush handle which is a slightly smaller diameter that the wheel discs, and immerse for a few seconds in boiling water. Remove from the water and plunge into cold water to set the plastic and leave a spiral. Cut off a length from the spiral which is slightly too long to fit over the disc, pull the ends of the cut plastic together to make them meet properly and place over the disc. By careful trimming of the end of the plastic rod a tyre can be cut which will sit tightly on the wheel disc. Hold in place with liquid cement and when dry clean up with filler and glass paper as necessary:

I know that in the above image I have a tyre from red rod and a spiral from white: I used the last of an old spiral to make the first tyre.
Thanks for looking.
Stevef.
One of the minor problems which resulted from moulding the fuselage was the rounded corners on the lower sides. These corners should be square. To remedy this deficiency is simple: I glued some stretched sprue around the edges which need to be squared off. When this was dry I applied a liberal coat of plastic putty over the sprue, waited for that to set and then sanded the corners until they were square:
I learned this from another modeller who makes vacuforms where the same problem frequently arises.
The lower wings were cemented to the nacelle one at a time. The first was attached, supported with a sophisticated jig, and allowed to set overnight:
Next day I repeated the process with the other lower wing.
With the wings in place and any small imperfections filled I was ready to fix the booms to the lower and upper wings. I have made many pushers and developed a simple technique which requires the same level of sophistication of jig manufacture as that required to fix the lower wings in place. First I use the side elevation to draw a line under the wing which touches the leading and trailing edges and continues to the rear beyond the leading edge of the horizontal stabilizer. Now measure the vertical distance on the plan from the new line to the leading edge of the rear horizontal stabilizer (distance a).
I use florists wire for the booms on my True Scale models and attach it to the wings by using the end of a round file to make a groove in the top or bottom surface of the rear of the wing. To locate where to file the groove, I place the nacelle and lower wing, or top wing, over the plans and trace the line of the booms on to the rear surfaces of the relevant wings. I measure how far forward the booms fit on to the wing - that marks the forward and deepest point of the groove. The florists wire is placed on the plans and four suitable lengths cut, two for each wing. (I know that this method is not 100% accurate but it is close enough in this scale that it does not matter if a boom is a couple of mm too long or short). The front ends of the booms are filed to make them flatter and thinner to achieve a larger surface in contact with the wing and allow the boom to taper forwards. The rear ends of the booms are filed to make a neat V when viewed from above and make a better mating surface.
Now make the jig. First lay the nacelle and wings over a copy of the plans so that the wings align with the plans exactly and lie flat on the bench. Take some scrap plastic/wood/card and make a support which is the same thickness as the vertical height (a) and place it so that the leading edge sits directly over the leading edge of the horizontal stabilizer on the plan. I use two part epoxy to attach the booms to the wings as this gives me a bit of wriggle time. When I am happy that the booms are properly set and aligned on the wing and are resting on the rear support I apply a small drop of CA to the V joint at the rear. This helps to stabilize the structure while the epoxy cures overnight.
Repeat the above operation with the top wing.
The booms should now be at the correct angle in relation to the wings. The upper and lower parts of the aeroplane are now ready for painting.
I have made the wheels using another simple process. Cut the wheel discs from circles of 60 thou card: I cut out squares, trim the corners and finish with a file. I also file down the edges until they are about half the thickness of the card. Take a length of 60 thou rod, wind it around a paintbrush handle which is a slightly smaller diameter that the wheel discs, and immerse for a few seconds in boiling water. Remove from the water and plunge into cold water to set the plastic and leave a spiral. Cut off a length from the spiral which is slightly too long to fit over the disc, pull the ends of the cut plastic together to make them meet properly and place over the disc. By careful trimming of the end of the plastic rod a tyre can be cut which will sit tightly on the wheel disc. Hold in place with liquid cement and when dry clean up with filler and glass paper as necessary:
I know that in the above image I have a tyre from red rod and a spiral from white: I used the last of an old spiral to make the first tyre.
Thanks for looking.
Stevef.
Please Log in to join the conversation.
3 years 7 months ago #412
by Stevef
Replied by Stevef on topic 1/72 Albatros CII
Evening All,
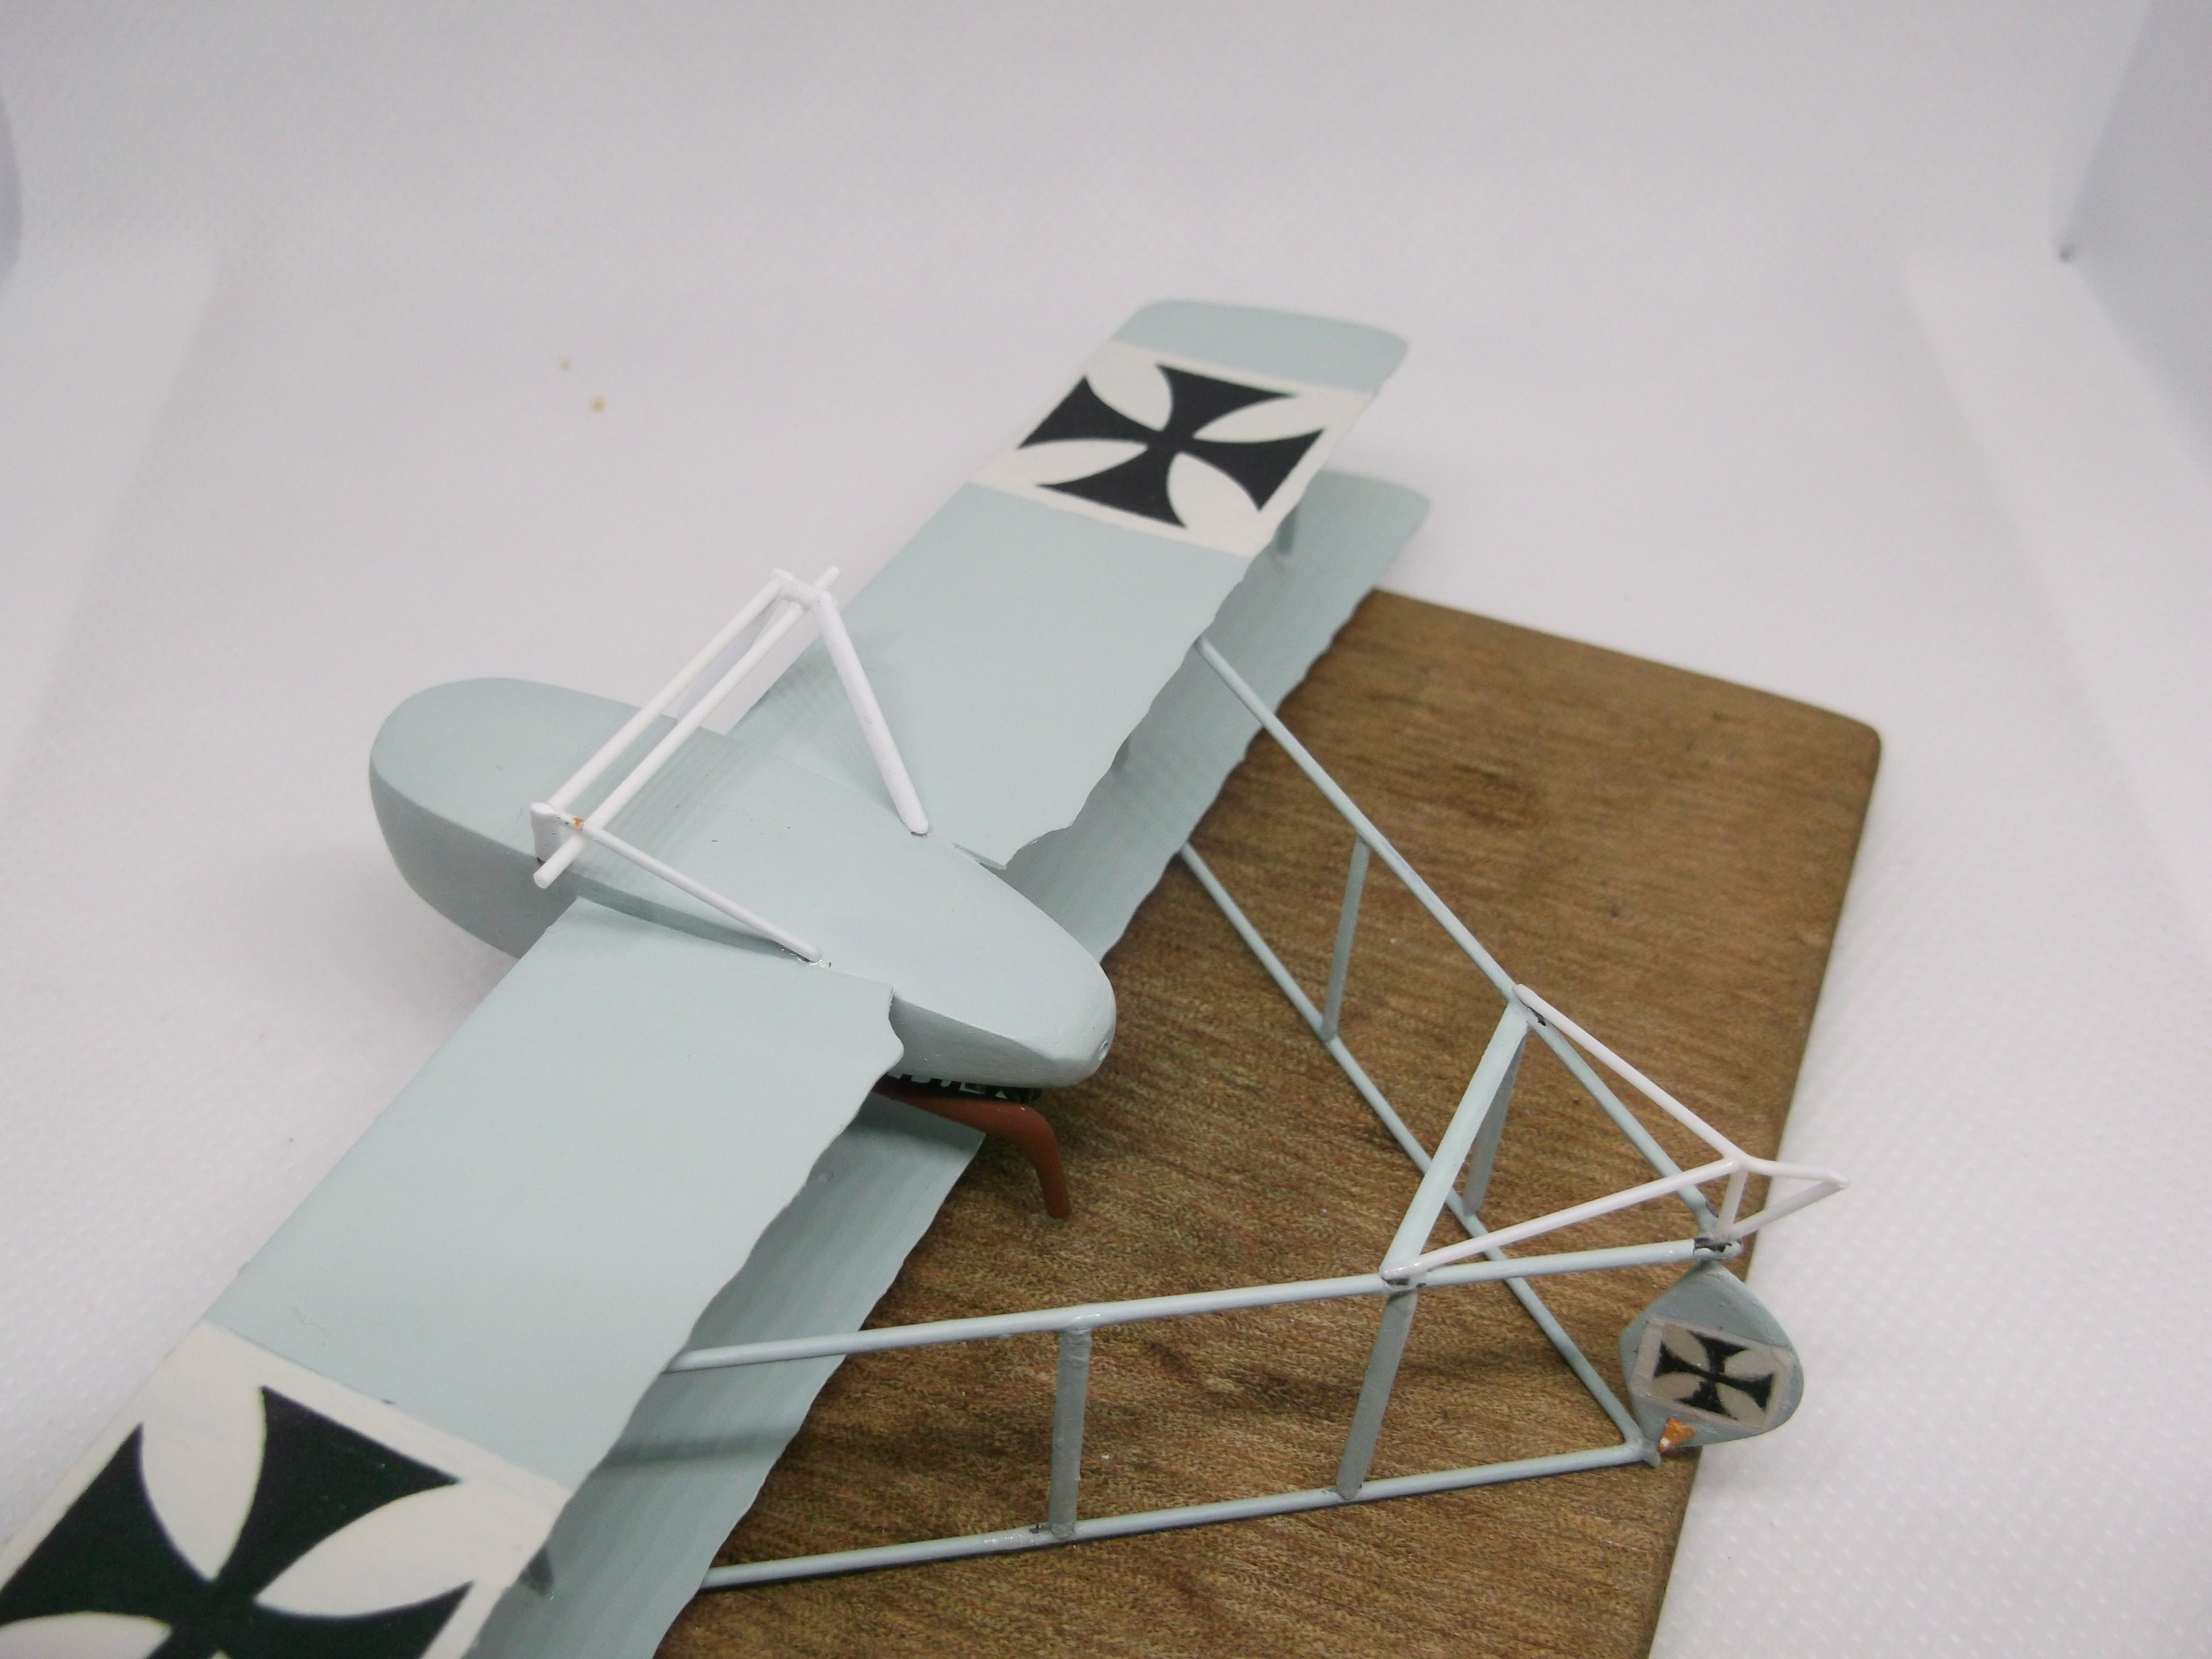
I added the radiator between the pilot's cockpit and engine compartment and painted the model light blue - I am not certain that this is the correct colour but as I only have black and white images to work from I am happy with my interpretation. The machine seems to have been of a uniform colour except for the white squares for the background to the wing and rudder crosses:


The next step was to fit the upper wing. The procedure is simple enough: I cemented the four outer wing struts to the lower wing and CA'd the bottom of the rudder post to the end of the V of the booms attached to the lower wing. While the cement and CA had a little wriggle room I put cement into the strut holes of the upper wing and a drop of CA on to the upper part of the rudder post, and gently lowered the top wing and boom assembly so that the struts and rudder post could be put into place. To add additional support I inserted the rear inner wing struts and jigged the structure with paint pots and left it to harden overnight. I forgot to take the photos with the paint pots for these pictures, but they will appear later:


 [
[
The remaining wing struts were fitted when the structure had been left overnight: here the complex jig arrangement has been set up to illustrate exactly how it works:


To finish the struts I added the cabanes first, and then the boom struts. All of the wing and cabane struts were cut from 20 x 30 thou Evergreen strip and sanded to aerofoil section. The boom struts were slightly larger so they were cut form 20 x 40 thou strip:


Thanks for looking.
Stevef.
I added the radiator between the pilot's cockpit and engine compartment and painted the model light blue - I am not certain that this is the correct colour but as I only have black and white images to work from I am happy with my interpretation. The machine seems to have been of a uniform colour except for the white squares for the background to the wing and rudder crosses:
The next step was to fit the upper wing. The procedure is simple enough: I cemented the four outer wing struts to the lower wing and CA'd the bottom of the rudder post to the end of the V of the booms attached to the lower wing. While the cement and CA had a little wriggle room I put cement into the strut holes of the upper wing and a drop of CA on to the upper part of the rudder post, and gently lowered the top wing and boom assembly so that the struts and rudder post could be put into place. To add additional support I inserted the rear inner wing struts and jigged the structure with paint pots and left it to harden overnight. I forgot to take the photos with the paint pots for these pictures, but they will appear later:
The remaining wing struts were fitted when the structure had been left overnight: here the complex jig arrangement has been set up to illustrate exactly how it works:
To finish the struts I added the cabanes first, and then the boom struts. All of the wing and cabane struts were cut from 20 x 30 thou Evergreen strip and sanded to aerofoil section. The boom struts were slightly larger so they were cut form 20 x 40 thou strip:
Thanks for looking.
Stevef.
Please Log in to join the conversation.
3 years 7 months ago #414
by Stevef
Replied by Stevef on topic 1/72 Albatros CII
Evening All,
I have completed the last parts of this build and the model is now complete. The first step was to make the main undercarriage which was fashioned from 30 thou card which was cut to V shape: well not quite a V as it has a short horizontal section between the legs. An axle was cut from 30 thou rod:

A strip of 20 x 30 thou strip was filed to aerofoil section and attached to the forward parts of the legs to form a spreader bar. The tail skid was constructed from 20 thou rod and was a rather complex affair but was straightforward to construct:


A propellor was carved from some hardwood strip and a boss made from a disc of 20 thou card:

With the final painting completed, wheels fitted to the axle and propellor in place the model is finished. I have not put on the serial number or the coloured stripe on the nose as seen in some photographs: I have gone for the simpler finish:


 [
[
Thanks for looking.
Stevef.
I have completed the last parts of this build and the model is now complete. The first step was to make the main undercarriage which was fashioned from 30 thou card which was cut to V shape: well not quite a V as it has a short horizontal section between the legs. An axle was cut from 30 thou rod:
A strip of 20 x 30 thou strip was filed to aerofoil section and attached to the forward parts of the legs to form a spreader bar. The tail skid was constructed from 20 thou rod and was a rather complex affair but was straightforward to construct:
A propellor was carved from some hardwood strip and a boss made from a disc of 20 thou card:
With the final painting completed, wheels fitted to the axle and propellor in place the model is finished. I have not put on the serial number or the coloured stripe on the nose as seen in some photographs: I have gone for the simpler finish:
Thanks for looking.
Stevef.
Please Log in to join the conversation.
Time to create page: 0.148 seconds
- You are here:
-
Home

-
Forum
-
Work in progress
-
Airfield
- 1/72 Albatros CII