1/32 Scratch Build Royal Aircraft Factory BE 2a

4 years 6 months ago #362
by Stevef
1/32 Scratch Build Royal Aircraft Factory BE 2a was created by Stevef
Evening All,
This project has come about almost by default. When I completed the de Haviland 1A I put it in a purpose made perspex display box, only to find that I had made a measurement error and the box is only just big enough to hold the model! I bought a second larger box for the de Haviland and now have a spare box. What to put into it? The box restricts the size of the subject: I had thought of an RE 5 or RE 7 but both of these are too large to fit. Other smaller subjects either do not interest me, are available as kits or are going to be released in the future, so they were all crossed off the list. Then the idea came to me to build a Royal Aircraft Factory BE 2a, (the predecessor of the better known BE 2c), as this was my first "free-lance" conversion (ie. I did not use an article but built it myself using the Airfix DH 4 as a donor kit for the wings, wheels, prop and struts), and it is very unlikely that a kit manufacturer is going to issue one at any time soon. This is the model I built in 1978:

When I made the above model I had originally wanted to build a BE 2c but detailed sources were limited and I could not find any drawings of the type. Therefore I built the BE 2a because I had a copy of Profile No 133:

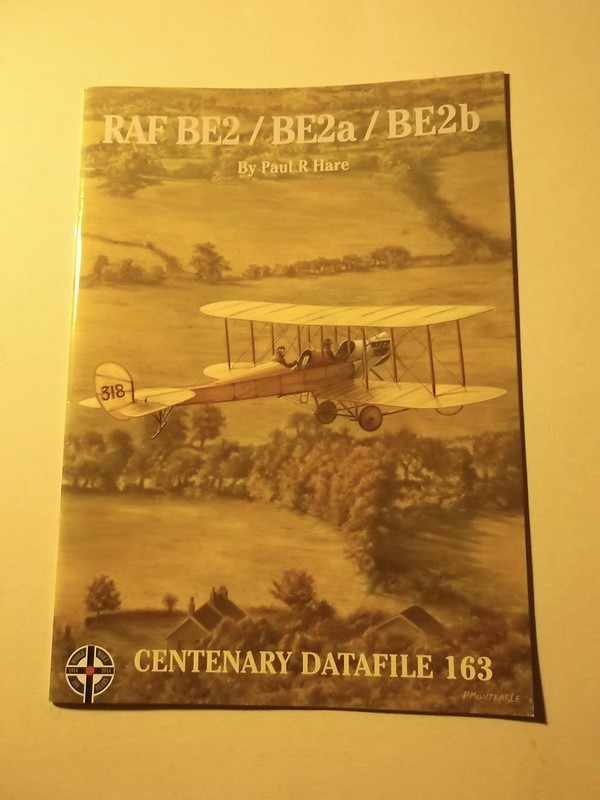
Building a model of an aeroplane in 1/32 scale means that a great deal more information is needed. Fortunately DataFile No 163 provides excellent 1/48 scale drawings and many photographs:
There are also many photographs of replica machines at Point Cook in Australia and Montrose in Scotland, and there is a replica BE 2b in the RAF Museum at Hendon. Recently this fine volume has appeared on the type:

This book is a mine of information on the type and a go-to source for information: there is a review in Cher Ami vol. 10 no 1.
There was only one outstanding problem: I could not find enough information on the 70 hp Renault engine dimensions to be able to scratch build one, (there are no kits of this type available in this scale). In the meantime I continued with other True Scale projects until I had a breakthrough via RichieW of ww1aircraftmodels.com. He is scratch building a 1/32 BE 2c and has to make a 100 hp RAF 1A engine. He was discussing how to make the cylinders on that website when "Rookie" gave him the engine sprue of the WingnutWings RE 8 which had an RAF 4A engine. The RAF 4A engine was a 12 cylinder V which had been developed from the 8 cylinder RAF 1A. The latter was an upgraded version of the Renault 70 hp and as Richie only needed 8 cylinders for his model that left two spare cylinders which he kindly passed over to me. I now had a potential solution to my biggest problem - how to scratch the 70 hp Renault engine - because I could now calculate the critical dimensions and had sufficient information about specific details to make an attempt. If I can build the engine, I can build the remainder of the model.
This project has come about almost by default. When I completed the de Haviland 1A I put it in a purpose made perspex display box, only to find that I had made a measurement error and the box is only just big enough to hold the model! I bought a second larger box for the de Haviland and now have a spare box. What to put into it? The box restricts the size of the subject: I had thought of an RE 5 or RE 7 but both of these are too large to fit. Other smaller subjects either do not interest me, are available as kits or are going to be released in the future, so they were all crossed off the list. Then the idea came to me to build a Royal Aircraft Factory BE 2a, (the predecessor of the better known BE 2c), as this was my first "free-lance" conversion (ie. I did not use an article but built it myself using the Airfix DH 4 as a donor kit for the wings, wheels, prop and struts), and it is very unlikely that a kit manufacturer is going to issue one at any time soon. This is the model I built in 1978:
When I made the above model I had originally wanted to build a BE 2c but detailed sources were limited and I could not find any drawings of the type. Therefore I built the BE 2a because I had a copy of Profile No 133:
Building a model of an aeroplane in 1/32 scale means that a great deal more information is needed. Fortunately DataFile No 163 provides excellent 1/48 scale drawings and many photographs:
There are also many photographs of replica machines at Point Cook in Australia and Montrose in Scotland, and there is a replica BE 2b in the RAF Museum at Hendon. Recently this fine volume has appeared on the type:
This book is a mine of information on the type and a go-to source for information: there is a review in Cher Ami vol. 10 no 1.
There was only one outstanding problem: I could not find enough information on the 70 hp Renault engine dimensions to be able to scratch build one, (there are no kits of this type available in this scale). In the meantime I continued with other True Scale projects until I had a breakthrough via RichieW of ww1aircraftmodels.com. He is scratch building a 1/32 BE 2c and has to make a 100 hp RAF 1A engine. He was discussing how to make the cylinders on that website when "Rookie" gave him the engine sprue of the WingnutWings RE 8 which had an RAF 4A engine. The RAF 4A engine was a 12 cylinder V which had been developed from the 8 cylinder RAF 1A. The latter was an upgraded version of the Renault 70 hp and as Richie only needed 8 cylinders for his model that left two spare cylinders which he kindly passed over to me. I now had a potential solution to my biggest problem - how to scratch the 70 hp Renault engine - because I could now calculate the critical dimensions and had sufficient information about specific details to make an attempt. If I can build the engine, I can build the remainder of the model.
Please Log in to join the conversation.
4 years 6 months ago #363
by Stevef
Replied by Stevef on topic 1/32 Scratch Build Royal Aircraft Factory BE 2a
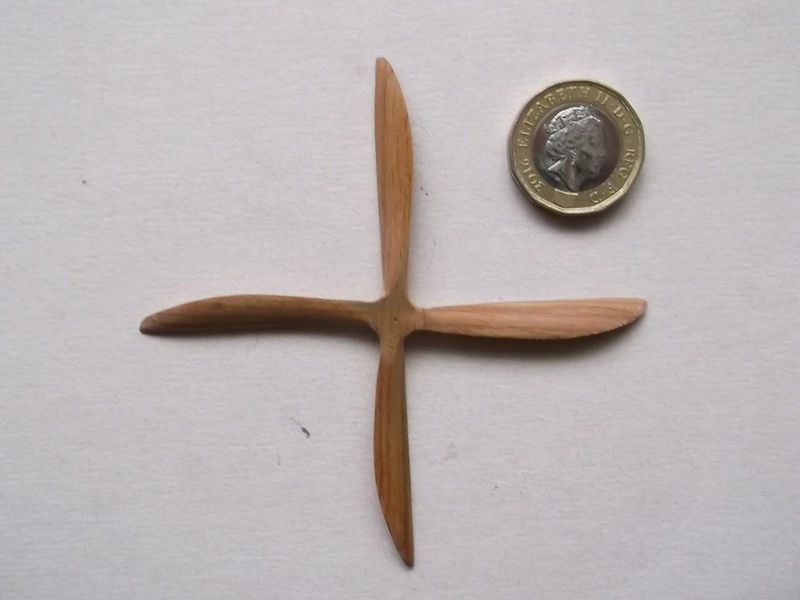
I intend to use as little aftermarket material as possible on this build, so I will only show it if I use any. Apart from the engine the other part that I was concerned about making was the 4 bladed propellor. I have made 2 bladed props in 1/32 scale, and 2 and 4 bladed props in the True Scale, but this would be my first 4 bladed prop in 1/32 so I started with this. I have a supply of hardwood strip, (I do not know what the wood is - I inherited it from my father many years ago), which I use to carve RFC and RNAS props. I cut two long strips and 4 shorter ones:

The long strips were glued to make a cross and the 4 shorter pieces then glued to each of the 4 arms with Evostick wood glue to give me the correct thickness of wood to carve. This was pressed for 24 hours in my state-of-the-art press (a pile of books):

The shape of the blades was drawn on to the surface of the cross and arrows drawn to indicate which way the blades needed to be filed:

The shape of the individual blades and boss were cut and filed first. This ensures that each blade is the correct shape and size when looked at head-on. The next step was to shape one of the blades: this was done with files only - it is too easy to slip when using a knife and the wood does not always cut smoothly, so an accident is possible and much time and effort can be wasted in a second if a mishap occurs. Filing may take longer but errors are much less likely. The arrows indicated the slope of the blade face - each one has to be identical to its neighbour and mistakes can be easily made here too. Final shaping and smoothing was done with glass paper:

The quantity of dust that filing and sanding one blade is shown here:

This is the finished propellor waiting to be varnished:

I will use a resin boss from Proper Plane, (an aftermarket product), as this will be in a very prominent position on the model and for once I am taking the quickest route!
I will post more on the engine later because at present it consists of a lump of laminated plastic waiting to be filed to shape.
Thanks for looking.
Stevef.
The long strips were glued to make a cross and the 4 shorter pieces then glued to each of the 4 arms with Evostick wood glue to give me the correct thickness of wood to carve. This was pressed for 24 hours in my state-of-the-art press (a pile of books):
The shape of the blades was drawn on to the surface of the cross and arrows drawn to indicate which way the blades needed to be filed:
The shape of the individual blades and boss were cut and filed first. This ensures that each blade is the correct shape and size when looked at head-on. The next step was to shape one of the blades: this was done with files only - it is too easy to slip when using a knife and the wood does not always cut smoothly, so an accident is possible and much time and effort can be wasted in a second if a mishap occurs. Filing may take longer but errors are much less likely. The arrows indicated the slope of the blade face - each one has to be identical to its neighbour and mistakes can be easily made here too. Final shaping and smoothing was done with glass paper:
The quantity of dust that filing and sanding one blade is shown here:
This is the finished propellor waiting to be varnished:
I will use a resin boss from Proper Plane, (an aftermarket product), as this will be in a very prominent position on the model and for once I am taking the quickest route!
I will post more on the engine later because at present it consists of a lump of laminated plastic waiting to be filed to shape.
Thanks for looking.
Stevef.
Please Log in to join the conversation.
4 years 6 months ago - 4 years 6 months ago #393
by Stevef
Replied by Stevef on topic 1/32 Scratch Build Royal Aircraft Factory BE 2a
Evening All,
I commented above that I intend to use a Proper Plane resin boss but did not provide a picture, so here is one:

Ideally I would like to make one of these, but I do not have the right materials and tools to do so, so I am opting for the [strk]easy[/strk] lazy route.
In between other activities I made the main and gravity fuel tanks from laminated card and painted them:

The filler caps may look large but that is partially an exaggeration caused by the lens, and partially because the originals were actually quite large.
I have shaped the engine block and made the timing cover for the front. All is from laminated card and strip with the circular plate and prop shaft support from rod: not difficult to make but fiddly and time consuming:

"Bolts" were added to the sides and rear of the engine block to represent the joint between the sump and head of the engine, the front was glued to the engine block and all painted in aluminium:
The arms sticking out of the sides are mounts which will rest on the fuselage frame later. The protrusion at the front is the magneto. I have also made a flywheel cut from a disc of card. The disc for the wheel was scribed using a pair of dividers and then the centre was shaped to a cross:


The arms are a little too wide but I cannot thin them much more or they will be so small that they will be too weak to handle.
Finally I am struggling with the cylinders. I have filed down the end of a piece of sprue to make the cylinder shape and then cut each length in turn:

The top of the cylinders was wider than the trunk because the inlet valve was positioned here. To make this wider part I cut and shaped some 60 x 180 thou strip:

The cylinders were bolted to the engine block via 4 long bolts. The bolts passed through cruciform clamps on the top of the cylinders so I shaped the latter from 40 thou card. First I cut a disc of card, then I marked a cross and finally I cut out the arms. On the right of the image is a cylinder with the head and arm in place:

There are still many more details to add before a cylinder is complete but I am having second thoughts about this method as I am not able to represent the cooling fins very well: scribing the plastic with the end of a scalpel is not as effective as I had hoped. In addition I will need to mount a small piece of aluminium strip to the top of one set of cylinders to represent the cowling and cover of the engine. This will need to abut the back plate of the engine which in turn must be made to exactly fit the fuselage frame.... In short I am of the opinion that the final engine assembly, including the bolts, push rods and valve springs, (which I intend to make from copper wire), and other assorted delicacies are best left until I have the fuselage frame and possibly lower wings completed. I can of course change my mind at any time and continue with the engine manufacture and assembly, but for the time being I will start to make ribs for the exposed parts of the wings, and the fuselage structure and interior details.
Thanks for looking.
Stevef.
I commented above that I intend to use a Proper Plane resin boss but did not provide a picture, so here is one:
Ideally I would like to make one of these, but I do not have the right materials and tools to do so, so I am opting for the [strk]easy[/strk] lazy route.
In between other activities I made the main and gravity fuel tanks from laminated card and painted them:
The filler caps may look large but that is partially an exaggeration caused by the lens, and partially because the originals were actually quite large.
I have shaped the engine block and made the timing cover for the front. All is from laminated card and strip with the circular plate and prop shaft support from rod: not difficult to make but fiddly and time consuming:
"Bolts" were added to the sides and rear of the engine block to represent the joint between the sump and head of the engine, the front was glued to the engine block and all painted in aluminium:
The arms sticking out of the sides are mounts which will rest on the fuselage frame later. The protrusion at the front is the magneto. I have also made a flywheel cut from a disc of card. The disc for the wheel was scribed using a pair of dividers and then the centre was shaped to a cross:
The arms are a little too wide but I cannot thin them much more or they will be so small that they will be too weak to handle.
Finally I am struggling with the cylinders. I have filed down the end of a piece of sprue to make the cylinder shape and then cut each length in turn:
The top of the cylinders was wider than the trunk because the inlet valve was positioned here. To make this wider part I cut and shaped some 60 x 180 thou strip:
The cylinders were bolted to the engine block via 4 long bolts. The bolts passed through cruciform clamps on the top of the cylinders so I shaped the latter from 40 thou card. First I cut a disc of card, then I marked a cross and finally I cut out the arms. On the right of the image is a cylinder with the head and arm in place:
There are still many more details to add before a cylinder is complete but I am having second thoughts about this method as I am not able to represent the cooling fins very well: scribing the plastic with the end of a scalpel is not as effective as I had hoped. In addition I will need to mount a small piece of aluminium strip to the top of one set of cylinders to represent the cowling and cover of the engine. This will need to abut the back plate of the engine which in turn must be made to exactly fit the fuselage frame.... In short I am of the opinion that the final engine assembly, including the bolts, push rods and valve springs, (which I intend to make from copper wire), and other assorted delicacies are best left until I have the fuselage frame and possibly lower wings completed. I can of course change my mind at any time and continue with the engine manufacture and assembly, but for the time being I will start to make ribs for the exposed parts of the wings, and the fuselage structure and interior details.
Thanks for looking.
Stevef.
Last edit: 4 years 6 months ago by Stevef.
Please Log in to join the conversation.
4 years 5 months ago #395
by Stevef
Replied by Stevef on topic 1/32 Scratch Build Royal Aircraft Factory BE 2a
Evening All,
I have stopped working on the engine for the time being - I am experimenting with some ideas but have nothing worthwhile to show for it. I have also decided that until I am ready to fit the engine to the fuselage frame I do not want to assemble much more because the cylinder head bolts were used to hold part of the cowling in place and I will need to instal part of the cowling at the same time that I put the cylinders in place. If you are confused all will become clear later.
The fuselage will need to be robust to support the weight of the model so I have opted to use brass bar for the longerons and some of the frame. I soldered the sides first using the standard method of holding the parts with pins while solder was applied:

The forward part of the upper longeron was steel tube on the real aircraft so I soldered some brass rod to represent this. With two sides made it was straightforward to join them with some horizontal bracing:

A rudder post was soldered to the rear - again brass rod:

All of the joints have been cleaned with a file: the remaining parts of the frame will be CA'd into place later.
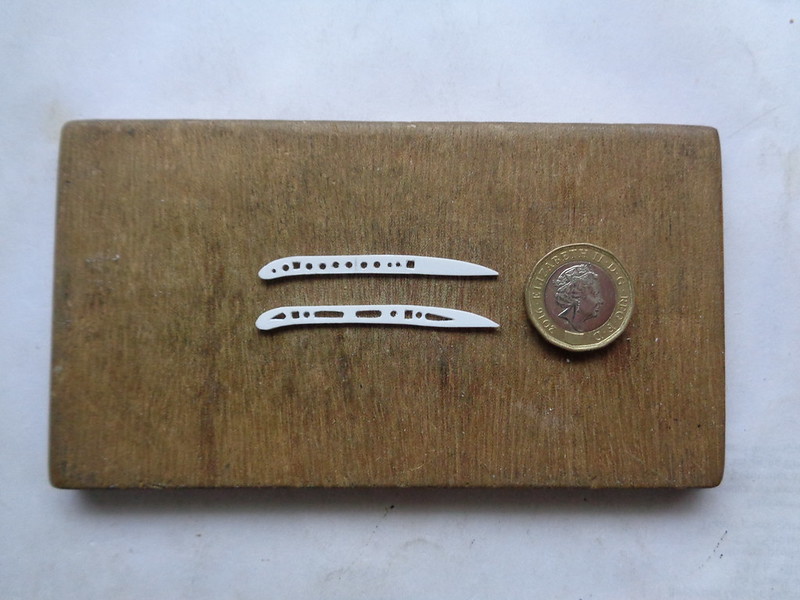
I have started to make the ribs for the wings. One lower wing and half of the upper wing will have the structure exposed so I will need approximately 30 ribs. The ribs closest to the centre had lightening holes, the remainder had slots. I tried 3 times to make the ribs with holes before I got it right... I have also cut one with slots. The image below shows the sequence of manufacture: top - a strip of 40 x 188 thou Evergreen strip, strip cut and shaped and holes drilled for spars, spar holes cut square, 2 versions of the rib with holes, bottom a rib with slots:

I will take some time to make the ribs and will work on some of the fuselage interior while I do so. I will be visiting family next week so progress will be even more glacial than usual and the next update may be some time away.
Thanks for looking.
Stevef.
I have stopped working on the engine for the time being - I am experimenting with some ideas but have nothing worthwhile to show for it. I have also decided that until I am ready to fit the engine to the fuselage frame I do not want to assemble much more because the cylinder head bolts were used to hold part of the cowling in place and I will need to instal part of the cowling at the same time that I put the cylinders in place. If you are confused all will become clear later.
The fuselage will need to be robust to support the weight of the model so I have opted to use brass bar for the longerons and some of the frame. I soldered the sides first using the standard method of holding the parts with pins while solder was applied:
The forward part of the upper longeron was steel tube on the real aircraft so I soldered some brass rod to represent this. With two sides made it was straightforward to join them with some horizontal bracing:
A rudder post was soldered to the rear - again brass rod:
All of the joints have been cleaned with a file: the remaining parts of the frame will be CA'd into place later.
I have started to make the ribs for the wings. One lower wing and half of the upper wing will have the structure exposed so I will need approximately 30 ribs. The ribs closest to the centre had lightening holes, the remainder had slots. I tried 3 times to make the ribs with holes before I got it right... I have also cut one with slots. The image below shows the sequence of manufacture: top - a strip of 40 x 188 thou Evergreen strip, strip cut and shaped and holes drilled for spars, spar holes cut square, 2 versions of the rib with holes, bottom a rib with slots:
I will take some time to make the ribs and will work on some of the fuselage interior while I do so. I will be visiting family next week so progress will be even more glacial than usual and the next update may be some time away.
Thanks for looking.
Stevef.
Please Log in to join the conversation.
4 years 4 months ago #400
by Stevef
Replied by Stevef on topic 1/32 Scratch Build Royal Aircraft Factory BE 2a
Evening All,
I have not posted anything for a while because I have been trying to make ribs for the exposed parts of the wings. I need 23 full sized ribs and 6 smaller ones for the tips. I had made the 23 full sized examples and was in the process of making the remaining 6 when i discovered that I had made a mistake - I had drilled and cut the holes for the spars in the wrong places for the larger ribs - all 23 of them....! Given that each rib takes about 45 minutes to make and I am not in the most motivated of states to make them, I will leave to your imaginations how I felt when I discovered my error. (It will save the mods having to delete this post if I do not write any more about that). At last I have finished the new ribs.... That was not as easy as I had expected either because I managed to spoil/ruin 10 more! In all 60 ribs made fro a total of 23 useable ones. I do not think that I will be attempting another large scale strip down model for some time. These are what the new ones look like - not all of them but you get the idea:
If anyone is wondering why I am making all of the ribs in one go, the reason is to try to maintain a consistent standard. If I were to make a few ribs, make something else and then start making ribs again I find that it is difficult to remember what has/has not been made/finished, and to keep a consistent standard of parts. I have also been experimenting making my own wicker seats but have not had much success there either so I may resort to some Barracuda resin examples instead.
I have been sent two printed engines from Beto: they are superb - I may use one of them but equally I may continue to try to scratch build one using the printed engines as a template. This is no disrespect to Beto's work - it is just that I would like to be able to scratch build as much of this model as possible. I am also experimenting with using some wood for interior parts - hopefully I can now focus on those next and start to make real progress rather than going around in circles and repeating errors...
Thanks for looking.
Stevef.
Please Log in to join the conversation.
4 years 2 months ago #402
by Stevef
Replied by Stevef on topic 1/32 Scratch Build Royal Aircraft Factory BE 2a
Evening All,
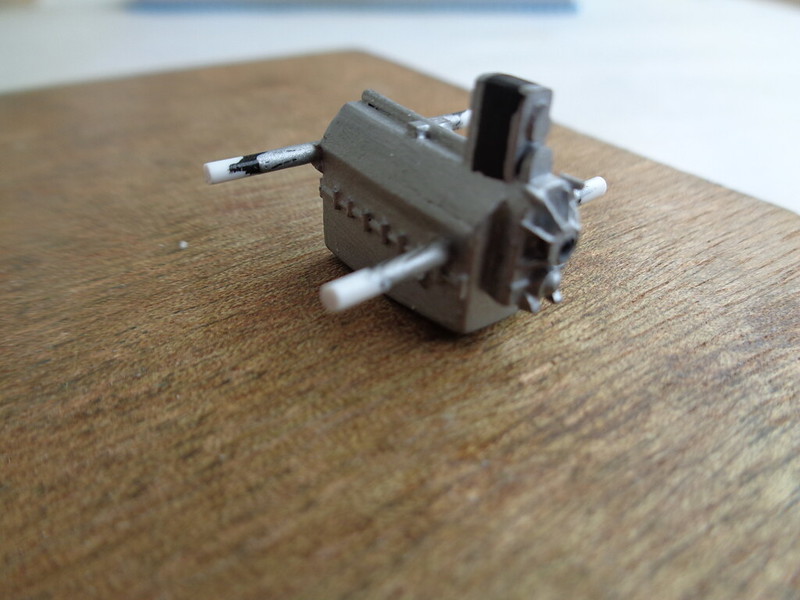
I was unhappy with my first attempt to make the engine cylinders because they seemed to be too small, so I made a second larger set. They were too large for the engine block! When I checked (again) the size of the engine block I found that it was too short....so I had to make another one. Still the new cylinders did not look right, so I did what I should have done long before - I got out the resin kit and looked closely at the parts only to find that the first set of cylinders were the correct size!!! Well I fitted 4 on one side of the block and all seemed to be well:


Then I had to put on the bolts which were fixed via cruciform brackets on the cylinder head to the engine block. They were external to the cylinders and very thin - but I could not decide what material to use to represent them. I tried some guitar wire but that was too thick. Then I lost motivation.....
Later I found some fuse wire which I had completely forgotten about and of course that was the correct size - but I baulked at the idea of fixing it in the small gaps between the cylinders. Another delay. When I came to fit the wire it was not really a problem after all!

Fitting the cylinders and bolts on the other side was then relatively easy:

I know that some bolts on the inside of the engine are not quite straight but they will be hardly visible when the inlet pipes are in place so I am not going to keep circling trying to get them perfect. For the moment I am setting the engine aside because I need to add tiny details such as spark plugs and inlet valve springs and push rods on the inside of the cylinders, and exhaust valves and push rods on the top. These will be easily and inevitably damaged if I put them on now - I will wait until the engine is mounted on the fuselage before I attempt them. I will also add the inlet and exhaust pipes at a later stage.
While I was struggling with the engine and in an attempt to revive my motivation I decided to mould the covered wing blanks. I carved moulds for the upper and lower surfaces from basswood: both ends have wing tips because I intend to represent the port lower and starboard upper wings covered. The wing plans were marked on the wood and the corners cut off. By making the moulds longer than a wing half I can use one set of moulds to make both wing halves. I cut a simple card template to measure the curvature of the surface and then proceeded to file the moulds to shape:


I was pleasantly surprised when I managed to get 4 moulds from the first 4 attempts. I have learned something from making large moudings in the past!

I am making no promises about when the next posting will be - Easter is looming which means family visit but I am hoping that I will be able to solder the lower wing spars to the fuselage frame and then finish the fuselage structure with plastic strip. After that I can start to make and install the cockpit parts. Well that is the plan!
Thanks for looking.
Stevef.
I was unhappy with my first attempt to make the engine cylinders because they seemed to be too small, so I made a second larger set. They were too large for the engine block! When I checked (again) the size of the engine block I found that it was too short....so I had to make another one. Still the new cylinders did not look right, so I did what I should have done long before - I got out the resin kit and looked closely at the parts only to find that the first set of cylinders were the correct size!!! Well I fitted 4 on one side of the block and all seemed to be well:
Then I had to put on the bolts which were fixed via cruciform brackets on the cylinder head to the engine block. They were external to the cylinders and very thin - but I could not decide what material to use to represent them. I tried some guitar wire but that was too thick. Then I lost motivation.....
Later I found some fuse wire which I had completely forgotten about and of course that was the correct size - but I baulked at the idea of fixing it in the small gaps between the cylinders. Another delay. When I came to fit the wire it was not really a problem after all!
Fitting the cylinders and bolts on the other side was then relatively easy:
I know that some bolts on the inside of the engine are not quite straight but they will be hardly visible when the inlet pipes are in place so I am not going to keep circling trying to get them perfect. For the moment I am setting the engine aside because I need to add tiny details such as spark plugs and inlet valve springs and push rods on the inside of the cylinders, and exhaust valves and push rods on the top. These will be easily and inevitably damaged if I put them on now - I will wait until the engine is mounted on the fuselage before I attempt them. I will also add the inlet and exhaust pipes at a later stage.
While I was struggling with the engine and in an attempt to revive my motivation I decided to mould the covered wing blanks. I carved moulds for the upper and lower surfaces from basswood: both ends have wing tips because I intend to represent the port lower and starboard upper wings covered. The wing plans were marked on the wood and the corners cut off. By making the moulds longer than a wing half I can use one set of moulds to make both wing halves. I cut a simple card template to measure the curvature of the surface and then proceeded to file the moulds to shape:
I was pleasantly surprised when I managed to get 4 moulds from the first 4 attempts. I have learned something from making large moudings in the past!
I am making no promises about when the next posting will be - Easter is looming which means family visit but I am hoping that I will be able to solder the lower wing spars to the fuselage frame and then finish the fuselage structure with plastic strip. After that I can start to make and install the cockpit parts. Well that is the plan!
Thanks for looking.
Stevef.
Please Log in to join the conversation.
4 years 2 months ago #403
by Stevef
Replied by Stevef on topic 1/32 Scratch Build Royal Aircraft Factory BE 2a
Evening All,
I have managed to make slightly faster progress lately - possibly because what I have done is a little more straightforward: ie I have finished soldering the fuselage frame and lower wing spars.
I soldered the lower wing spars to the fuselage longerons first using my usual hyper-complex and expensive jig:

The method involves adding a rib to each end of the spars and supporting the longer end of the spars with a simple support. The front spar sits in a small slot created by the fuselage longerons and rib, the rear is held in place by its own weight. A set square was used to check that all was square which it was because the slots in the fuselage frame were correctly aligned. A quick action with the soldering iron ensured that they are firmly and permanently in place.

The starboard, (right) side spars are longer than the port, (left) because the port side will have the solid wing and the spars do not need to run the whole width of the wing, whereas the starboard side will be uncovered and so the whole of the spar will be exposed on the completed model.
Having put the spars in place I realised that I would have been better advised to wait until I had finished soldering the fuselage frame.......
So having made the mistake I nevertheless proceeded to complete the framework. I used plastic strip at the rear as the sections were so short that cutting and filing the brass bar to length was too trying: the strip is easier to cut and file and was CA'd into place. The remaining framework was brass bar and was soldered a few pieces at a time. The top and bottom sections were straightforward as the piece could be laid on the balsa block and pinned, but the side pieces were more difficult because the spars got in the way... However all is finished and joints filed:


Deciding what to do next has involved some deep thought, (well deep for me). I had to think about whether to put in the cockpit internal details and the rig the fuselage frame before adding the port wing, or add the port wing and then the rig the frame and insert the cockpit details. I have decided that the potential for damage will be less if I attach the wing first. I will have to prime the brass before I do anything so that will be the next step, and then on to constructing the two wing halves and drilling holes for struts and rigging before they are fixed to the spars. That at least is the plan at the moment, but experience so far with this build means that could yet change. The next post will show what I actually decide to do.
Thanks for looking.
Stevef.
I have managed to make slightly faster progress lately - possibly because what I have done is a little more straightforward: ie I have finished soldering the fuselage frame and lower wing spars.
I soldered the lower wing spars to the fuselage longerons first using my usual hyper-complex and expensive jig:
The method involves adding a rib to each end of the spars and supporting the longer end of the spars with a simple support. The front spar sits in a small slot created by the fuselage longerons and rib, the rear is held in place by its own weight. A set square was used to check that all was square which it was because the slots in the fuselage frame were correctly aligned. A quick action with the soldering iron ensured that they are firmly and permanently in place.
The starboard, (right) side spars are longer than the port, (left) because the port side will have the solid wing and the spars do not need to run the whole width of the wing, whereas the starboard side will be uncovered and so the whole of the spar will be exposed on the completed model.
Having put the spars in place I realised that I would have been better advised to wait until I had finished soldering the fuselage frame.......
So having made the mistake I nevertheless proceeded to complete the framework. I used plastic strip at the rear as the sections were so short that cutting and filing the brass bar to length was too trying: the strip is easier to cut and file and was CA'd into place. The remaining framework was brass bar and was soldered a few pieces at a time. The top and bottom sections were straightforward as the piece could be laid on the balsa block and pinned, but the side pieces were more difficult because the spars got in the way... However all is finished and joints filed:
Deciding what to do next has involved some deep thought, (well deep for me). I had to think about whether to put in the cockpit internal details and the rig the fuselage frame before adding the port wing, or add the port wing and then the rig the frame and insert the cockpit details. I have decided that the potential for damage will be less if I attach the wing first. I will have to prime the brass before I do anything so that will be the next step, and then on to constructing the two wing halves and drilling holes for struts and rigging before they are fixed to the spars. That at least is the plan at the moment, but experience so far with this build means that could yet change. The next post will show what I actually decide to do.
Thanks for looking.
Stevef.
Please Log in to join the conversation.
4 years 1 month ago #404
by Stevef
Replied by Stevef on topic 1/32 Scratch Build Royal Aircraft Factory BE 2a
Evening All,
I intend to represent one half of each wing as if it were covered in fabric and the other half to show the structure: the lower wing will be covered on the port (left) side and uncovered on the starboard (right) and the reverse will apply to the upper wing. Hopefully that will distribute the weight of the model more evenly. I have already shown some wing blanks as prepared from the moulds, but here are a pair of blanks after they have been removed from the plastic sheet and are ready to be assembled:

They are for the upper wing as they represent the starboard side, but the lower port wing half is very similar. I started assembly of the port wing by drilling holes for the struts and rigging wires in the top face. Thread was passed through the rigging holes and secured with small squares of scrap plastic. The spars were CAed to the top wing surface and the edges of the wing packed as necessary with scrap strip and card. The latter made a better joint surface between the upper and lower wing sections and helped fill gaps caused by trying to marry two moulds together. Experience gained using this method of construction has taught me that filler will be needed in these areas:

After the two wing moulds had been joined, using copious amounts of tube and liquid glue, and this had been left overnight to harden, I applied large quantities of filler:

At this stage the whole structure looks a mess - indeed it was a mess, but patient filing and sanding, and more filling and sanding eventually resulted in a wing surface which when painted will be quite acceptable:

The upper surface ribs were applied by using 10 x 20 thou Evergreen strip which was allowed to dry thoroughly and the sanded to thin it. Mr Surfacer 500 was applied first to the edges of the strips, followed by 1000 grade to eliminate any small undulations and provide a smooth surface for priming.

The plastic bag which conceals the fuselage and spars of the starboard part of the lower wing is not there to hide mistakes or horrors of the model: it is there because later I will have to paint the new wing. Following the painting I will have much work to do on and in the fuselage, including painting the fuselage frame, and on the exposed wing structure, and I wish to be able to protect the newly painted wing.
Next I will make both sides of the upper wing before I proceed any further with the existing structure.
Thanks for looking.
Stevef.
I intend to represent one half of each wing as if it were covered in fabric and the other half to show the structure: the lower wing will be covered on the port (left) side and uncovered on the starboard (right) and the reverse will apply to the upper wing. Hopefully that will distribute the weight of the model more evenly. I have already shown some wing blanks as prepared from the moulds, but here are a pair of blanks after they have been removed from the plastic sheet and are ready to be assembled:
They are for the upper wing as they represent the starboard side, but the lower port wing half is very similar. I started assembly of the port wing by drilling holes for the struts and rigging wires in the top face. Thread was passed through the rigging holes and secured with small squares of scrap plastic. The spars were CAed to the top wing surface and the edges of the wing packed as necessary with scrap strip and card. The latter made a better joint surface between the upper and lower wing sections and helped fill gaps caused by trying to marry two moulds together. Experience gained using this method of construction has taught me that filler will be needed in these areas:
After the two wing moulds had been joined, using copious amounts of tube and liquid glue, and this had been left overnight to harden, I applied large quantities of filler:
At this stage the whole structure looks a mess - indeed it was a mess, but patient filing and sanding, and more filling and sanding eventually resulted in a wing surface which when painted will be quite acceptable:
The upper surface ribs were applied by using 10 x 20 thou Evergreen strip which was allowed to dry thoroughly and the sanded to thin it. Mr Surfacer 500 was applied first to the edges of the strips, followed by 1000 grade to eliminate any small undulations and provide a smooth surface for priming.
The plastic bag which conceals the fuselage and spars of the starboard part of the lower wing is not there to hide mistakes or horrors of the model: it is there because later I will have to paint the new wing. Following the painting I will have much work to do on and in the fuselage, including painting the fuselage frame, and on the exposed wing structure, and I wish to be able to protect the newly painted wing.
Next I will make both sides of the upper wing before I proceed any further with the existing structure.
Thanks for looking.
Stevef.
Please Log in to join the conversation.
3 years 11 months ago #405
by Stevef
Replied by Stevef on topic 1/32 Scratch Build Royal Aircraft Factory BE 2a
Evening All,
After a long delay in which I have made three unsuccessful attempts to mould an upper wing section I decided to change tack and start on another part of the model. I have painted the lower wing half in a mixture of Revell acrylics: beige and white. Lots of very thin coats to build up the paint and get a smooth finish. The rigging wires can also be seen - I had to paint around them:

The plastic bag was to protect the fuselage frame while I painted the wing but now it is protecting the wing while I paint and work on the fuselage frame. The frame was first primed with Halfords' rattle can white and then painted in Revell acrylics - a mixture of Okre, Braun and just a small amount of red to give a reddish hue to the wood. Rigging of the frame followed:


I am experimenting with materials with this model so I decided to use real wood for the upper and lower fuselage surfaces as they were wood on the original machines. I used some laminate from a pack of assorted wood and I do not know from which species of tree the wood was taken, but after it had been given a coat of varnish it looked fine to me. I have cut an upper and lower decking:
The lower decking has been super-glued into place:

The next stage will be to add the cockpit details: seats, fuel tank under the observer seat and flying controls and wires before I add the upper decking. This sequence should allow me access to the fuselage so that I can insert the small parts - on the completed model I intend to leave the fuselage sides open.
Thanks for looking.
Stevef.
After a long delay in which I have made three unsuccessful attempts to mould an upper wing section I decided to change tack and start on another part of the model. I have painted the lower wing half in a mixture of Revell acrylics: beige and white. Lots of very thin coats to build up the paint and get a smooth finish. The rigging wires can also be seen - I had to paint around them:
The plastic bag was to protect the fuselage frame while I painted the wing but now it is protecting the wing while I paint and work on the fuselage frame. The frame was first primed with Halfords' rattle can white and then painted in Revell acrylics - a mixture of Okre, Braun and just a small amount of red to give a reddish hue to the wood. Rigging of the frame followed:
I am experimenting with materials with this model so I decided to use real wood for the upper and lower fuselage surfaces as they were wood on the original machines. I used some laminate from a pack of assorted wood and I do not know from which species of tree the wood was taken, but after it had been given a coat of varnish it looked fine to me. I have cut an upper and lower decking:
The lower decking has been super-glued into place:
The next stage will be to add the cockpit details: seats, fuel tank under the observer seat and flying controls and wires before I add the upper decking. This sequence should allow me access to the fuselage so that I can insert the small parts - on the completed model I intend to leave the fuselage sides open.
Thanks for looking.
Stevef.
Please Log in to join the conversation.
3 years 8 months ago #409
by Stevef
Replied by Stevef on topic 1/32 Scratch Build Royal Aircraft Factory BE 2a
Evening All,
After a long break I am able to post some more material. In fact I have done more than I realised so this is going to have to be posted in 2 parts.
The BE 2 was a two seat reconnaissance machine, so two wicker seats were needed. I have tried scratch building them but decided that life is too short when there is a high quality option available: step in Barracuda with their resin seats. Some may argue that the Baraccuda pattern is wrong, (wicker seats varied considerably), but photos do not show the real things in any detail so I have gone with these:

The seats were mounted on frames and the frames held with wires which were fixed to corners of the fuselage frame. I made the wood frames for the seats with 10 x 20 thou plastic strip and the lap belts from paper. The belts are based on photos of originals which were posted on Britmodeller some years ago.
Other interior details include the control column and rudder bar. The former was made from plastic rod, the latter from scrap plastic. Both have been rigged with EZ line to represent the control wires which will extend to the rudder and elevators later:

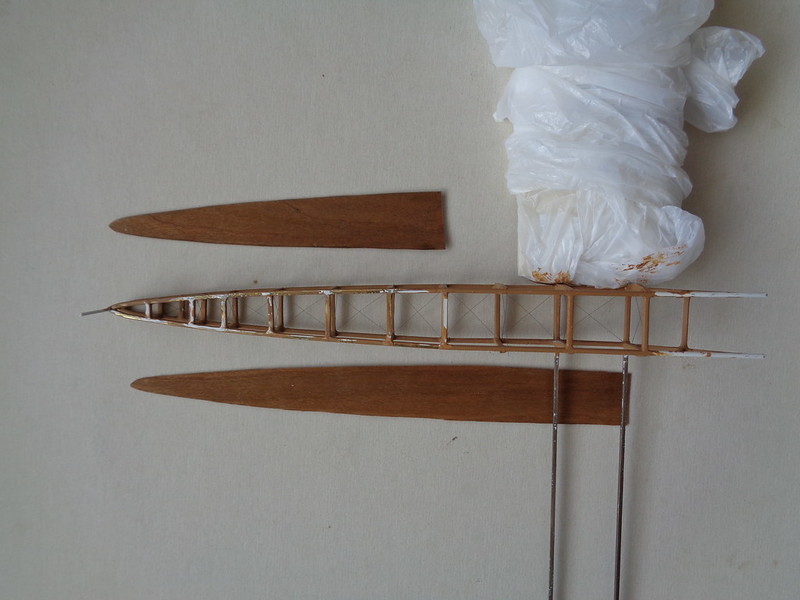
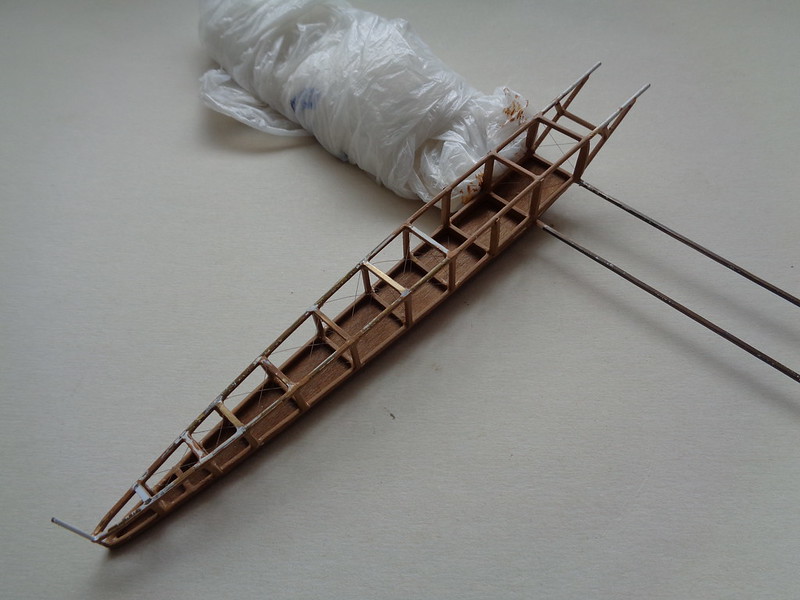
The lower wing which has the structure exposed has had the centre spar added. This was made up from 40 x 60 thou Evergreen strip with small holes made at the points were they join the ribs and where a rigging wire will pass later:

This is still not ready for paint because I still need to add the leading and trailing edge parts and the leading edge strengthening ribs, but I am avoiding them at the moment as they will only get damaged while I handle the model to add other parts.
I have at last got the top wing sandwich sorted out. I moulded the upper and lower parts successfully, drilled the lower half and added the rigging wires, and joined the two parts:
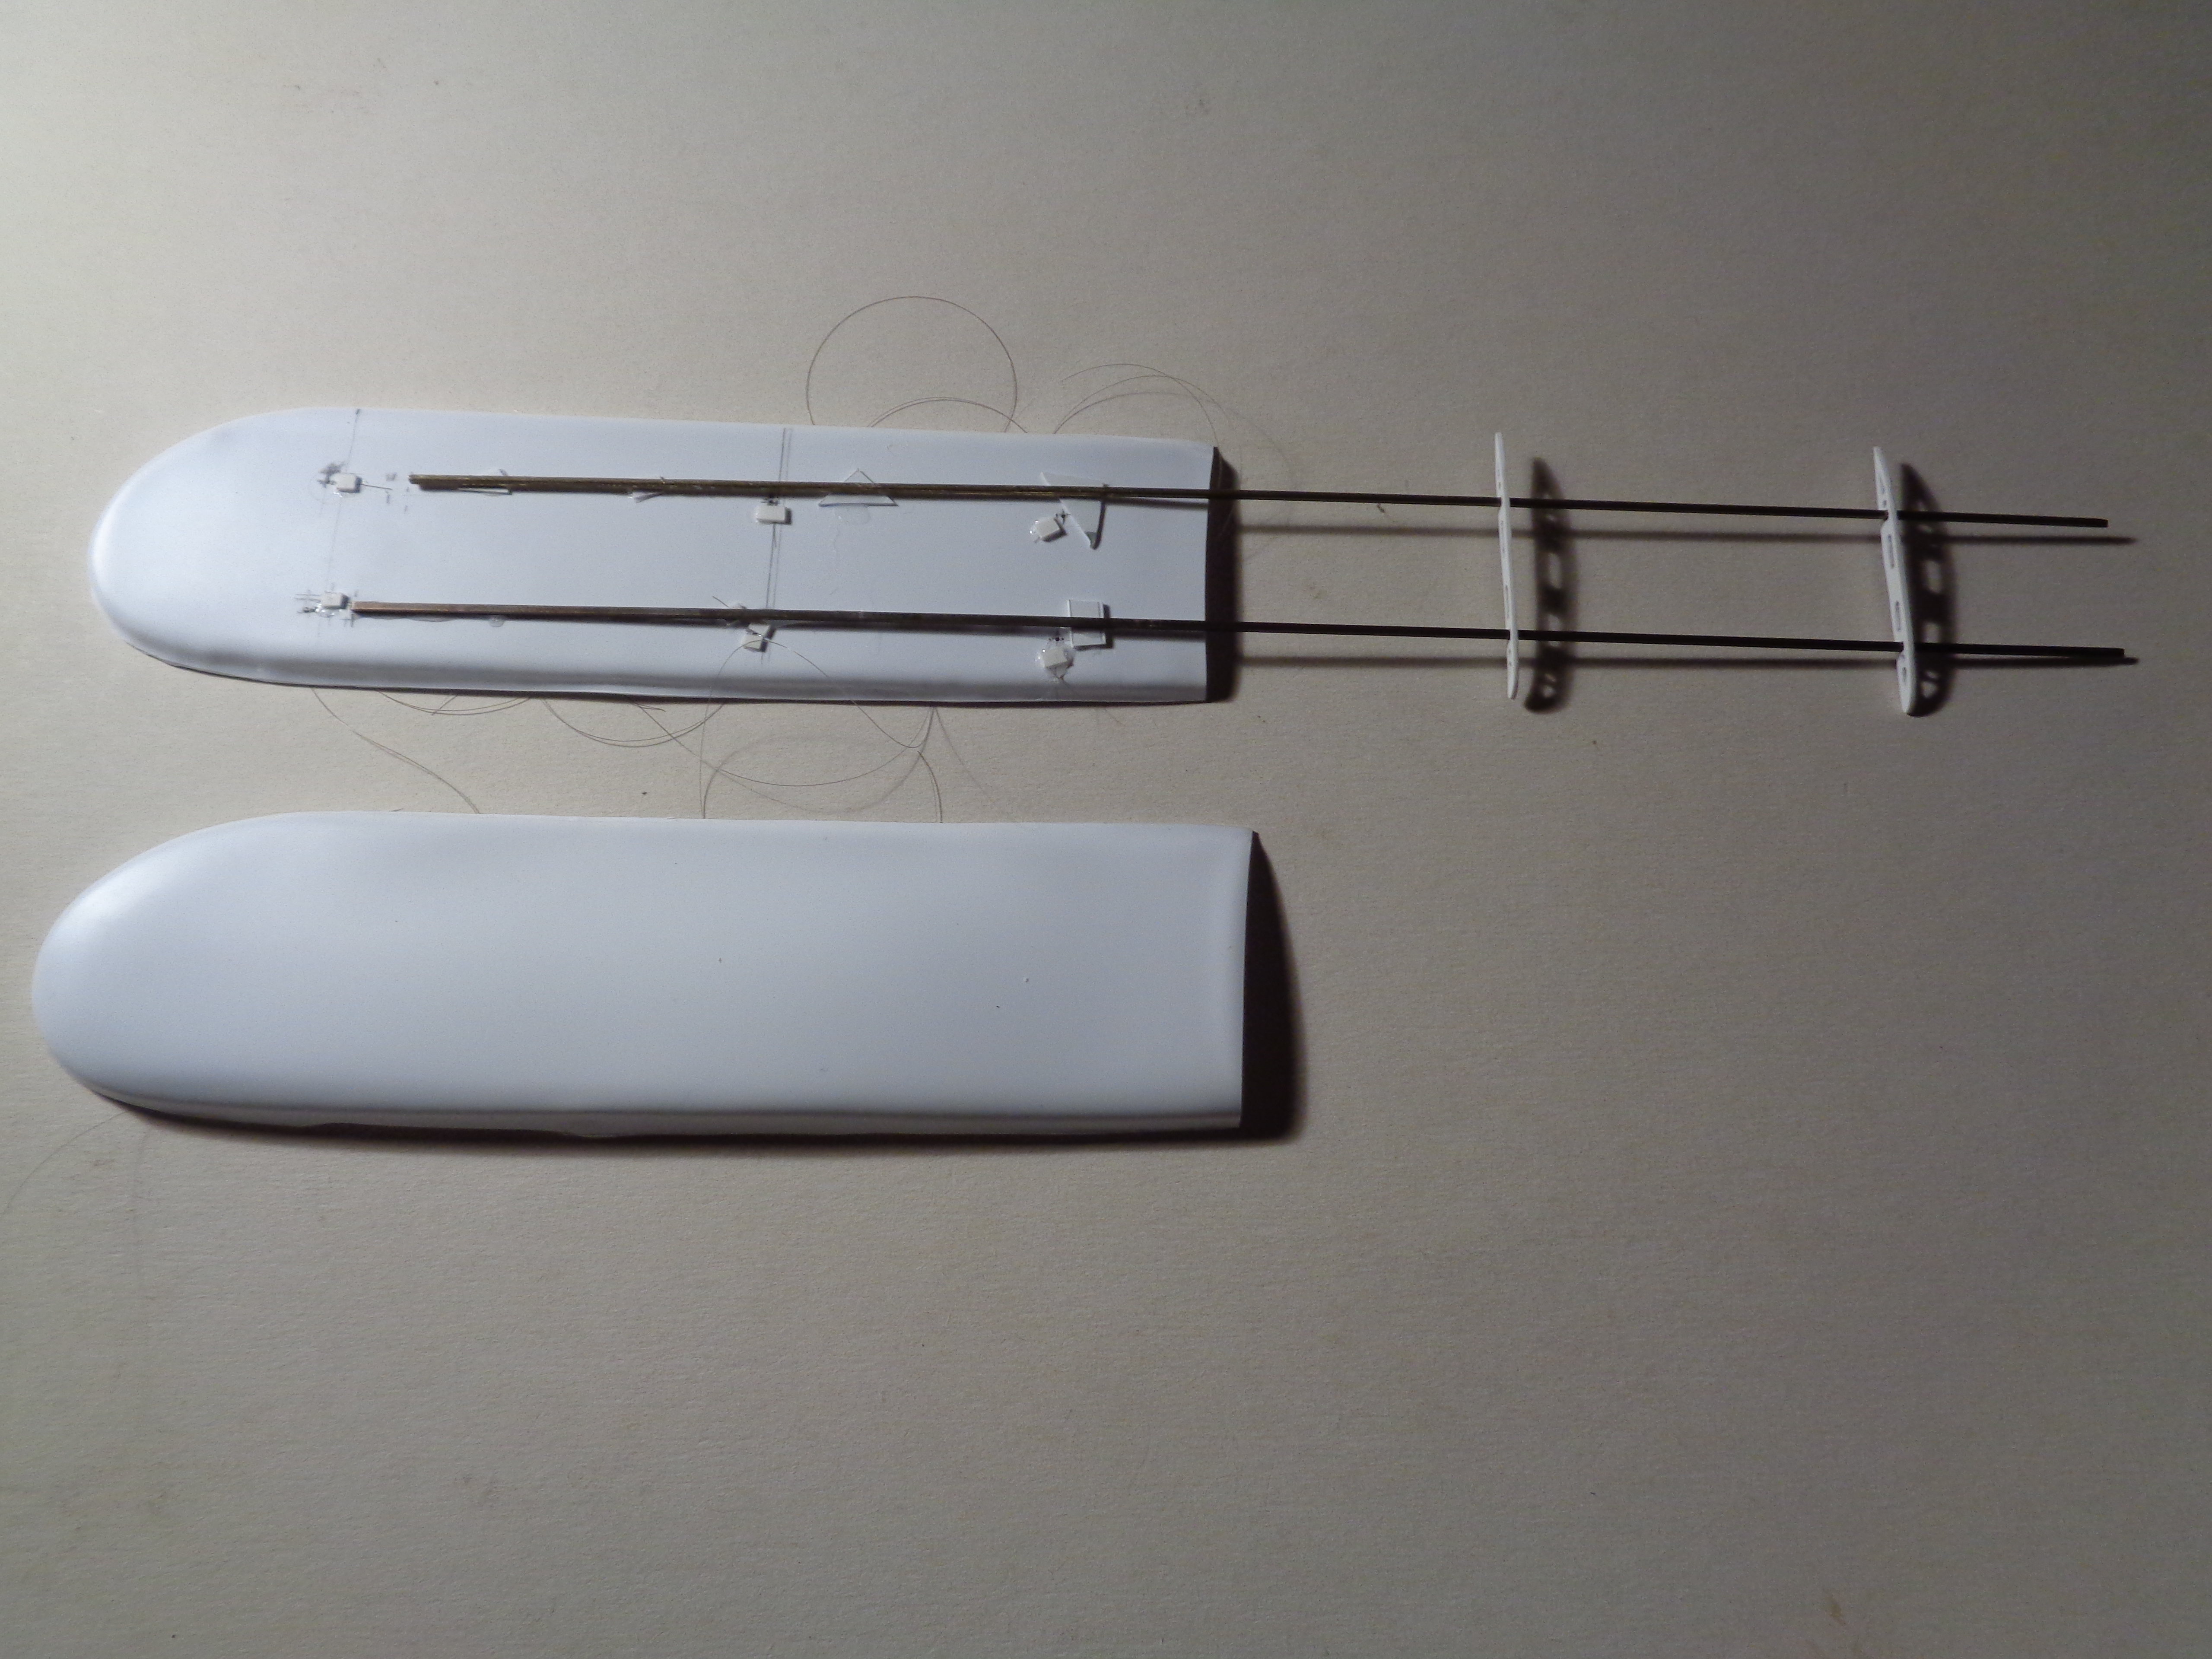

Note the advanced clamps used to hold things while they dried out. The joint was as usual best described as an ugly mess, but filing and sanding and the use of card filler and putty soon sorted out those problems on the underside.
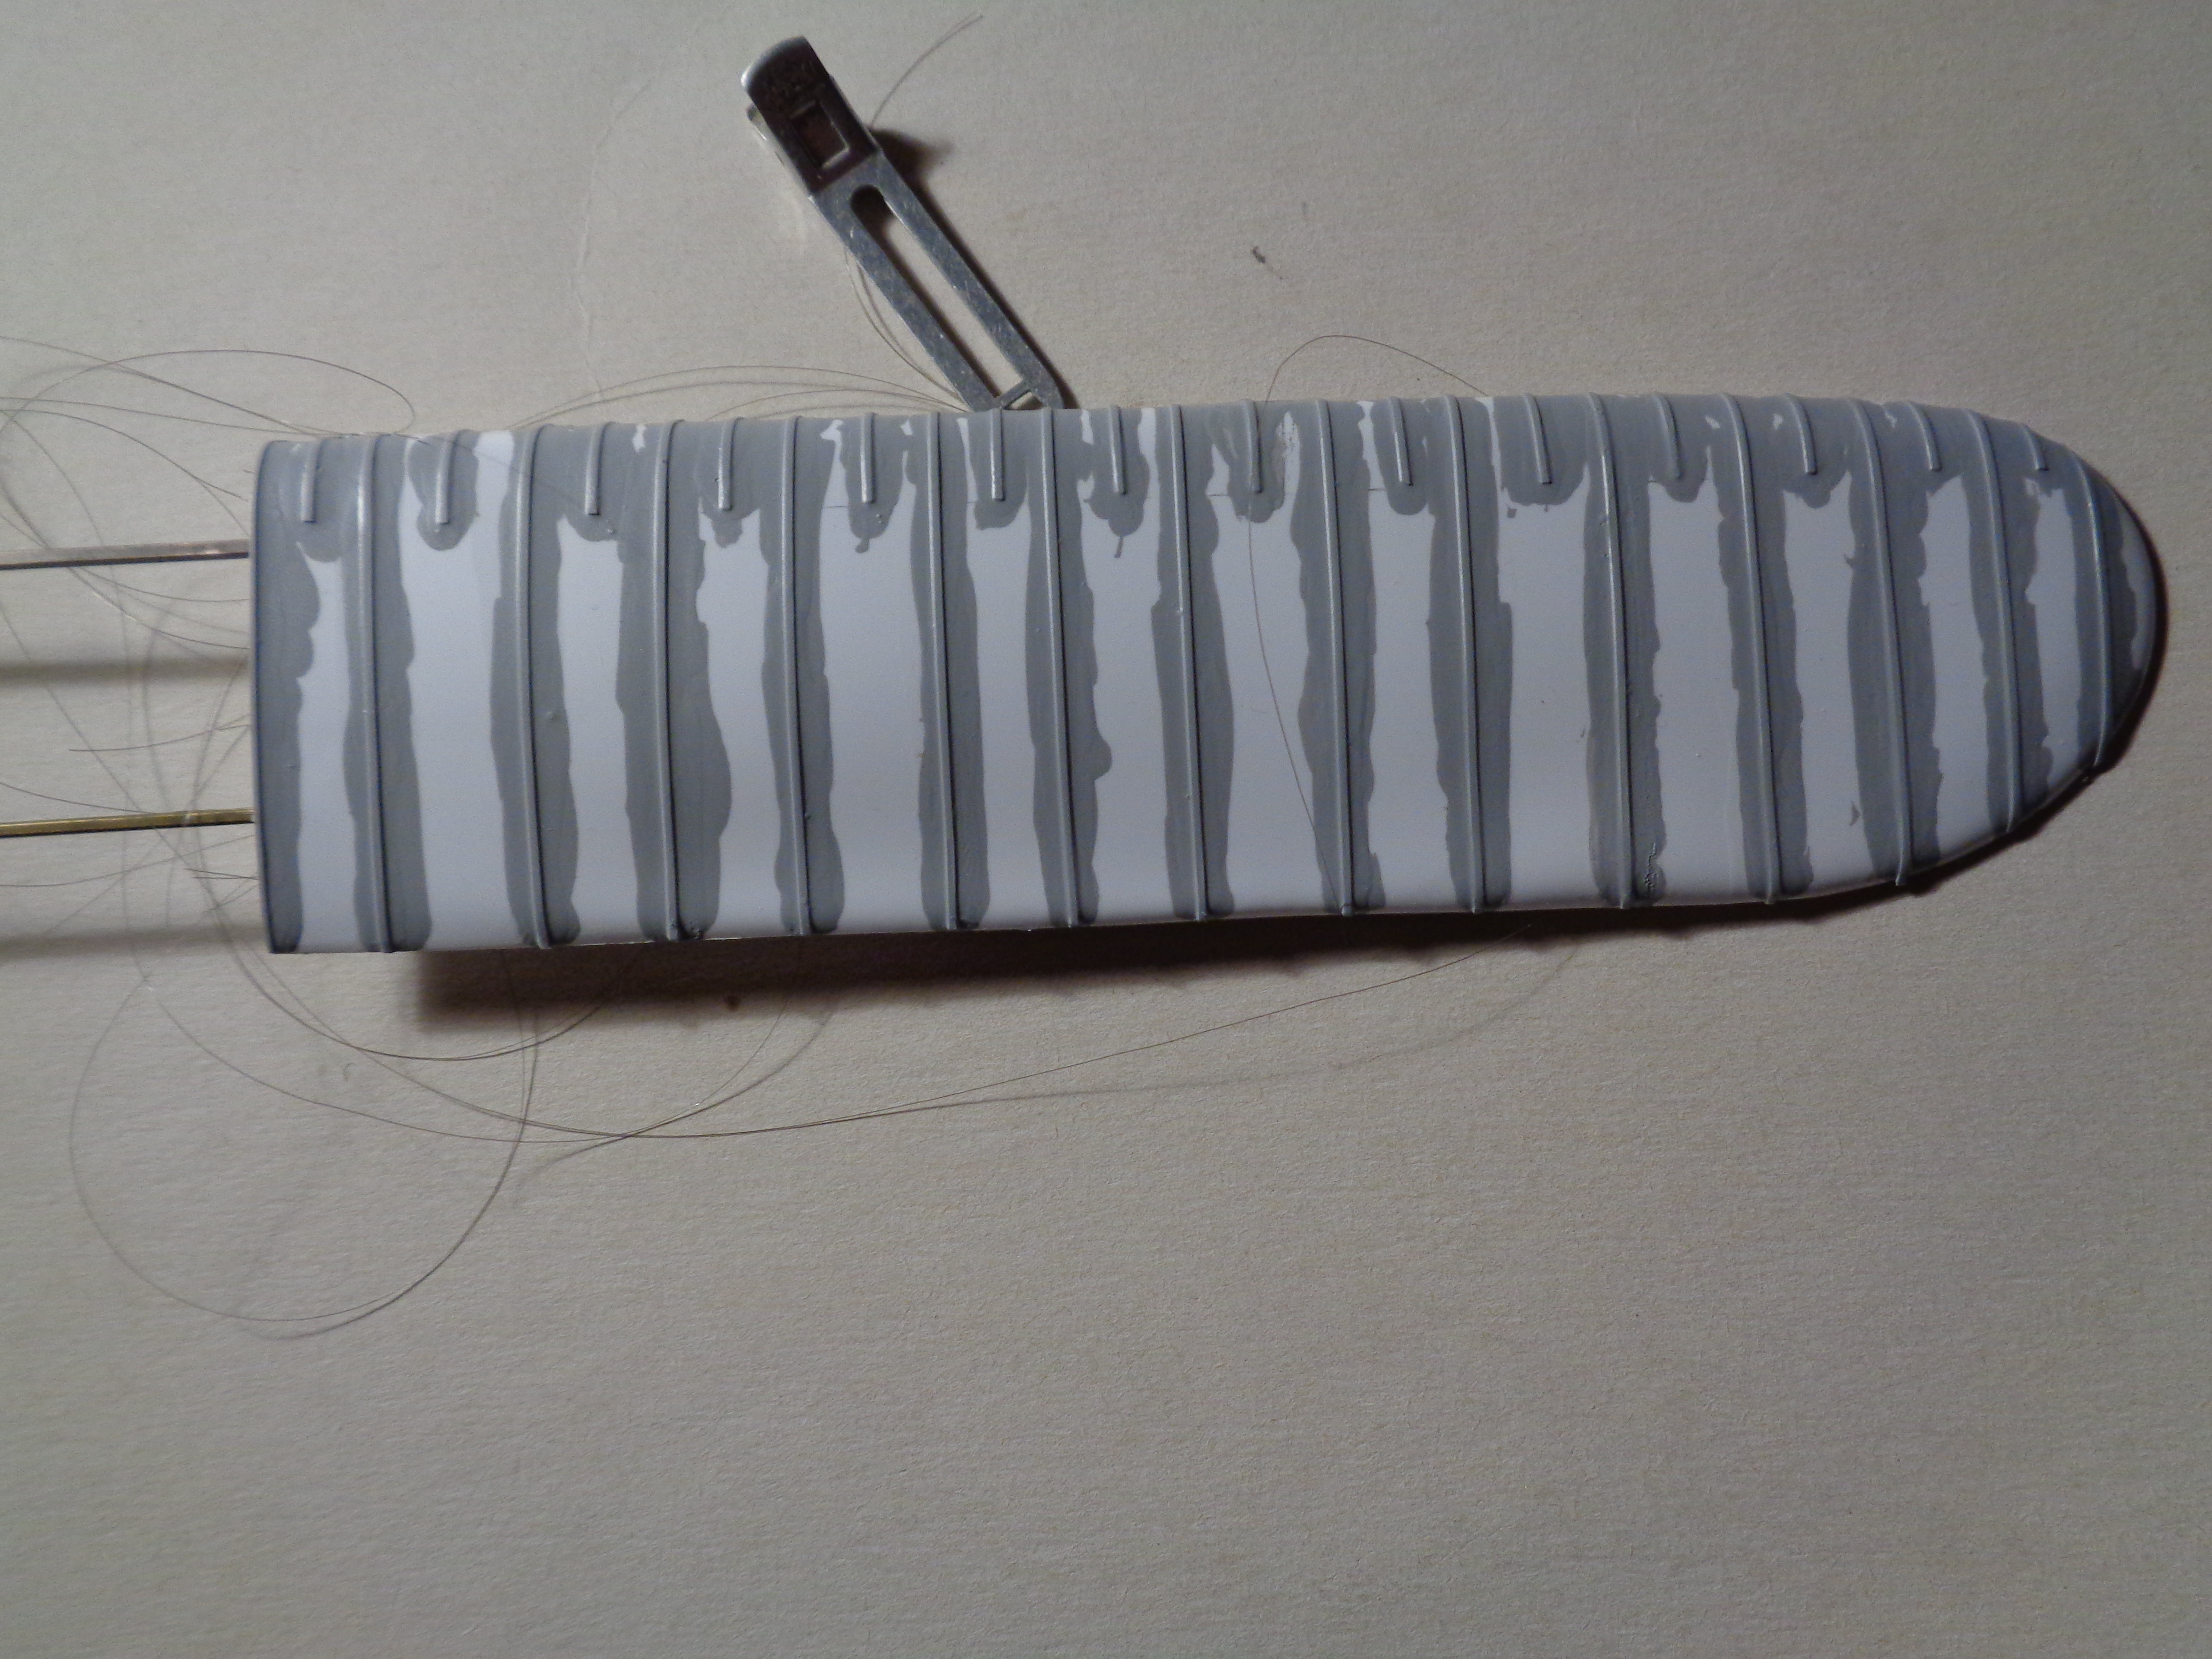
The ribs are 10 x 30 thou Evergreen strip with a liberal coating of Surfacer 500. I have not sanded the ribs down yet - probably two or three sessions will be needed with an application of Surfacer between each coat, followed by a Surfacer 1000 to finish them off. At least this part is now well on the way to completion at last. (The clip is holding rigging wires):
After a long break I am able to post some more material. In fact I have done more than I realised so this is going to have to be posted in 2 parts.
The BE 2 was a two seat reconnaissance machine, so two wicker seats were needed. I have tried scratch building them but decided that life is too short when there is a high quality option available: step in Barracuda with their resin seats. Some may argue that the Baraccuda pattern is wrong, (wicker seats varied considerably), but photos do not show the real things in any detail so I have gone with these:
The seats were mounted on frames and the frames held with wires which were fixed to corners of the fuselage frame. I made the wood frames for the seats with 10 x 20 thou plastic strip and the lap belts from paper. The belts are based on photos of originals which were posted on Britmodeller some years ago.
Other interior details include the control column and rudder bar. The former was made from plastic rod, the latter from scrap plastic. Both have been rigged with EZ line to represent the control wires which will extend to the rudder and elevators later:
The lower wing which has the structure exposed has had the centre spar added. This was made up from 40 x 60 thou Evergreen strip with small holes made at the points were they join the ribs and where a rigging wire will pass later:
This is still not ready for paint because I still need to add the leading and trailing edge parts and the leading edge strengthening ribs, but I am avoiding them at the moment as they will only get damaged while I handle the model to add other parts.
I have at last got the top wing sandwich sorted out. I moulded the upper and lower parts successfully, drilled the lower half and added the rigging wires, and joined the two parts:
Note the advanced clamps used to hold things while they dried out. The joint was as usual best described as an ugly mess, but filing and sanding and the use of card filler and putty soon sorted out those problems on the underside.
The ribs are 10 x 30 thou Evergreen strip with a liberal coating of Surfacer 500. I have not sanded the ribs down yet - probably two or three sessions will be needed with an application of Surfacer between each coat, followed by a Surfacer 1000 to finish them off. At least this part is now well on the way to completion at last. (The clip is holding rigging wires):
Please Log in to join the conversation.
Time to create page: 0.209 seconds
- You are here:
-
Home

-
Forum
-
Work in progress
-
Airfield
- 1/32 Scratch Build Royal Aircraft Factory BE 2a