1/72 Morane Saulnier Type L Parasol scratchbuild

5 years 1 month ago #338
by Stevef
1/72 Moraine Saulnier Type L Parasol was created by Stevef
Evening All,
I thought that I would amaze you all by building a tractor monoplane for a change - just to show you that I can do it! It will still have a fan at the front, (it would not be a real aeroplane if it did not have a fan), but the spare wing will be missing. However it will have a few wires to help to hold it together, so it can be regarded as authentic!! I have chosen this subject because I want something simple for a change: in addition this is another type which has been on my "to do" list for a long time. The Moraine type L Parasol was widely used by RFC, RNAS and French and Russian forces in the first two years of WW1. The Pfalz Company in Germany also built many of these under license. Perhaps its most famous moment came in June 1915 when Lt Warneford managed to down Zeppelin LZ 37 by dropping small bombs on it. The French pilot R Garros had steel deflector plates fitted to the propellor of his MS L so that he could fire a machine gun forwards along the line of flight and in doing so caused others to investigate more seriously the interruptor mechanism for machine guns firing through the propellor arc.
I have made a small start by cutting some 30 thou plastic sheet for the fuselage sides, top and bottom:

I have started to modify a cowling from an Airfix Avro 504 which I found in the spares box and did not know I had! I have cut off the rear to narrow the chord and glued a piece of 20 thou card on the inside of the opening to make that smaller. Later I will reshape the front of the cowling:

The green stick is an old cocktail stick, (again found in the spares box), which I intend to use to make cylinders for the rotary engine. The other pieces are also for the engine.
The engine crank case was made from a disc of 40 thou card and the cylinders were mounted around the edges. A smaller disc of card made up the front of the engine and push rods were made from 20 thou Evergreen rod:
 [
[
More to follow in due course.
Thanks for looking.
Stevef.
I thought that I would amaze you all by building a tractor monoplane for a change - just to show you that I can do it! It will still have a fan at the front, (it would not be a real aeroplane if it did not have a fan), but the spare wing will be missing. However it will have a few wires to help to hold it together, so it can be regarded as authentic!! I have chosen this subject because I want something simple for a change: in addition this is another type which has been on my "to do" list for a long time. The Moraine type L Parasol was widely used by RFC, RNAS and French and Russian forces in the first two years of WW1. The Pfalz Company in Germany also built many of these under license. Perhaps its most famous moment came in June 1915 when Lt Warneford managed to down Zeppelin LZ 37 by dropping small bombs on it. The French pilot R Garros had steel deflector plates fitted to the propellor of his MS L so that he could fire a machine gun forwards along the line of flight and in doing so caused others to investigate more seriously the interruptor mechanism for machine guns firing through the propellor arc.
I have made a small start by cutting some 30 thou plastic sheet for the fuselage sides, top and bottom:
I have started to modify a cowling from an Airfix Avro 504 which I found in the spares box and did not know I had! I have cut off the rear to narrow the chord and glued a piece of 20 thou card on the inside of the opening to make that smaller. Later I will reshape the front of the cowling:
The green stick is an old cocktail stick, (again found in the spares box), which I intend to use to make cylinders for the rotary engine. The other pieces are also for the engine.
The engine crank case was made from a disc of 40 thou card and the cylinders were mounted around the edges. A smaller disc of card made up the front of the engine and push rods were made from 20 thou Evergreen rod:
More to follow in due course.
Thanks for looking.
Stevef.
Please Log in to join the conversation.
5 years 1 month ago #339
by Stevef
Replied by Stevef on topic 1/72 Moraine Saulnier Type L Parasol
Evening All,
I have finished painting the interior and rigged the parts of the cockpit sides that will be visible with copper wire. I used strip and rod for most details, some of which I have not shown yet. I will put a bulkhead in the rear fuselage so I have not put any details in there: they will not be visible and I wish to keep this as a fairly quick and simple build. In addition I have painted the engine: as this will be largely obscured by the cowling and propellor I decided that this too would suffice for this model:

I have still got to finish shaping the cowling and add a firewall, make some seats and controls and other minor details and then I can assemble the fuselage. I hope to show that stage in the next post.
Thanks for looking.
Stevef.
NB the observant among you will notice the difference in spelling of "Morane" in the first post of this topic. The correct spelling is Morane: I mispelt the name in the post and cannot edit it! Apologies to all.
I have finished painting the interior and rigged the parts of the cockpit sides that will be visible with copper wire. I used strip and rod for most details, some of which I have not shown yet. I will put a bulkhead in the rear fuselage so I have not put any details in there: they will not be visible and I wish to keep this as a fairly quick and simple build. In addition I have painted the engine: as this will be largely obscured by the cowling and propellor I decided that this too would suffice for this model:
I have still got to finish shaping the cowling and add a firewall, make some seats and controls and other minor details and then I can assemble the fuselage. I hope to show that stage in the next post.
Thanks for looking.
Stevef.
NB the observant among you will notice the difference in spelling of "Morane" in the first post of this topic. The correct spelling is Morane: I mispelt the name in the post and cannot edit it! Apologies to all.
Please Log in to join the conversation.
5 years 1 month ago #340
by Stevef
Replied by Stevef on topic 1/72 Moraine Saulnier Type L Parasol
Evening All,
The fuselage is assembled and nose added. I decided to put in a couple of pockets for the pilot and observer on the starboard (right) side of the fuselage - not sure why as they can barely be seen and usually I do not bother with such details these days as I consider that if it cannot be seen on the completed model then there is no point in putting it in. I also added seats, an oil and fuel tank, controls for the pilot etc. After the fuselage parts had been glued together a small amount of filler was run along the joints just to ensure that there were no gaps.


The images also show the upper decking of the front of the fuselage and engine cowling prior to fixing to the fuselage. The decking is 20 thou card which has been gently bent over a paintbrush handle. The cowling has been modified by sticking some 30 thou card in the front apature and then filing and sanding until I achieved the correct shape. The firewall at the back is 30 thou card. The interior of the cowling assembly was painted in aluminium and some wash of brown/black applied to represent the oil thrown off the engine. The fuselage assembly is now ready for paint:


I have cut the wing from 30 thou card which had been bent in an old pipe and plunged into very hot water for about 10 seconds. The ribs have been applied (10 x 20 thou strip) but not sanded when I took the photo. Similarly I cut the horizontal tail surfaces and added the ribs:

The model is about ready for paint - just have to make the wheels from discs of 60 thou card and tyres from 40 thou rod.
Thanks for looking.
Stevef.
The fuselage is assembled and nose added. I decided to put in a couple of pockets for the pilot and observer on the starboard (right) side of the fuselage - not sure why as they can barely be seen and usually I do not bother with such details these days as I consider that if it cannot be seen on the completed model then there is no point in putting it in. I also added seats, an oil and fuel tank, controls for the pilot etc. After the fuselage parts had been glued together a small amount of filler was run along the joints just to ensure that there were no gaps.
The images also show the upper decking of the front of the fuselage and engine cowling prior to fixing to the fuselage. The decking is 20 thou card which has been gently bent over a paintbrush handle. The cowling has been modified by sticking some 30 thou card in the front apature and then filing and sanding until I achieved the correct shape. The firewall at the back is 30 thou card. The interior of the cowling assembly was painted in aluminium and some wash of brown/black applied to represent the oil thrown off the engine. The fuselage assembly is now ready for paint:
I have cut the wing from 30 thou card which had been bent in an old pipe and plunged into very hot water for about 10 seconds. The ribs have been applied (10 x 20 thou strip) but not sanded when I took the photo. Similarly I cut the horizontal tail surfaces and added the ribs:
The model is about ready for paint - just have to make the wheels from discs of 60 thou card and tyres from 40 thou rod.
Thanks for looking.
Stevef.
Please Log in to join the conversation.
5 years 3 weeks ago #341
by Stevef
Replied by Stevef on topic 1/72 Moraine Saulnier Type L Parasol
Evening All,
I have painted the main parts of the model. I used Humbrol 103, (clear doped linen), mixed with white for the fuselage and flying surfaces, and Humbrol black for the cowling and stripes on the fuselage. I added some 10 x 20 thou strip with the corners rounded with a file to make the frame on the front of the fuselage behind the cowling. The wood was Revell 382, as was the propellor which I found in the spares box: I had made one for another model and reduced it in size to fit this one.
The national markings were Humbrol white, red (60) and blue (25) mixed with white. I scribe a circle the diameter of the roundel using a pair of dividers on to the surface I wish to paint. I apply two or three thin coats of white to the circle - the paint is taken to the edge of the circle but not allowed to run into the groove. I then scribe two more circles into the white paint and apply the red and blue - this time the paint is allowed to run into the groove and a nice clean edge results (provided that my hand does not move when I am painting). I rest my and on the desk when painting like this and I use an eye loupe (magnifying lens) on my glasses. The roundels are of the Royal Naval Air Service prior to mid -1916: I have not added a serial as I do not have suitable transfers so this will be a generic representative model.


Next I intend to complete the assembly and final details - undercarriage, wing plus struts, engine etc.
Thanks for looking.
Stevef.
I have painted the main parts of the model. I used Humbrol 103, (clear doped linen), mixed with white for the fuselage and flying surfaces, and Humbrol black for the cowling and stripes on the fuselage. I added some 10 x 20 thou strip with the corners rounded with a file to make the frame on the front of the fuselage behind the cowling. The wood was Revell 382, as was the propellor which I found in the spares box: I had made one for another model and reduced it in size to fit this one.
The national markings were Humbrol white, red (60) and blue (25) mixed with white. I scribe a circle the diameter of the roundel using a pair of dividers on to the surface I wish to paint. I apply two or three thin coats of white to the circle - the paint is taken to the edge of the circle but not allowed to run into the groove. I then scribe two more circles into the white paint and apply the red and blue - this time the paint is allowed to run into the groove and a nice clean edge results (provided that my hand does not move when I am painting). I rest my and on the desk when painting like this and I use an eye loupe (magnifying lens) on my glasses. The roundels are of the Royal Naval Air Service prior to mid -1916: I have not added a serial as I do not have suitable transfers so this will be a generic representative model.
Next I intend to complete the assembly and final details - undercarriage, wing plus struts, engine etc.
Thanks for looking.
Stevef.
Please Log in to join the conversation.
5 years 2 weeks ago #342
by Stevef
Replied by Stevef on topic 1/72 Moraine Saulnier Type L Parasol
Evening All,
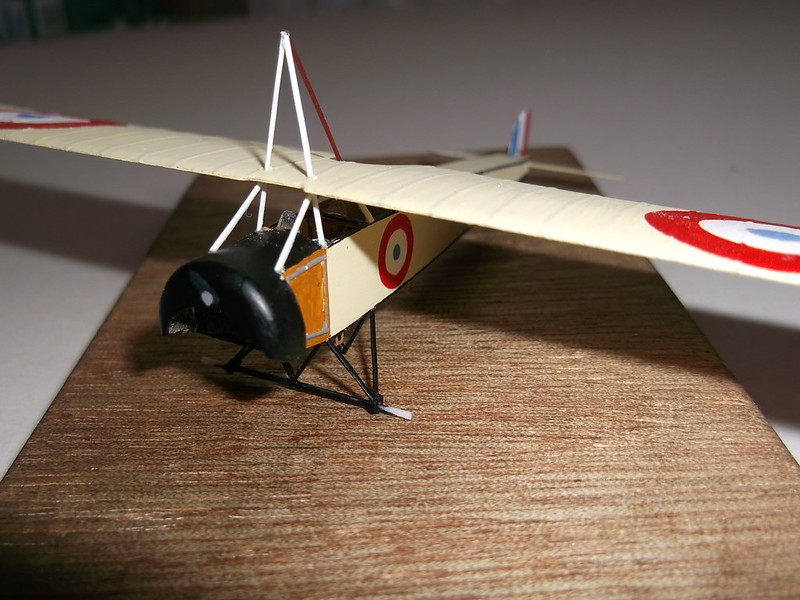
Most of the assembly is now completed - just the rigging, wheels and prop to add.
The first step was to fit the undercarriage. The tail skid assembly looks complicated but in reality it is 4 outer support struts with a central post on which the skid was mounted. The purpose of the outer struts was to keep the skid rigid. Similarly the main undercarriage legs were simple to make and assemble - I used 30 thou rod, (which is probably a little over scale but needed for strength), with plastic rod for the axle. The V struts for the bracing wires were also made from plastic rod and the undercarriage assemblies were painted after fixing in place:

Once it was on its legs I could finish the details in the cockpit and add the windscreens for the pilot and observer. They were cut and shaped from clear acetate. To fix the wing I drilled two holes where the main struts passed through and then enlarged them a little with the end of a round file. The struts were shaped from 20 x 30 thou Evergreen strip which had been filed to remove the corners. After several attempts to get everything correctly aligned I cut the rear struts and cemented these to the sides of the cockpit. The main struts were threaded through the holes in the wing and cemented at the top and where they join the wing. While the cement was still wet I lowered the wing/strut assembly so the the main struts were on the fuselage sides and the rear struts fixed against the rear of the wing. This was set aside to harden properly.

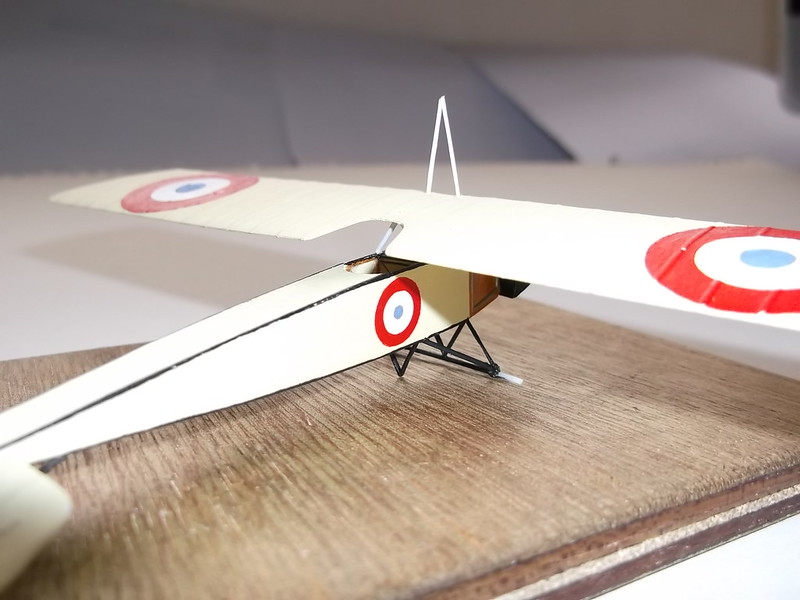
When the above had set properly it was a simple task to add the reinforcing front struts:
 [
[
All that remains now is to paint the struts, rigging and add the wheels and propellor.
Thanks for looking.
Stevef.
Most of the assembly is now completed - just the rigging, wheels and prop to add.
The first step was to fit the undercarriage. The tail skid assembly looks complicated but in reality it is 4 outer support struts with a central post on which the skid was mounted. The purpose of the outer struts was to keep the skid rigid. Similarly the main undercarriage legs were simple to make and assemble - I used 30 thou rod, (which is probably a little over scale but needed for strength), with plastic rod for the axle. The V struts for the bracing wires were also made from plastic rod and the undercarriage assemblies were painted after fixing in place:
Once it was on its legs I could finish the details in the cockpit and add the windscreens for the pilot and observer. They were cut and shaped from clear acetate. To fix the wing I drilled two holes where the main struts passed through and then enlarged them a little with the end of a round file. The struts were shaped from 20 x 30 thou Evergreen strip which had been filed to remove the corners. After several attempts to get everything correctly aligned I cut the rear struts and cemented these to the sides of the cockpit. The main struts were threaded through the holes in the wing and cemented at the top and where they join the wing. While the cement was still wet I lowered the wing/strut assembly so the the main struts were on the fuselage sides and the rear struts fixed against the rear of the wing. This was set aside to harden properly.
When the above had set properly it was a simple task to add the reinforcing front struts:
All that remains now is to paint the struts, rigging and add the wheels and propellor.
Thanks for looking.
Stevef.
Please Log in to join the conversation.
5 years 2 weeks ago #343
by Stevef
Replied by Stevef on topic 1/72 Moraine Saulnier Type L Parasol
Evening All,
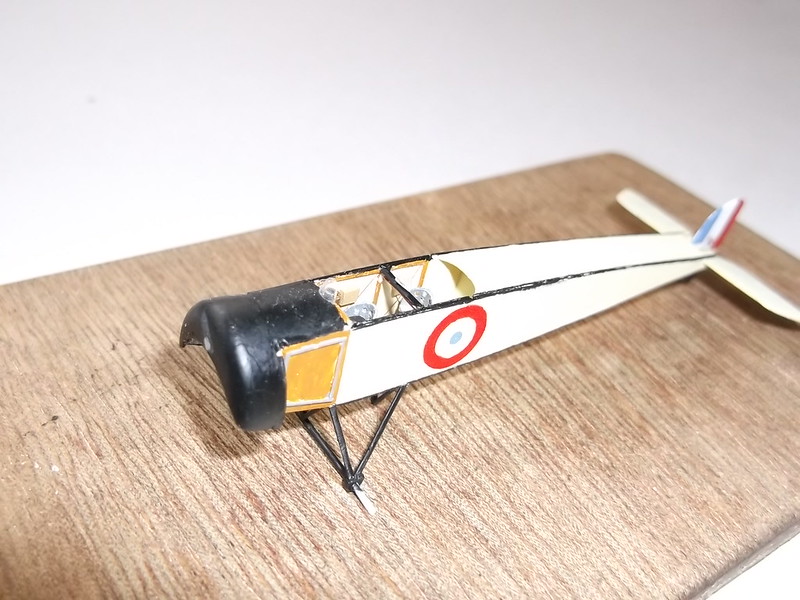
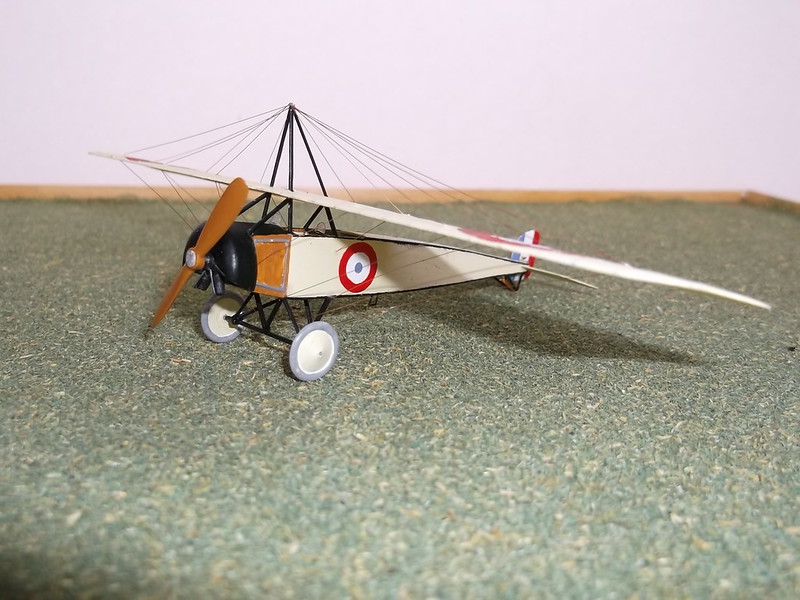
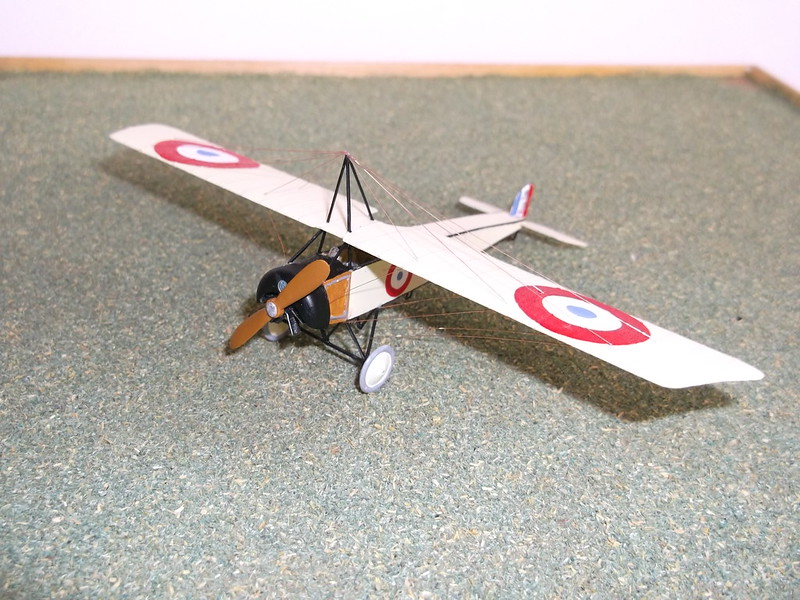
I have finished the Morane: the rigging was fairly straightforward as there is only one wing and the attachment of the wires was relatively easy when compared with rigging multi-winged types. I used rolled 40 SWG copper wire attached with CA. The propellor and wheels were easily fitted too and the model was complete.


 [
[
Stevef.
I have finished the Morane: the rigging was fairly straightforward as there is only one wing and the attachment of the wires was relatively easy when compared with rigging multi-winged types. I used rolled 40 SWG copper wire attached with CA. The propellor and wheels were easily fitted too and the model was complete.
Stevef.
Please Log in to join the conversation.
Time to create page: 0.142 seconds
- You are here:
-
Home

-
Forum
-
Work in progress
-
Airfield
- 1/72 Morane Saulnier Type L Parasol scratchbuild