1/72 Short S 38 on HMS Africa and HMS Hibernia 1912

2 years 6 months ago #439
by Stevef
1/72 Short S 38 on HMS Africa and HMS Hibernia 1912 was created by Stevef
Evening All,
Now that my modelling sanity has returned and I am back to building models of real aeroplanes, I have started on my next project, which, like the Gordon Bennett racers, was another pioneering type for a number of reasons, the most important of which was that it was the first aeroplane to take off from a ship in the UK, and only the second anywhere in the world. In addition the same feat was performed shortly afterwards when it took off from a moving ship: these events took place in 1912. The aircraft in question was the Short S 27 Improved: it was also known as the S 38. The original S 27 looked like this:
(published with kind permission of Eastchurch Aviation Museum, copyright reserved).
A replica of the S 38 is in the Fleet Air Arm Museum at Yeovilton:

(photo: Wikimedia Commons)
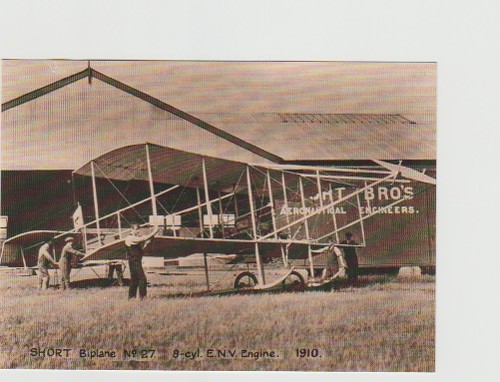
It was a design based on the Farman MF 7 so it consists mainly of struts and wires with a spare wing, engine and elevators - in other words an ideal subject. I will use a Barracuda wicker seat for the pilot (although the pattern is not strictly correct), and a Small Stuff engine. I intend to show the aircraft on a wooden platform above the front turret of HMS Africa and HMS Hibernia - the two warships from which the aircraft took off in 1912. There are no kits of King Edward VII class battleship main gun turrets in 1/72 scale so I will scratch build one of those and the wooden platform and part of the wooden runway. There are many photographs of the platform and runway, the aircraft being loaded on to and sitting on the platform on HMS Hibernia, and of the aircraft after take off. This is one source among many:
www.maritimequest.com/warship_directory/...nia/hms_hibernia.htm
This is a photograph of the aircraft at the start of the take-off run on the platform:

Now that my modelling sanity has returned and I am back to building models of real aeroplanes, I have started on my next project, which, like the Gordon Bennett racers, was another pioneering type for a number of reasons, the most important of which was that it was the first aeroplane to take off from a ship in the UK, and only the second anywhere in the world. In addition the same feat was performed shortly afterwards when it took off from a moving ship: these events took place in 1912. The aircraft in question was the Short S 27 Improved: it was also known as the S 38. The original S 27 looked like this:
(published with kind permission of Eastchurch Aviation Museum, copyright reserved).
A replica of the S 38 is in the Fleet Air Arm Museum at Yeovilton:
(photo: Wikimedia Commons)
It was a design based on the Farman MF 7 so it consists mainly of struts and wires with a spare wing, engine and elevators - in other words an ideal subject. I will use a Barracuda wicker seat for the pilot (although the pattern is not strictly correct), and a Small Stuff engine. I intend to show the aircraft on a wooden platform above the front turret of HMS Africa and HMS Hibernia - the two warships from which the aircraft took off in 1912. There are no kits of King Edward VII class battleship main gun turrets in 1/72 scale so I will scratch build one of those and the wooden platform and part of the wooden runway. There are many photographs of the platform and runway, the aircraft being loaded on to and sitting on the platform on HMS Hibernia, and of the aircraft after take off. This is one source among many:
www.maritimequest.com/warship_directory/...nia/hms_hibernia.htm
This is a photograph of the aircraft at the start of the take-off run on the platform:
Please Log in to join the conversation.
2 years 6 months ago #440
by Stevef
Replied by Stevef on topic 1/72 Short S 38 on HMS Africa and HMS Hibernia 1912
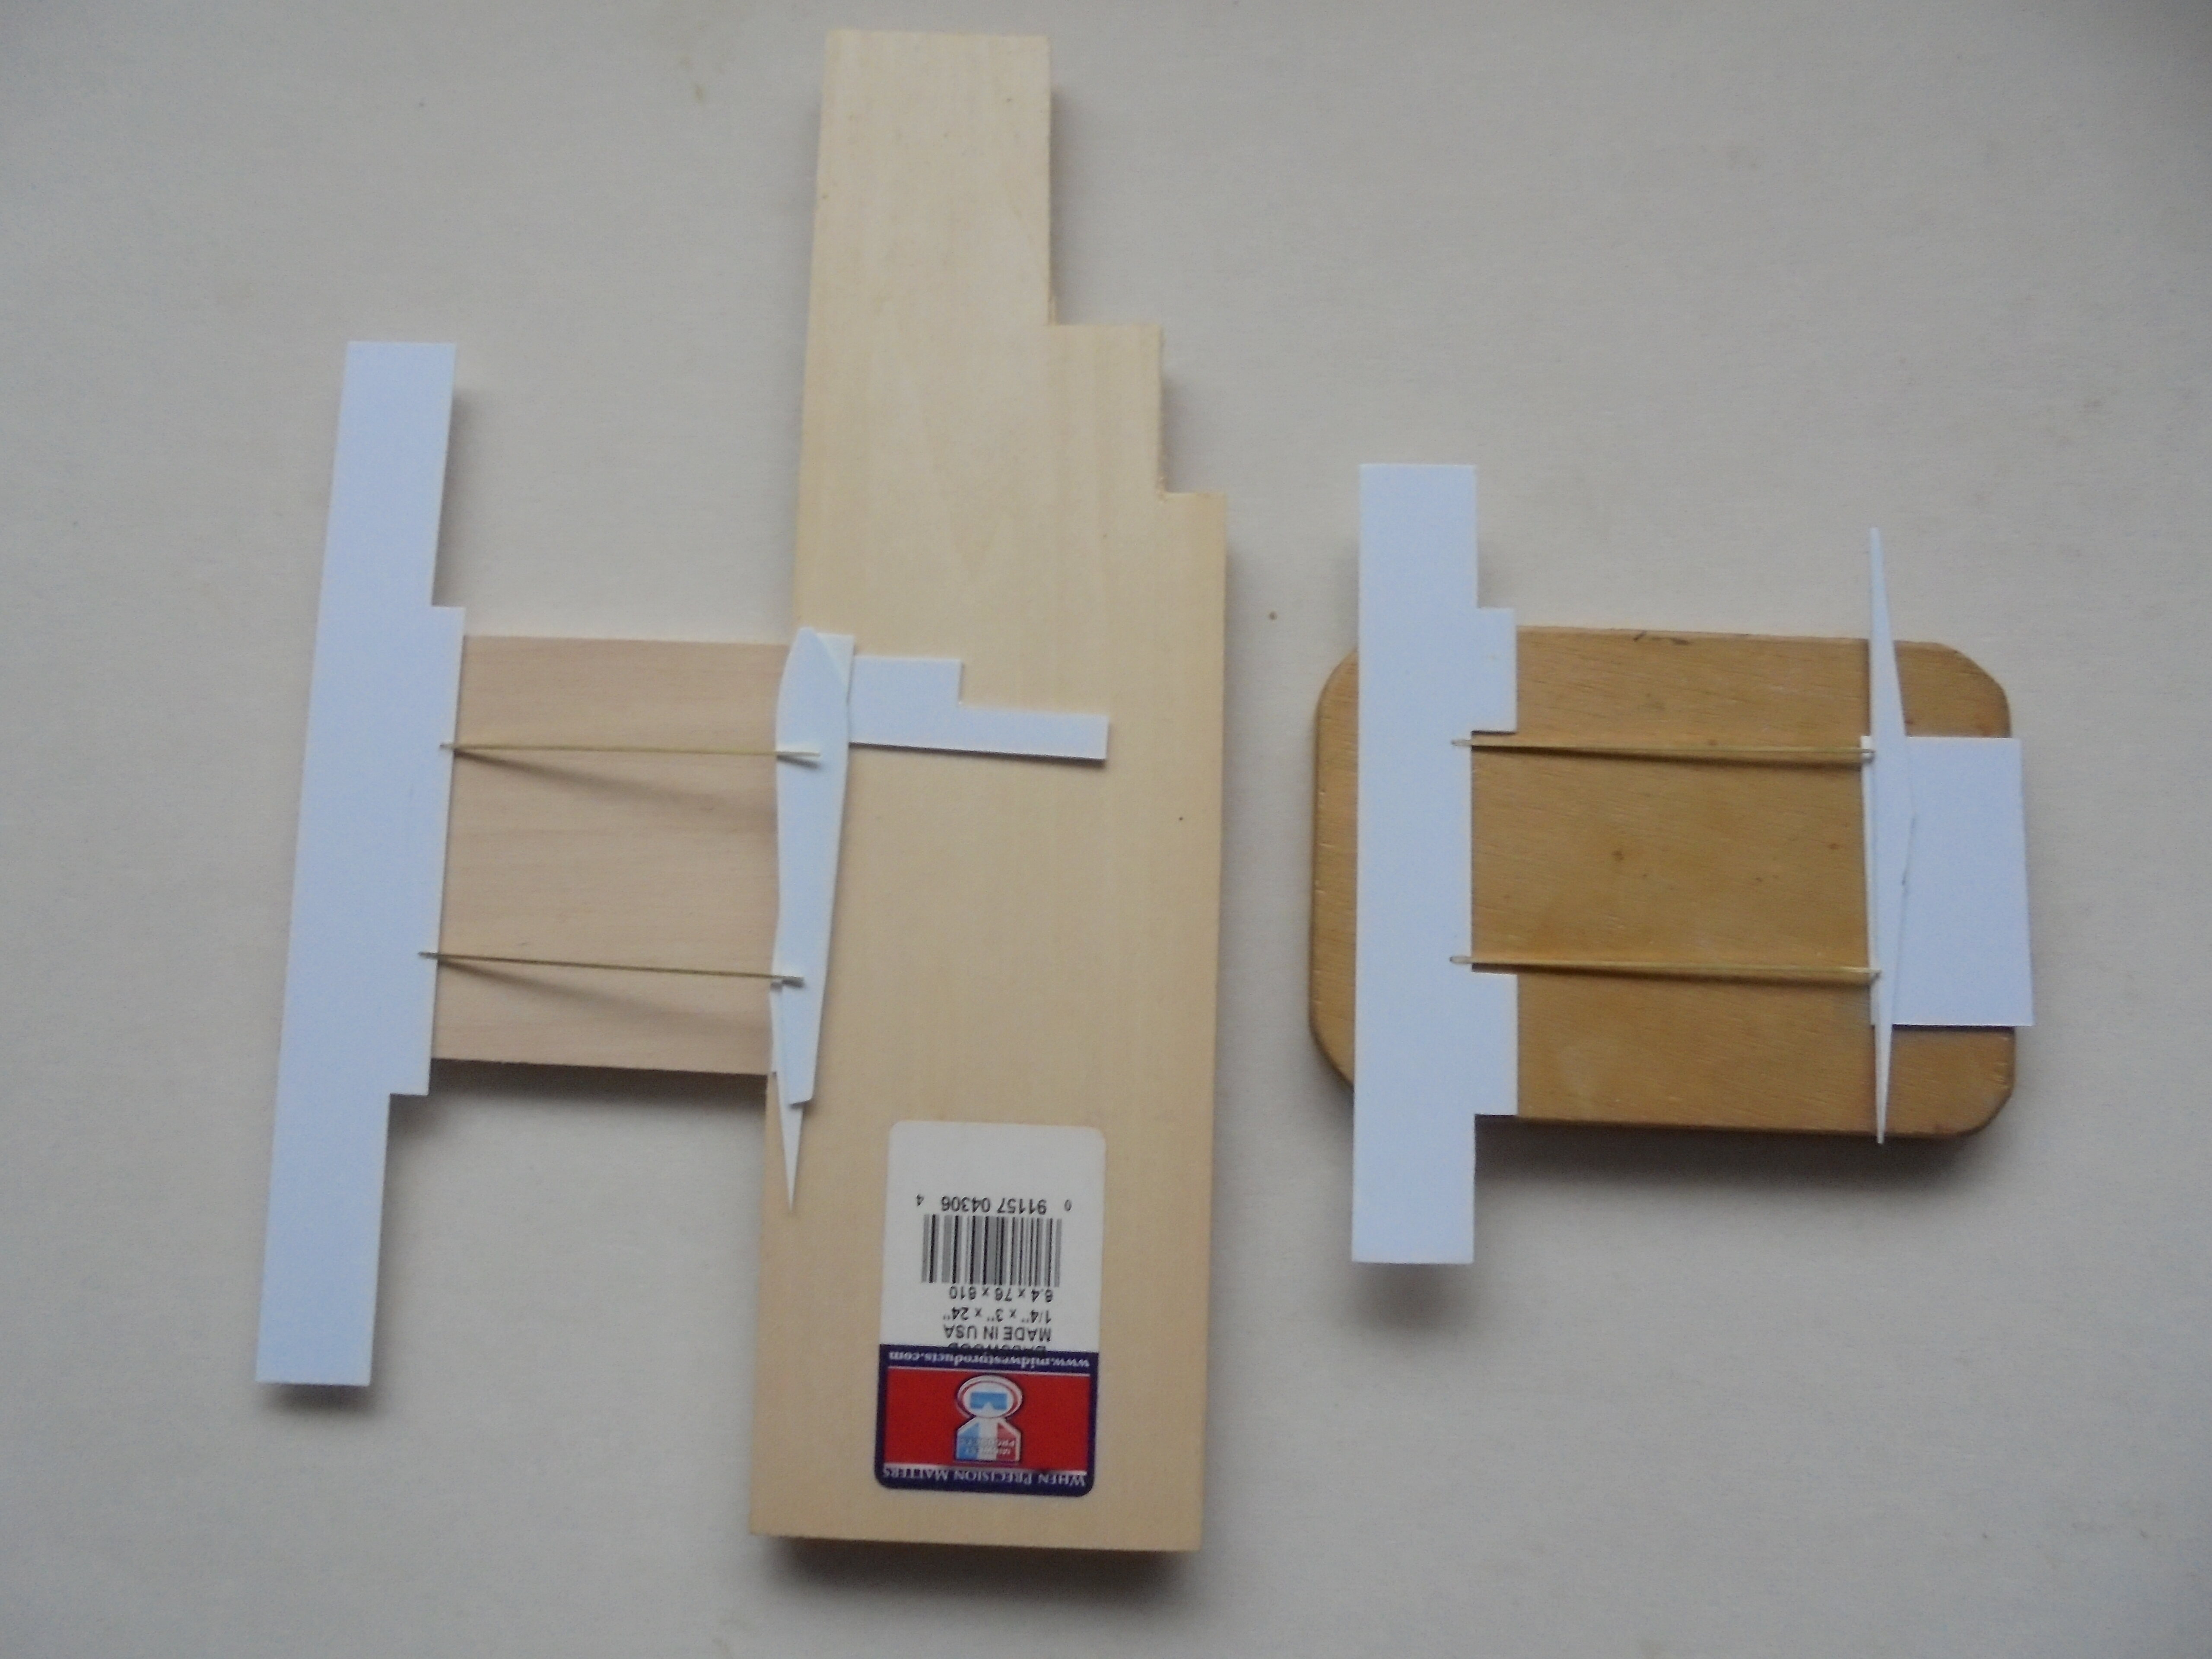
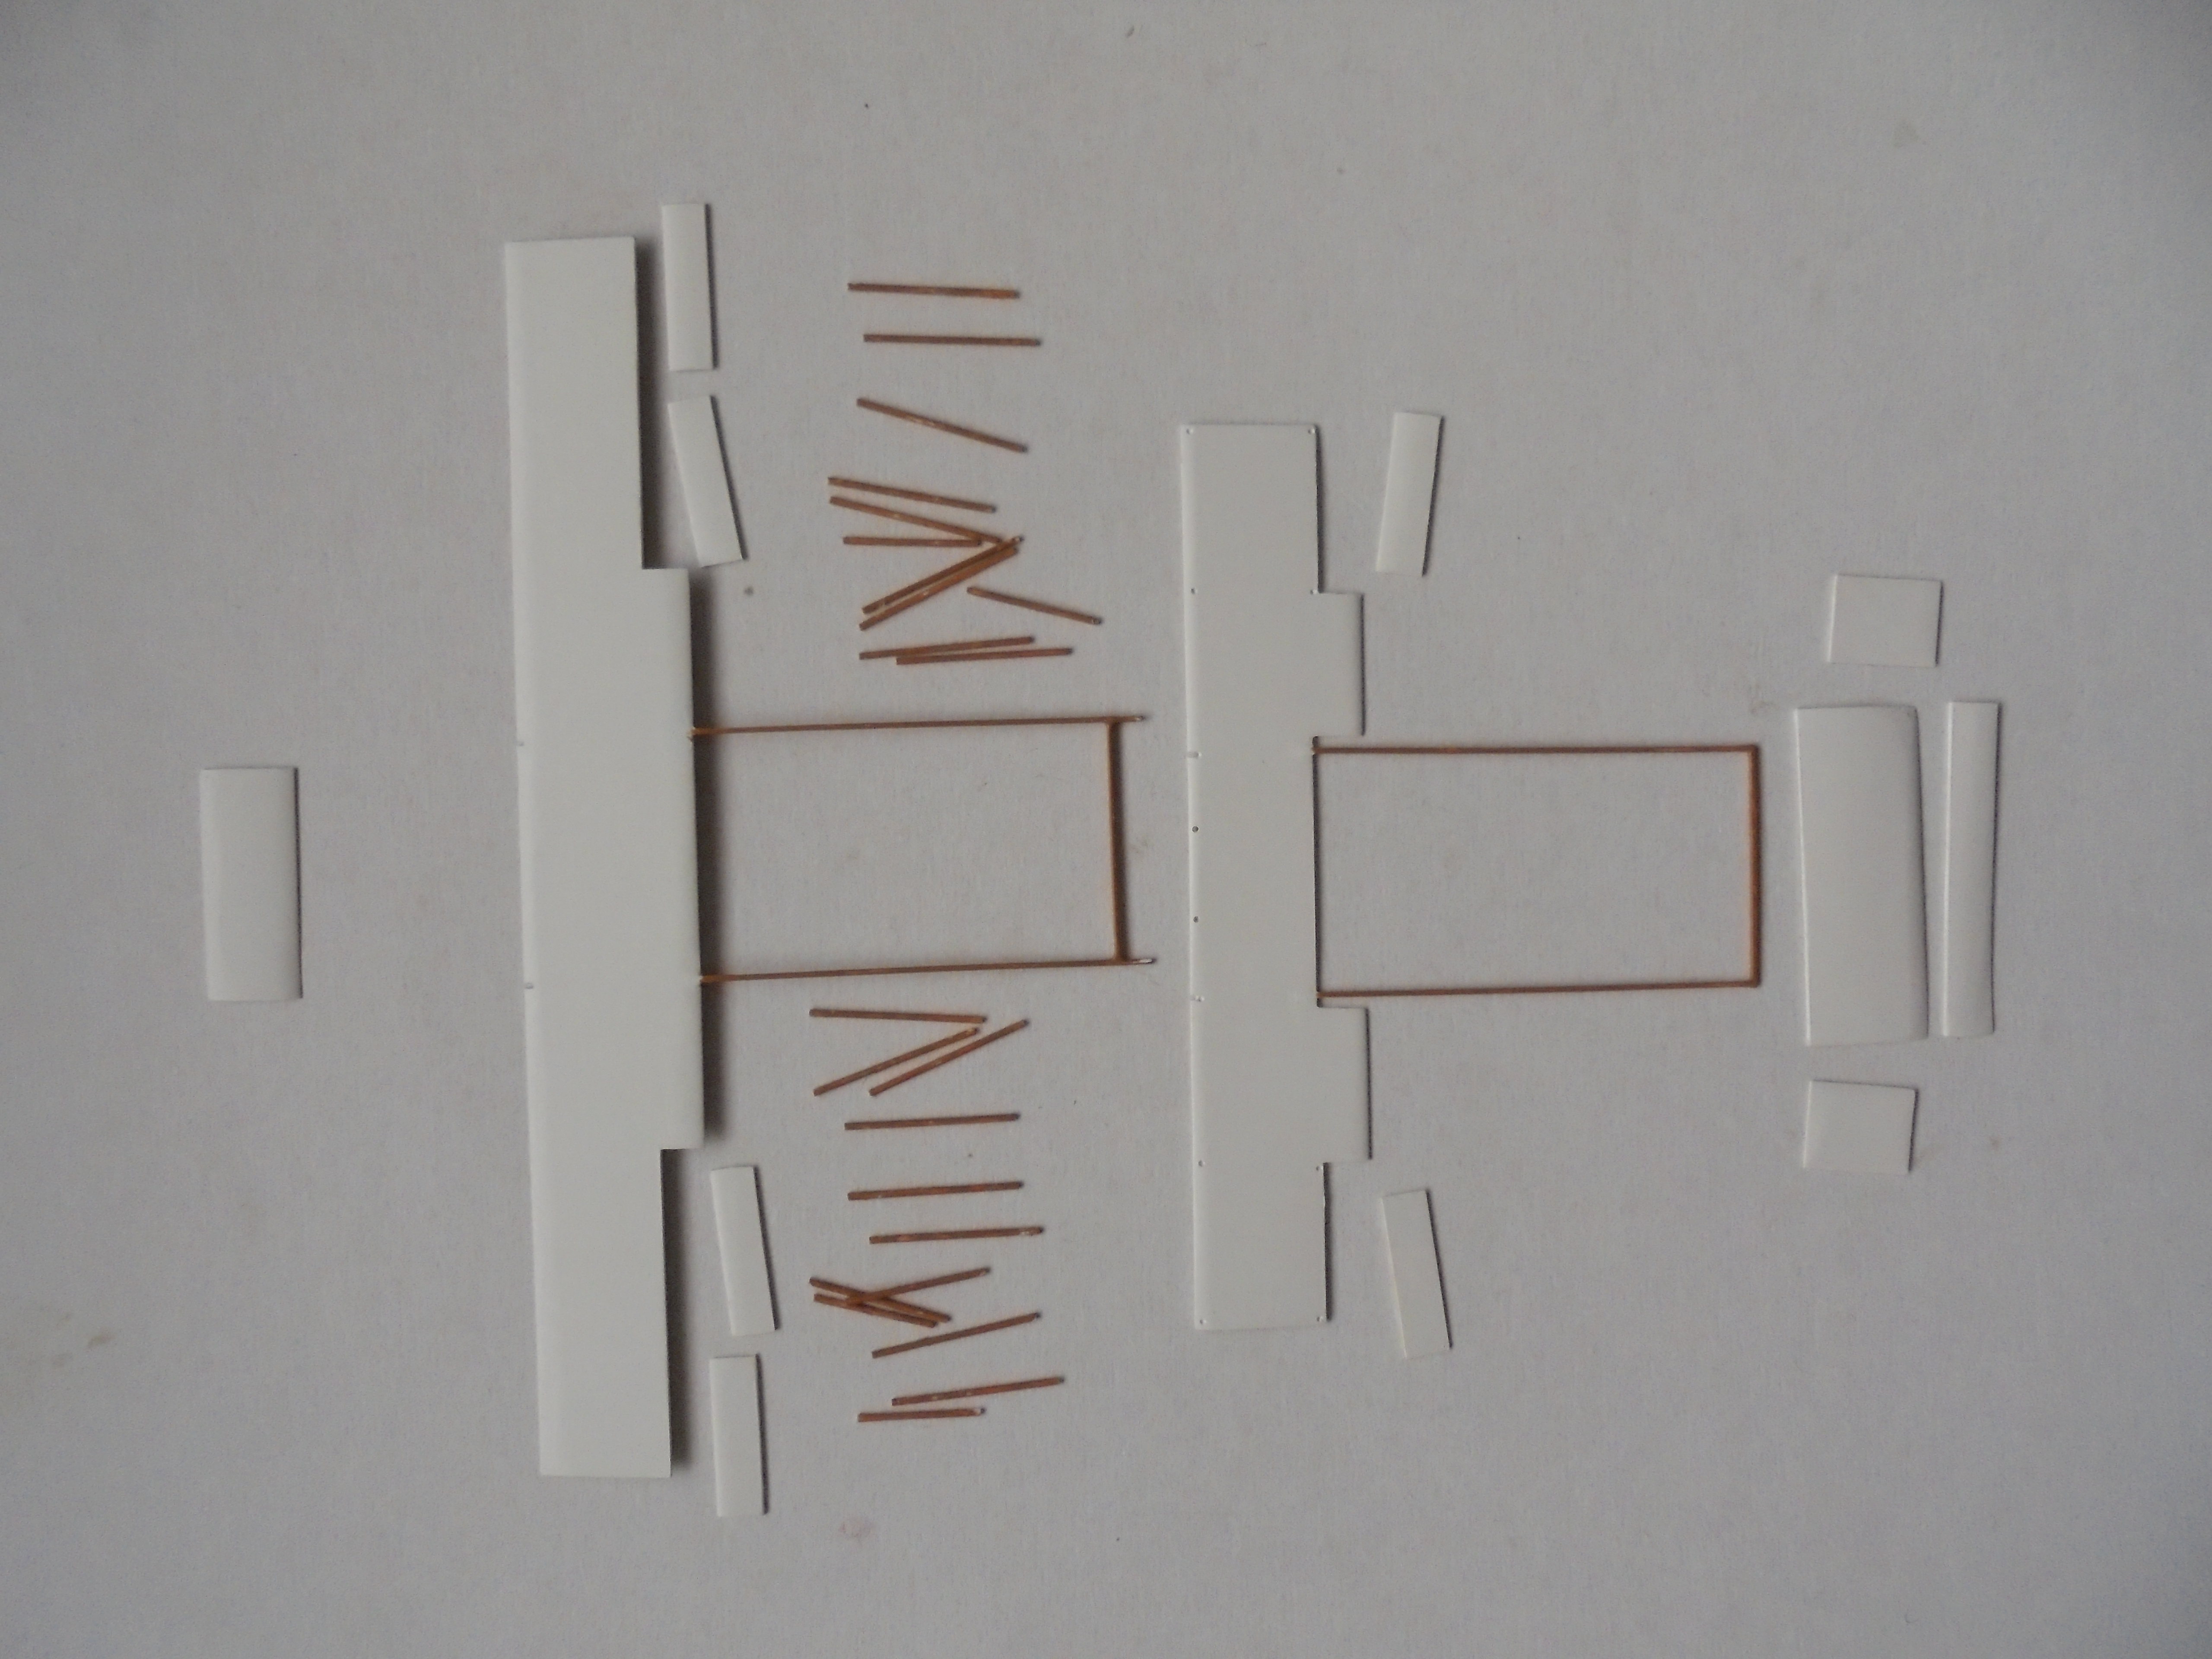
The flying surfaces are easy to make on these types: just some 30 thou plastic card cut and sanded to aerofoil section:

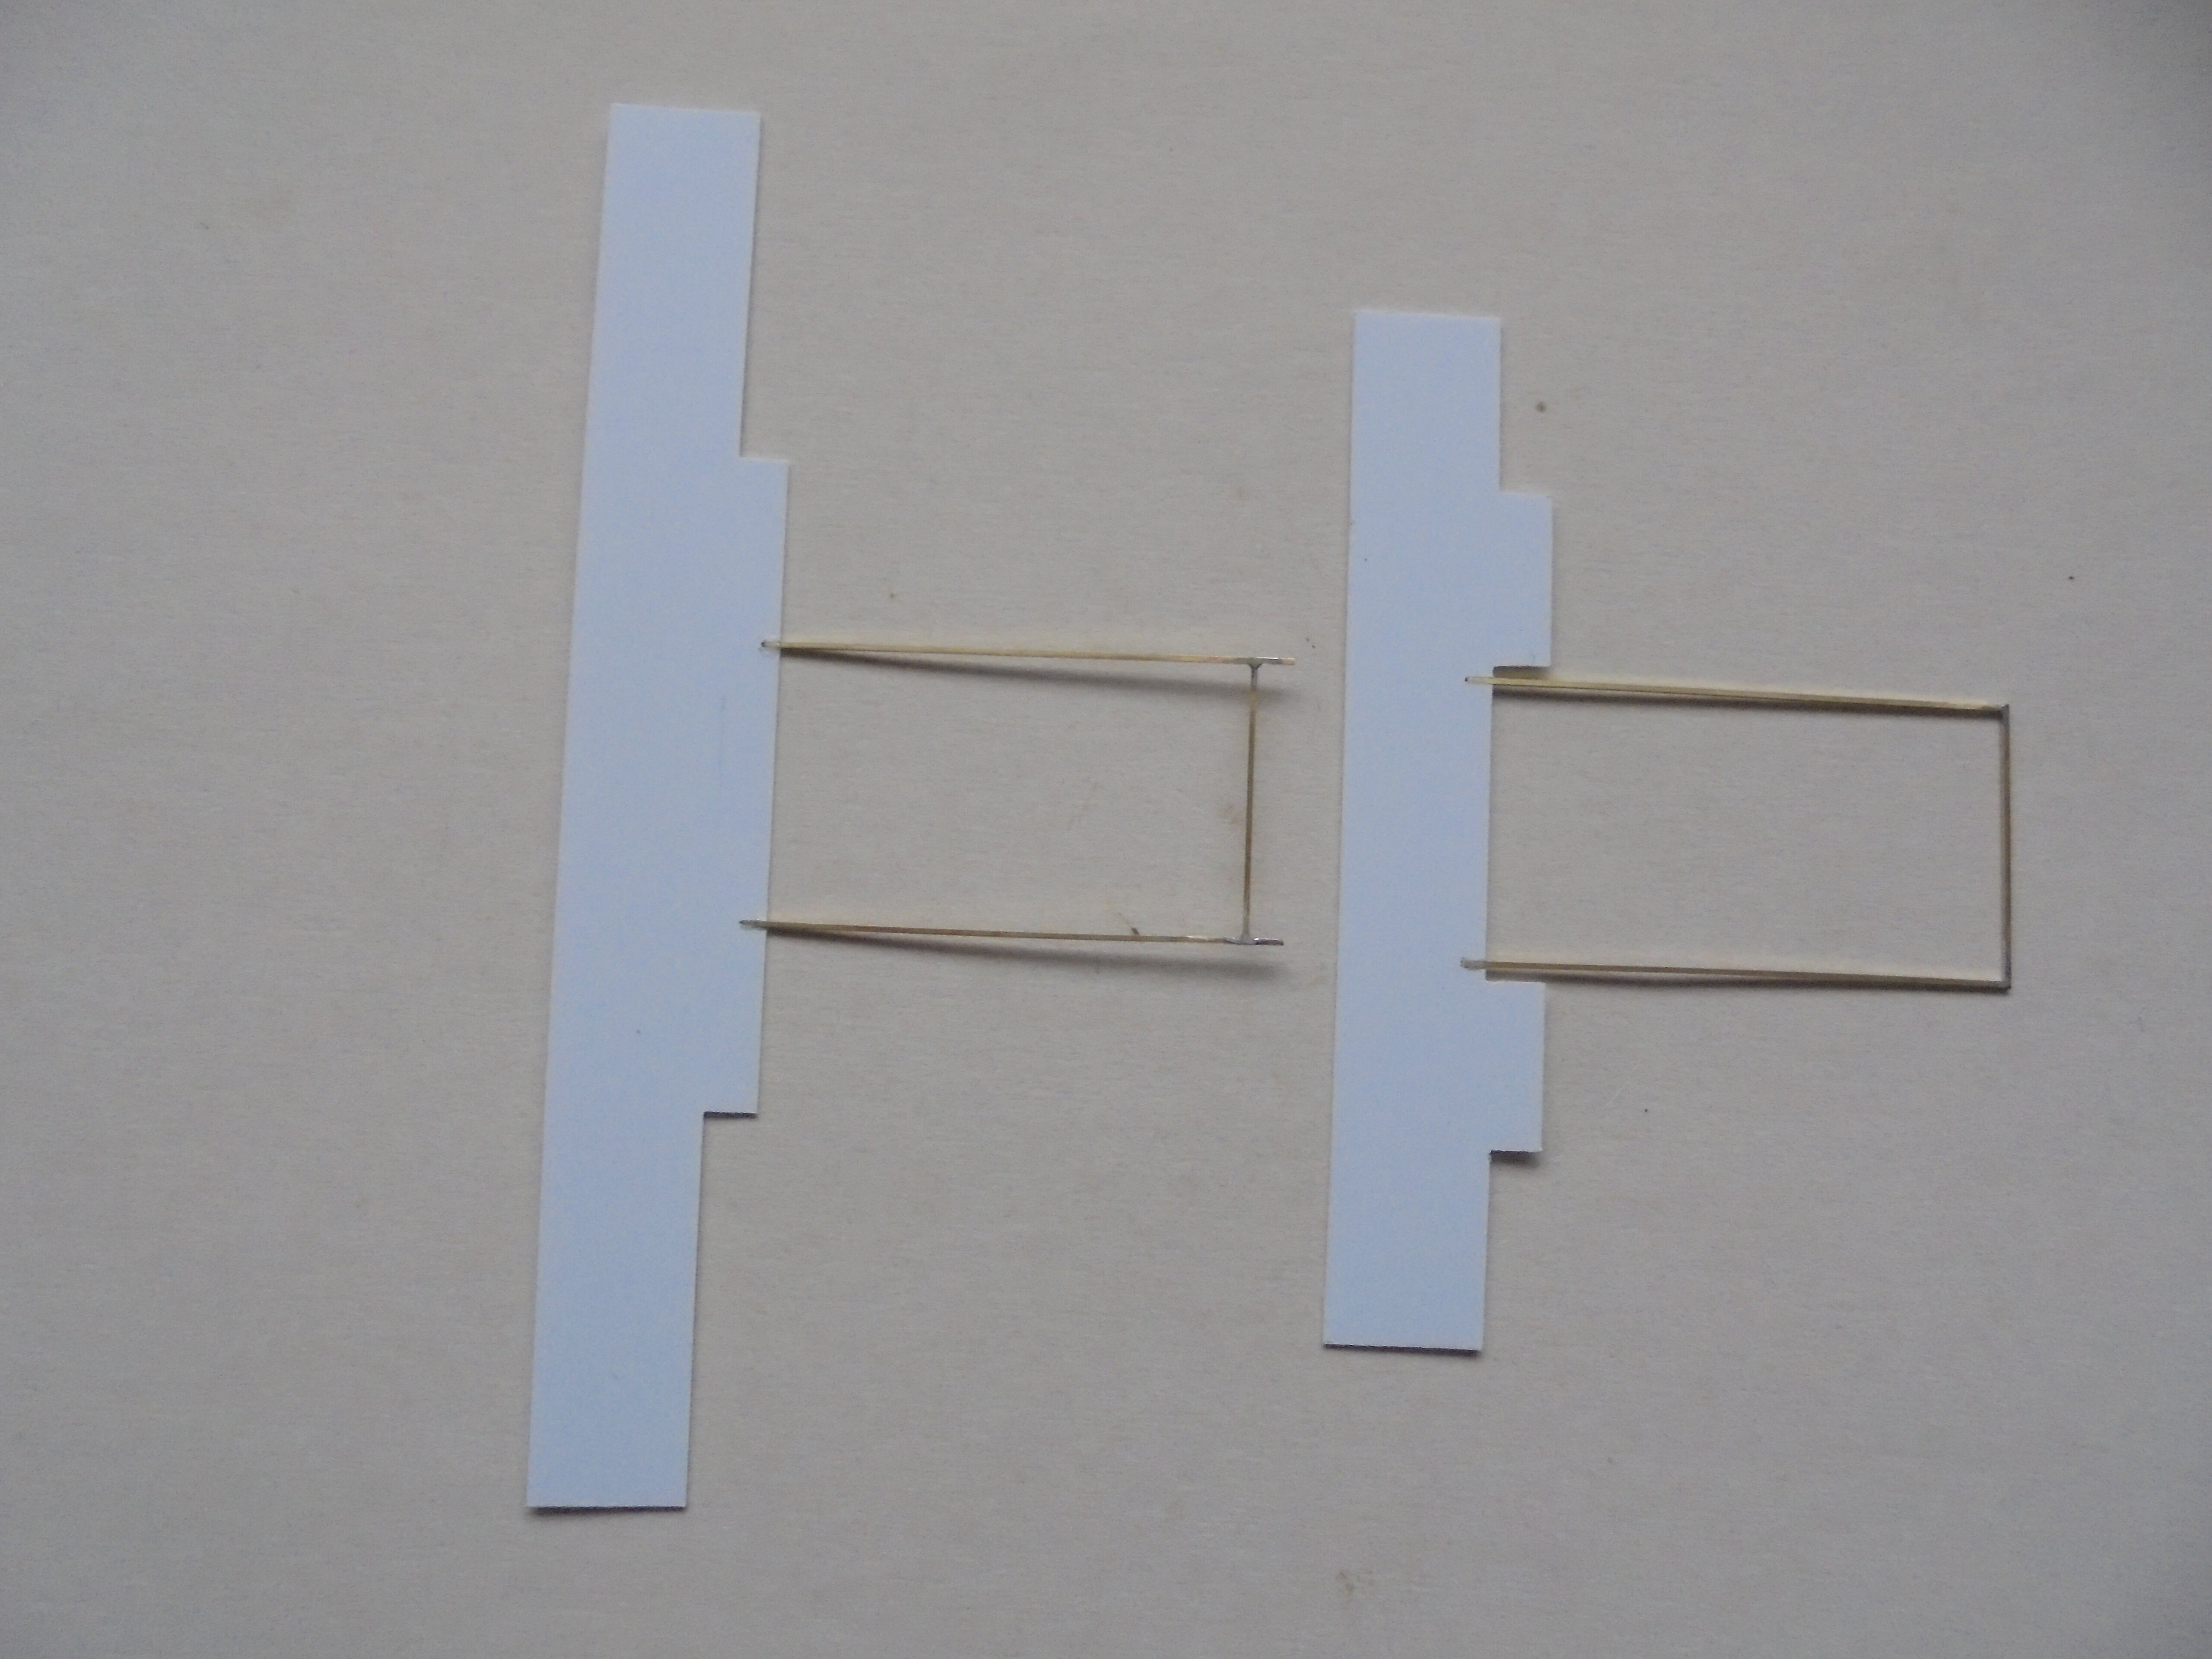
The booms and fore-booms on these aircraft were square section, so I used brass bar for these parts. They were CA'd to the wings and held by my highly sophisticated and expensive method of jigging as I have described in other builds of pushers:
When the CA had set I soldered the horizontal bars to the rear of the booms:
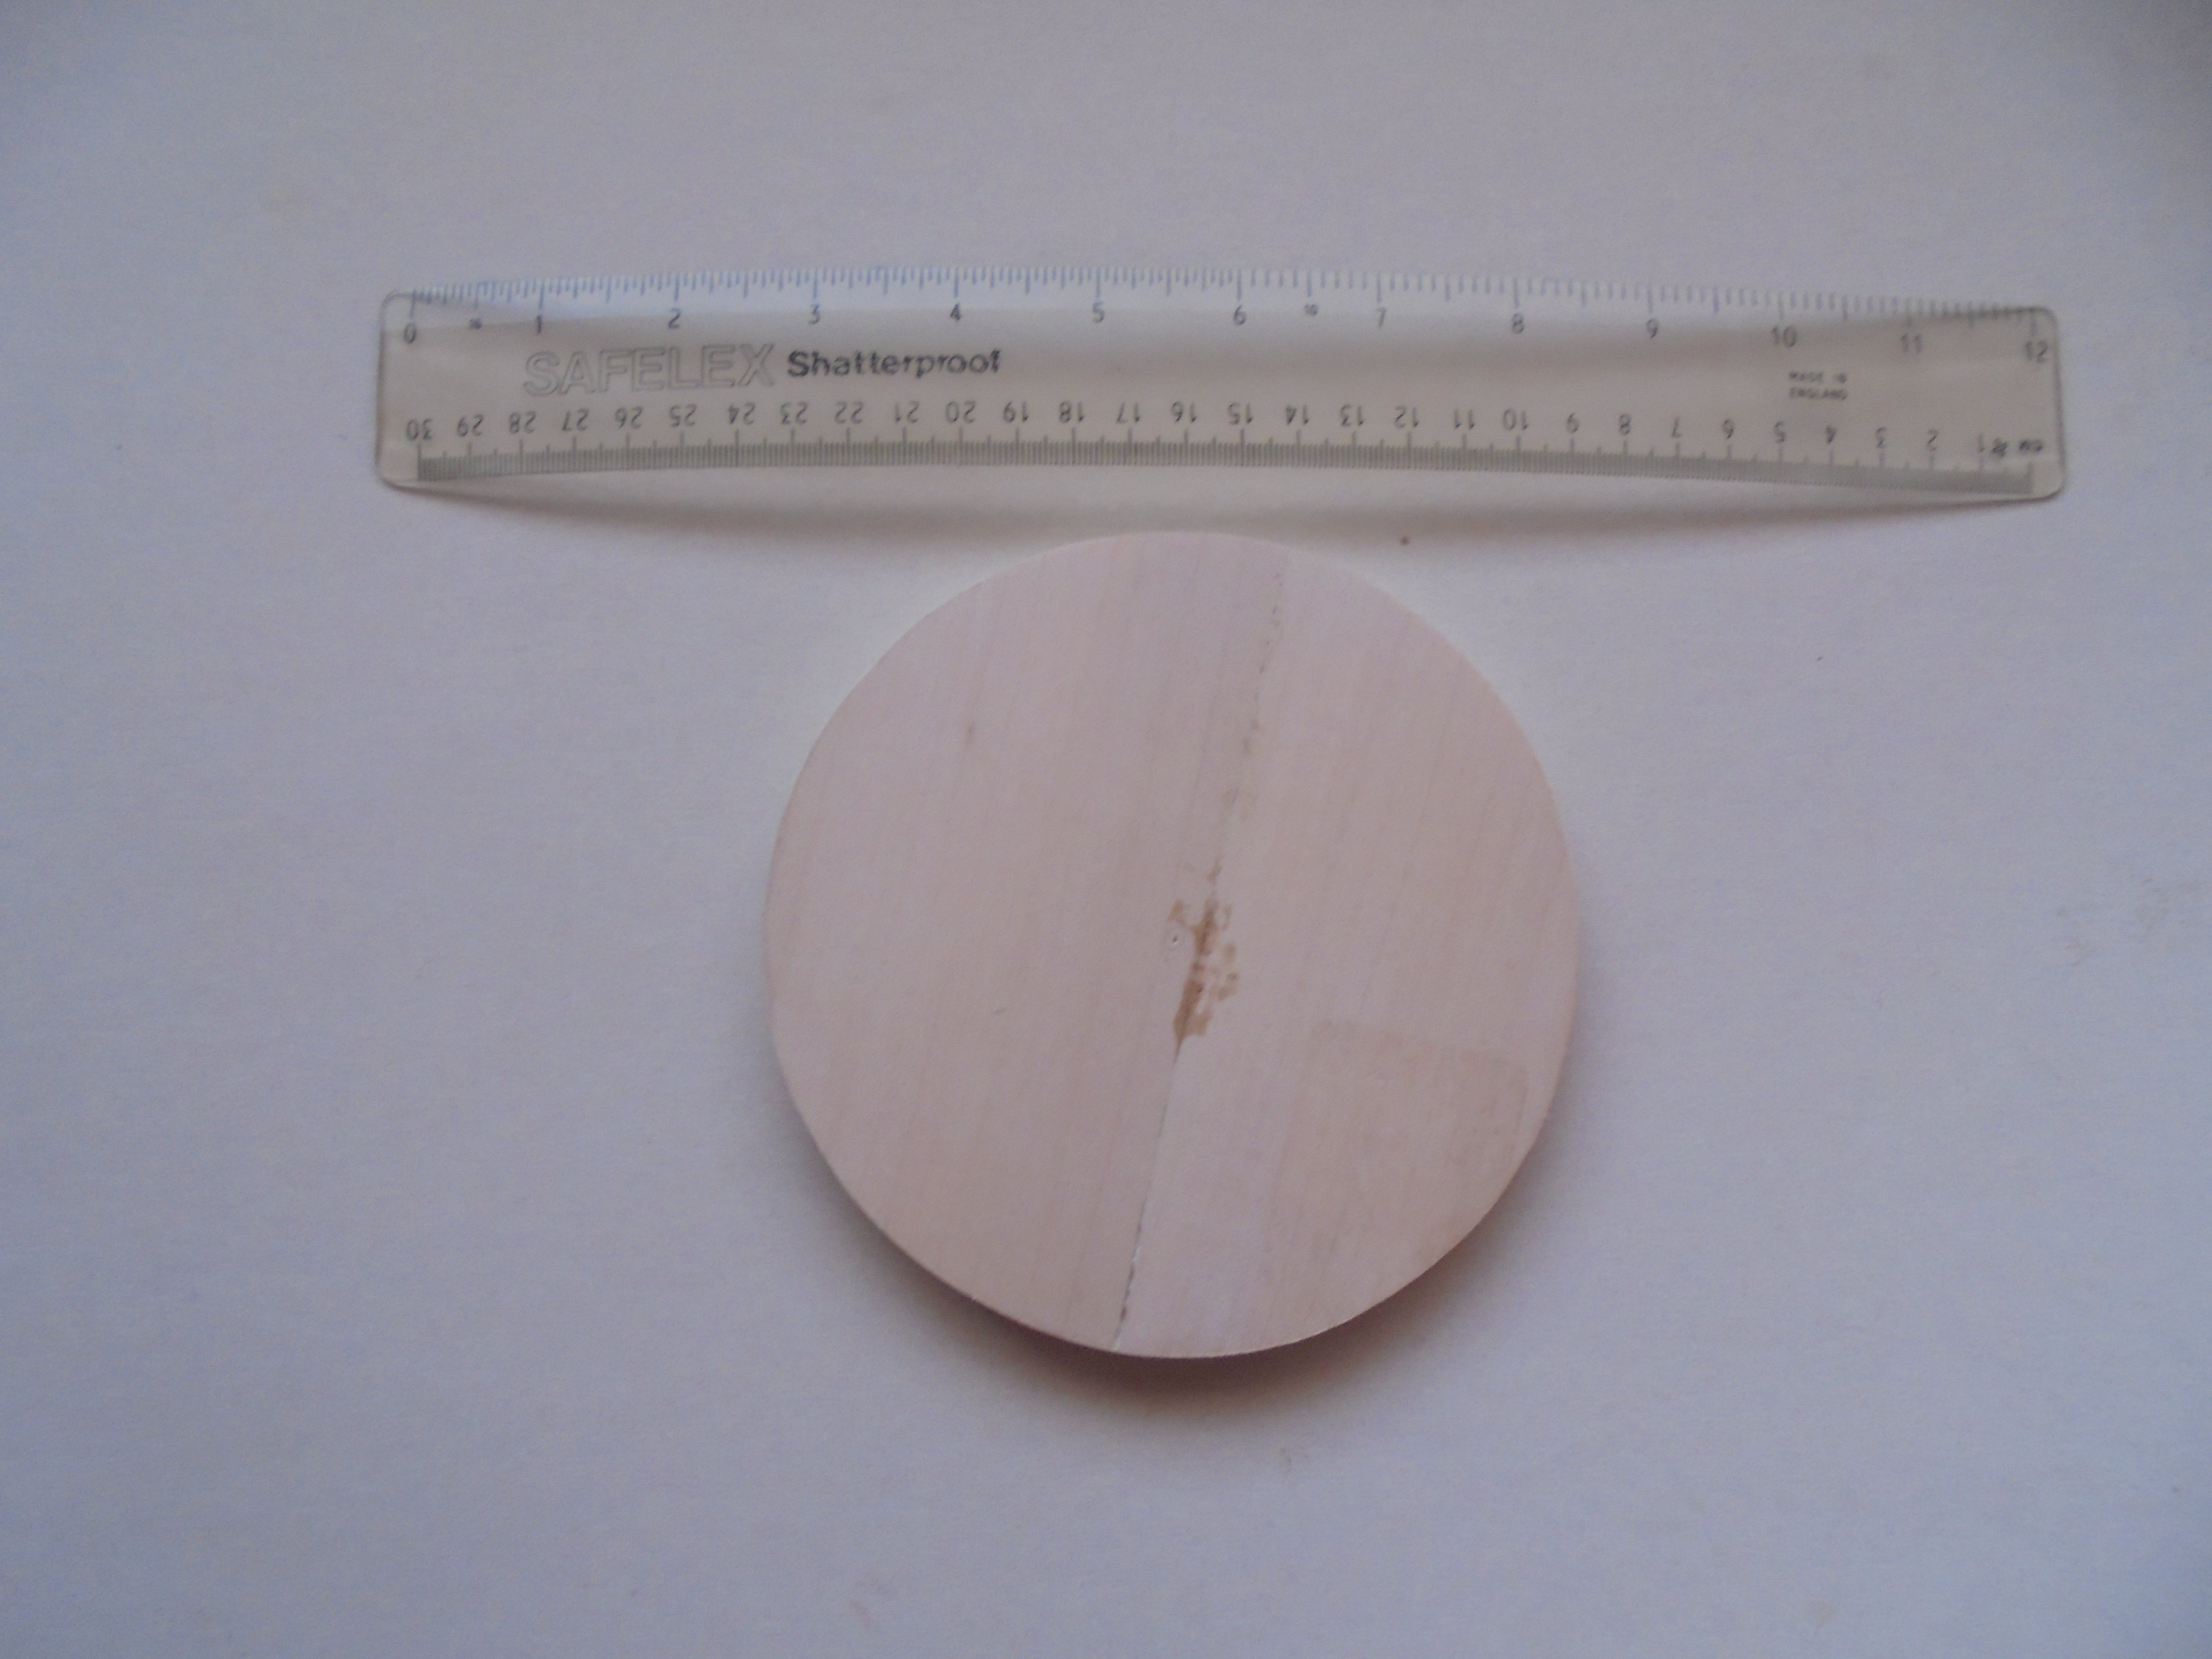
I made the flotation bags from some 1/4 inch (6mm) dowel. I turned the dowel in an electric drill and sanded the ends with coarse grade glass-paper, and finished by hand with fine grade glass-paper. I do not have drawings or the exact dimensions of the floatation bags so these are a best guess:
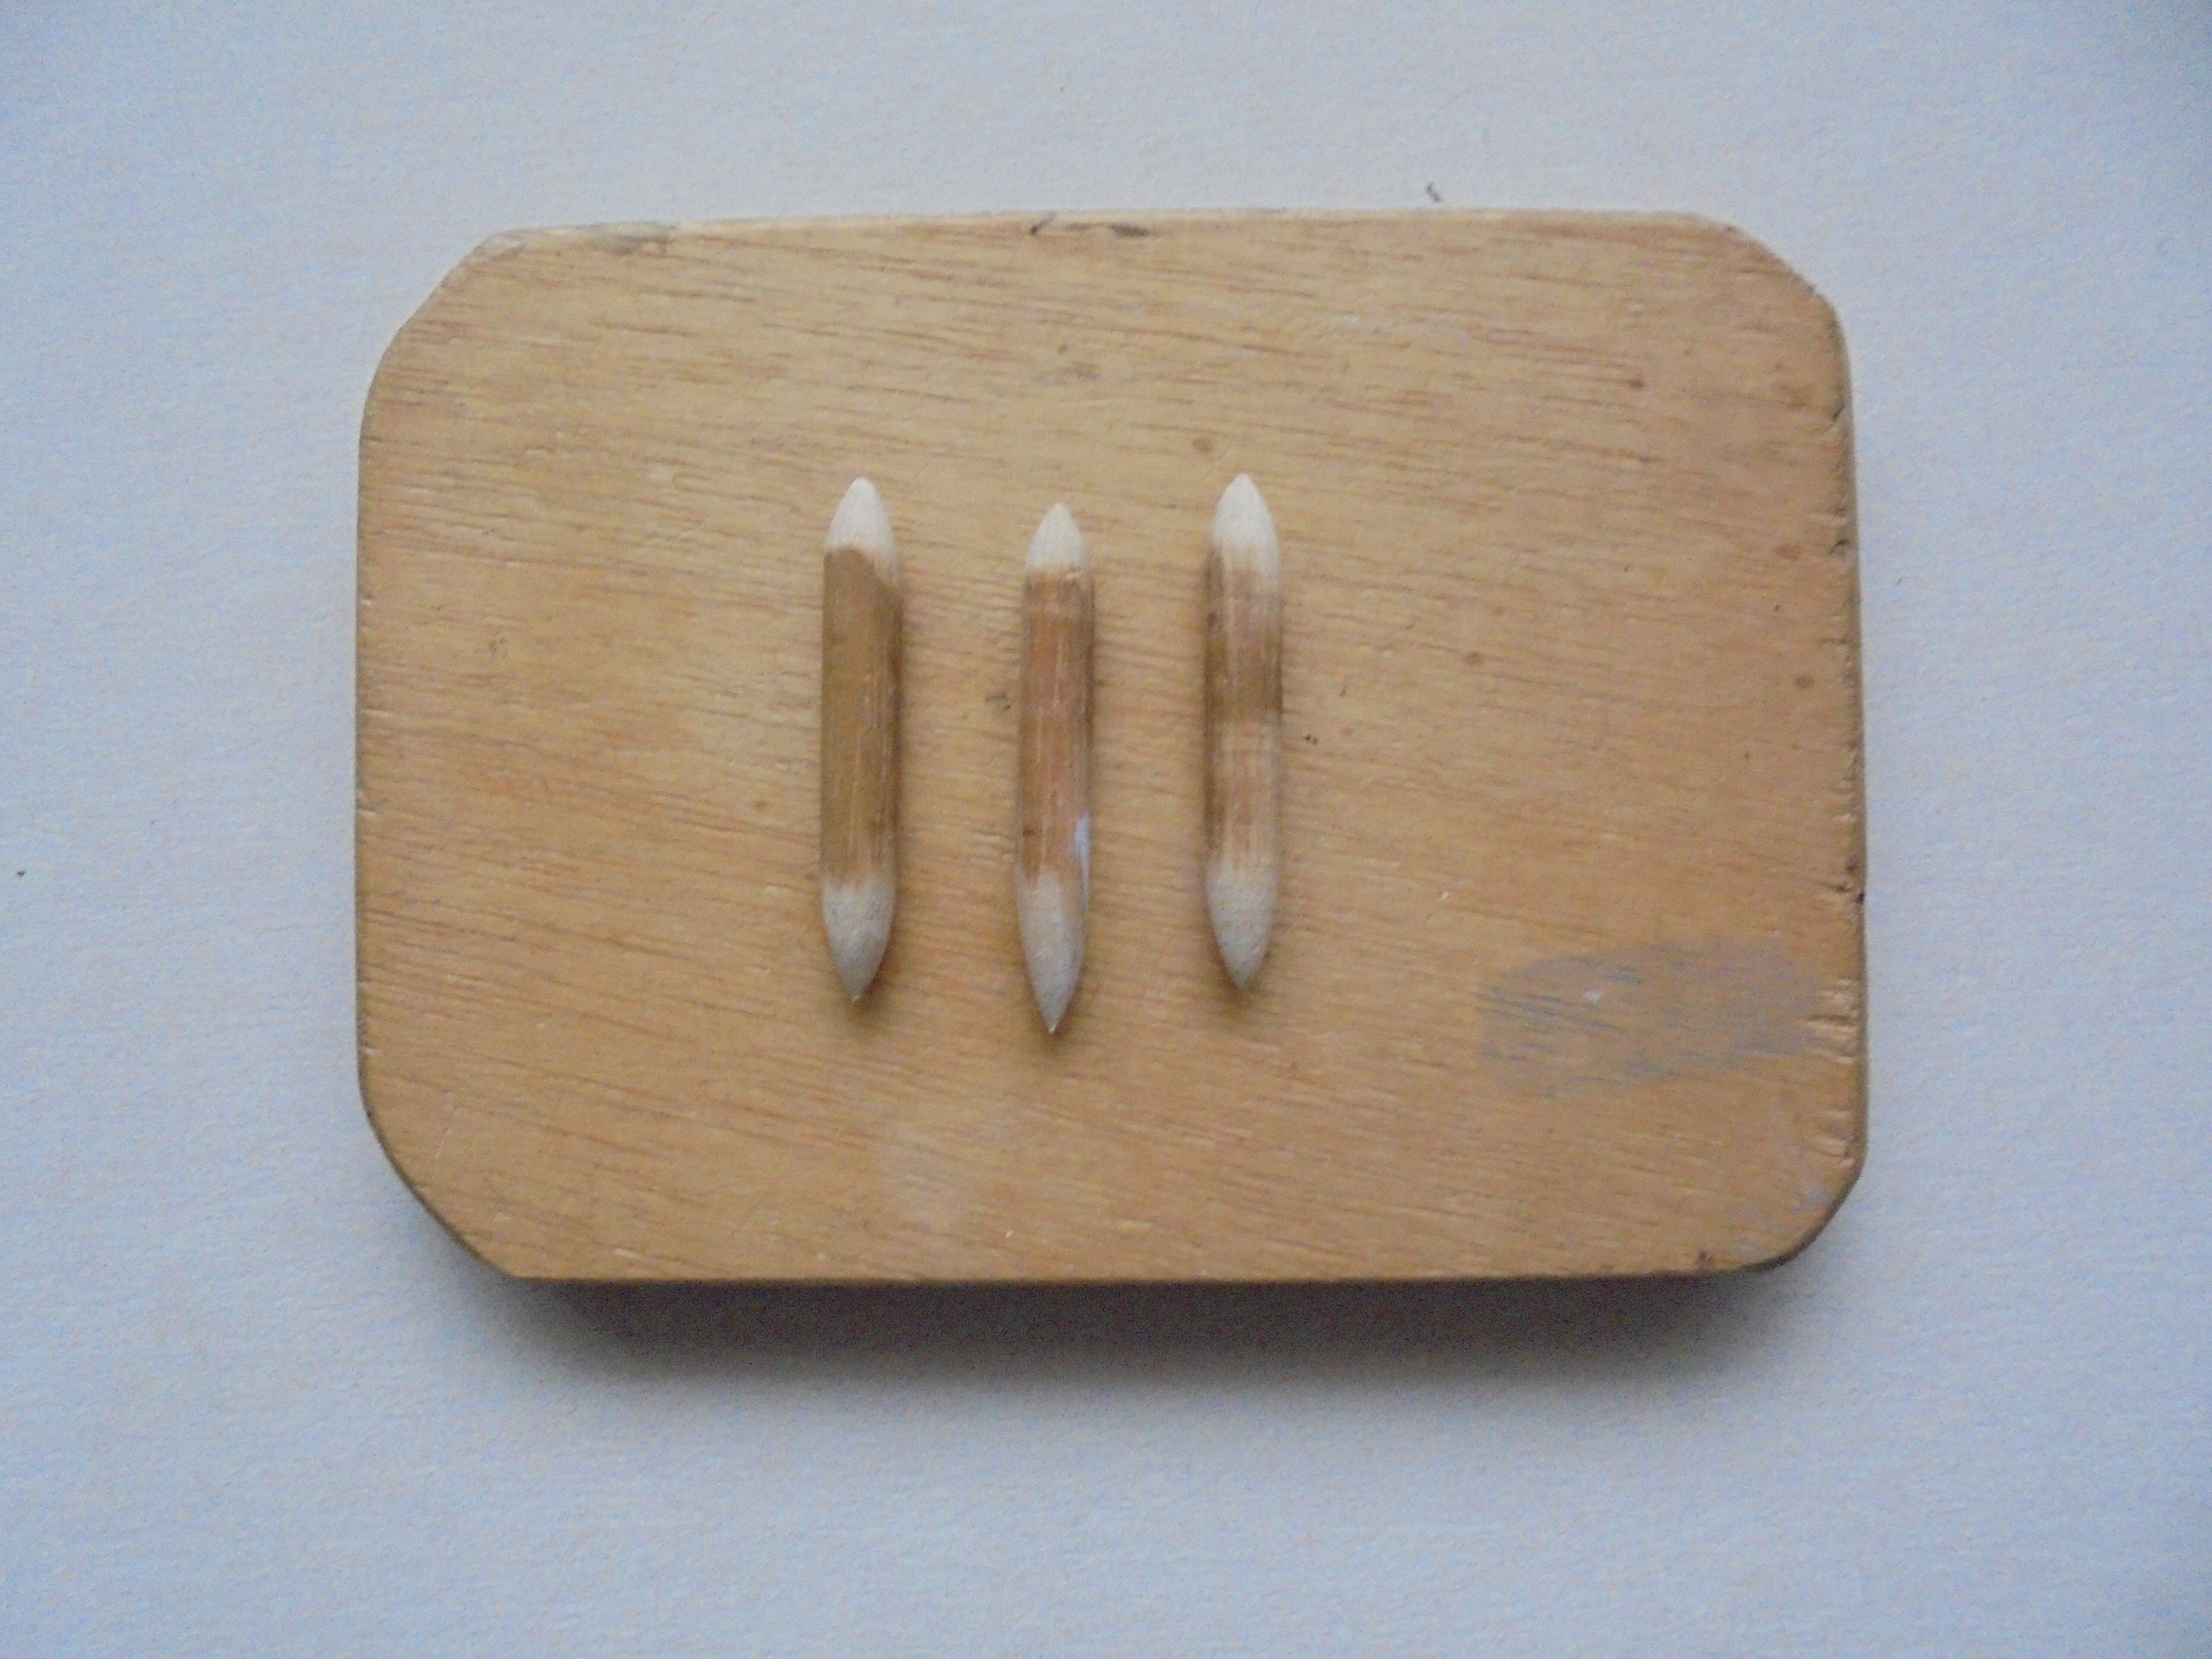
They will be treated with talcum powder and dope grain filler/sealant later.
Thanks for looking.
Stevef.
The booms and fore-booms on these aircraft were square section, so I used brass bar for these parts. They were CA'd to the wings and held by my highly sophisticated and expensive method of jigging as I have described in other builds of pushers:
When the CA had set I soldered the horizontal bars to the rear of the booms:
I made the flotation bags from some 1/4 inch (6mm) dowel. I turned the dowel in an electric drill and sanded the ends with coarse grade glass-paper, and finished by hand with fine grade glass-paper. I do not have drawings or the exact dimensions of the floatation bags so these are a best guess:
They will be treated with talcum powder and dope grain filler/sealant later.
Thanks for looking.
Stevef.
Please Log in to join the conversation.
2 years 3 months ago - 2 years 3 months ago #441
by Stevef
Replied by Stevef on topic 1/72 Short S 38 on HMS Africa and HMS Hibernia 1912
Evening All,
I have been working on this while working on the GB dio. Now that the latter is finished, (well almost - as I will explain later, I have decided to make two new Bleriot XXIII's because I have finally sorted out the wing problem), I will focus on this subject.
Having made most of the major parts I painted them: CDL for the flying surfaces, and Revell semi-matt 382 tan for the struts:
The engine was mounted on a block on the trailing edge of the lower wing: I made a mounting from plastic card and inserted a piece of rod to represent the shaft which connected the fuel and oil tanks to the engine. The fuel/oil tanks were cut from 60 thou rod and mounted on a frame made from plastic strip. There was a passenger seat in front of the fuel/oil tanks - that was cut from 20 thou card and after all had been painted, the sub-assemblies were fixed to the lower wing:


NB the pilot's seat and frame are only placed on the model - they will be attached permanently later.
All was now ready to attach the upper wing. I followed my usual procedure for making the process easy: select 4 wing struts and the two rear boom struts. Place drops of cement into the holes on the ends of the lower wing and place the struts into the holes. While the cement is still soft put small drops of cement into the relevant holes in the upper wing and gently place the lower wing and struts into the 4 holes in the inverted upper wing. I had paint pots handy to keep the wing edges square and supported while I put super glue on to one corner of the rear of the booms. I inserted one of the rear struts, followed by the second, and I had a square structure. I set this aside and allowed the cement to set:


When the cement had set I had a rigid structure which can be handled so that the remaining struts can be fixed at leisure:


The next step will be to add the interplane and boom struts and then the undercarriage.
Thanks for looking.
Stevef.
I have been working on this while working on the GB dio. Now that the latter is finished, (well almost - as I will explain later, I have decided to make two new Bleriot XXIII's because I have finally sorted out the wing problem), I will focus on this subject.
Having made most of the major parts I painted them: CDL for the flying surfaces, and Revell semi-matt 382 tan for the struts:
The engine was mounted on a block on the trailing edge of the lower wing: I made a mounting from plastic card and inserted a piece of rod to represent the shaft which connected the fuel and oil tanks to the engine. The fuel/oil tanks were cut from 60 thou rod and mounted on a frame made from plastic strip. There was a passenger seat in front of the fuel/oil tanks - that was cut from 20 thou card and after all had been painted, the sub-assemblies were fixed to the lower wing:
NB the pilot's seat and frame are only placed on the model - they will be attached permanently later.
All was now ready to attach the upper wing. I followed my usual procedure for making the process easy: select 4 wing struts and the two rear boom struts. Place drops of cement into the holes on the ends of the lower wing and place the struts into the holes. While the cement is still soft put small drops of cement into the relevant holes in the upper wing and gently place the lower wing and struts into the 4 holes in the inverted upper wing. I had paint pots handy to keep the wing edges square and supported while I put super glue on to one corner of the rear of the booms. I inserted one of the rear struts, followed by the second, and I had a square structure. I set this aside and allowed the cement to set:
When the cement had set I had a rigid structure which can be handled so that the remaining struts can be fixed at leisure:
The next step will be to add the interplane and boom struts and then the undercarriage.
Thanks for looking.
Stevef.
Last edit: 2 years 3 months ago by Stevef.
Please Log in to join the conversation.
2 years 3 months ago #442
by Stevef
Replied by Stevef on topic 1/72 Short S 38 on HMS Africa and HMS Hibernia 1912
Evening All,
I have made some progress with this project, but did have a case of two steps forward and one back, which meant that I had to dissemble and re-assemble some parts. I completed the addition of the interplane and boom struts after the initial assembly had dried out: this was a straightforward task as it involved gently placing the ends of the struts into the pre-drilled holes in the wings after I had place a small drop of glue into the relevant holes. The boom struts were cut to exact length and fixed in place with CA:
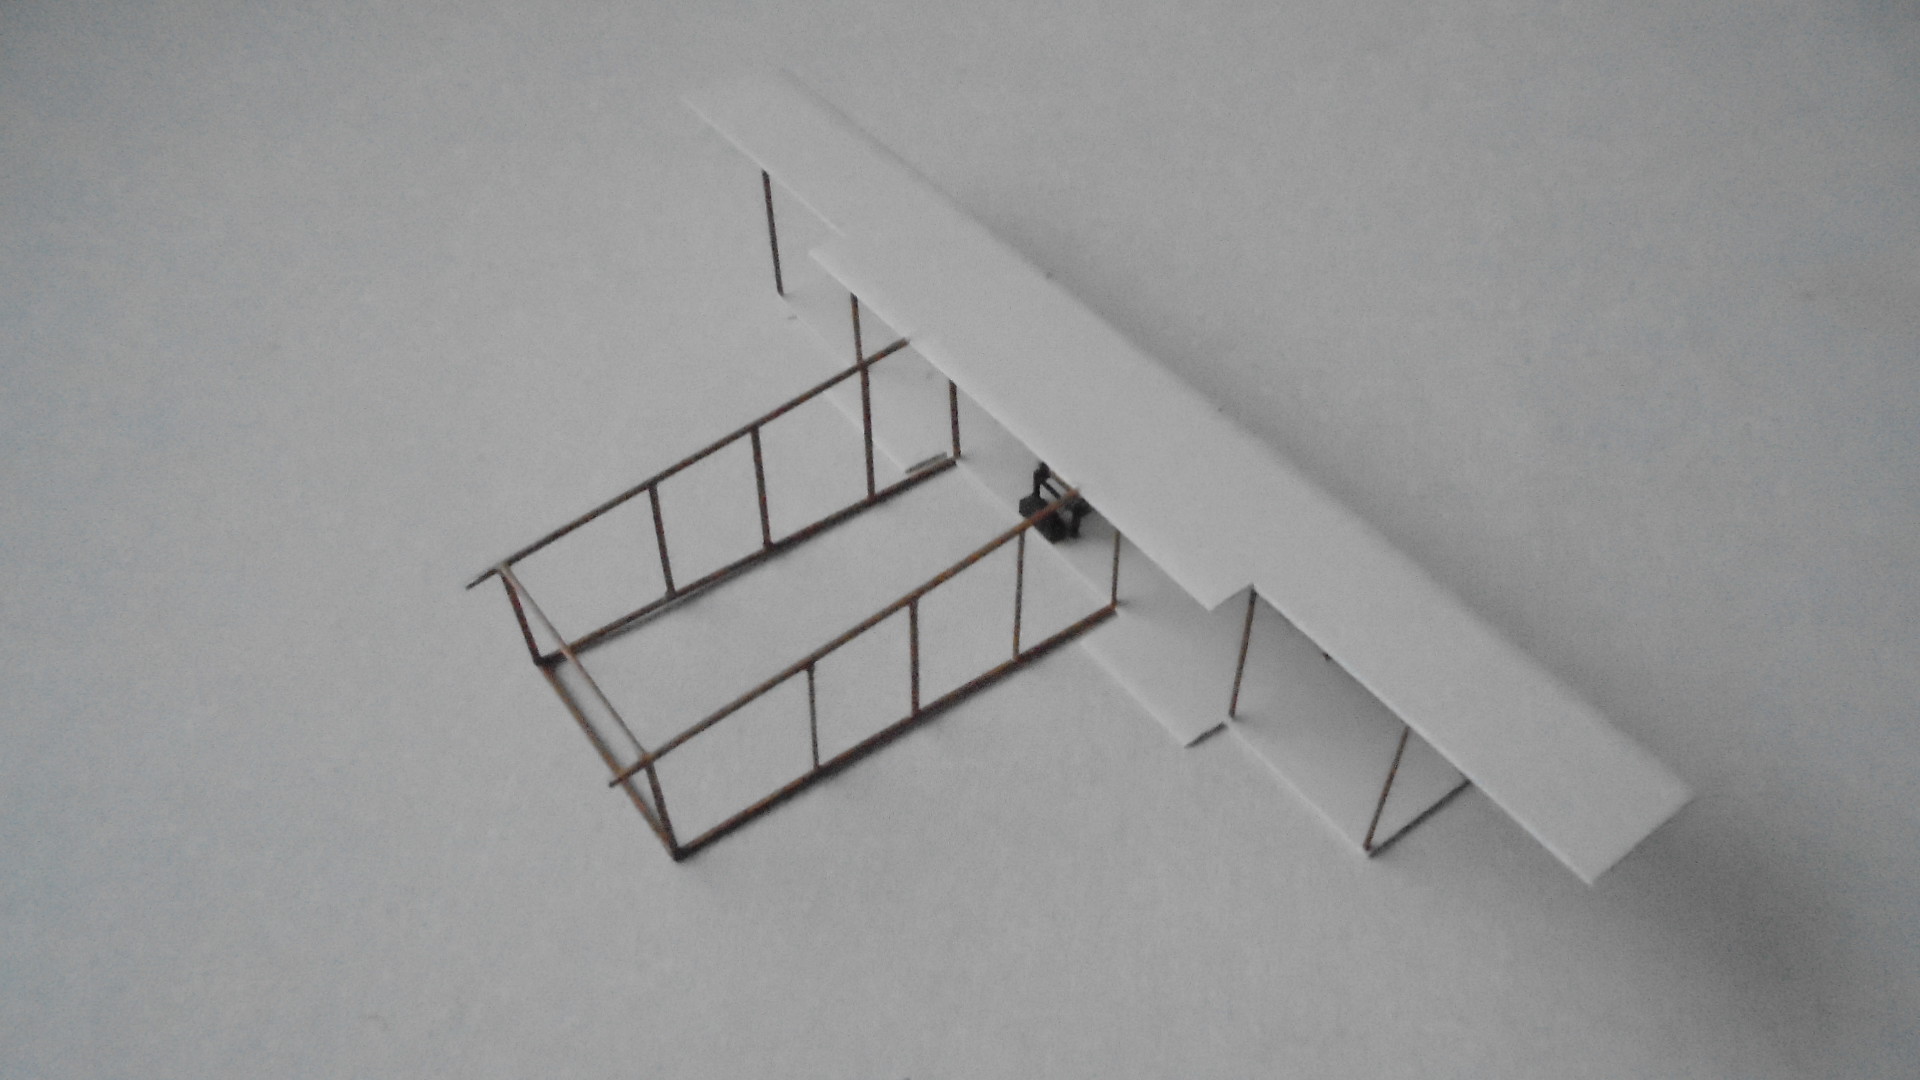

When I added the supporting struts for the upper wing overhang I did not cut them to the correct length and as a consequence I distorted the wing and boom structures. It took me a whole evening of fiddling and thinking before I realised the cause of the problem, by which time I had partially dissembled the top wing. Fortunately as soon as I removed the outermost interplane struts the problem was resolved: the wing was re-assembled and new outer struts cut and glued into place and all was square again.
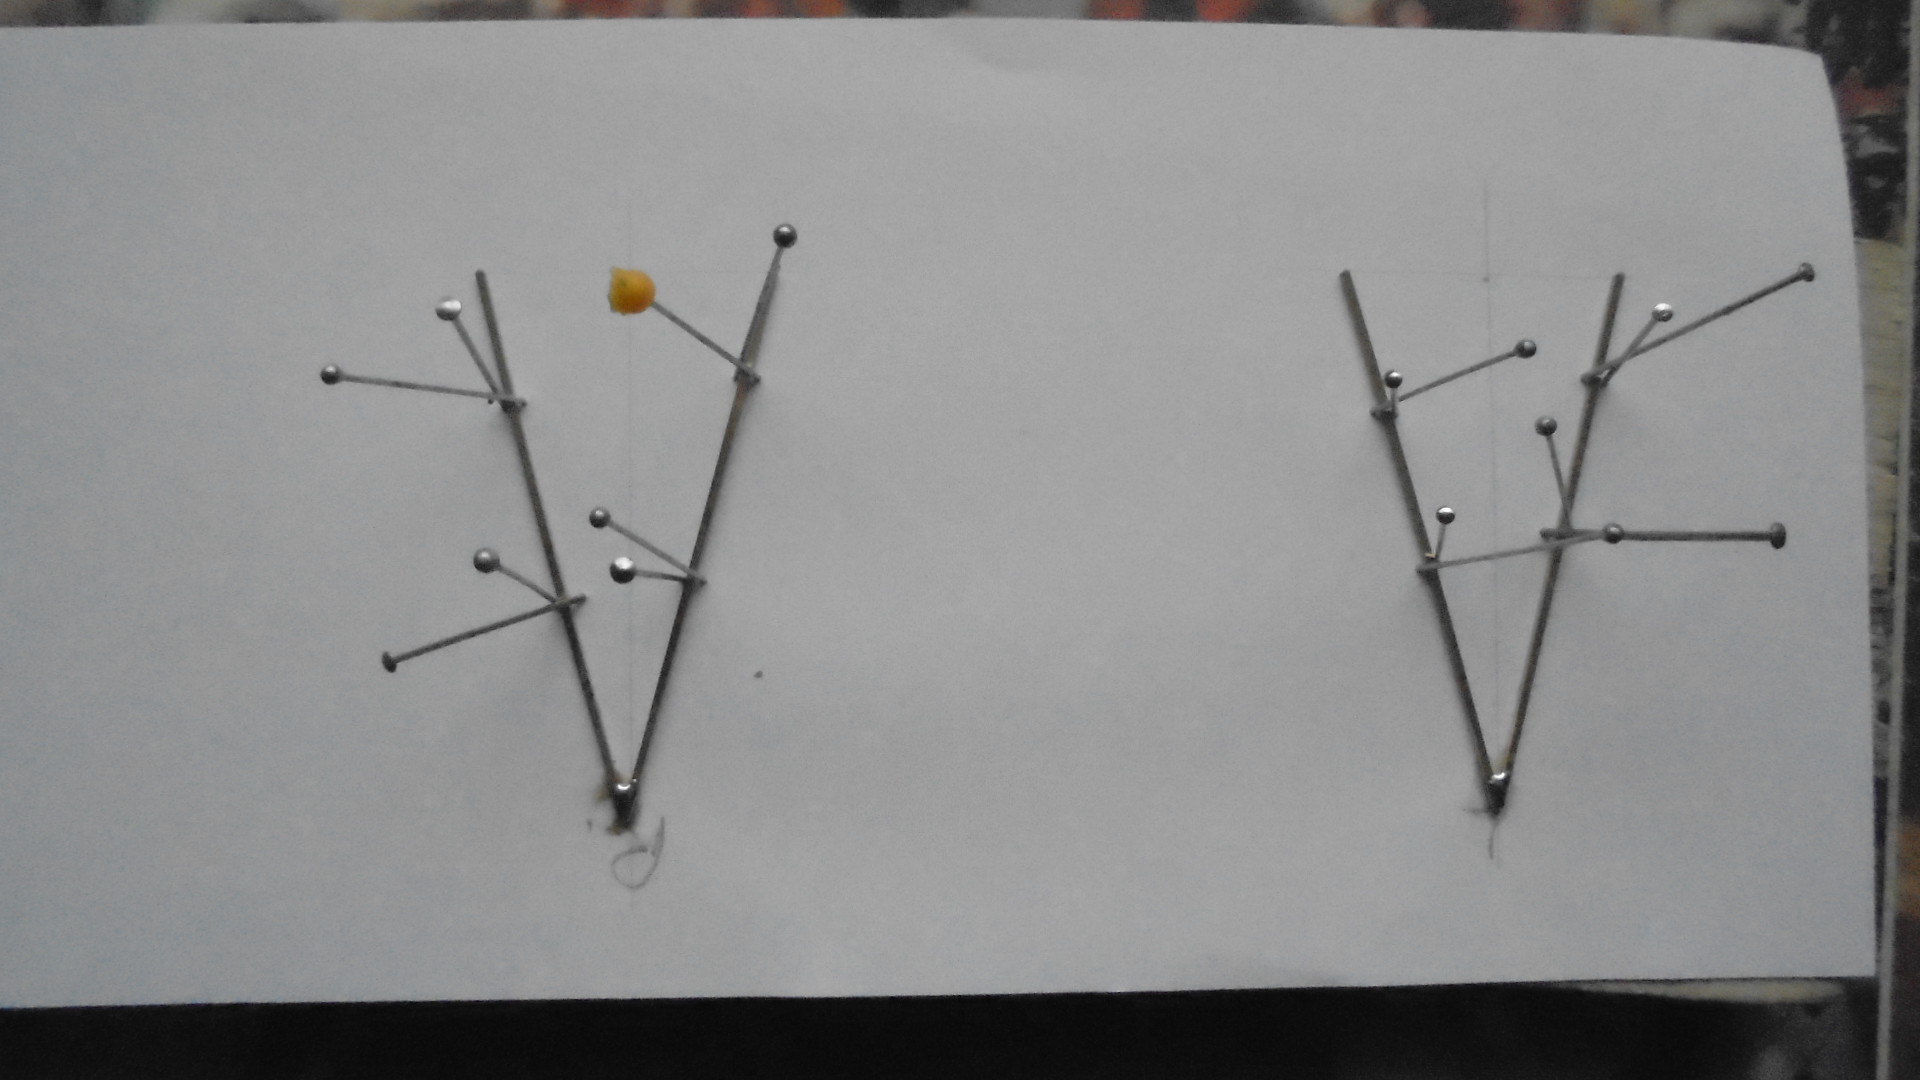
I made the front booms from brass bar as the originals were square section. I measured the gap between the wings using a pair of dividers and marked the where the ends of the booms needed to be with a pencil on a piece of paper. I could then lay the brass bar on the paper to form two V's which I was able to solder:
After the joints had been cleaned with a file I was able to CA the repective booms to each side of the front of the model. I started rigging the model at this stage because some areas will be difficult to reach later. The wings and boom bracing was rigged using rolled copper wire held with CA:

I have now reached a snag: the undercarriage was a simple structure consisting of two struts on each side supporting two skids. The axle ran across the skids. This will be an inherently weak part of the model which will require careful handling, especially when rigging. In addition if I finish the aircraft before I make the turret and foredeck on which I intend to mount it, I will have to be very careful in storing the aircraft model to stop it being accidentally damaged, so I have put it to one side for the moment while I concentrate on the base.
I have made a small start on the base but am still in the process of studying photos of the deck and turret to work out some of the smaller details. I am not a ship modeller so I am on a very steep (vertical?) learning curve at the moment, but in the last couple of days I have had access to some very helpful information with the help of a fellow modeller and I hope to be able to present the results of my research in model form before too long.
Thanks for looking.
Stevef.
I have made some progress with this project, but did have a case of two steps forward and one back, which meant that I had to dissemble and re-assemble some parts. I completed the addition of the interplane and boom struts after the initial assembly had dried out: this was a straightforward task as it involved gently placing the ends of the struts into the pre-drilled holes in the wings after I had place a small drop of glue into the relevant holes. The boom struts were cut to exact length and fixed in place with CA:
When I added the supporting struts for the upper wing overhang I did not cut them to the correct length and as a consequence I distorted the wing and boom structures. It took me a whole evening of fiddling and thinking before I realised the cause of the problem, by which time I had partially dissembled the top wing. Fortunately as soon as I removed the outermost interplane struts the problem was resolved: the wing was re-assembled and new outer struts cut and glued into place and all was square again.
I made the front booms from brass bar as the originals were square section. I measured the gap between the wings using a pair of dividers and marked the where the ends of the booms needed to be with a pencil on a piece of paper. I could then lay the brass bar on the paper to form two V's which I was able to solder:
After the joints had been cleaned with a file I was able to CA the repective booms to each side of the front of the model. I started rigging the model at this stage because some areas will be difficult to reach later. The wings and boom bracing was rigged using rolled copper wire held with CA:
I have now reached a snag: the undercarriage was a simple structure consisting of two struts on each side supporting two skids. The axle ran across the skids. This will be an inherently weak part of the model which will require careful handling, especially when rigging. In addition if I finish the aircraft before I make the turret and foredeck on which I intend to mount it, I will have to be very careful in storing the aircraft model to stop it being accidentally damaged, so I have put it to one side for the moment while I concentrate on the base.
I have made a small start on the base but am still in the process of studying photos of the deck and turret to work out some of the smaller details. I am not a ship modeller so I am on a very steep (vertical?) learning curve at the moment, but in the last couple of days I have had access to some very helpful information with the help of a fellow modeller and I hope to be able to present the results of my research in model form before too long.
Thanks for looking.
Stevef.
Please Log in to join the conversation.
2 years 3 months ago #443
by Stevef
Replied by Stevef on topic 1/72 Short S 38 on HMS Africa and HMS Hibernia 1912
Evening All,
I have given a lot of thought to the undercarriage problem but cannot drill holes under the wing because in the front there is a strut in the way, and at the rear the boom is where the undercarriage leg is to be attached. I will probably have to use butt joints which are not the strongest attachment, but I am hoping that if the model is secured to the launch platform it will have sufficient strength to hold properly.
I have become a ship modeller recently: usually I make aeroplanes so I am learning fast. When I dropped into my LMS and asked for a kit of the front turret and foredeck of an Edwaed VII class battleship of 1912 in 1/72 scale I just received a blank stare! I started by downloading a plan and side elevation of the foredeck of HMS Africa/Hibernia and enlarged it until 1mm represents 1 foot. I could then draw a plan at 1/72 scale where 1 inch represents 6 feet.
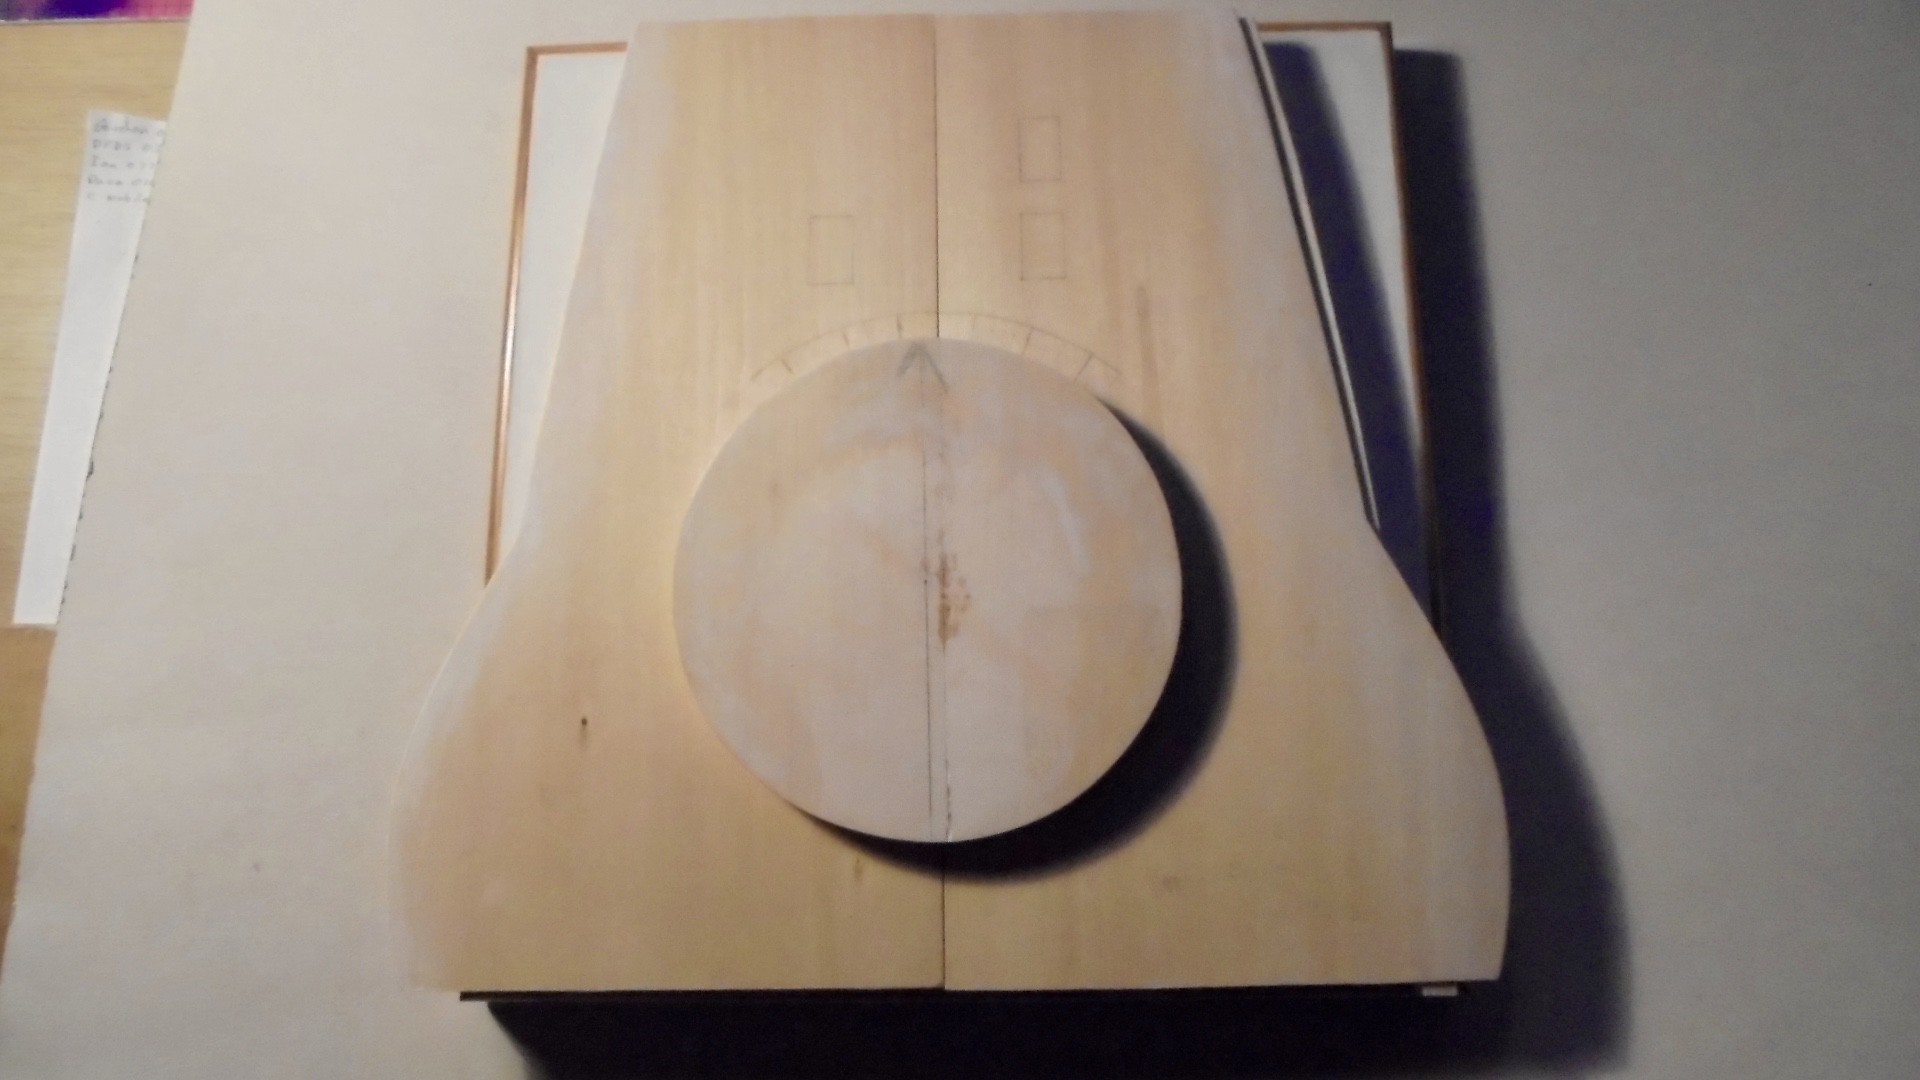
I have made a base which is 12 inches (30 cm) x 11 inches (28cm) from hardboard and painted the edges which will not be covered by the deck white. I used white rather than sea blue because this will not be a waterline model: only the top of the ship sides above the portholes of the crew accommodation will be represented. Three supports from 1 inch x 1 inch (2.5cm x 2.5 cm) wood were glued to the top of the hardboard - these will hold the deck. I shaped 2 pieces of 1 inch square wood to represent the sides of the ship immediately below the deck line and covered the outer faces with 10 thou plastic sheet. These will be painted battleship grey later. The small fillets at the rear of the sides represent the curve of the ship sides above a 9.2 inch gun mounted low down in the hull:
The gaps at the front and rear of the model between deck and base will be covered with plastic card later. The deck was cut form 1/8th inch (2mm) basswood (lime) sheet: 2 pieces were cut and shaped to represent the deck forward of the bridge to a point approximately 30 feet (8.2m) forward of the forward barbette breakwater. The edges were rounded with glass paper and sealed with a mixture of talcum powder and dope:

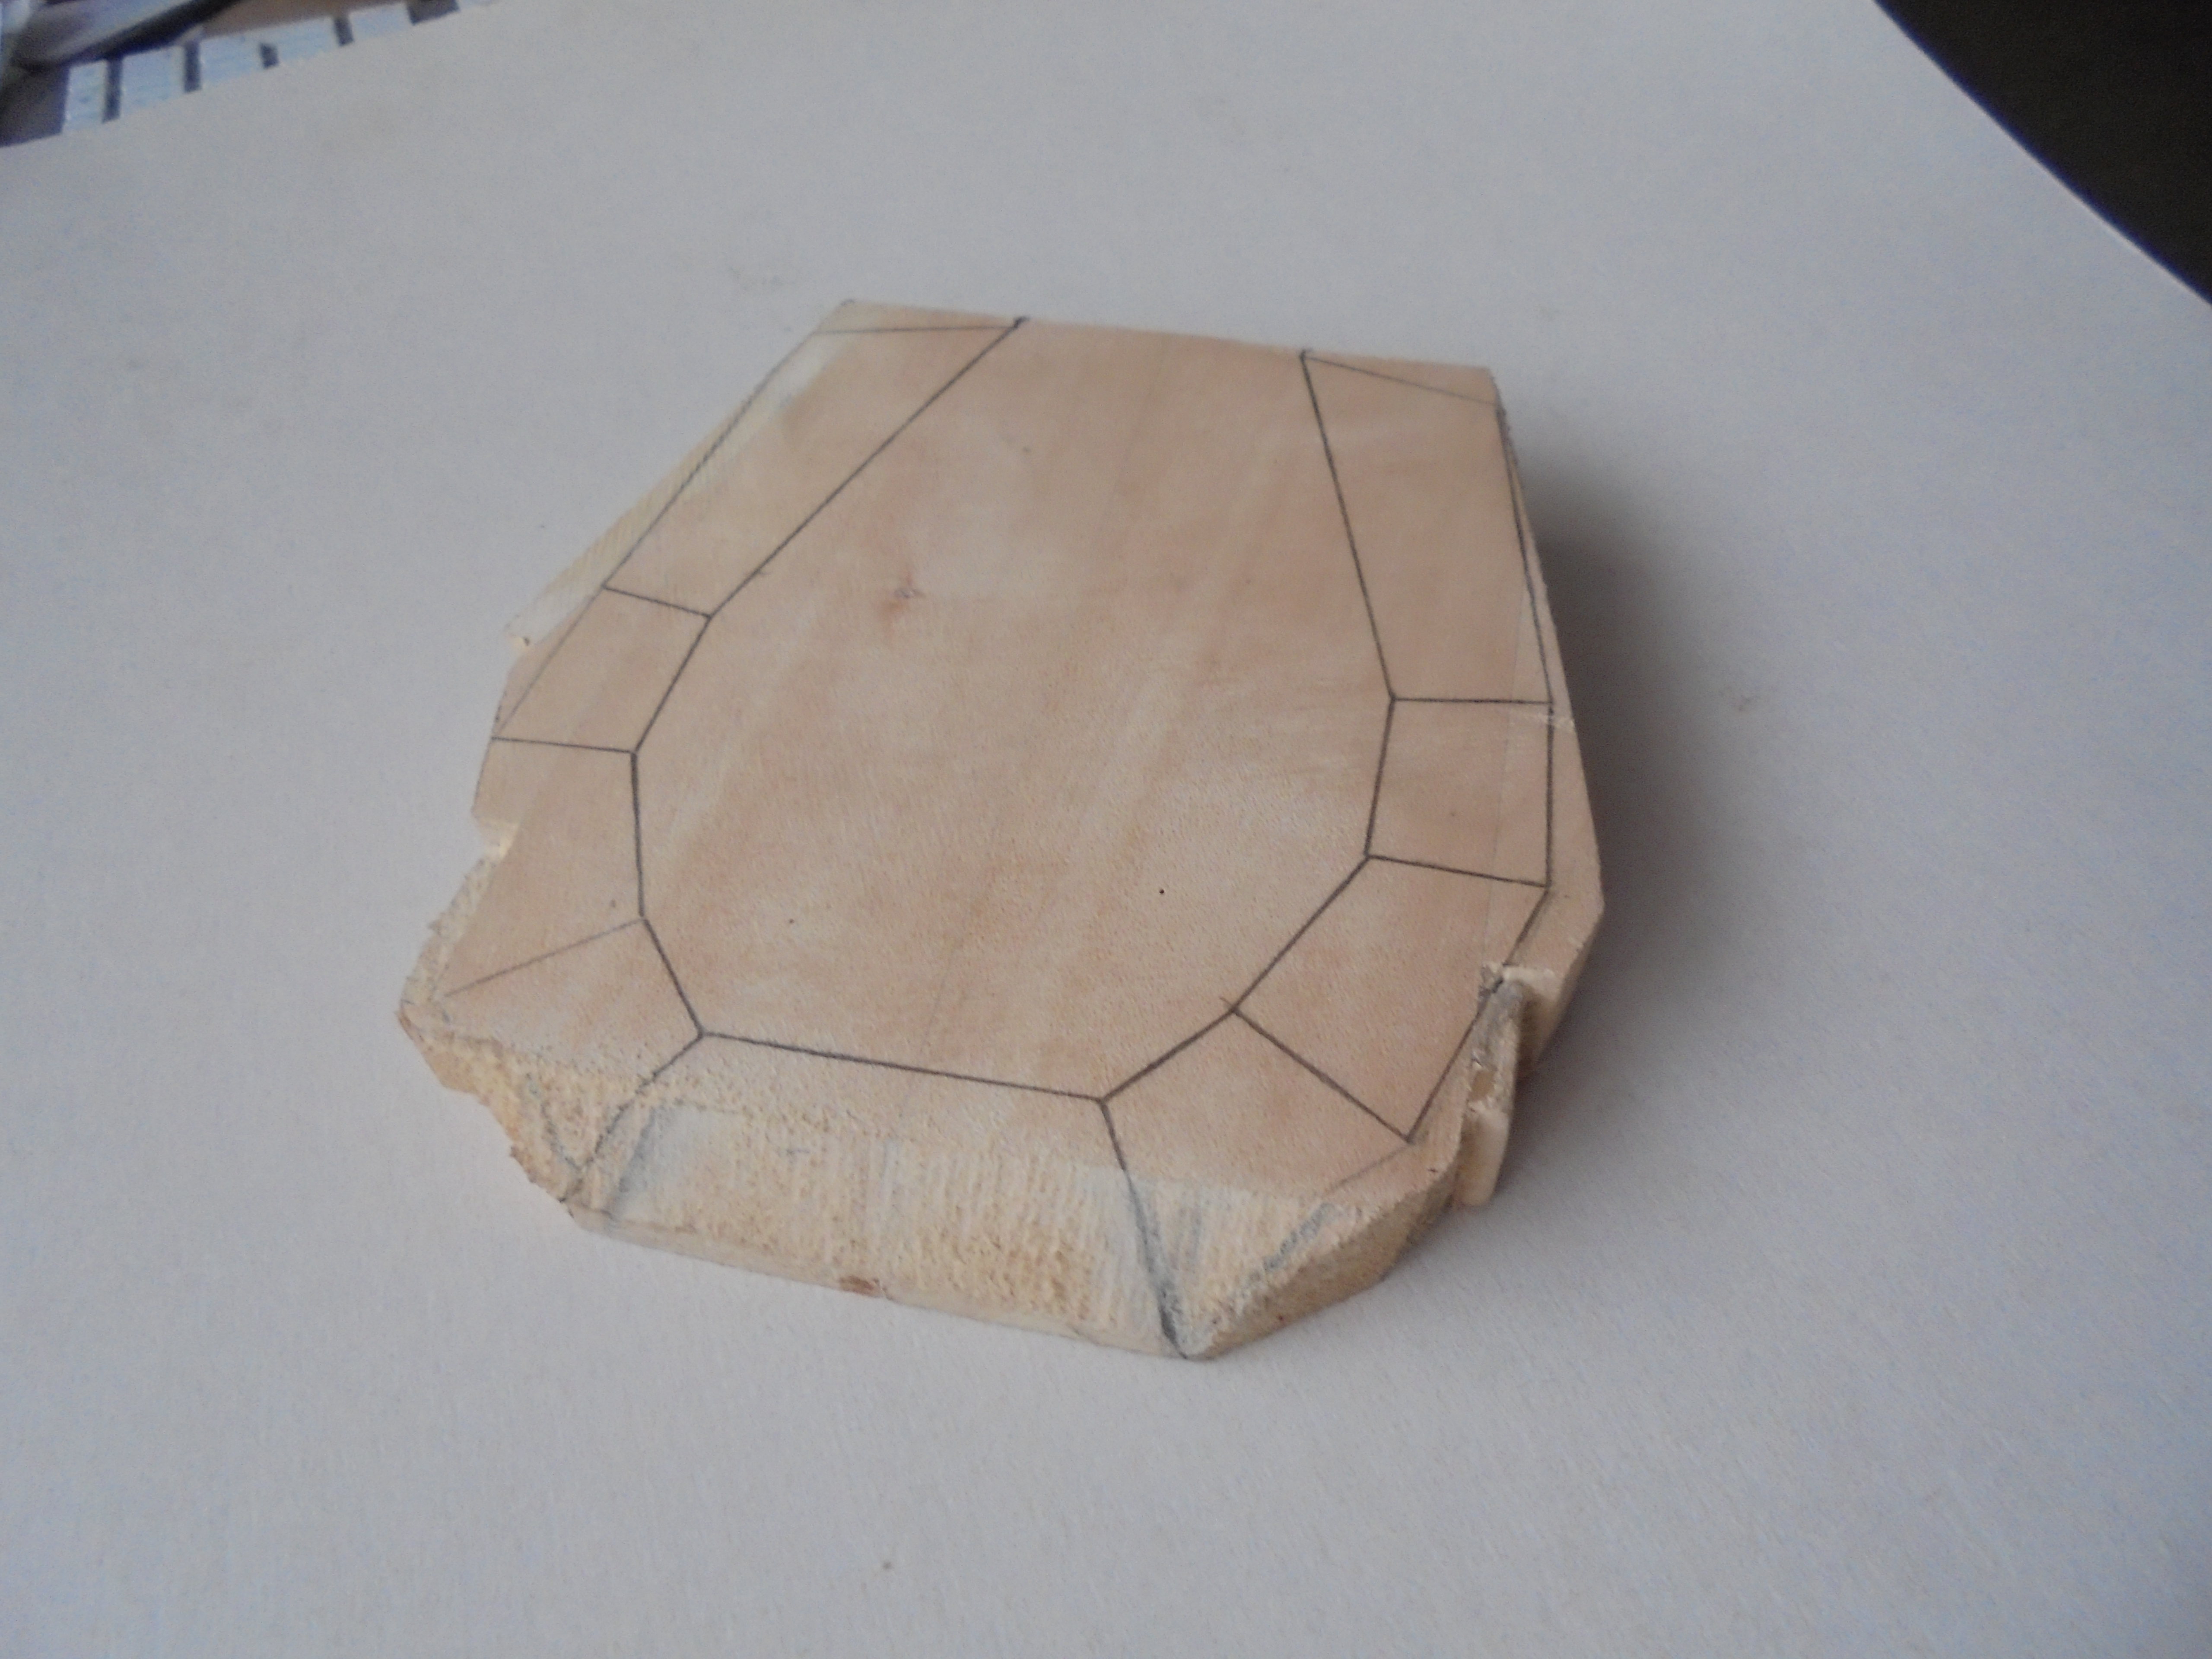
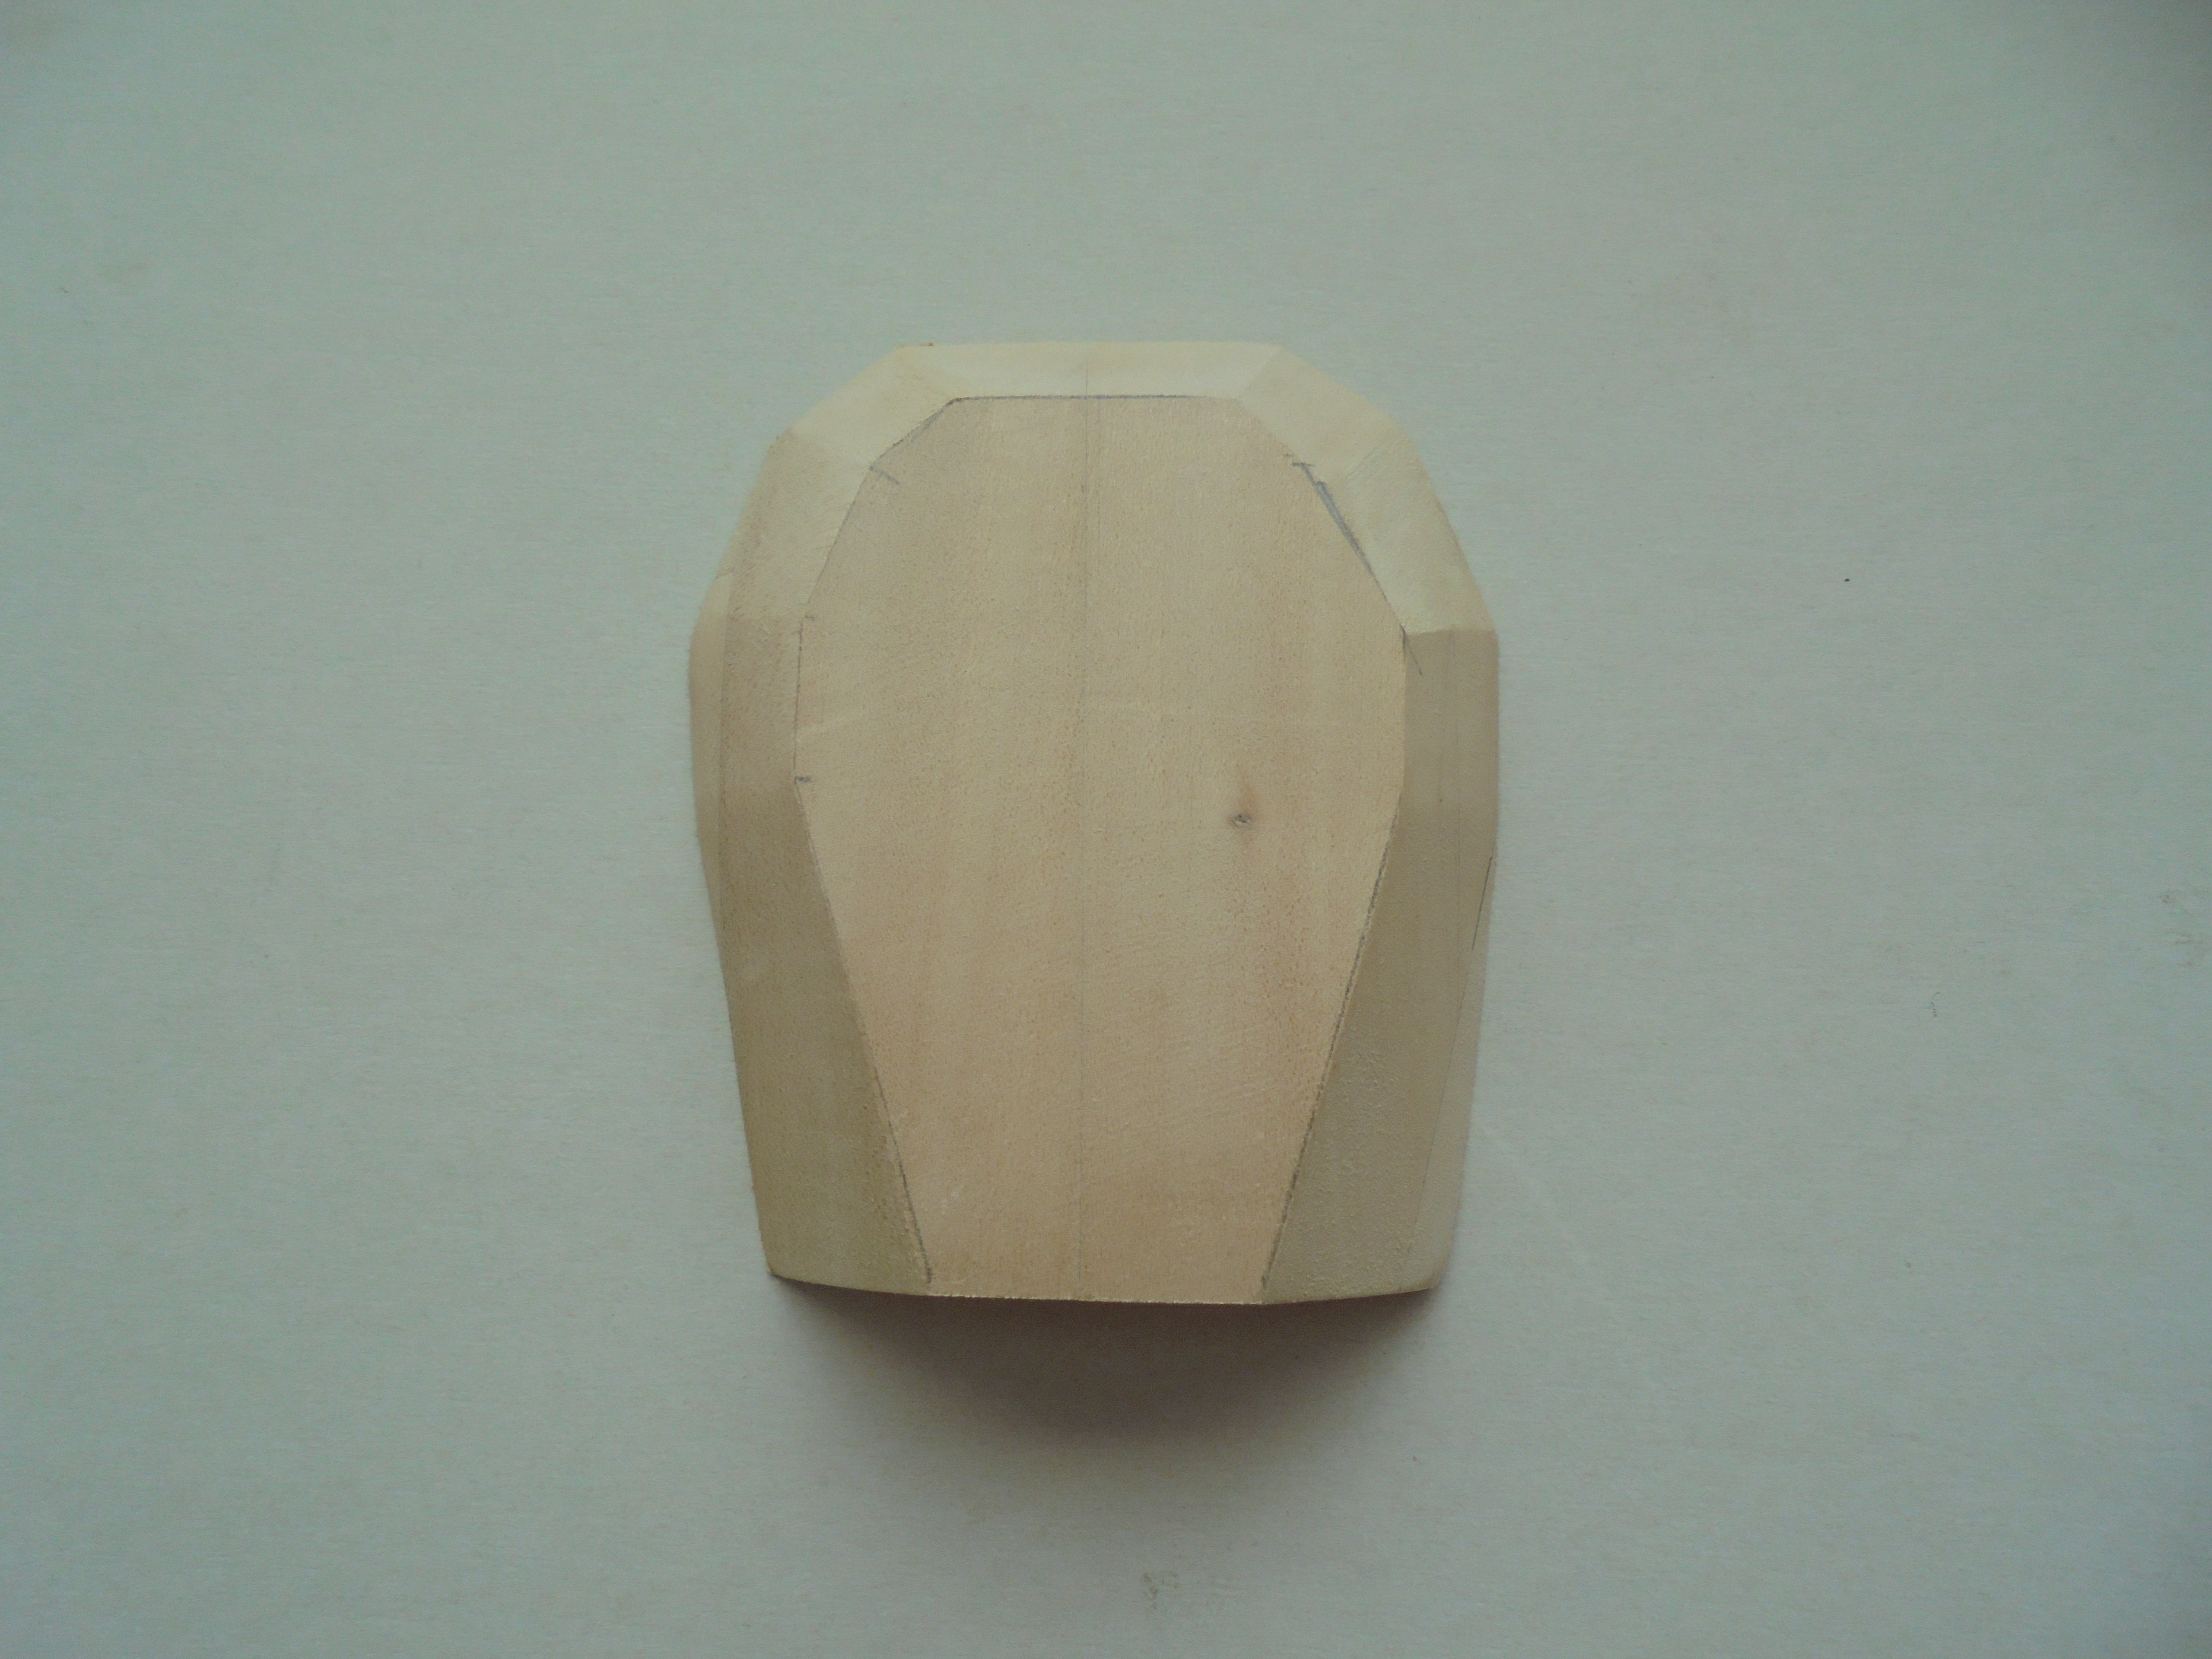
The circle and arc represent where the barbette and breakwater will be positioned later. The curved rear covered the 9.2 inch guns in the hull and will have 60th plastic sheet CA'd underneath to represent the armoured deck.The top of the deck will be covered with 1/8 inch (2mm) square pine strip to represent the wood planking on the real ships. The barbette was cut form 4 pieces of 1/4 inch (0.5mm) basswood sheet: 2 pieces were joined to form a square sheet and the two sheets glued so that the joints were at 90 degrees. When the glue had set I cut off the waste wood around the circle that I had drawn on one surface, and the final rounding was achieved with a wood file:

I made a block for the turret from 2 inch (5cm) square basswood: I cut a length of wood into two and glued the two pieces together and then added two more pieces of 1/4 inch sheet to the rear of the sides to allow for the wider rear of the turret. The top of the block was removed with a saw:


The front of the turret has also been trimmed to save filing the front face later. I filed/shaped the top of the turret first. I traced the upper and lower surfaces of the turret plan and the faces of the turret sides from the drawing and transferred these to the wood block and cut the sides of the block so that they were almost in alignment with the lower outline:

Starting at the rear I could now file the individual faces of one side of the turret using the lines as a guide:

The above operation was repeated for the other half of the turret and the front surface was also completed:
The rear of the turret had the recesses cut with a saw. I drilled two holes in the front of the turret to take the gun barrels. The barrels of the guns were made from pine dowel which had been turned in an electric drill and sanded to shape with coarse, and polished with fine, glasspaper. The ends were shaped to fit into the holes in the turret.

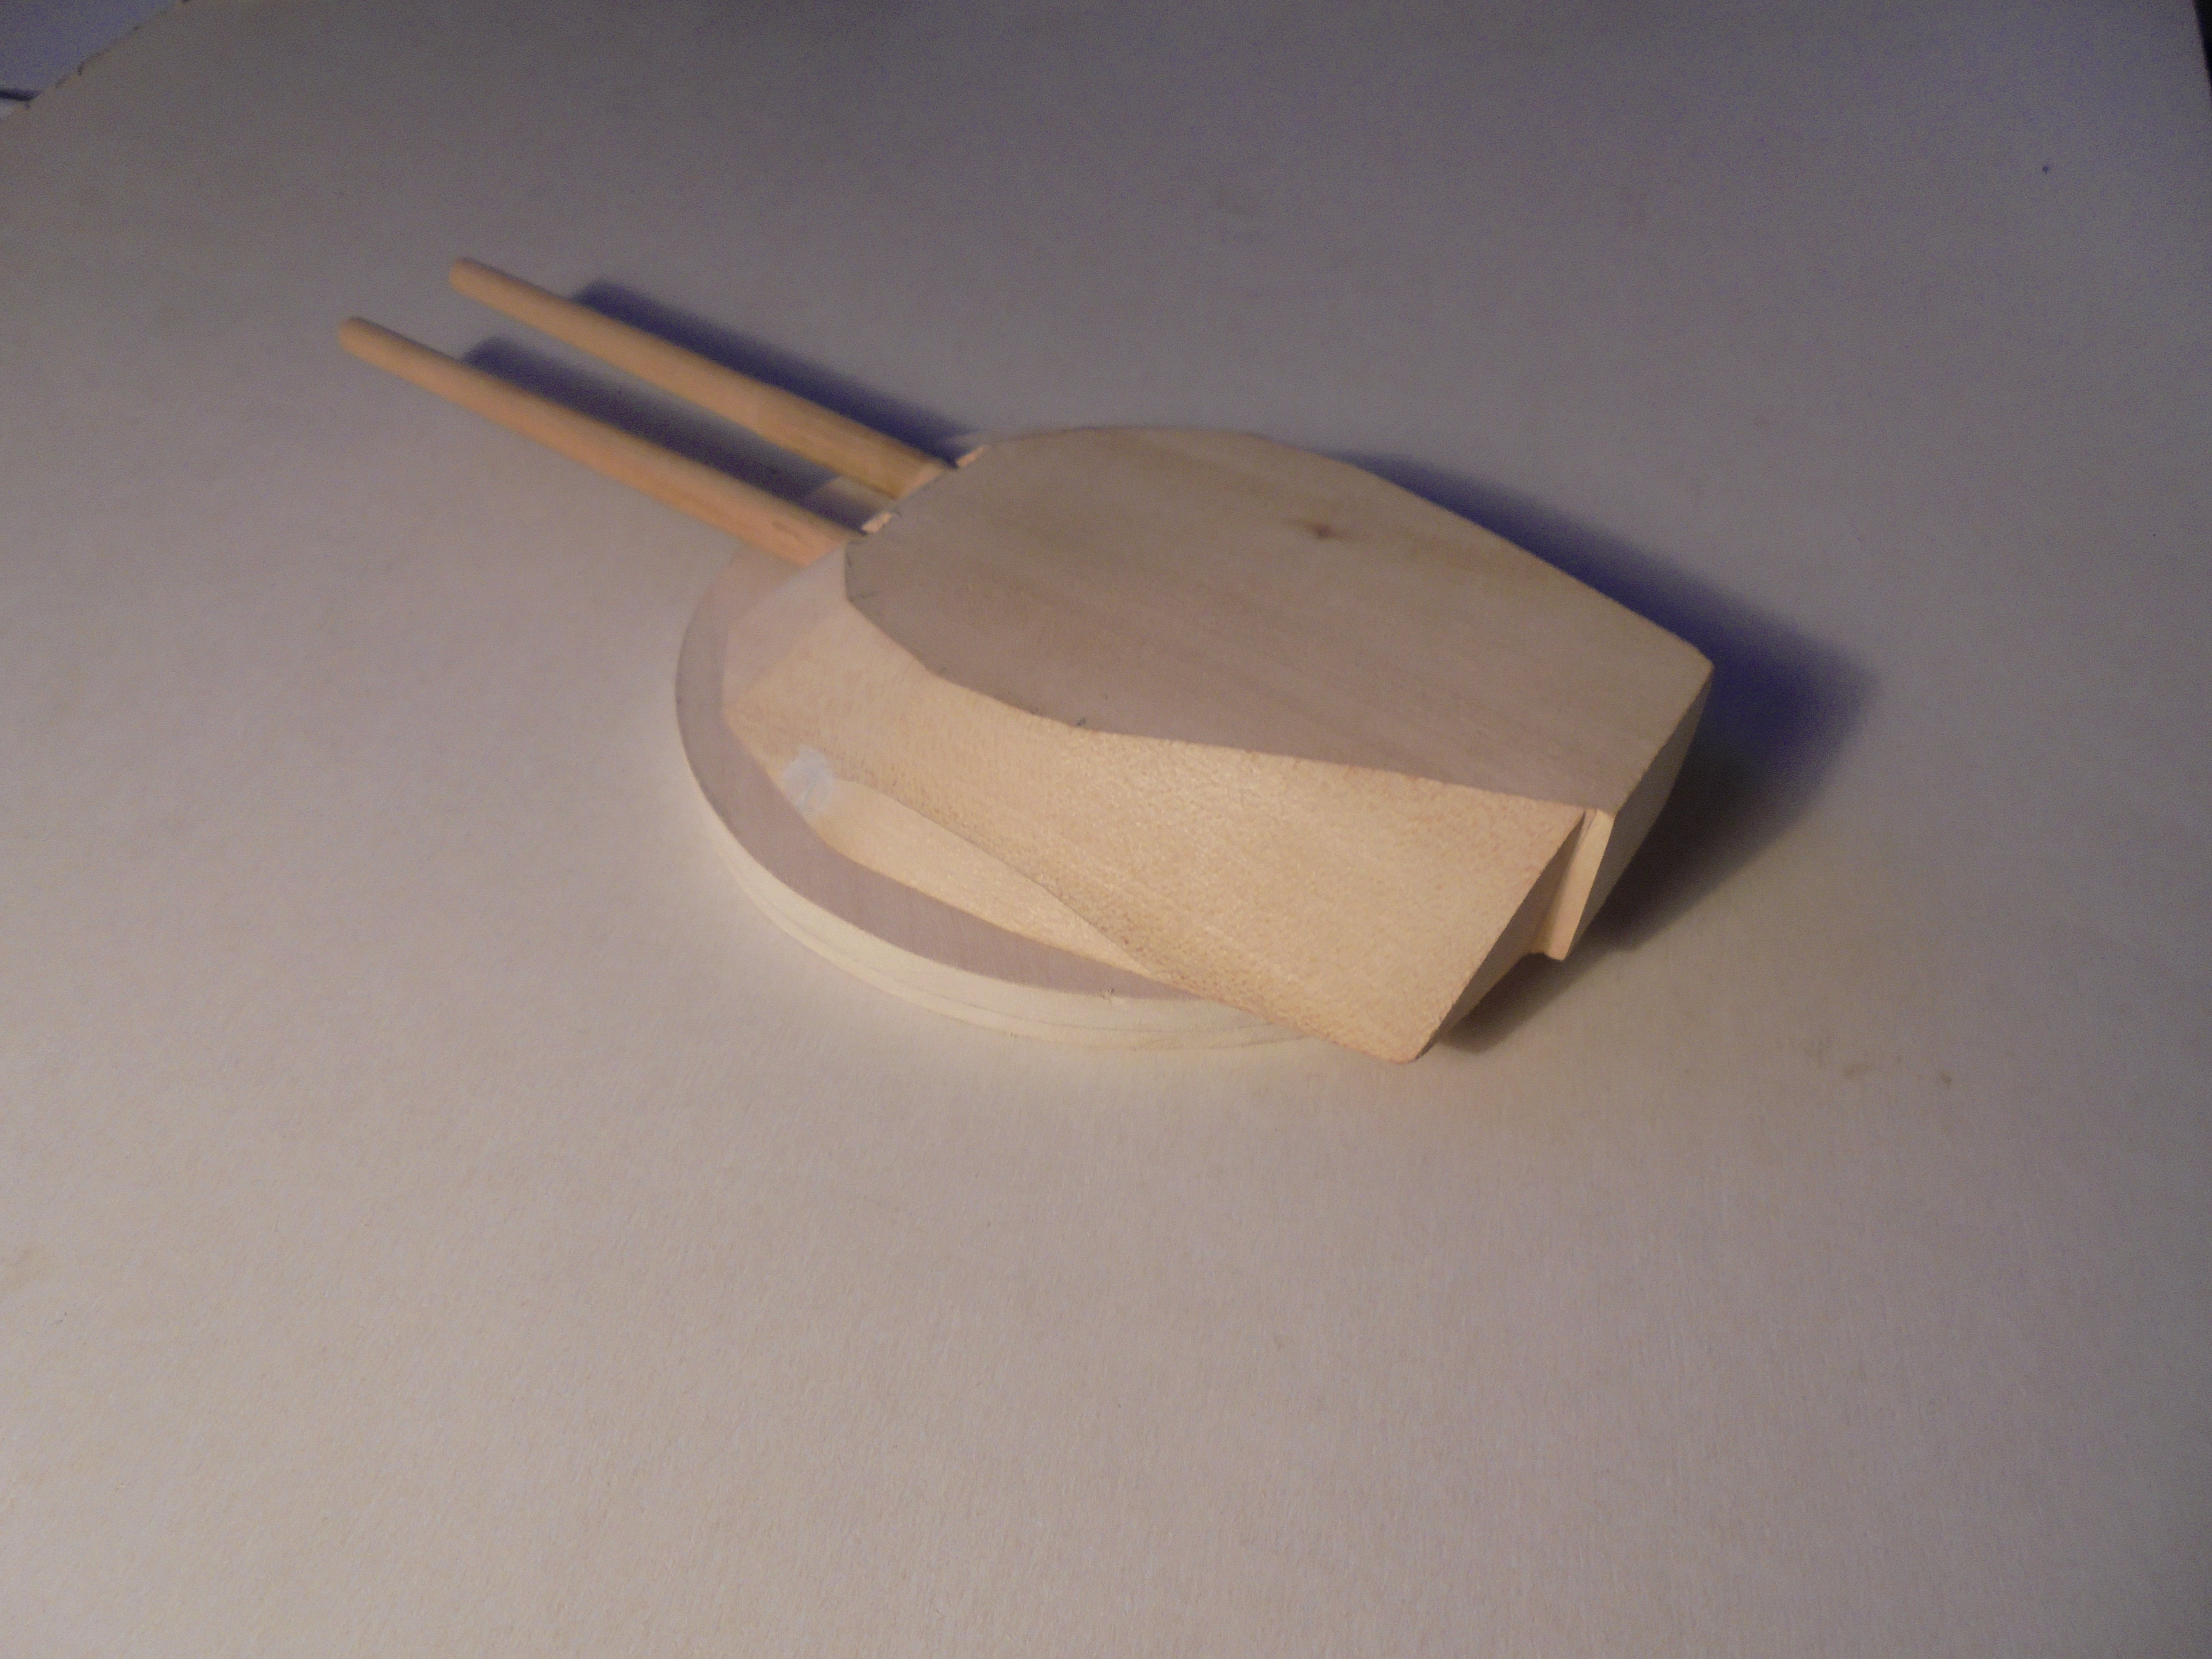
The turret, gun barrels and barbette were sealed with my go to wood sealant - talcum powder and dope mixture - and sanded smooth:
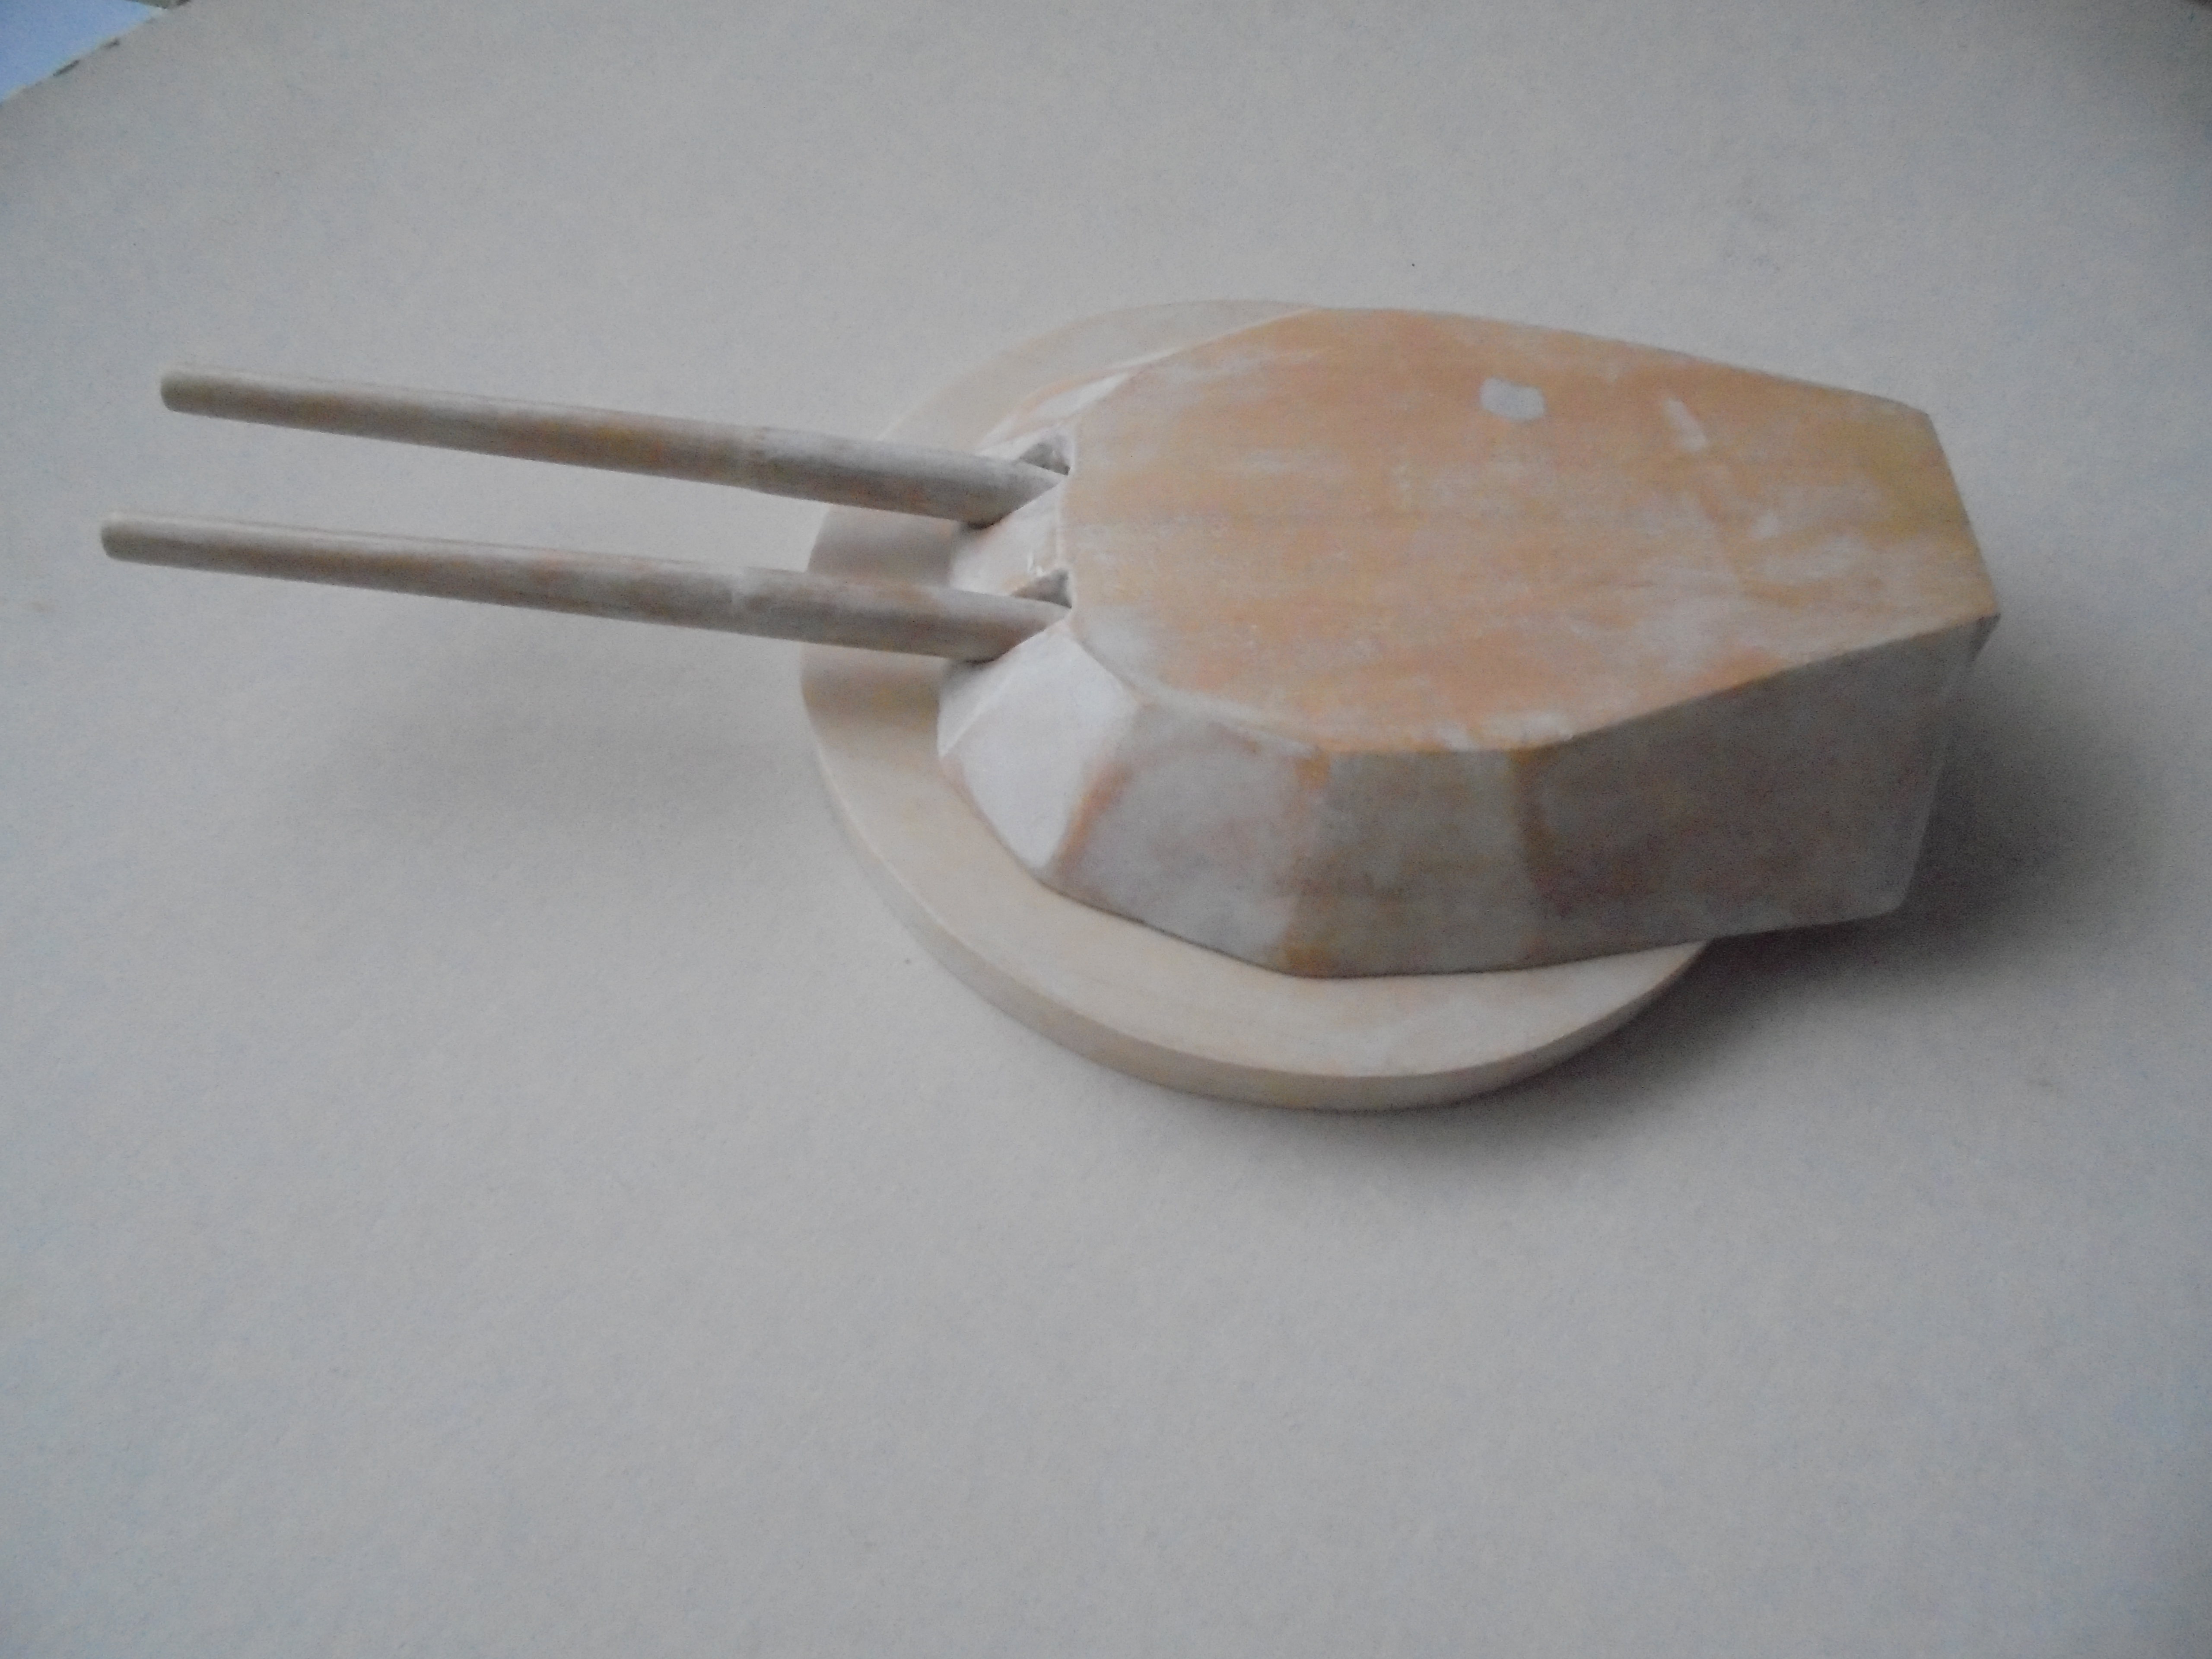
The gun barrels, turret and barbette have only been placed together for photos and checking fit and position. They will be permanently glued together later.

Thanks for looking.
Stevef.
I have given a lot of thought to the undercarriage problem but cannot drill holes under the wing because in the front there is a strut in the way, and at the rear the boom is where the undercarriage leg is to be attached. I will probably have to use butt joints which are not the strongest attachment, but I am hoping that if the model is secured to the launch platform it will have sufficient strength to hold properly.
I have become a ship modeller recently: usually I make aeroplanes so I am learning fast. When I dropped into my LMS and asked for a kit of the front turret and foredeck of an Edwaed VII class battleship of 1912 in 1/72 scale I just received a blank stare! I started by downloading a plan and side elevation of the foredeck of HMS Africa/Hibernia and enlarged it until 1mm represents 1 foot. I could then draw a plan at 1/72 scale where 1 inch represents 6 feet.
I have made a base which is 12 inches (30 cm) x 11 inches (28cm) from hardboard and painted the edges which will not be covered by the deck white. I used white rather than sea blue because this will not be a waterline model: only the top of the ship sides above the portholes of the crew accommodation will be represented. Three supports from 1 inch x 1 inch (2.5cm x 2.5 cm) wood were glued to the top of the hardboard - these will hold the deck. I shaped 2 pieces of 1 inch square wood to represent the sides of the ship immediately below the deck line and covered the outer faces with 10 thou plastic sheet. These will be painted battleship grey later. The small fillets at the rear of the sides represent the curve of the ship sides above a 9.2 inch gun mounted low down in the hull:
The gaps at the front and rear of the model between deck and base will be covered with plastic card later. The deck was cut form 1/8th inch (2mm) basswood (lime) sheet: 2 pieces were cut and shaped to represent the deck forward of the bridge to a point approximately 30 feet (8.2m) forward of the forward barbette breakwater. The edges were rounded with glass paper and sealed with a mixture of talcum powder and dope:
The circle and arc represent where the barbette and breakwater will be positioned later. The curved rear covered the 9.2 inch guns in the hull and will have 60th plastic sheet CA'd underneath to represent the armoured deck.The top of the deck will be covered with 1/8 inch (2mm) square pine strip to represent the wood planking on the real ships. The barbette was cut form 4 pieces of 1/4 inch (0.5mm) basswood sheet: 2 pieces were joined to form a square sheet and the two sheets glued so that the joints were at 90 degrees. When the glue had set I cut off the waste wood around the circle that I had drawn on one surface, and the final rounding was achieved with a wood file:
I made a block for the turret from 2 inch (5cm) square basswood: I cut a length of wood into two and glued the two pieces together and then added two more pieces of 1/4 inch sheet to the rear of the sides to allow for the wider rear of the turret. The top of the block was removed with a saw:
The front of the turret has also been trimmed to save filing the front face later. I filed/shaped the top of the turret first. I traced the upper and lower surfaces of the turret plan and the faces of the turret sides from the drawing and transferred these to the wood block and cut the sides of the block so that they were almost in alignment with the lower outline:
Starting at the rear I could now file the individual faces of one side of the turret using the lines as a guide:
The above operation was repeated for the other half of the turret and the front surface was also completed:
The rear of the turret had the recesses cut with a saw. I drilled two holes in the front of the turret to take the gun barrels. The barrels of the guns were made from pine dowel which had been turned in an electric drill and sanded to shape with coarse, and polished with fine, glasspaper. The ends were shaped to fit into the holes in the turret.
The turret, gun barrels and barbette were sealed with my go to wood sealant - talcum powder and dope mixture - and sanded smooth:
The gun barrels, turret and barbette have only been placed together for photos and checking fit and position. They will be permanently glued together later.
Thanks for looking.
Stevef.
Please Log in to join the conversation.
2 years 3 months ago #444
by Stevef
Replied by Stevef on topic 1/72 Short S 38 on HMS Africa and HMS Hibernia 1912
Evening All,
I have been studying the many photographs that were taken in early May 1912 on and of HMS Hibernia to try to get to grips with the details of the deck and fittings. In one of the photos and on the scale drawings there are some oblongs in front of the turre, and I could not work out what they were. A friend helped me to solve the problem when he showed me a photograph of another pre-WW1 battleship foredeck: they were ventilator openings to the focsle (crew quarters) in the front end of the ship. Having solved that problem I felt able to proceed with the basic deck/barbette assembly.
I covered the edges of the pieces of wood which will represent the ship sides with thin plastic sheet and painted them Tamiya Dark Sea Grey as I have been advised that this is probably close to the grey of RN ships of that era: these were glued to the base. I glued strips of 20 x 30 Evergreen strip to to represent the metal step on the edges of the deck and painted these and the wood grey as above:

I decided that the basswood needed more support underneath, so before I attached the decking I reinforced the base with some more support:
When the deck pieces were well set I added the barbette, which had also been painted, and the breakwater in front of the barbette. The latter was cut form 15 thou card with holes drilled as observed on a photograph, and the bracing pieces also as observed on a photograph and ship plans. The vents for the crew quarters were also made from 15 thou card and painted grey, except the bottoms which are black as I have no intention of trying to replicate the internals of the ship! The covers will be added later in the open position.

The next part will be to add the deck planking and start on the bridge which will form the rear of the model and support for the rear of the launch ramp.
Thanks for looking.
Stevf.
I have been studying the many photographs that were taken in early May 1912 on and of HMS Hibernia to try to get to grips with the details of the deck and fittings. In one of the photos and on the scale drawings there are some oblongs in front of the turre, and I could not work out what they were. A friend helped me to solve the problem when he showed me a photograph of another pre-WW1 battleship foredeck: they were ventilator openings to the focsle (crew quarters) in the front end of the ship. Having solved that problem I felt able to proceed with the basic deck/barbette assembly.
I covered the edges of the pieces of wood which will represent the ship sides with thin plastic sheet and painted them Tamiya Dark Sea Grey as I have been advised that this is probably close to the grey of RN ships of that era: these were glued to the base. I glued strips of 20 x 30 Evergreen strip to to represent the metal step on the edges of the deck and painted these and the wood grey as above:
I decided that the basswood needed more support underneath, so before I attached the decking I reinforced the base with some more support:
When the deck pieces were well set I added the barbette, which had also been painted, and the breakwater in front of the barbette. The latter was cut form 15 thou card with holes drilled as observed on a photograph, and the bracing pieces also as observed on a photograph and ship plans. The vents for the crew quarters were also made from 15 thou card and painted grey, except the bottoms which are black as I have no intention of trying to replicate the internals of the ship! The covers will be added later in the open position.
The next part will be to add the deck planking and start on the bridge which will form the rear of the model and support for the rear of the launch ramp.
Thanks for looking.
Stevf.
Please Log in to join the conversation.
2 years 3 months ago #445
by Stevef
Replied by Stevef on topic 1/72 Short S 38 on HMS Africa and HMS Hibernia 1912
Evening All,
Many thanks indeed to all who left such positive comments at the end of my last post: I have been seriously distracted in the last month and have not had a great deal of time either to comment or to do a great deal on the current project. Added to which what I have done has been time consuming and laborious, so what follows is not a great deal but did take a lot of time and effort, both of which have been in short supply of late.
I used 1/16 x 1/16 inch (2mm x 2mm) pine strip to make the deck planking. For those who like me know little or nothing about the construction of armoured warships, the decks were covered in wood: teak in the case of British warships. This was because these ships operated in oceans and seas around the world, which meant that in the tropics and sub-tropical waters a bare steel deck would become so hot during the day that sailors would not be able to walk on it. In addition the crew quarters below the decks would have been unbearably hot. In Arctic and Southern Ocean waters in winter, ice would rapidly build up on the very cold bare steel decks and rapidly make the ship top heavy and unstable. Wood acts as an insulator and thus helps to keep the ship cool in the tropics and slows the build-up of ice on the ship in high latitude seas and oceans.
After that lesson in marine construction I glued the strips of pine to the lime base, starting at the front centre and working outwards:
After several sessions and what seemed at the time like an eternity I had managed to cover the whole of the deck area:

Making the strip fit the different curves of the barbette, edge of the deck and fill the gaps between the ventilation hatches involved another steep learning curve for me.
The decks of those old warships were teak as stated above, but the wood rapidly discoloured in the salt air and under the influence of the sun. In addition sailors were expected to scrub the decks with honeystone, an abrasive stone which was supposed to make the decks white: an affectation of senior naval officers, some of whom seemed to think that they were still living in the age of sail. Indeed it could be said that if the Royal Navy prior to 1914 had spent more time practising gunnery and other military activity than burnishing the brass and decks of the warships, they may have been more effective, even successful, when they finally engaged the enemy. However that may have been, the decks of warships were not the colour of pine strip, so I had to find a way of representing discoloured teak. Colour photographs of modern preserved battleship wood decks show that they are a dull grey.
I stained the pine with a dark red wood stain (Peruvian mahogony), to try to represent the teak deck when new:
In the process I managed to remove several areas of the acryllic grey on the barbette and ventilation covers, so these will need to be repainted later. When the woodstain was dry I used a wash of Revell Hellgrau(76) mixed with white: I applied many coats of this until I had something close to the grey in my reference photographs:

The slightly uneven colours are what I wanted to achieve: the deck areas of these ships was huge and the variation in colour on the originals was considerable. Now all I have to do is to repaint the barbette and ventilation covers before I attach the turret and guns and start to make the bridge structure which will form the rear of the display.
Thanks for looking.
Stevef.
Many thanks indeed to all who left such positive comments at the end of my last post: I have been seriously distracted in the last month and have not had a great deal of time either to comment or to do a great deal on the current project. Added to which what I have done has been time consuming and laborious, so what follows is not a great deal but did take a lot of time and effort, both of which have been in short supply of late.
I used 1/16 x 1/16 inch (2mm x 2mm) pine strip to make the deck planking. For those who like me know little or nothing about the construction of armoured warships, the decks were covered in wood: teak in the case of British warships. This was because these ships operated in oceans and seas around the world, which meant that in the tropics and sub-tropical waters a bare steel deck would become so hot during the day that sailors would not be able to walk on it. In addition the crew quarters below the decks would have been unbearably hot. In Arctic and Southern Ocean waters in winter, ice would rapidly build up on the very cold bare steel decks and rapidly make the ship top heavy and unstable. Wood acts as an insulator and thus helps to keep the ship cool in the tropics and slows the build-up of ice on the ship in high latitude seas and oceans.
After that lesson in marine construction I glued the strips of pine to the lime base, starting at the front centre and working outwards:
After several sessions and what seemed at the time like an eternity I had managed to cover the whole of the deck area:
Making the strip fit the different curves of the barbette, edge of the deck and fill the gaps between the ventilation hatches involved another steep learning curve for me.
The decks of those old warships were teak as stated above, but the wood rapidly discoloured in the salt air and under the influence of the sun. In addition sailors were expected to scrub the decks with honeystone, an abrasive stone which was supposed to make the decks white: an affectation of senior naval officers, some of whom seemed to think that they were still living in the age of sail. Indeed it could be said that if the Royal Navy prior to 1914 had spent more time practising gunnery and other military activity than burnishing the brass and decks of the warships, they may have been more effective, even successful, when they finally engaged the enemy. However that may have been, the decks of warships were not the colour of pine strip, so I had to find a way of representing discoloured teak. Colour photographs of modern preserved battleship wood decks show that they are a dull grey.
I stained the pine with a dark red wood stain (Peruvian mahogony), to try to represent the teak deck when new:
In the process I managed to remove several areas of the acryllic grey on the barbette and ventilation covers, so these will need to be repainted later. When the woodstain was dry I used a wash of Revell Hellgrau(76) mixed with white: I applied many coats of this until I had something close to the grey in my reference photographs:
The slightly uneven colours are what I wanted to achieve: the deck areas of these ships was huge and the variation in colour on the originals was considerable. Now all I have to do is to repaint the barbette and ventilation covers before I attach the turret and guns and start to make the bridge structure which will form the rear of the display.
Thanks for looking.
Stevef.
Please Log in to join the conversation.
2 years 2 months ago #447
by Stevef
Replied by Stevef on topic 1/72 Short S 38 on HMS Africa and HMS Hibernia 1912
Evening All,
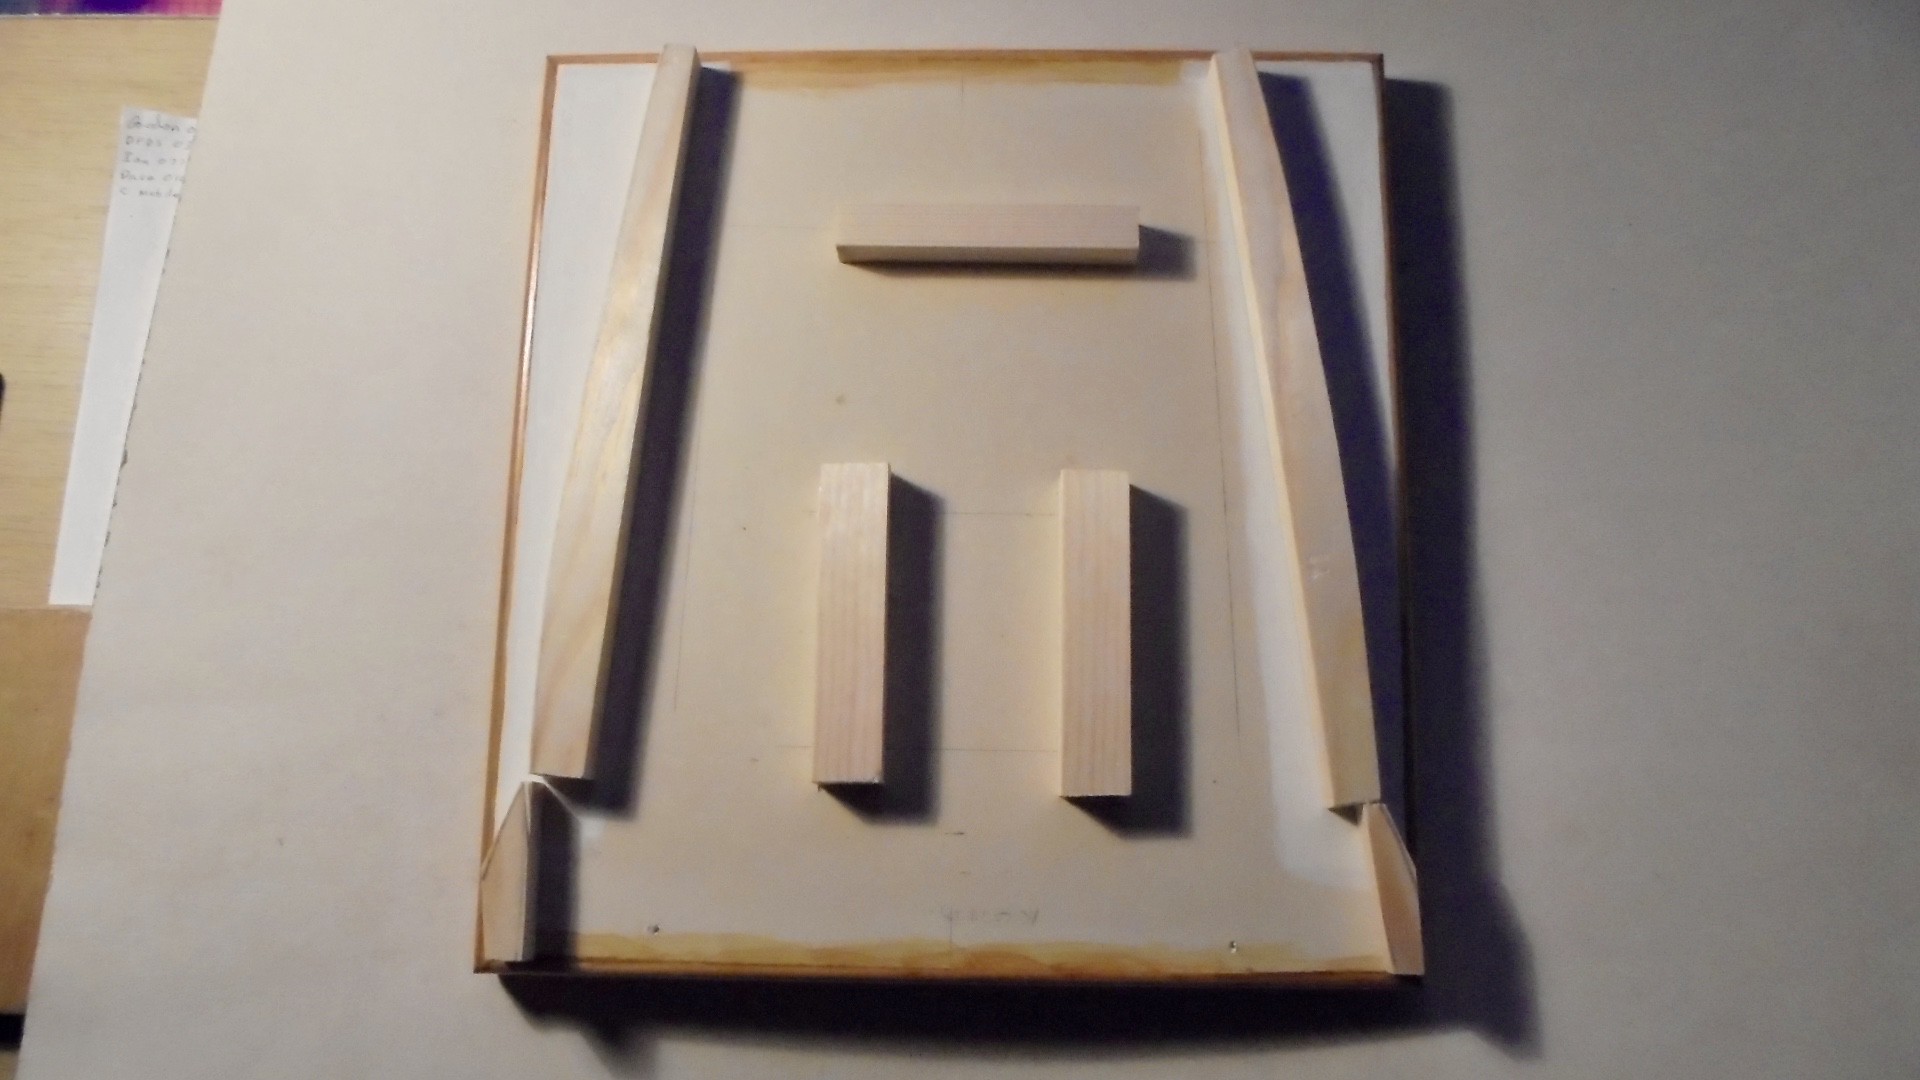
Progress on the S38 Africa/Hibernia project has been delayed again, this time by my error of judgement. When I made the block for the barbette I laminated three pieces of wood, but then thought that it would be too deep so I removed one of them. After I had installed the wood strip for the decking I realised that I should have left the three wood laminates, so I had to add the third after the decking had been laid. I also had to remove the vents on the foredeck and replace them with larger ones when the barbette was finished. This meant cutting and shaping a piece of wood to almost the correct dimensions, gluing it to the top of the existing barbette and finishing it in place. That required some careful filing and sanding, plus a little filler, and then repainting. I also had to protect the wood decking form the dust from the wood grain filler. In all a right fiddle which had I thought more carefully at an earlier stage of construction I could have avoided. When the barbette was complete I added new vents.
A new part of the structure was the forward superstructure and flying bridge, on to which the ramp was fixed. I am only representing the front faces of those structures - I am not building a model of a warship! The bridge was set about three feet (1 meter) ahead of the flying bridge, so I cut out both as a single piece from 60 thou card, and then separated them. I used a small block of wood to join them together with a scale gap between. On the Africa and Hibernia two small guns were mounted on each side of a central observation post: I have deliberately left these out as they had nothing to do with the launch ramp and would only add unnecessary complexity to the model. Instead I added some smaller details to the front face of the forward superstructure and cut out the windows in the section between flying bridge, and cemented the observation platform on the front superstructure:

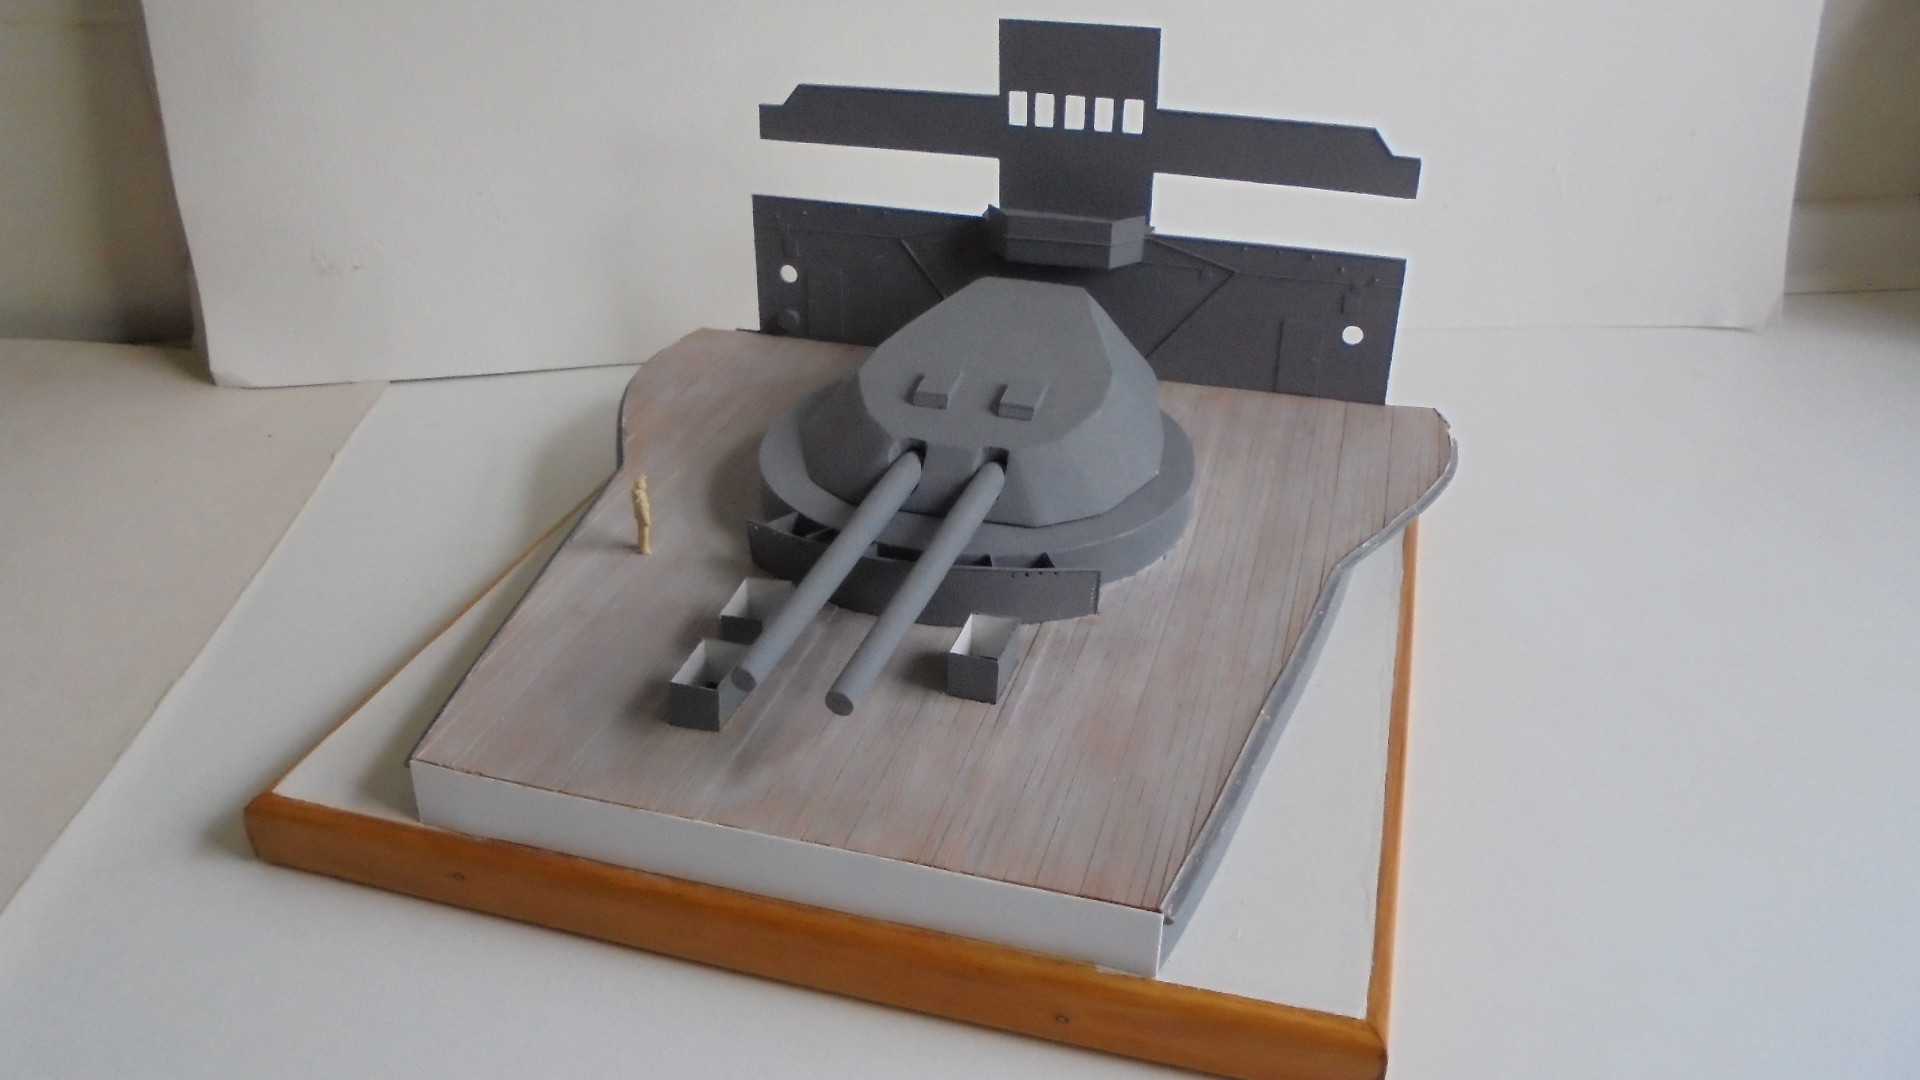
After this had been painted I screwed it to the rear of the base: I did think about using epoxy but decided that a stronger attachment was desirable given the small area of contact. The turret was painted and placed on the barbette. The sailor figure gives an idea of the size of the 12 inch gun turret and foredeck of the ship:

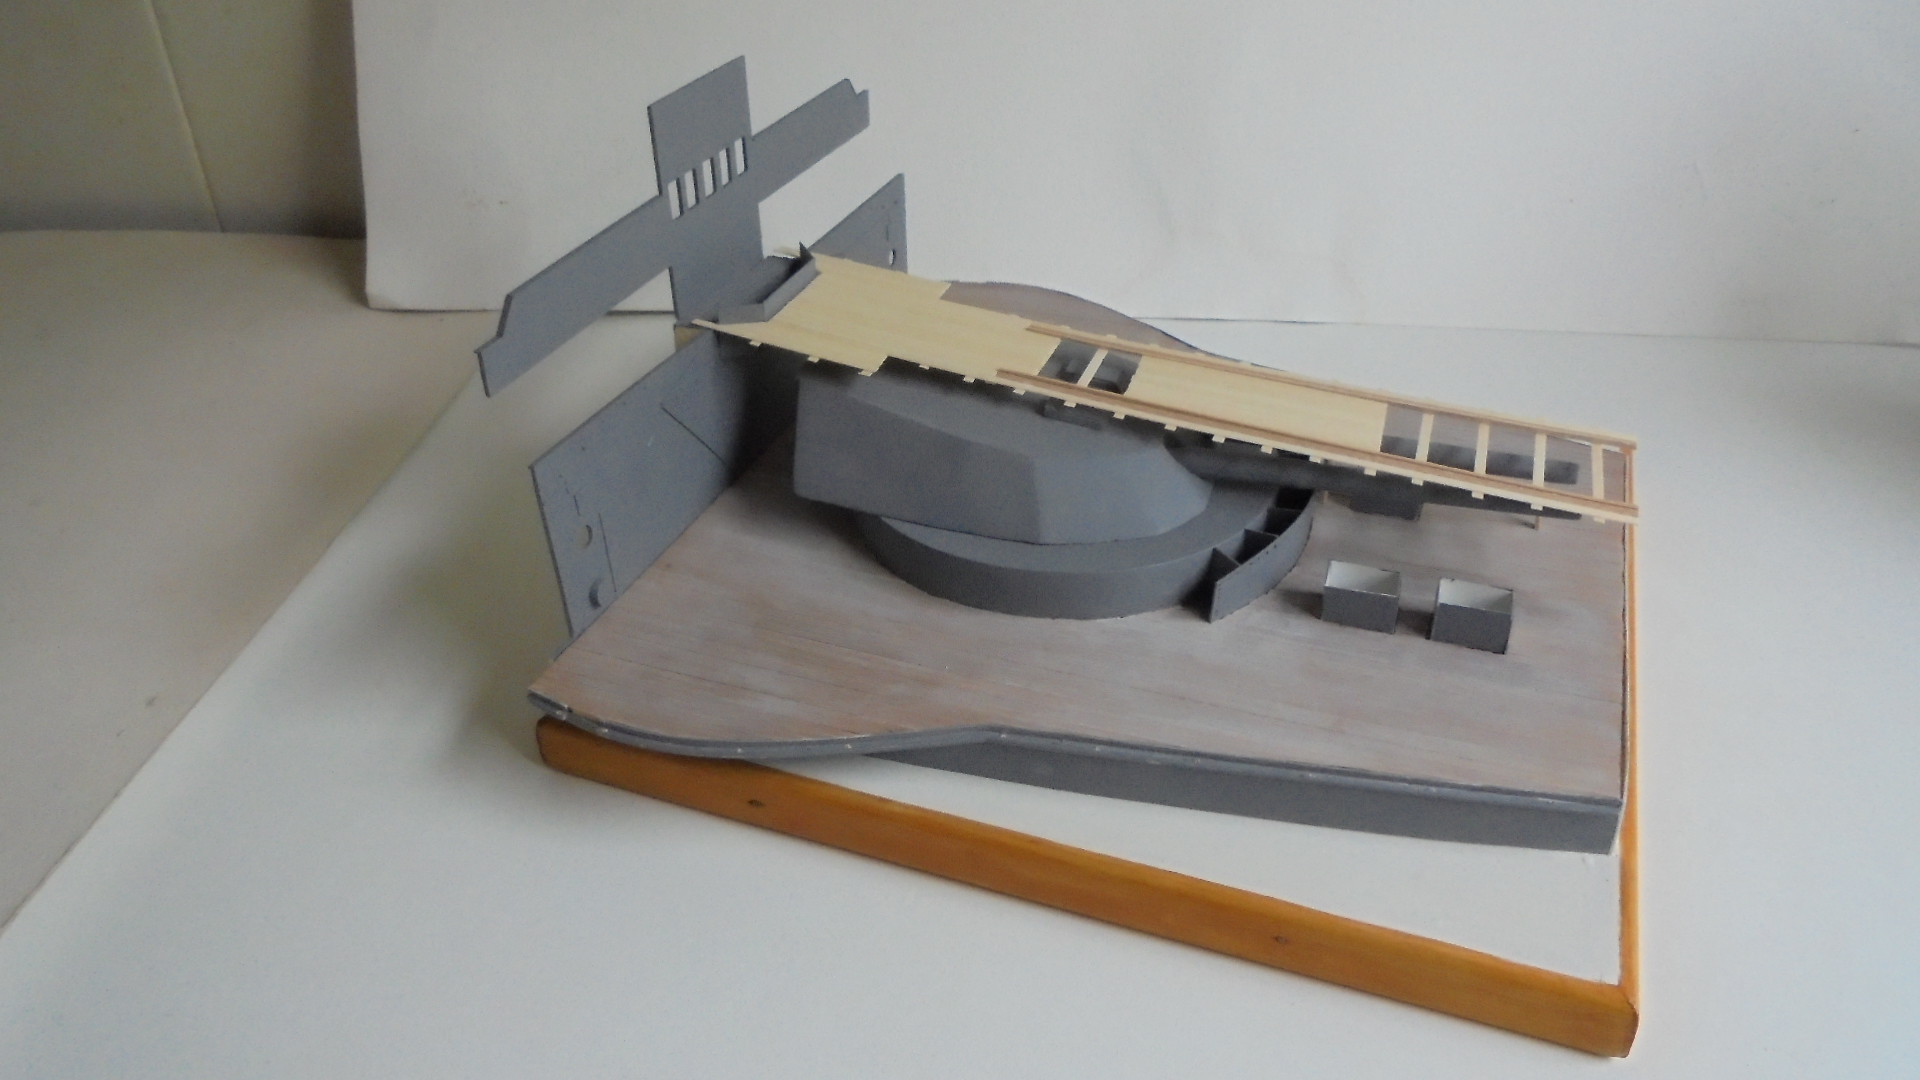
I made a paper template for part of the launch ramp and placed it and the part completed S38 on to the turret just to check alignments and sizes:


I made up the ramp from basswood (lime) strip with a strip of beech for part of the runway. The difference in colour of the wood can be clearly seen on one of the contemporary photographs taken on the runway. The gaps and solid platform sections are based on photographic evidence but I cannot be certain that the dimensions are 100% accurate, but at least it looks proportional when I tried it for fit on the model:

I have still to give the wood platform a wash with light grey to tone doen the lime wood. The next step will be to make the supports for the ramp and attach them to the top of the turret and foredeck. The canvass screens which were draped to protect the superstructure of the ship and which covered the observation platform will be made from paper and glued in place when ready. I will post more when I have completed that part of the model.
Thanks for looking.
Stevef.
Progress on the S38 Africa/Hibernia project has been delayed again, this time by my error of judgement. When I made the block for the barbette I laminated three pieces of wood, but then thought that it would be too deep so I removed one of them. After I had installed the wood strip for the decking I realised that I should have left the three wood laminates, so I had to add the third after the decking had been laid. I also had to remove the vents on the foredeck and replace them with larger ones when the barbette was finished. This meant cutting and shaping a piece of wood to almost the correct dimensions, gluing it to the top of the existing barbette and finishing it in place. That required some careful filing and sanding, plus a little filler, and then repainting. I also had to protect the wood decking form the dust from the wood grain filler. In all a right fiddle which had I thought more carefully at an earlier stage of construction I could have avoided. When the barbette was complete I added new vents.
A new part of the structure was the forward superstructure and flying bridge, on to which the ramp was fixed. I am only representing the front faces of those structures - I am not building a model of a warship! The bridge was set about three feet (1 meter) ahead of the flying bridge, so I cut out both as a single piece from 60 thou card, and then separated them. I used a small block of wood to join them together with a scale gap between. On the Africa and Hibernia two small guns were mounted on each side of a central observation post: I have deliberately left these out as they had nothing to do with the launch ramp and would only add unnecessary complexity to the model. Instead I added some smaller details to the front face of the forward superstructure and cut out the windows in the section between flying bridge, and cemented the observation platform on the front superstructure:
After this had been painted I screwed it to the rear of the base: I did think about using epoxy but decided that a stronger attachment was desirable given the small area of contact. The turret was painted and placed on the barbette. The sailor figure gives an idea of the size of the 12 inch gun turret and foredeck of the ship:
I made a paper template for part of the launch ramp and placed it and the part completed S38 on to the turret just to check alignments and sizes:
I made up the ramp from basswood (lime) strip with a strip of beech for part of the runway. The difference in colour of the wood can be clearly seen on one of the contemporary photographs taken on the runway. The gaps and solid platform sections are based on photographic evidence but I cannot be certain that the dimensions are 100% accurate, but at least it looks proportional when I tried it for fit on the model:
I have still to give the wood platform a wash with light grey to tone doen the lime wood. The next step will be to make the supports for the ramp and attach them to the top of the turret and foredeck. The canvass screens which were draped to protect the superstructure of the ship and which covered the observation platform will be made from paper and glued in place when ready. I will post more when I have completed that part of the model.
Thanks for looking.
Stevef.
Please Log in to join the conversation.
2 years 1 month ago #449
by Stevef
Replied by Stevef on topic 1/72 Short S 38 on HMS Africa and HMS Hibernia 1912
Evening All,
I have been back at the Short S38/Hibernia project this week as I do want to get this one moving again. For a number of reasons it seems to have slowed to a crawl recently, so I have focussed some time and attention and have almost completed the ship part of the project, although there are still details to add before it will be ready to take the model aeroplane.
The first item was to weather the ramp: photographs show that it was not badly weathered at all as the wood had probably been bought and used for the ramp from new. I used a grey wash but dd not apply too many coats - just enough to take the brightness out of the lime strip.
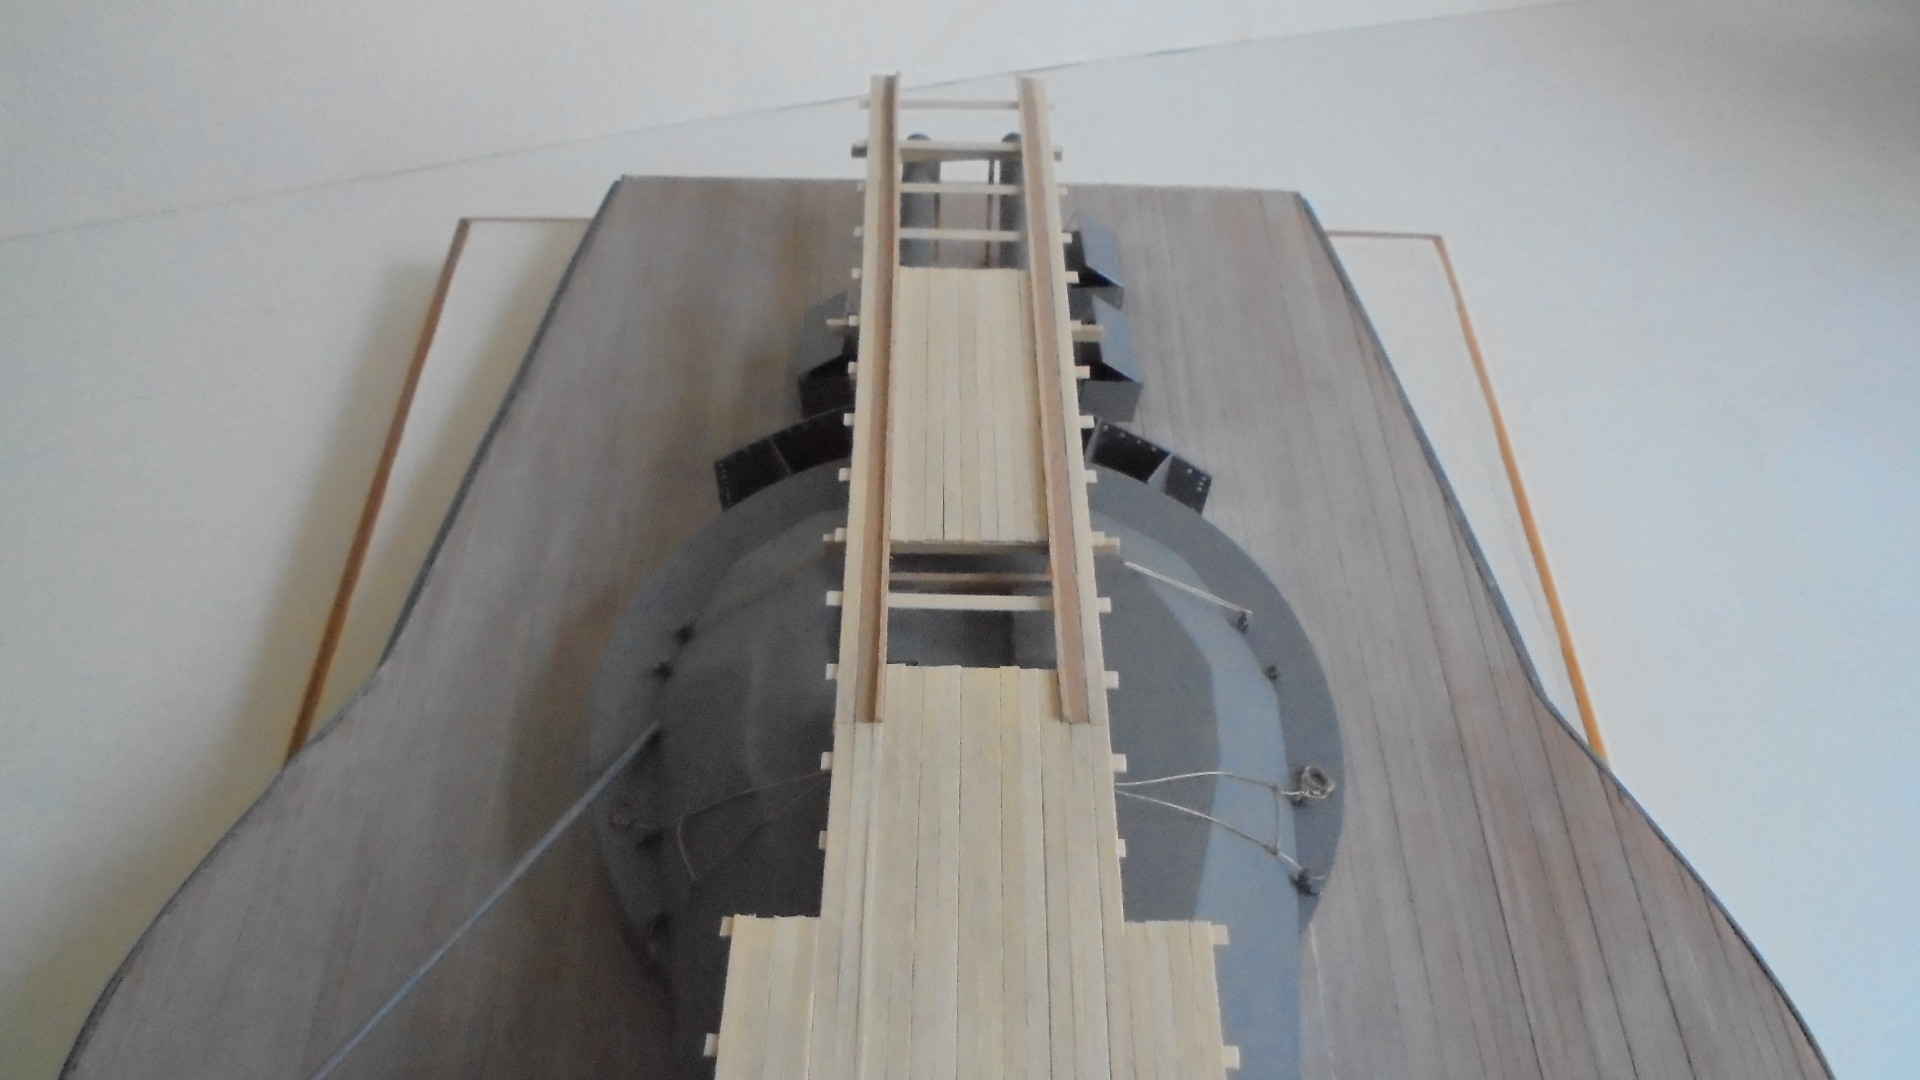
I also gave a couple of coats to the other stripwood that I used to make up the supports. There are three cross supports on the top of the turret but they can hardly be seen when in place. These were made from beech with some very thin strips for the cross pieces around the gun barrels from lime. I also added eyes from thin copper wire under the cross beams of the ramp above the turret: later they had thread passed through them to represent the rope bracing which is clearly visible in photographs.
The turret was glued to the barbette using wood glue and when that had set put the ramp supports over the turret on to the underside of the ramp. I also glued the two outer (thicker) front supports on either side of the guns and the attached the ramp structure to the turret and deck. When this was dry I could add the remaining upright supports and cross members around the gun barrels.
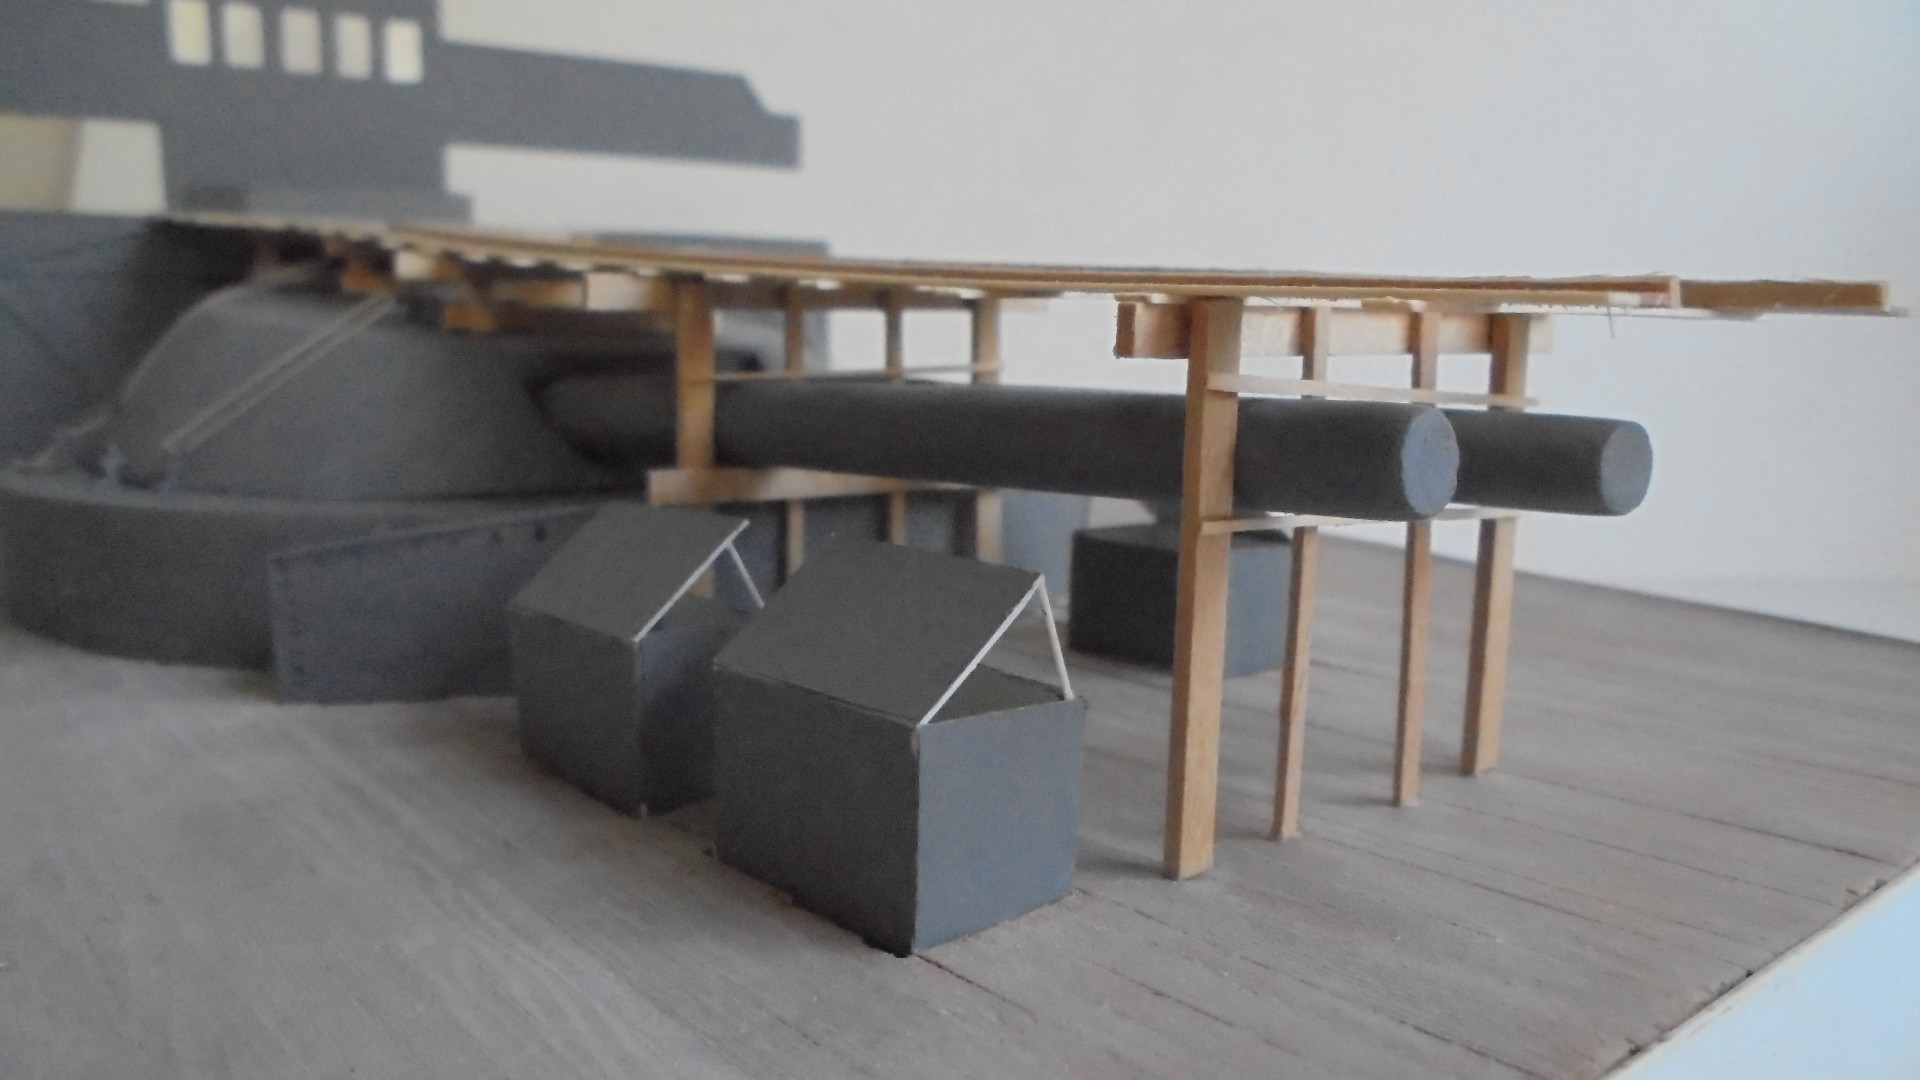
Brackets were made from plastic card and rod and attached to the top of the barbette with CA. I made ropes using cotton thread and copied the pattern from the photographs: when pulling the threads tight on two of the threads the copper wire eyes pulled out of the wood of the ramp. After much bad language and gnashing of teeth I managed to retrieve the situation - just.
On the port (left) side of the turret a large brace was fixed from the top of the bridge to the base of the turret above the barbette. I used 80 thou rod for this - on the ship I think that it was a boom used to hold the anti-torpedo nets, but the photographs are not completely clear so that is only a guess.

I added the tops to the vent shafts for the crew quarters - these are in the open position.
On the sides of the hull there were two sets of steel brackets which the crew used to gain access to the torpedo net booms: I added some of these from 30 thou rod to the hull sides. I have made two gangways from wood: these will be added when I put on the post and rails around the edges of the deck. I have not photographed them yet because they have not been washed and weathered.
Sadly I have been quite unable to find any suitable navy figures to put on the deck and ramp: does anyone know of a possible suitable source of figures which I could adapt and modify? They must be 1/72 or 1/76 scale and not metal if possible. Any guidance would be gratefully received.
Thanks for looking.
Stevef.
I have been back at the Short S38/Hibernia project this week as I do want to get this one moving again. For a number of reasons it seems to have slowed to a crawl recently, so I have focussed some time and attention and have almost completed the ship part of the project, although there are still details to add before it will be ready to take the model aeroplane.
The first item was to weather the ramp: photographs show that it was not badly weathered at all as the wood had probably been bought and used for the ramp from new. I used a grey wash but dd not apply too many coats - just enough to take the brightness out of the lime strip.
I also gave a couple of coats to the other stripwood that I used to make up the supports. There are three cross supports on the top of the turret but they can hardly be seen when in place. These were made from beech with some very thin strips for the cross pieces around the gun barrels from lime. I also added eyes from thin copper wire under the cross beams of the ramp above the turret: later they had thread passed through them to represent the rope bracing which is clearly visible in photographs.
The turret was glued to the barbette using wood glue and when that had set put the ramp supports over the turret on to the underside of the ramp. I also glued the two outer (thicker) front supports on either side of the guns and the attached the ramp structure to the turret and deck. When this was dry I could add the remaining upright supports and cross members around the gun barrels.
Brackets were made from plastic card and rod and attached to the top of the barbette with CA. I made ropes using cotton thread and copied the pattern from the photographs: when pulling the threads tight on two of the threads the copper wire eyes pulled out of the wood of the ramp. After much bad language and gnashing of teeth I managed to retrieve the situation - just.
On the port (left) side of the turret a large brace was fixed from the top of the bridge to the base of the turret above the barbette. I used 80 thou rod for this - on the ship I think that it was a boom used to hold the anti-torpedo nets, but the photographs are not completely clear so that is only a guess.
I added the tops to the vent shafts for the crew quarters - these are in the open position.
On the sides of the hull there were two sets of steel brackets which the crew used to gain access to the torpedo net booms: I added some of these from 30 thou rod to the hull sides. I have made two gangways from wood: these will be added when I put on the post and rails around the edges of the deck. I have not photographed them yet because they have not been washed and weathered.
Sadly I have been quite unable to find any suitable navy figures to put on the deck and ramp: does anyone know of a possible suitable source of figures which I could adapt and modify? They must be 1/72 or 1/76 scale and not metal if possible. Any guidance would be gratefully received.
Thanks for looking.
Stevef.
Please Log in to join the conversation.
2 years 1 month ago #452
by Stevef
Replied by Stevef on topic 1/72 Short S 38 on HMS Africa and HMS Hibernia 1912
Evening All
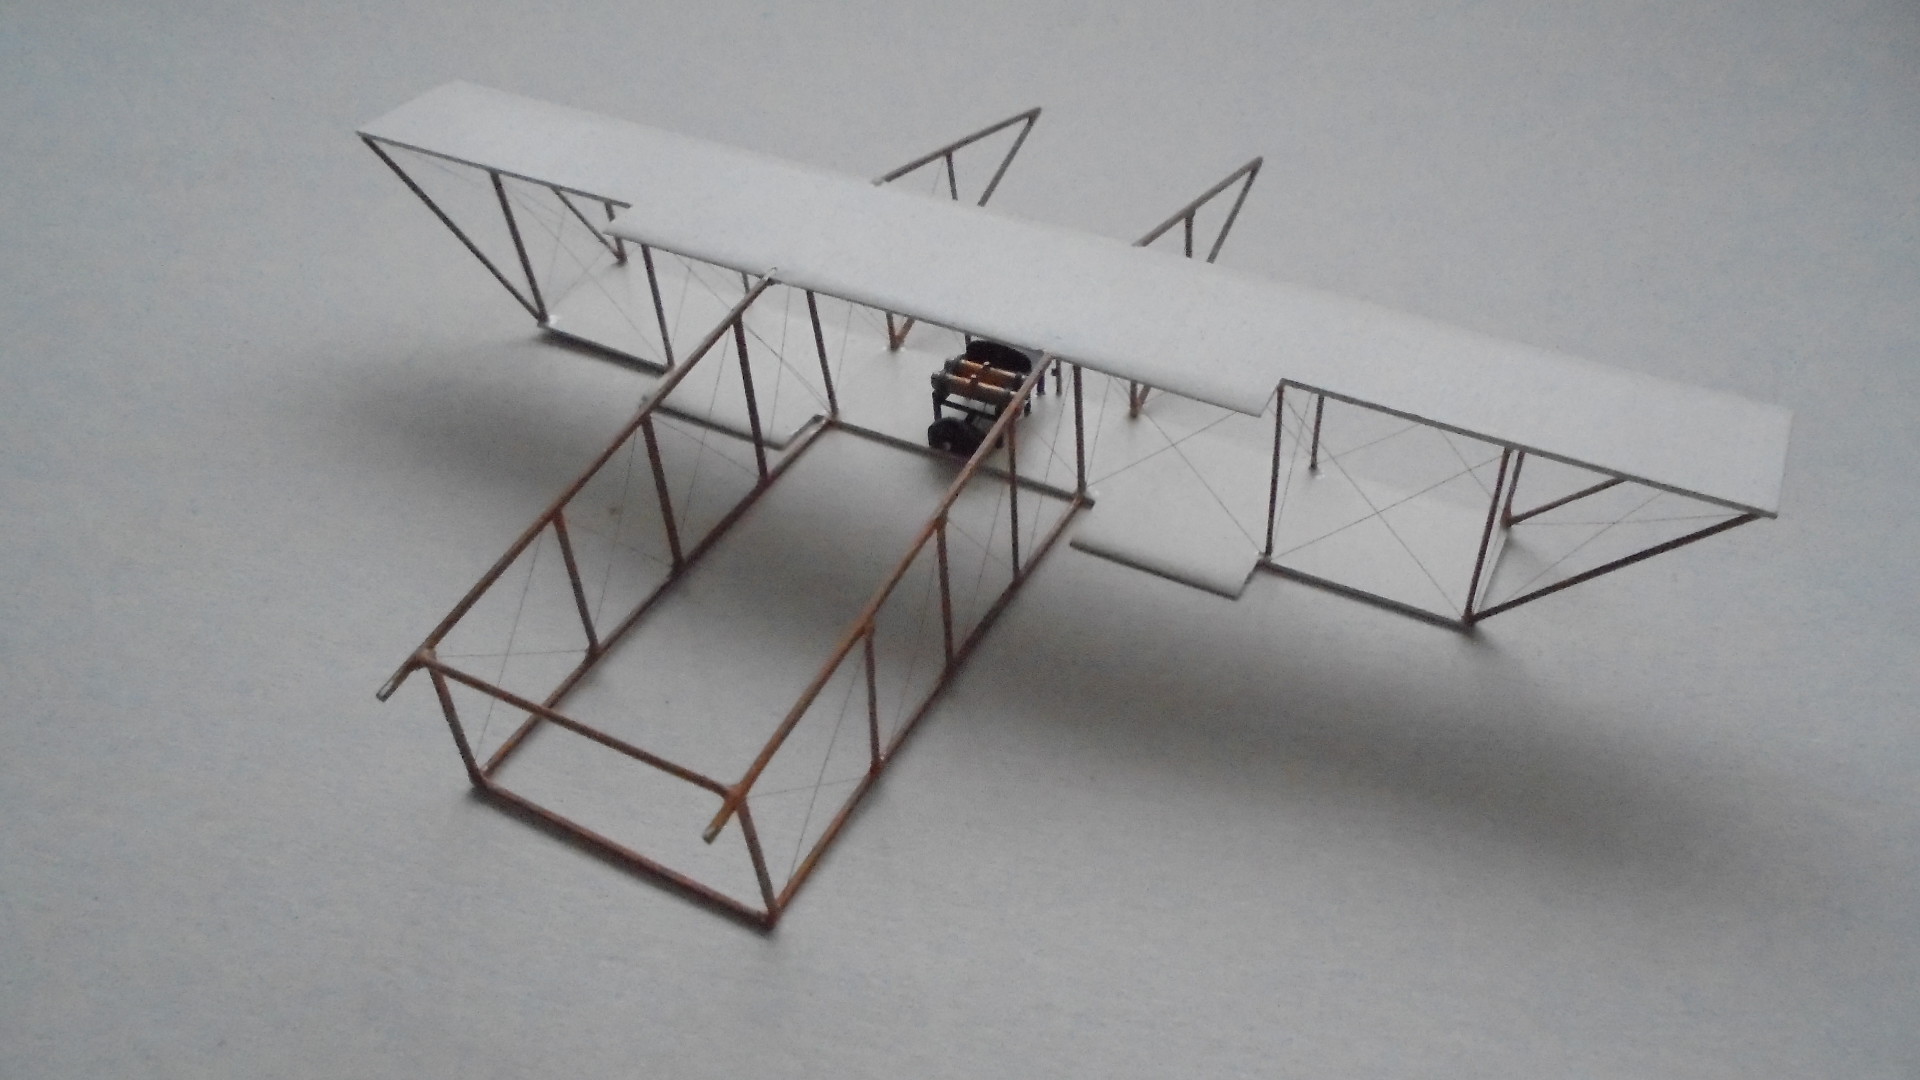
I have completed the S38 part of the Africa/Hibernia project: the S 38 will be set on the launch ramp over the turret when that part of the project is finished. Here is how the last parts of the aircraft were put together and then the remaining rigging finished. I started by fitting the front elevator to the front booms and added the control horns to the sides:

I fixed the pilot's seat and the small platform which extended in front of the pilot, plus the rudder bar and control stick, to the leading edge of the lower wing. The undercarriage was next. This consisted of two horizontal skids held by two legs on each side of the centre line, with a single axle and two wheels mounted inside the skids. I expected this to be weak, (which is why I had been putting it off for a long time), as the undercarriage legs are only set in very shallow pits on the underside of the wing. However once the axle and wheels were in place the structure seemed to gain strength so provided that I handle the model carefully, it seems to hold up well. I rigged this part of the model straight away as it was easily accessible at this stage:

The engine and propellor followed: before I could fit the engine I had to add the push rods. Those supplied in the kit were just too thin for me to handle, and in addition some of the locating holes in the crank case had become filled with paint, so I made some alternatives from stretched sprue instead. I did not bother with the spark plugs: they are so small that they are impossible for me to handle and nobody would ever see them anyway. With the engine in place the wood propellor was added to finish that part of the model. Rigging of the lower boom arms followed so that I could fit the rear float. That sat on two arms suspended between the tail skids. The arms were made from 20 thou styrene rod and the skids from thin strip. I also fitted the horizontal tail surfaces and ailerons which completed almost all of the sub-assemblies except the floats and rudders:


I superglued two pieces of stripwood to the main undercarraige struts - they form the attachment points for the forward floats when they were fitted later. Final rigging now took place - I used rolled 40 SWG copper wire held with superglue to finish the booms and add the control wires to the elevator and rudders. Before I could fit the rudders to the rudder post the bracing had to be attached first - 6 wires per side on two rudders:

With the rudders attached and rigging complete it only needed the fixing of the undercarriage floats to complete the aircraft.
I will show more photographs of the completed S38 when I have finished the whole project and can put the aeroplane permanently on to the platform. However that will not be for a few days so in the meantime here is a teaser shot of the S38:

Thanks for looking.
Stevf.
I have completed the S38 part of the Africa/Hibernia project: the S 38 will be set on the launch ramp over the turret when that part of the project is finished. Here is how the last parts of the aircraft were put together and then the remaining rigging finished. I started by fitting the front elevator to the front booms and added the control horns to the sides:
I fixed the pilot's seat and the small platform which extended in front of the pilot, plus the rudder bar and control stick, to the leading edge of the lower wing. The undercarriage was next. This consisted of two horizontal skids held by two legs on each side of the centre line, with a single axle and two wheels mounted inside the skids. I expected this to be weak, (which is why I had been putting it off for a long time), as the undercarriage legs are only set in very shallow pits on the underside of the wing. However once the axle and wheels were in place the structure seemed to gain strength so provided that I handle the model carefully, it seems to hold up well. I rigged this part of the model straight away as it was easily accessible at this stage:
The engine and propellor followed: before I could fit the engine I had to add the push rods. Those supplied in the kit were just too thin for me to handle, and in addition some of the locating holes in the crank case had become filled with paint, so I made some alternatives from stretched sprue instead. I did not bother with the spark plugs: they are so small that they are impossible for me to handle and nobody would ever see them anyway. With the engine in place the wood propellor was added to finish that part of the model. Rigging of the lower boom arms followed so that I could fit the rear float. That sat on two arms suspended between the tail skids. The arms were made from 20 thou styrene rod and the skids from thin strip. I also fitted the horizontal tail surfaces and ailerons which completed almost all of the sub-assemblies except the floats and rudders:
I superglued two pieces of stripwood to the main undercarraige struts - they form the attachment points for the forward floats when they were fitted later. Final rigging now took place - I used rolled 40 SWG copper wire held with superglue to finish the booms and add the control wires to the elevator and rudders. Before I could fit the rudders to the rudder post the bracing had to be attached first - 6 wires per side on two rudders:
With the rudders attached and rigging complete it only needed the fixing of the undercarriage floats to complete the aircraft.
I will show more photographs of the completed S38 when I have finished the whole project and can put the aeroplane permanently on to the platform. However that will not be for a few days so in the meantime here is a teaser shot of the S38:
Thanks for looking.
Stevf.
Please Log in to join the conversation.
Time to create page: 0.247 seconds
- You are here:
-
Home

-
Forum
-
Work in progress
-
Airfield
- 1/72 Short S 38 on HMS Africa and HMS Hibernia 1912