1/32 Scratch Build Royal Aircraft Factory BE 2a

3 years 8 months ago #410
by Stevef
Replied by Stevef on topic 1/32 Scratch Build Royal Aircraft Factory BE 2a
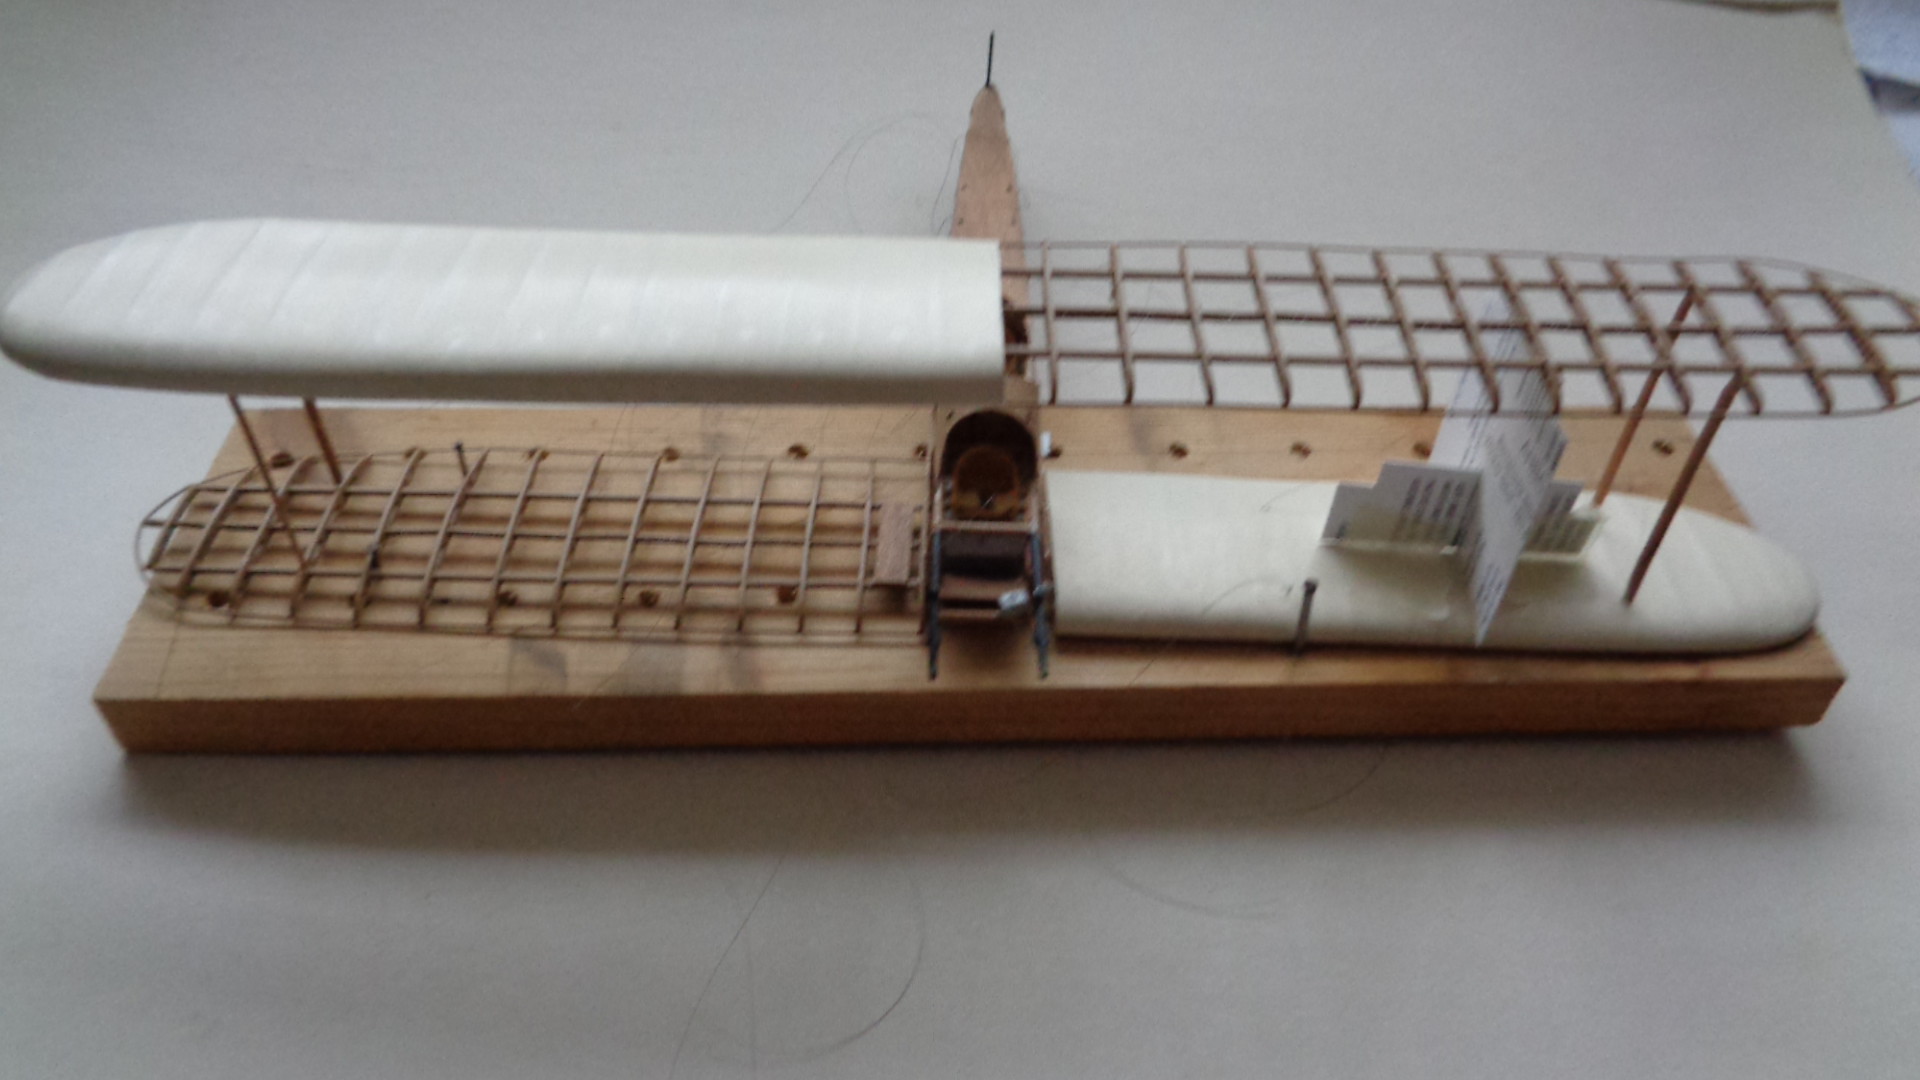
I have decided to make the wooden parts of the fuselage from wood for two reasons: first I am a hopeless artist and painting plastic to look like wood is not at all easy for me. Secondly the most realistic wood effect is obtained by using real wood. I have already shown the lower fuselage surface in place: I cut a second piece for the upper decking. The cockpit curvature was cut out with a craft knife and finshed with a round file and glasspaper wrapped around a piece of dowel. The fuselage immediately behind the pilot was raised and consisted of a piece of curved wood which was supported by small triangular braces. I cut the vertical face from the same marquetry wood as the fuselage panels, and shaped the top with a craft knife and sanded it smooth. I carefully curved it to fit the shape of the cockpit opening: this was a delicate operation as the wood is so thin it would easily break, so I superglued one end of the curve to the top of the fuselage panel. When this had set I glued a short length to the panel, gently bending the wood as I did so, and held it in place while the glue set. I repeated this operation several times until I had worked my way around the rear of the cockpit opening. Finally I cut the three triangular braces and superglued them into place. The image shows the finished part - the panel is resting on the fuselage frame at the moment as I still have to add the controls and other internal details:


The other part which I have made from wood was the decking between the pilot and observer's cockpits. On the original this was made from plywood which had been steamed and bent to shape, and has a marked forward slope. The curve of the decking was such that I could not bend the marquetry wood unaided, so I resorted to steaming it too. I have never used the steam bending method before, but a quick search on the net provided me with useful tutorial videos and I worked out a method. I made a mould from basswood in the same way as i would have done to make a part from plastic. This had a sufficiently large curve to allow the wood to be bent over it without breaking. A piece of wood which was larger than the final piece was cut and bent over the mould and held in place with a simple clamp and wood buffers:
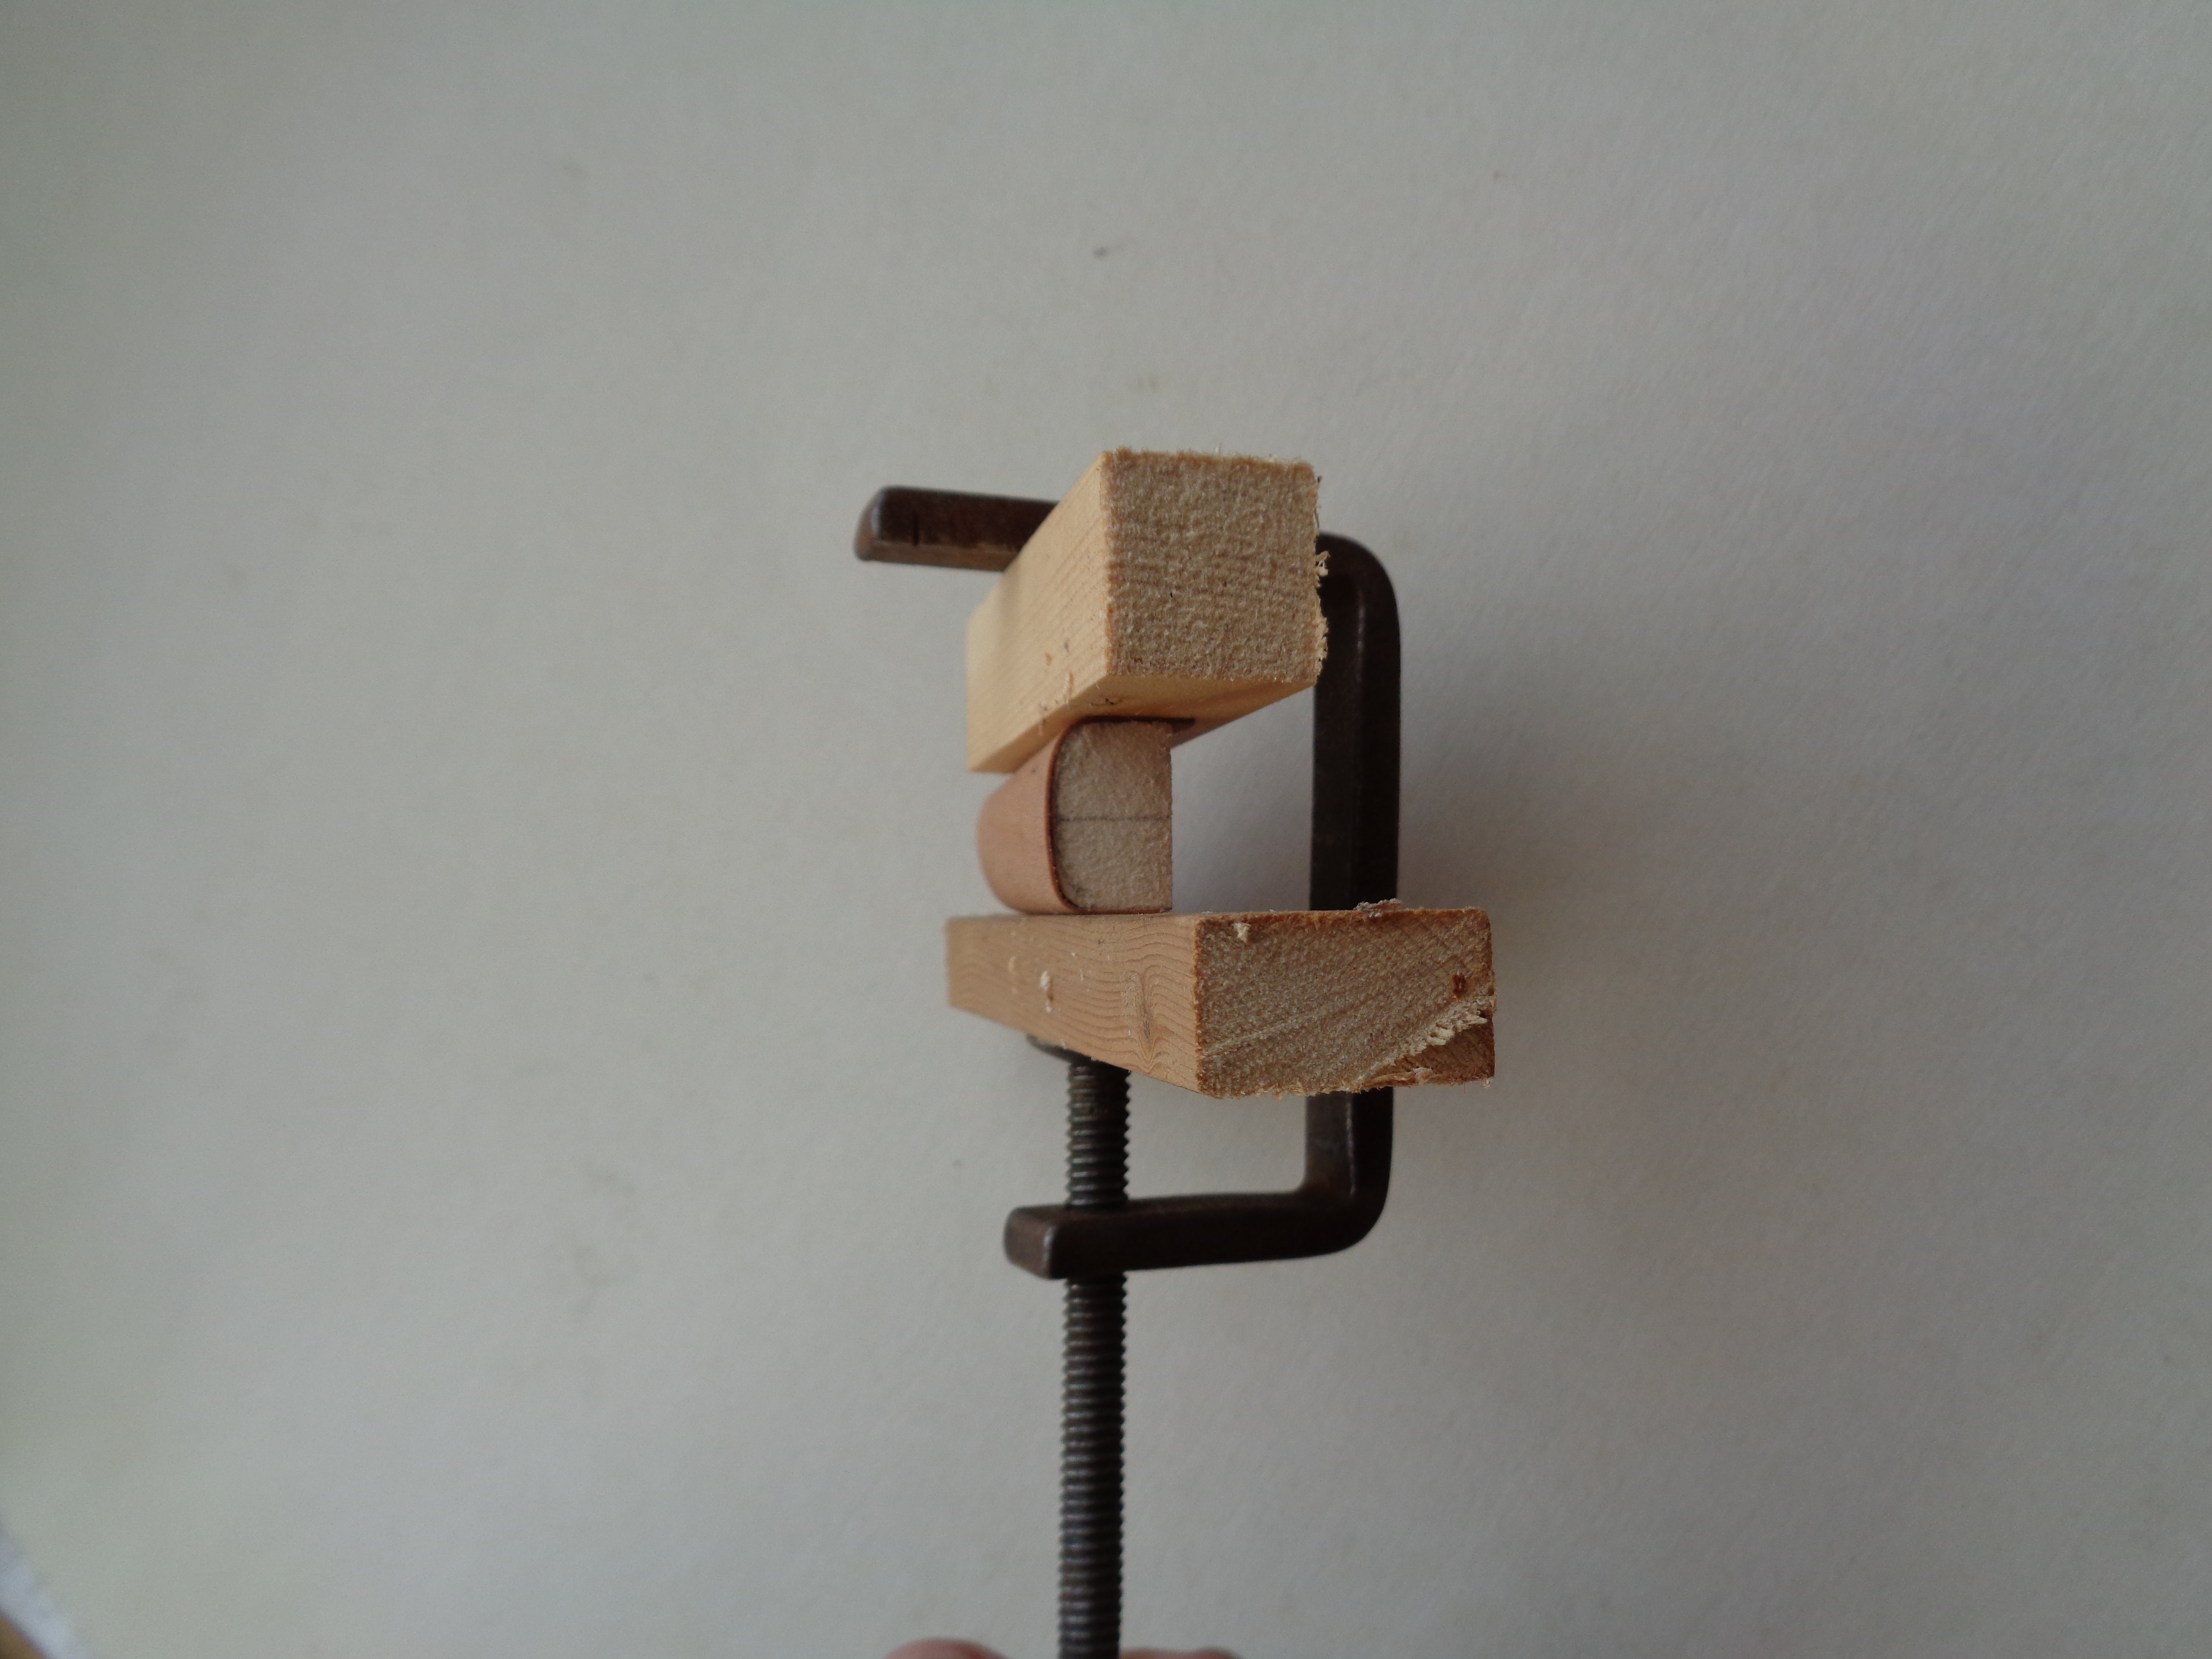 [
[
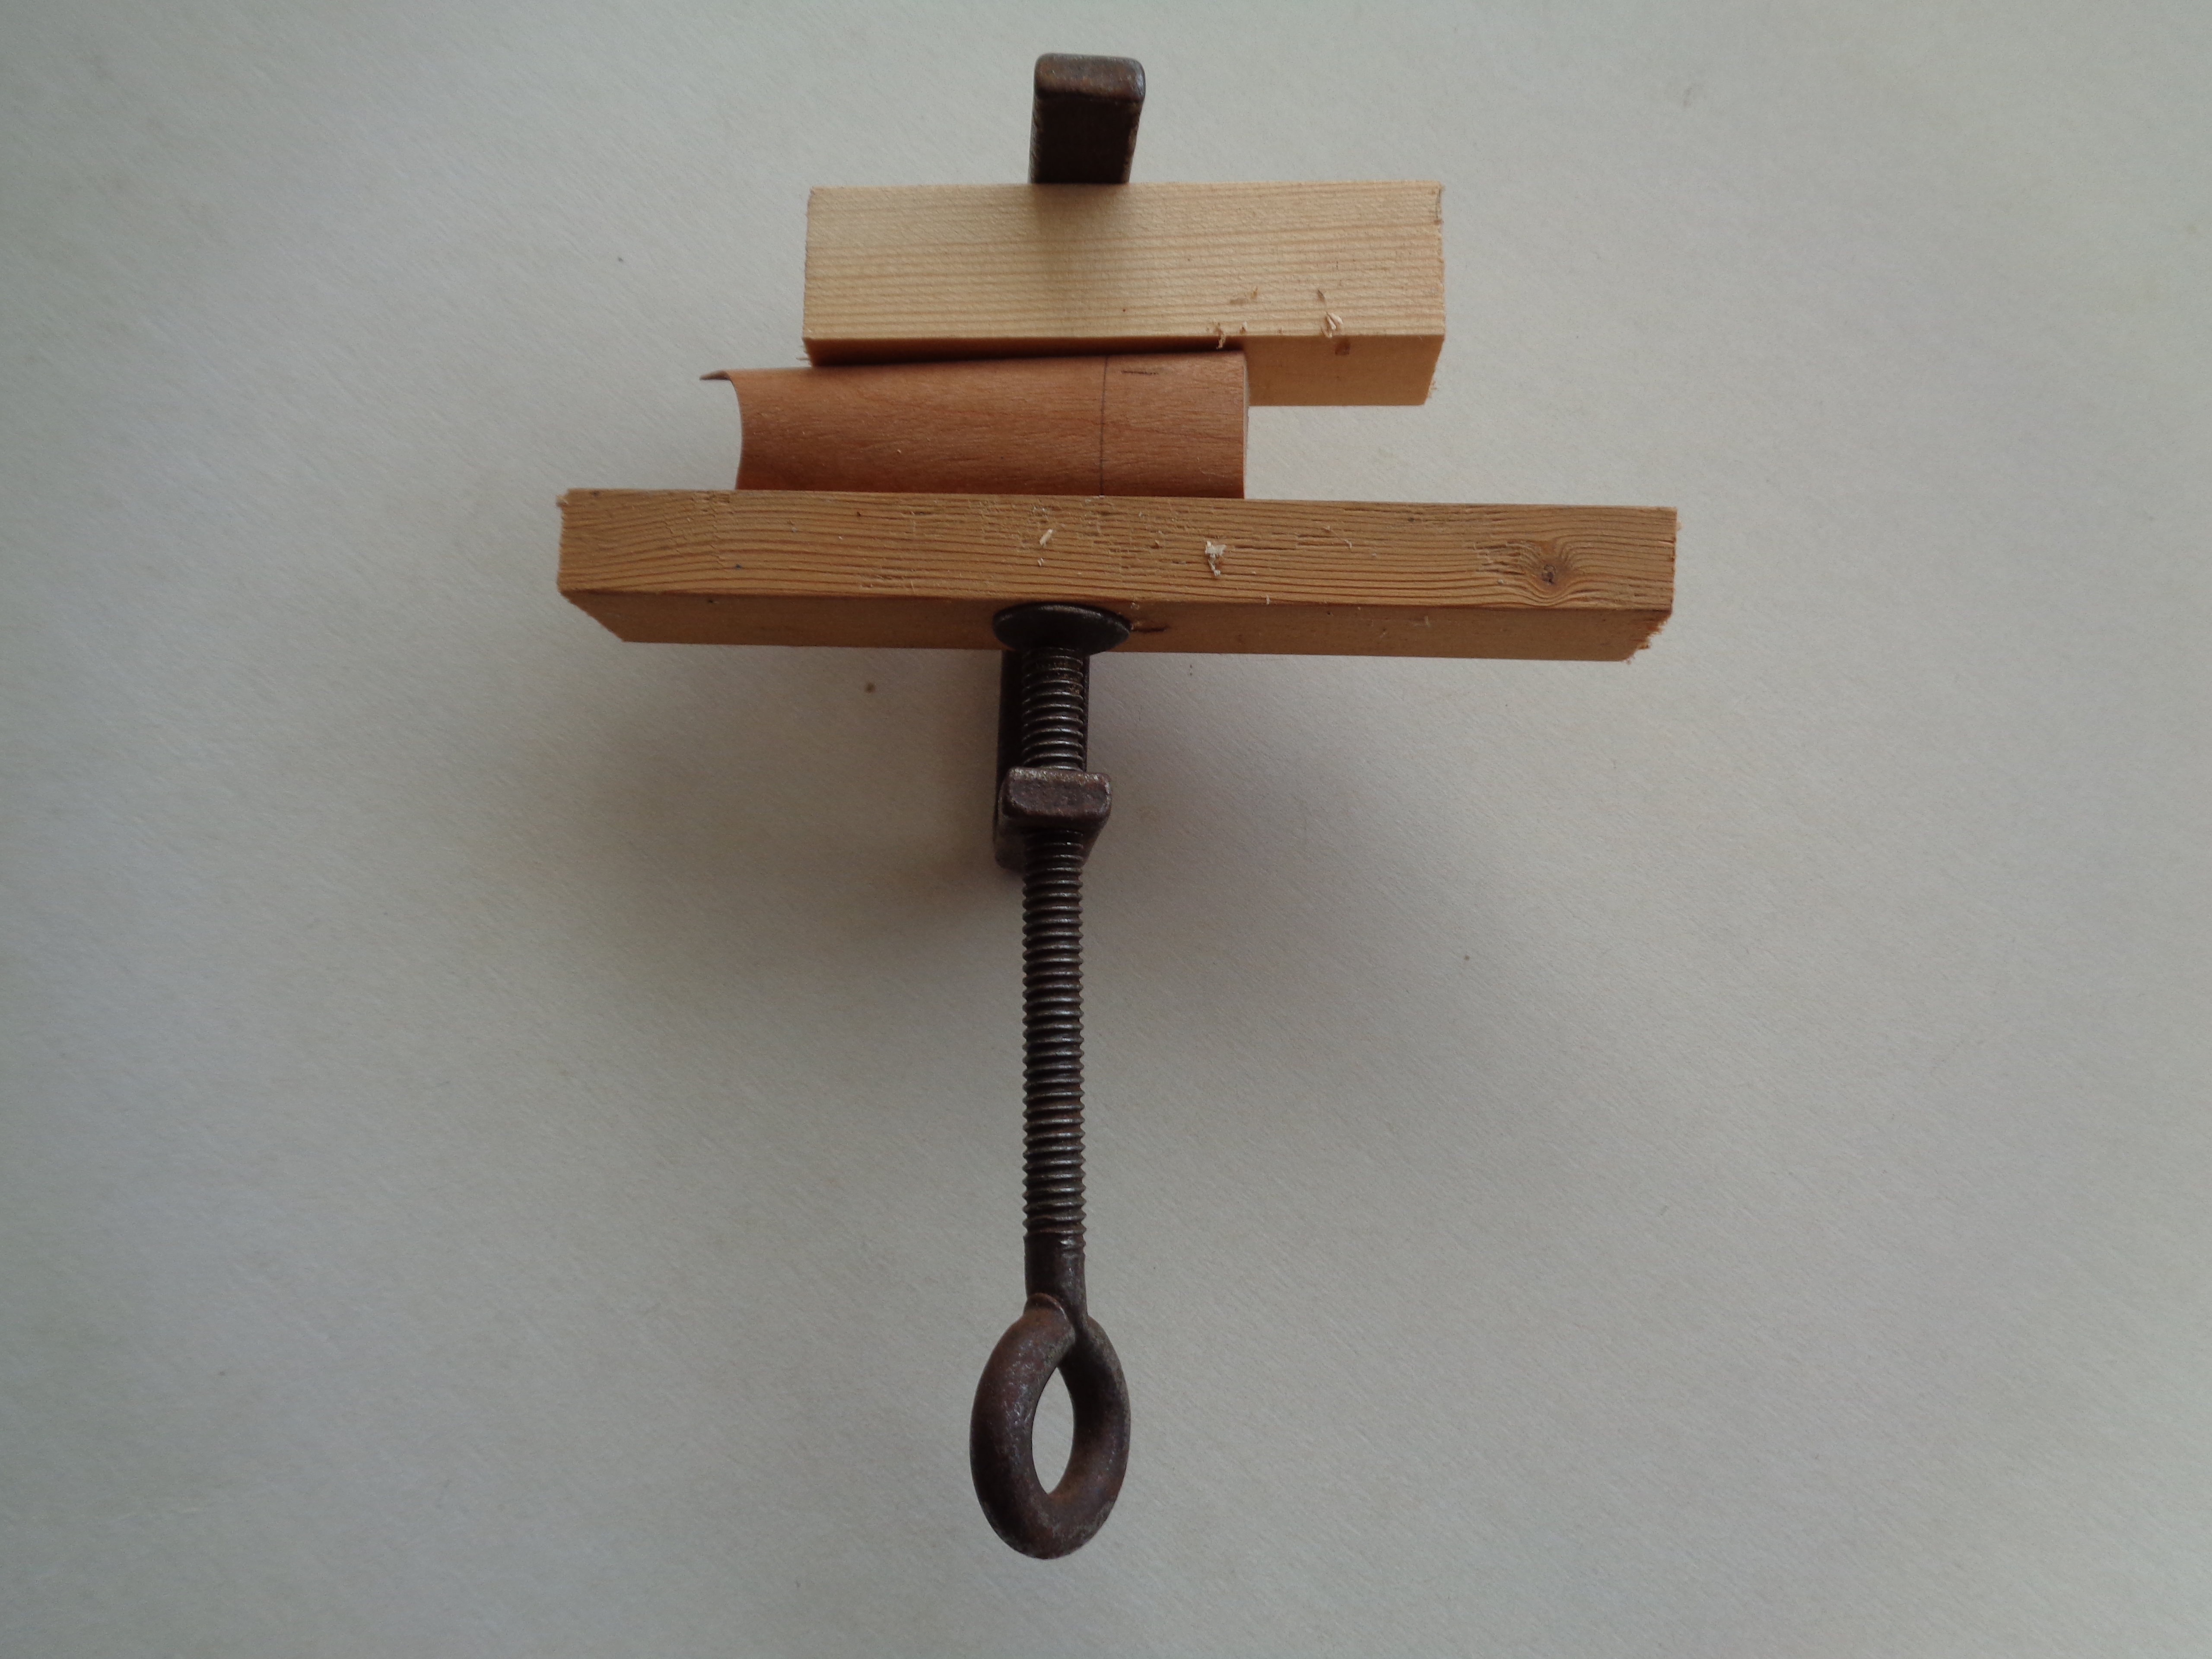
Steaming the wood was achieved by holding the sample over the mouth of a steaming kettle and the kettle kept boiling for about 15 seconds. The sample was allowed to cool and released to produce a nicely shaped piece of wood:

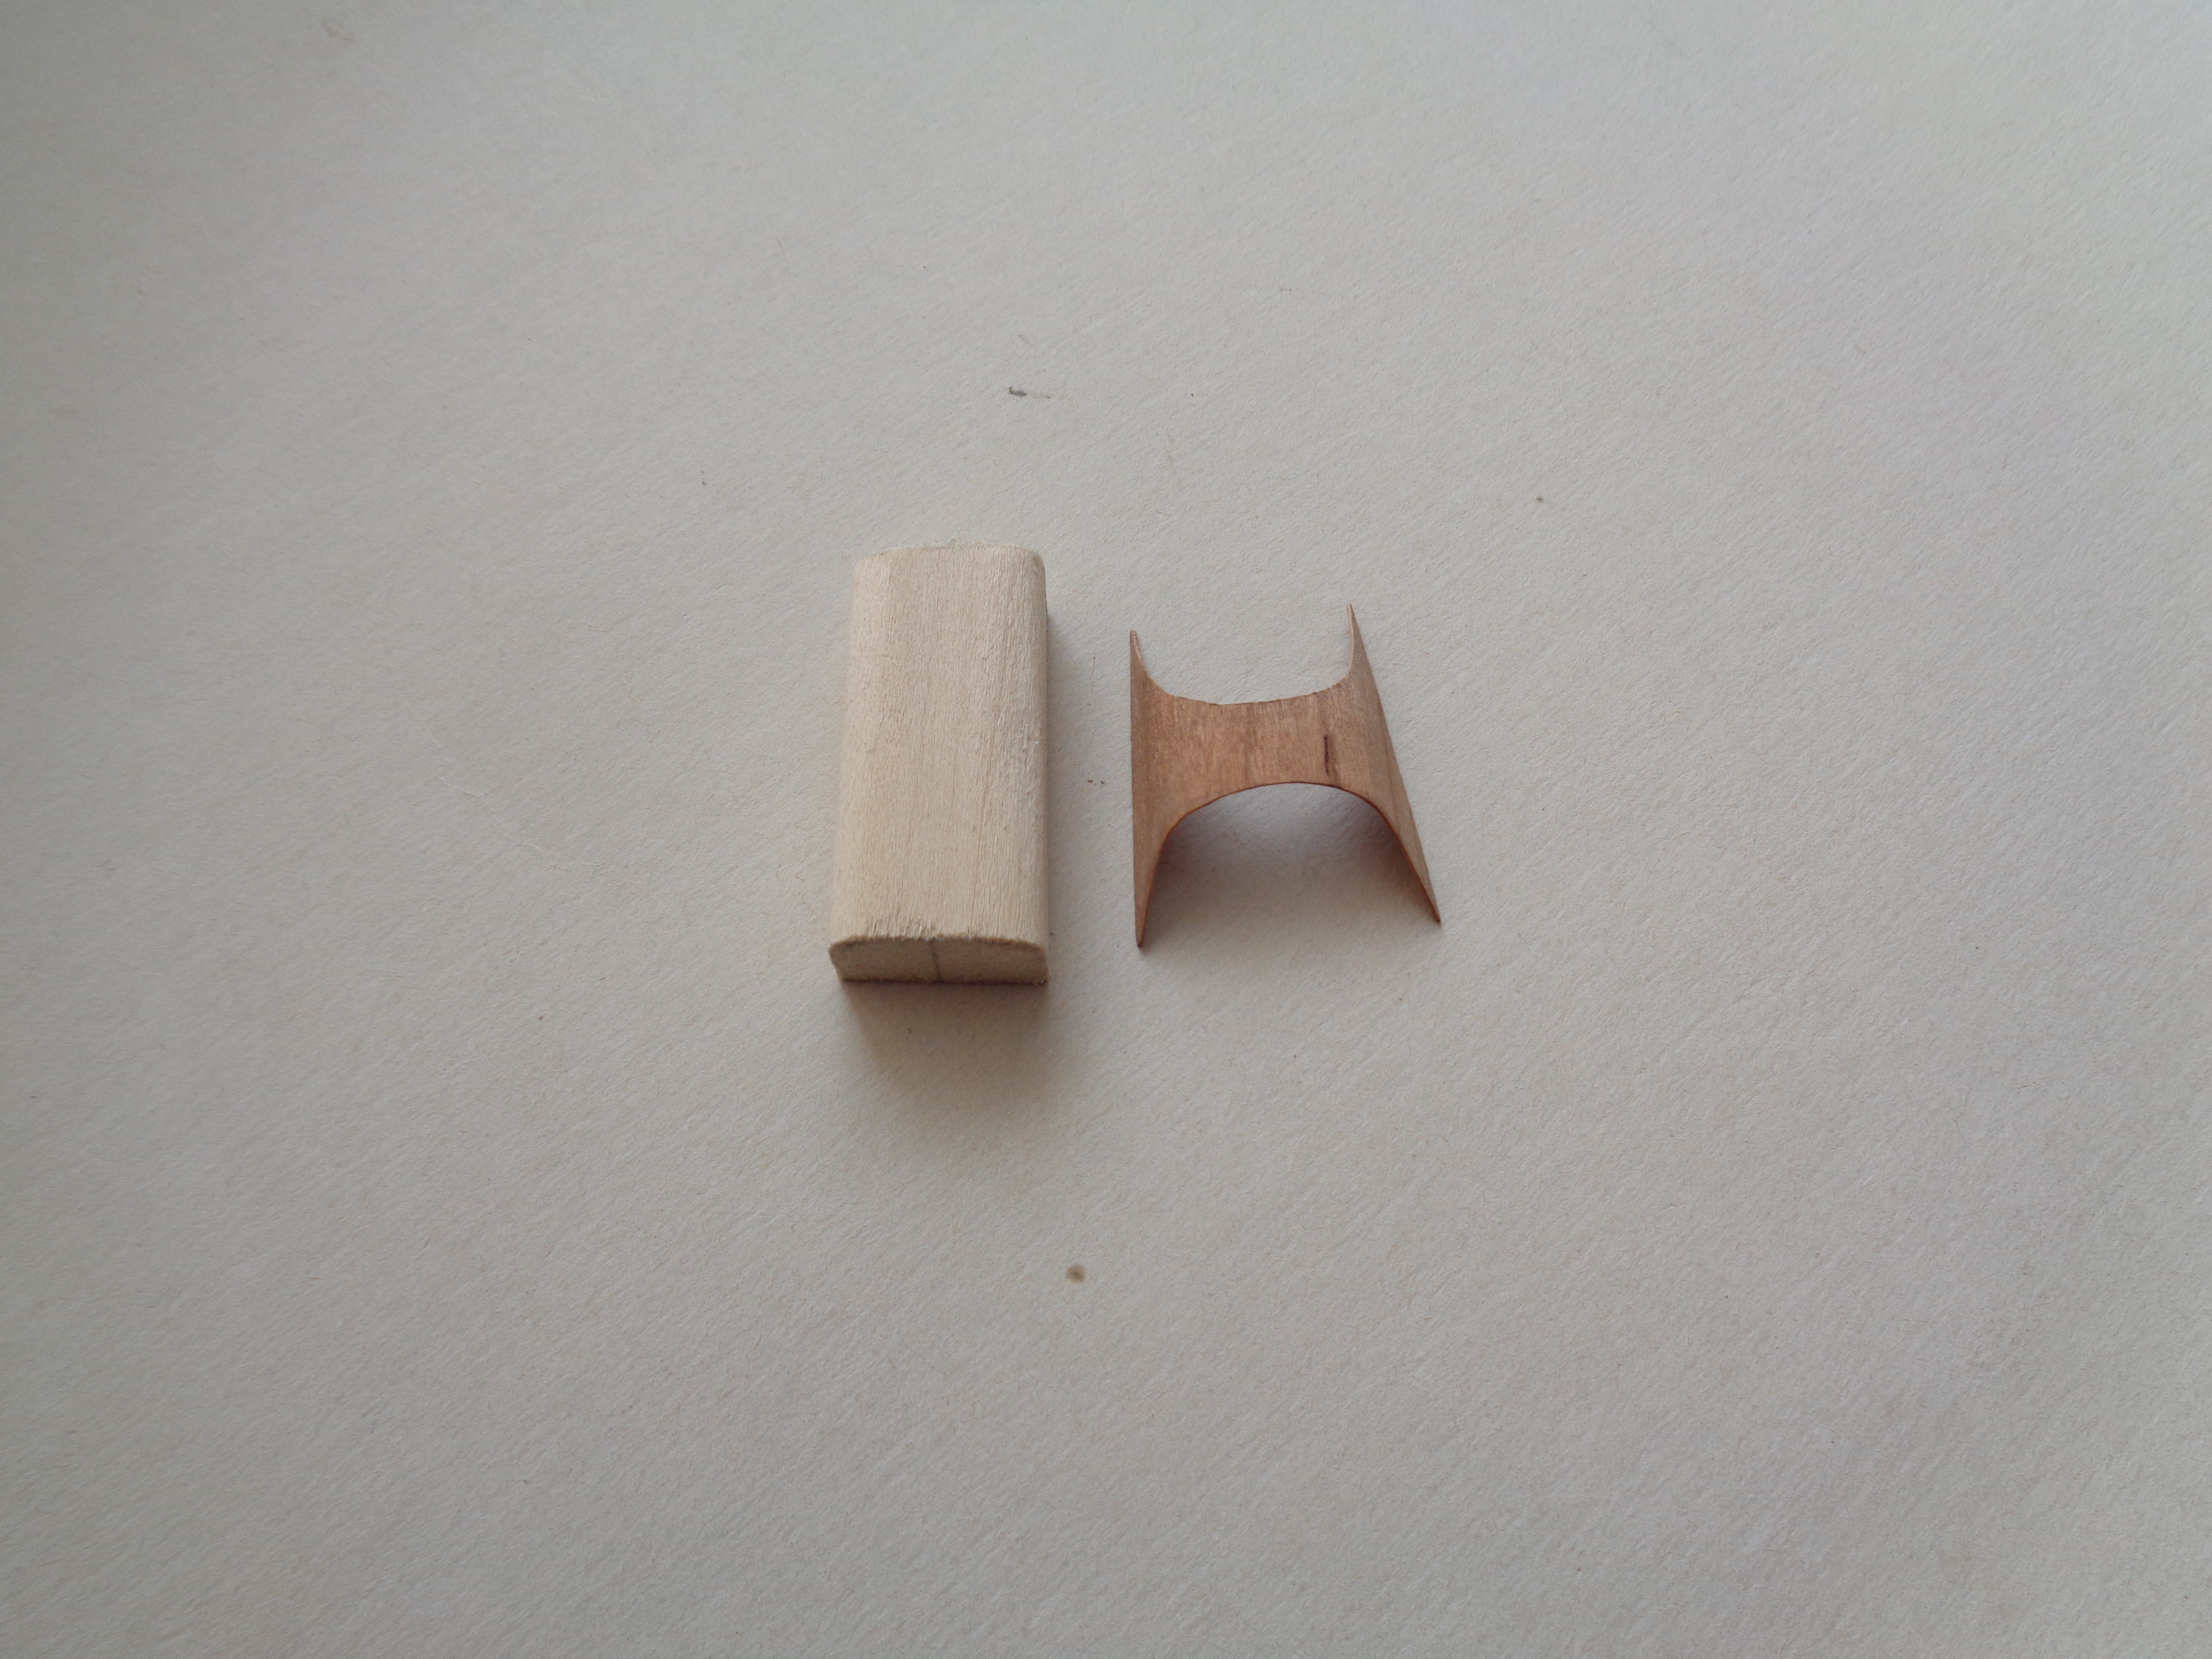
from which I was able to cut the required size and shape for the model:
The instrument board will fit inside the wood panel and help to strengthen it when it is fixed to the fuselage frame.
The next step will be to finish the upper wing including adding the ribs and centre spar. After that I need to have a long think about what to do next as the model is going to become rather delicate to handle.
Thanks for looking.
Stevef.
The other part which I have made from wood was the decking between the pilot and observer's cockpits. On the original this was made from plywood which had been steamed and bent to shape, and has a marked forward slope. The curve of the decking was such that I could not bend the marquetry wood unaided, so I resorted to steaming it too. I have never used the steam bending method before, but a quick search on the net provided me with useful tutorial videos and I worked out a method. I made a mould from basswood in the same way as i would have done to make a part from plastic. This had a sufficiently large curve to allow the wood to be bent over it without breaking. A piece of wood which was larger than the final piece was cut and bent over the mould and held in place with a simple clamp and wood buffers:
Steaming the wood was achieved by holding the sample over the mouth of a steaming kettle and the kettle kept boiling for about 15 seconds. The sample was allowed to cool and released to produce a nicely shaped piece of wood:
from which I was able to cut the required size and shape for the model:
The instrument board will fit inside the wood panel and help to strengthen it when it is fixed to the fuselage frame.
The next step will be to finish the upper wing including adding the ribs and centre spar. After that I need to have a long think about what to do next as the model is going to become rather delicate to handle.
Thanks for looking.
Stevef.
Please Log in to join the conversation.
3 years 7 months ago #413
by Stevef
Replied by Stevef on topic 1/32 Scratch Build Royal Aircraft Factory BE 2a
Evening All,
I have been working on some of the smaller parts while waiting for larger parts to dry/set and one of these was the instrument board. Early aircraft had very few instruments (some had only a clock, fuel gauge and compass): the BE 2 was not an exception. It had an Elliot board: one pattern for RFC machines and a different one for RNAS machines. I intend to represent a machine from the RNAS based at Eastchurch on Sheppy in Kent so I have modelled the Elliot board Mk 1 which had three instrument dials between an air speed indicator and an ascent/descent guage. Above the board were two smaller dials. I could not find any transfers which even remotely represented the dials on the board, or were small enough so a blob of paint and some bezels form Eduard have to suffice. Next to the instrument board is a map board:

This is not the best instrument board/panel that I have made but as it will be largely hidden under the fuselage cover and as I want to live to do something else, this will have to suffice.
Another set of parts which can be tedious to make are the struts. I am making them from laminated marquetry wood and will varnish them, so to save my shoulder I have made a few in between other tasks; the remainder including the undercarriage legs and skids, will follow later:

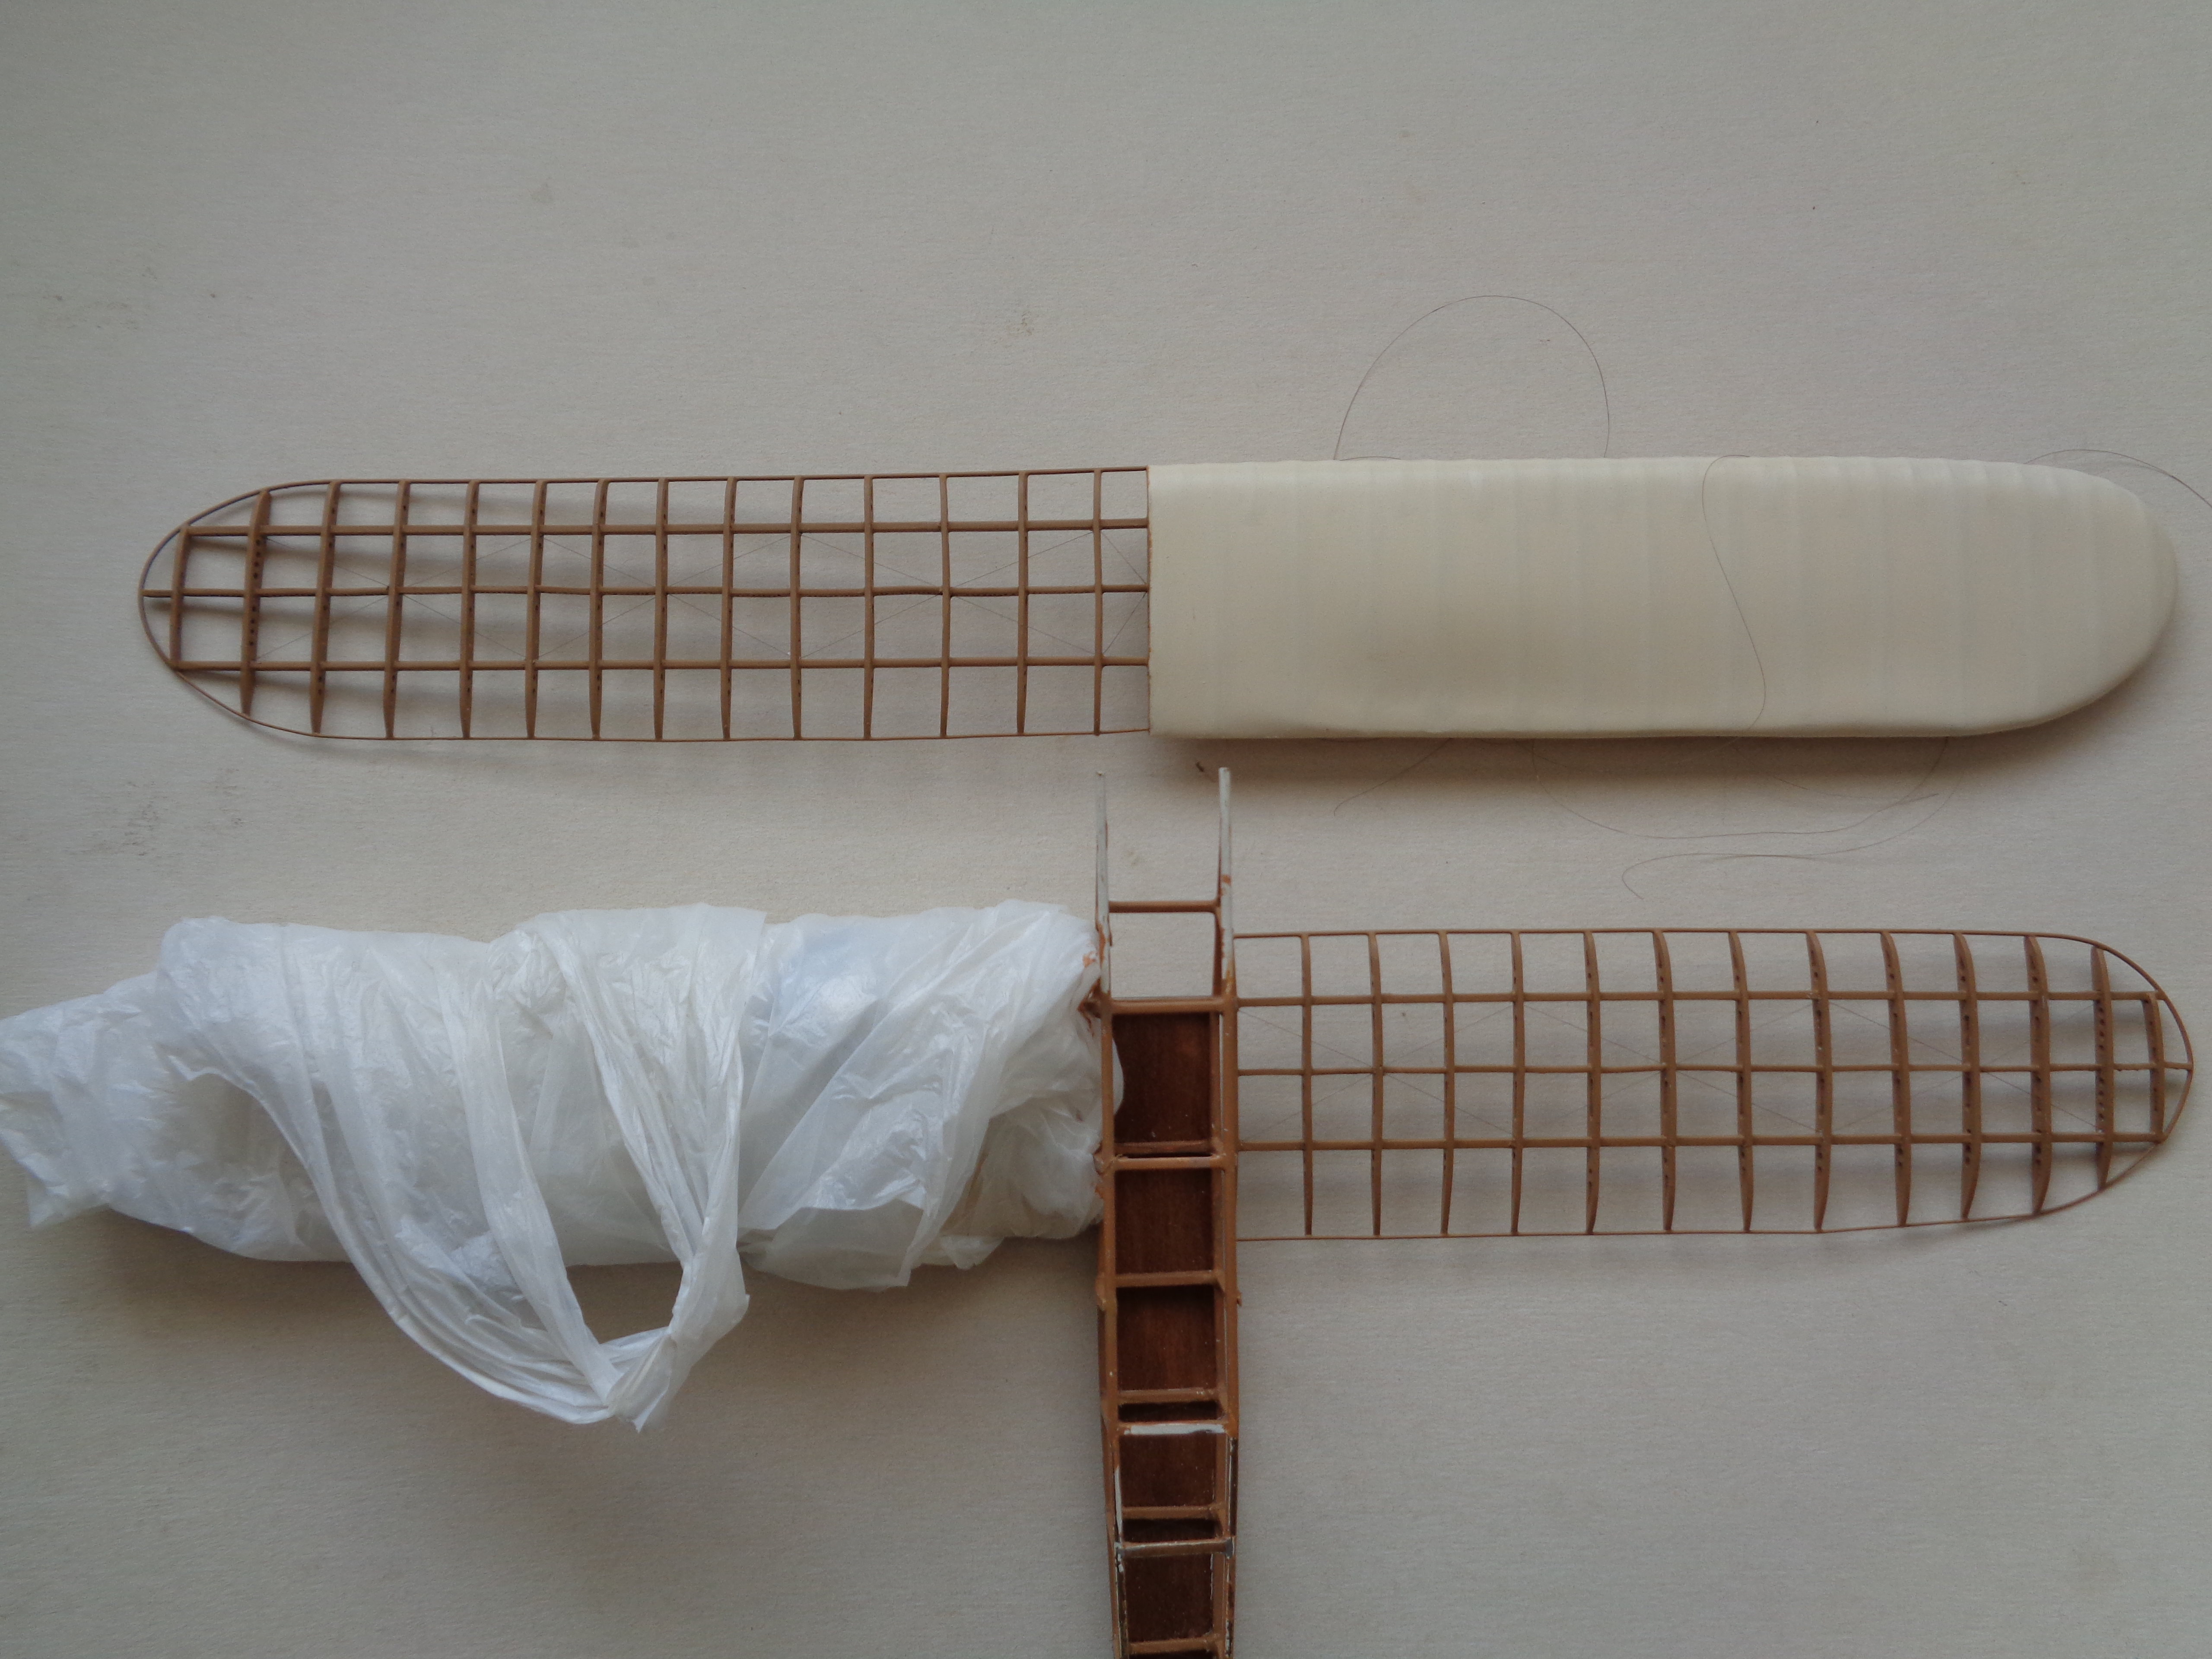
With the solid part of the upper wing sanded and ready to paint I added a strip of 20 thou card to the opening in the centre to represent the rib:

That was shaped and filled prior to adding the remaining ribs to the spars. Then the fun began because the wings had two solid spars front and rear, and a centre spar which was full of holes. Cue cutting short lengths of 40 thou plastic card, drilling lots of holes and then inserting said pieces of drilled plastic between the ribs.... I found that I could make two or at most three of these per session before the will to live nearly expired. However they are now done!

To finish the construction of the top wing I used 30 thou rod for the leading edge and 20 thou rod for the trailing edge:

and looking at the photo I can see that I have got to adjust some of the centre spar sections to make them line up more accurately.....grrrr.
However the span of the upper uncovered wing half matches the covered lower wing half on the same side of the model. I have also checked that the strut holes in the covered parts of the wings align accurately with the exposed spars on the opposing wing: at least I have managed to get that right! Now the struts should line up vertically from the sides and front as per the original machines.

This project seemed to be badly stalled but it is truly under way again: making the Albatros at the same time has really helped restore my mojo. Must remember that in future ..... keep to God's Own Scale and all is (usually) well.
Thanks for looking.
Stevef.
I have been working on some of the smaller parts while waiting for larger parts to dry/set and one of these was the instrument board. Early aircraft had very few instruments (some had only a clock, fuel gauge and compass): the BE 2 was not an exception. It had an Elliot board: one pattern for RFC machines and a different one for RNAS machines. I intend to represent a machine from the RNAS based at Eastchurch on Sheppy in Kent so I have modelled the Elliot board Mk 1 which had three instrument dials between an air speed indicator and an ascent/descent guage. Above the board were two smaller dials. I could not find any transfers which even remotely represented the dials on the board, or were small enough so a blob of paint and some bezels form Eduard have to suffice. Next to the instrument board is a map board:
This is not the best instrument board/panel that I have made but as it will be largely hidden under the fuselage cover and as I want to live to do something else, this will have to suffice.
Another set of parts which can be tedious to make are the struts. I am making them from laminated marquetry wood and will varnish them, so to save my shoulder I have made a few in between other tasks; the remainder including the undercarriage legs and skids, will follow later:
With the solid part of the upper wing sanded and ready to paint I added a strip of 20 thou card to the opening in the centre to represent the rib:
That was shaped and filled prior to adding the remaining ribs to the spars. Then the fun began because the wings had two solid spars front and rear, and a centre spar which was full of holes. Cue cutting short lengths of 40 thou plastic card, drilling lots of holes and then inserting said pieces of drilled plastic between the ribs.... I found that I could make two or at most three of these per session before the will to live nearly expired. However they are now done!
To finish the construction of the top wing I used 30 thou rod for the leading edge and 20 thou rod for the trailing edge:
and looking at the photo I can see that I have got to adjust some of the centre spar sections to make them line up more accurately.....grrrr.
However the span of the upper uncovered wing half matches the covered lower wing half on the same side of the model. I have also checked that the strut holes in the covered parts of the wings align accurately with the exposed spars on the opposing wing: at least I have managed to get that right! Now the struts should line up vertically from the sides and front as per the original machines.
This project seemed to be badly stalled but it is truly under way again: making the Albatros at the same time has really helped restore my mojo. Must remember that in future ..... keep to God's Own Scale and all is (usually) well.
Thanks for looking.
Stevef.
Please Log in to join the conversation.
3 years 5 months ago #415
by Stevef
Replied by Stevef on topic 1/32 Scratch Build Royal Aircraft Factory BE 2a
Evening All
Now that the Albatros is finished I have been turning my attention to the BE 2a again. I intend to show part of the structure of the aircraft so I have bought a set of wire wheels from Gaspatch, but I will also need a covered wheel disc for one side of the model. I made the disc from laminated card: first scribe the outline of the disc on to the card:

The cross marks the centre of the circle of the disc and was used to place one leg of the dividers which I used for scribing. The I cut away the edges of the card to get as close to the scribed circle as practical:
and filing completed the job.
The fabric covered part of the horizontal tail surfaces were made from 30 thou card which had been filed to shape and ribs added and sanded as described for the wings. The exposed half of the surfaces were made from 25 thou rod and 20 x 30 thou card. The rod was bent and held in place over a plan using pins and a block of balsa wood as a base:

Liquid cement holds everything together. The exposed elevator was constructed in the same way:


The upper wing which is represented as fabric covered was painted with my usual mix of thinned white and Revell beige(314) acrylics and as per usual took many coats before I achieved a good finish. The fabric covered parts of the tail surfaces and wheel disc were painted at the same time. Painting the wood parts of the exposed wings and tail structures was a little more difficult because I could not match very well the colour that I had mixed for the fuselage frame. (Note to myself: write down the ratios of colours used next time!) Eventually I found something close to the original:

The wire frame of the tail surfaces will be painted black later, as will the frame and ribs of the rudder.
The rudder was cut from 20 thou card and the ribs on one side added as described above, only this time I used 10 x 20 strip for the ribs on the fabric covered side. I painted the aircraft number in black on both sides of the rudder, but reversed the number on the side which will represent the uncovered portion on the finished model. I carefully brushed 4 thin coats of paint over the revered numerals to give the impression of looking through fabric to see the number.

Finally I added the internal rigging for the wings and was pleased to be able to secure two threads on the top wing which have benn dangling and causing frustration for a while now:

Now at last I can return to construction and start to add some of the fuselage internal details and clear away some parts which have been stored in a box to keep them safe from accidental damage. More later.
Thanks for looking.
Stevef.
Now that the Albatros is finished I have been turning my attention to the BE 2a again. I intend to show part of the structure of the aircraft so I have bought a set of wire wheels from Gaspatch, but I will also need a covered wheel disc for one side of the model. I made the disc from laminated card: first scribe the outline of the disc on to the card:
The cross marks the centre of the circle of the disc and was used to place one leg of the dividers which I used for scribing. The I cut away the edges of the card to get as close to the scribed circle as practical:
and filing completed the job.
The fabric covered part of the horizontal tail surfaces were made from 30 thou card which had been filed to shape and ribs added and sanded as described for the wings. The exposed half of the surfaces were made from 25 thou rod and 20 x 30 thou card. The rod was bent and held in place over a plan using pins and a block of balsa wood as a base:
Liquid cement holds everything together. The exposed elevator was constructed in the same way:
The upper wing which is represented as fabric covered was painted with my usual mix of thinned white and Revell beige(314) acrylics and as per usual took many coats before I achieved a good finish. The fabric covered parts of the tail surfaces and wheel disc were painted at the same time. Painting the wood parts of the exposed wings and tail structures was a little more difficult because I could not match very well the colour that I had mixed for the fuselage frame. (Note to myself: write down the ratios of colours used next time!) Eventually I found something close to the original:
The wire frame of the tail surfaces will be painted black later, as will the frame and ribs of the rudder.
The rudder was cut from 20 thou card and the ribs on one side added as described above, only this time I used 10 x 20 strip for the ribs on the fabric covered side. I painted the aircraft number in black on both sides of the rudder, but reversed the number on the side which will represent the uncovered portion on the finished model. I carefully brushed 4 thin coats of paint over the revered numerals to give the impression of looking through fabric to see the number.
Finally I added the internal rigging for the wings and was pleased to be able to secure two threads on the top wing which have benn dangling and causing frustration for a while now:
Now at last I can return to construction and start to add some of the fuselage internal details and clear away some parts which have been stored in a box to keep them safe from accidental damage. More later.
Thanks for looking.
Stevef.
Please Log in to join the conversation.
3 years 5 months ago #416
by Stevef
Replied by Stevef on topic 1/32 Scratch Build Royal Aircraft Factory BE 2a
Evening All,
Recently I have been working on the fuselage innards and engine - all fiddly and time consuming but not particularly difficult, but I hope the results will be worth looking at. I will describe in detail what I have done so that readers will see that most steps were relatively simple.
The controls and cables were the first items to add to the fuselage. I started with the rudder bar and the control cables which run the length of the fuselage: the cables are EZ line and were threaded through the rudder bar. View from front:
and rear:

Next in was the control column and rod actuator:

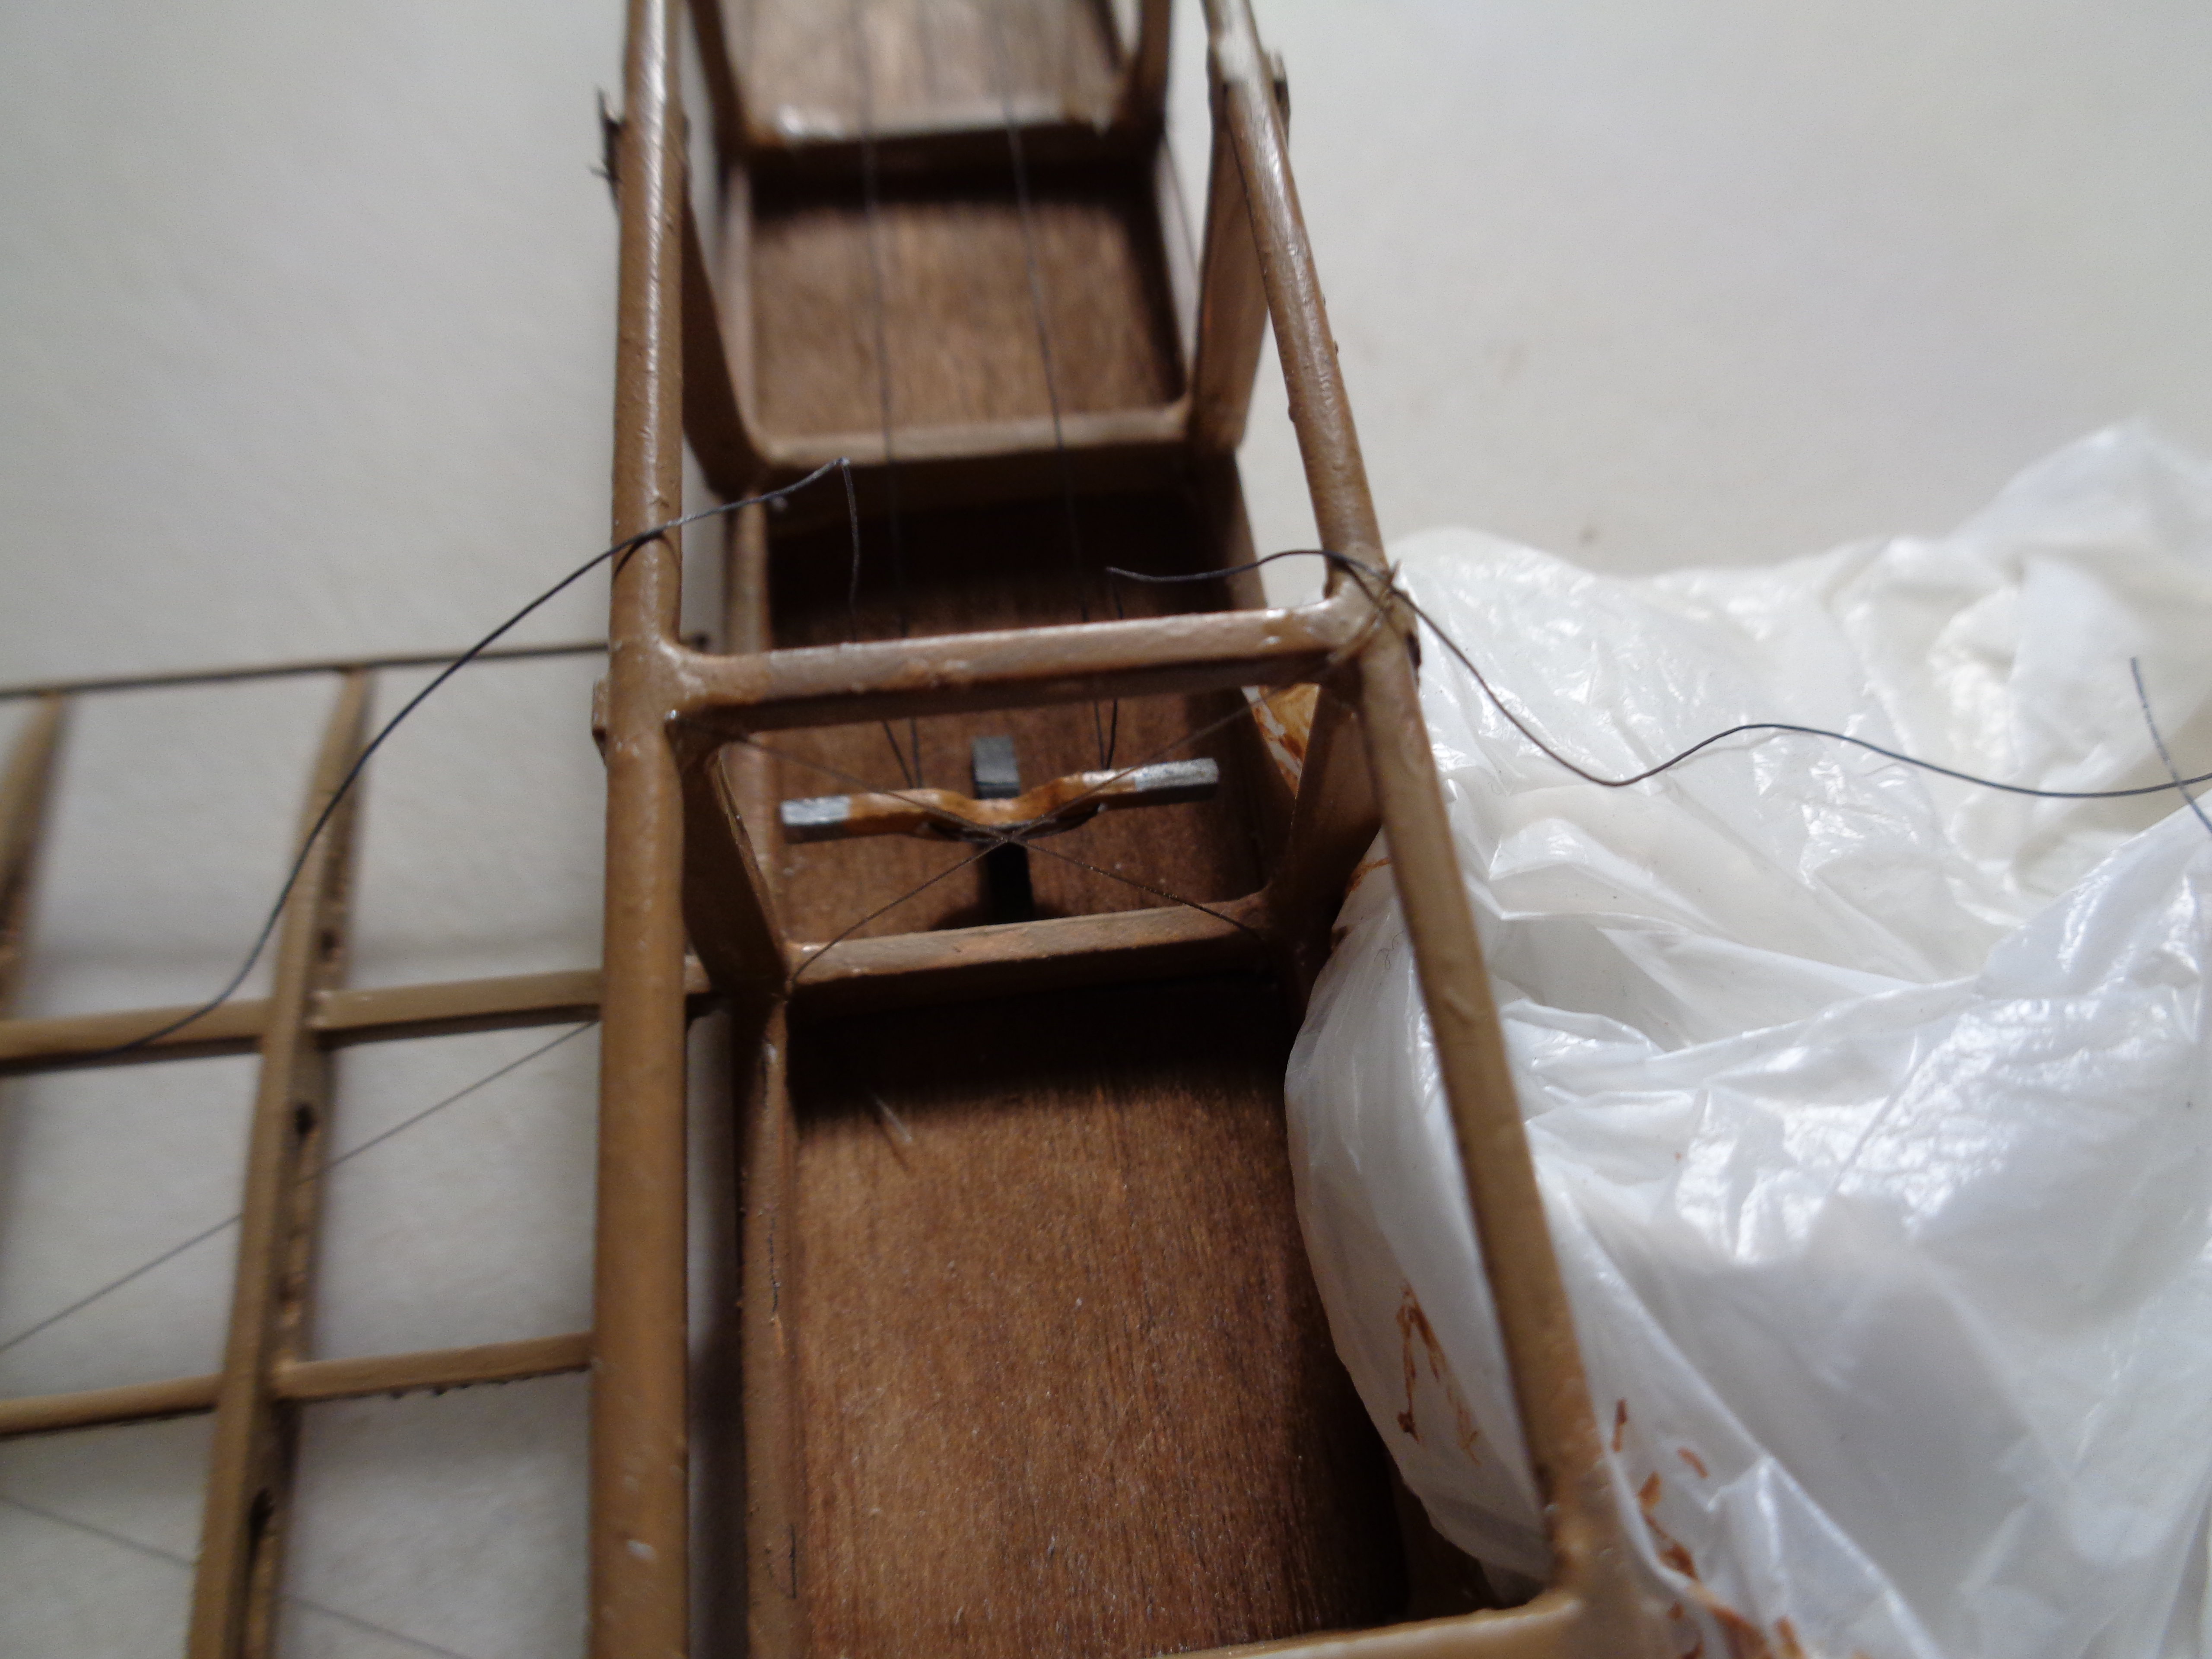
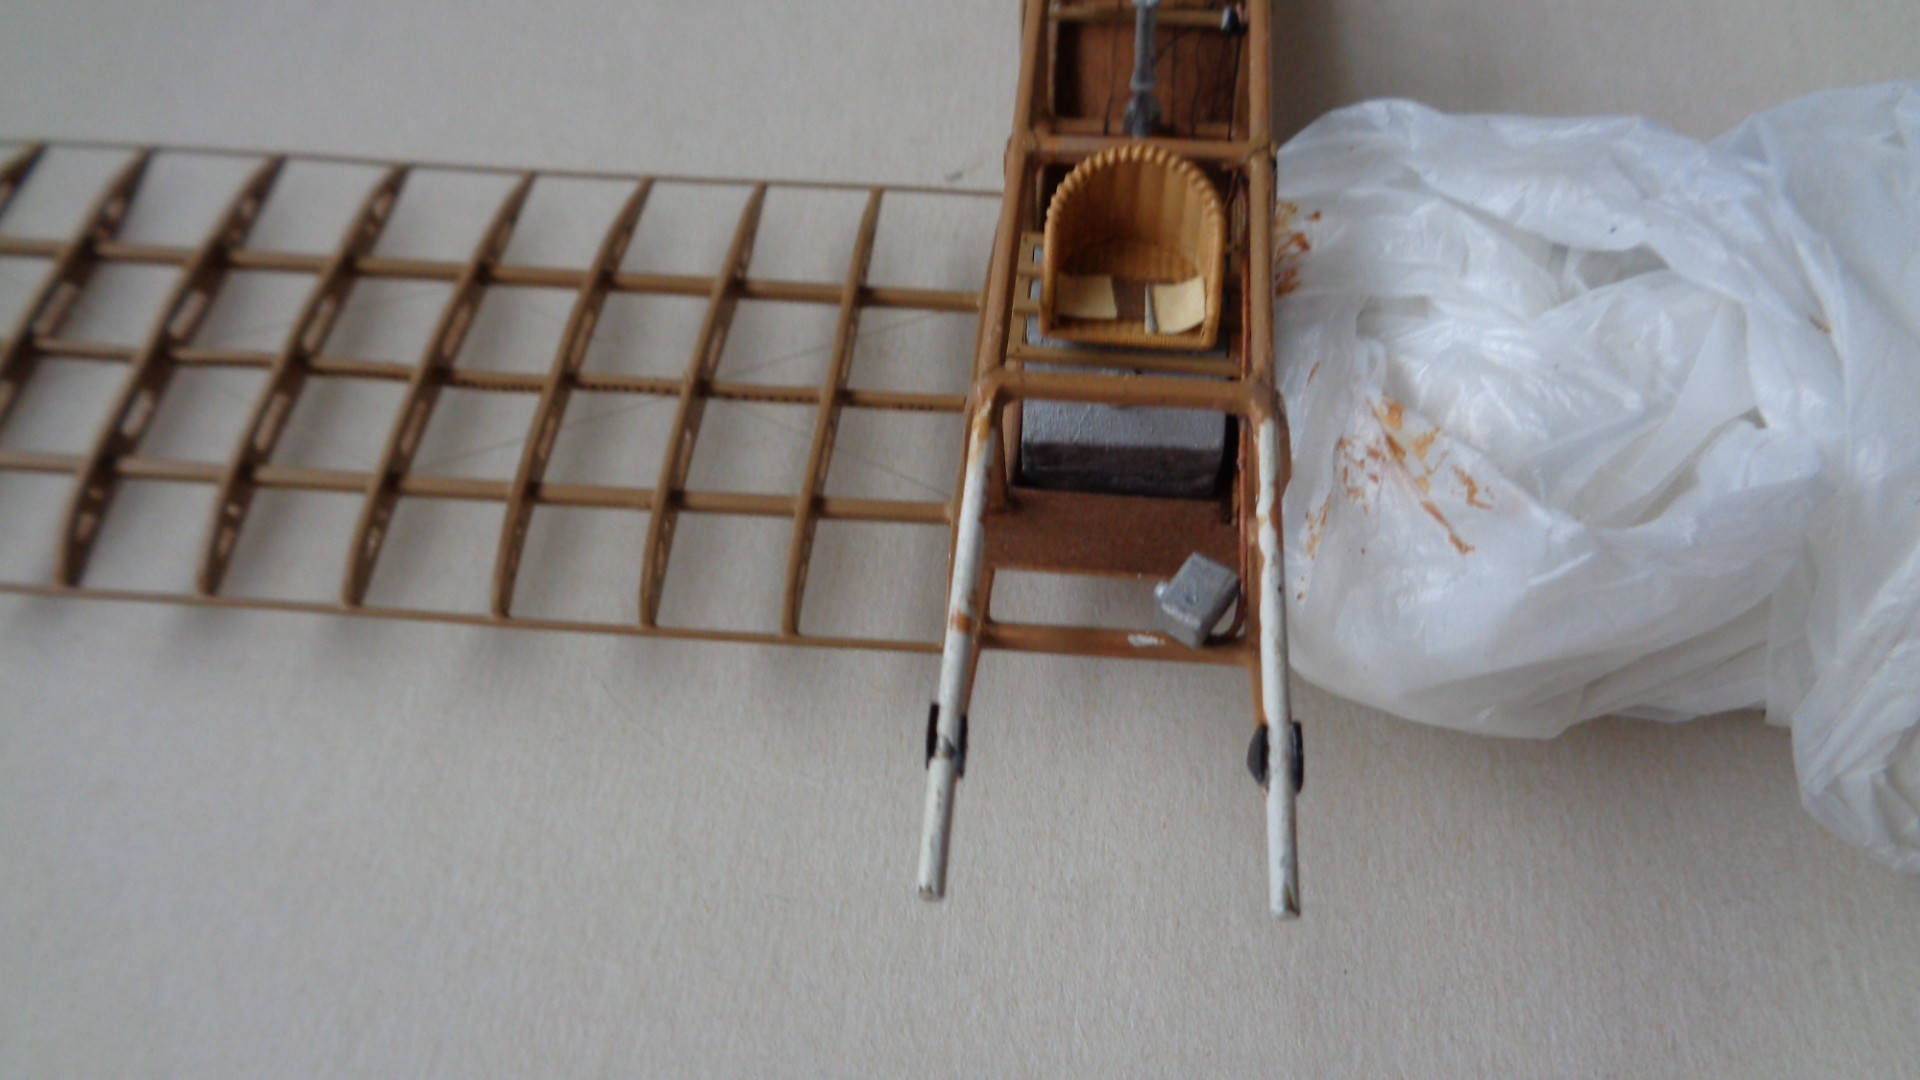
The elevator cables run rearwards from the cockpit: at the front end of the actuator rod there is a rounded piece - that was a mechanism which pulled on the wing wires which caused the outer trailing edges of the wings to flex as ailerons were not fitted to these early machines. Later I will add two springs, one on each side of the control column: they were to help the pilot keep the control column upright in level flight. The pilot's seat was next. I had added the lap belts and had glued the seat to a wooden frame (made from plastic strip). The seat frame was suspended by wires to the corners of the fuselage uprights and longerons:


The wires on the model are part EZ line and part monofilament thread. The observer sat over the main fuel tank and had a board to rest his feet on: the latter was made from wood and CA'd into place first, followed by the fuel tank:


The observer's seat followed and this too was suspended by wires. In this case I simply glued the seat frame to the top of the fuel tank and used monofilament thread for the support wires:
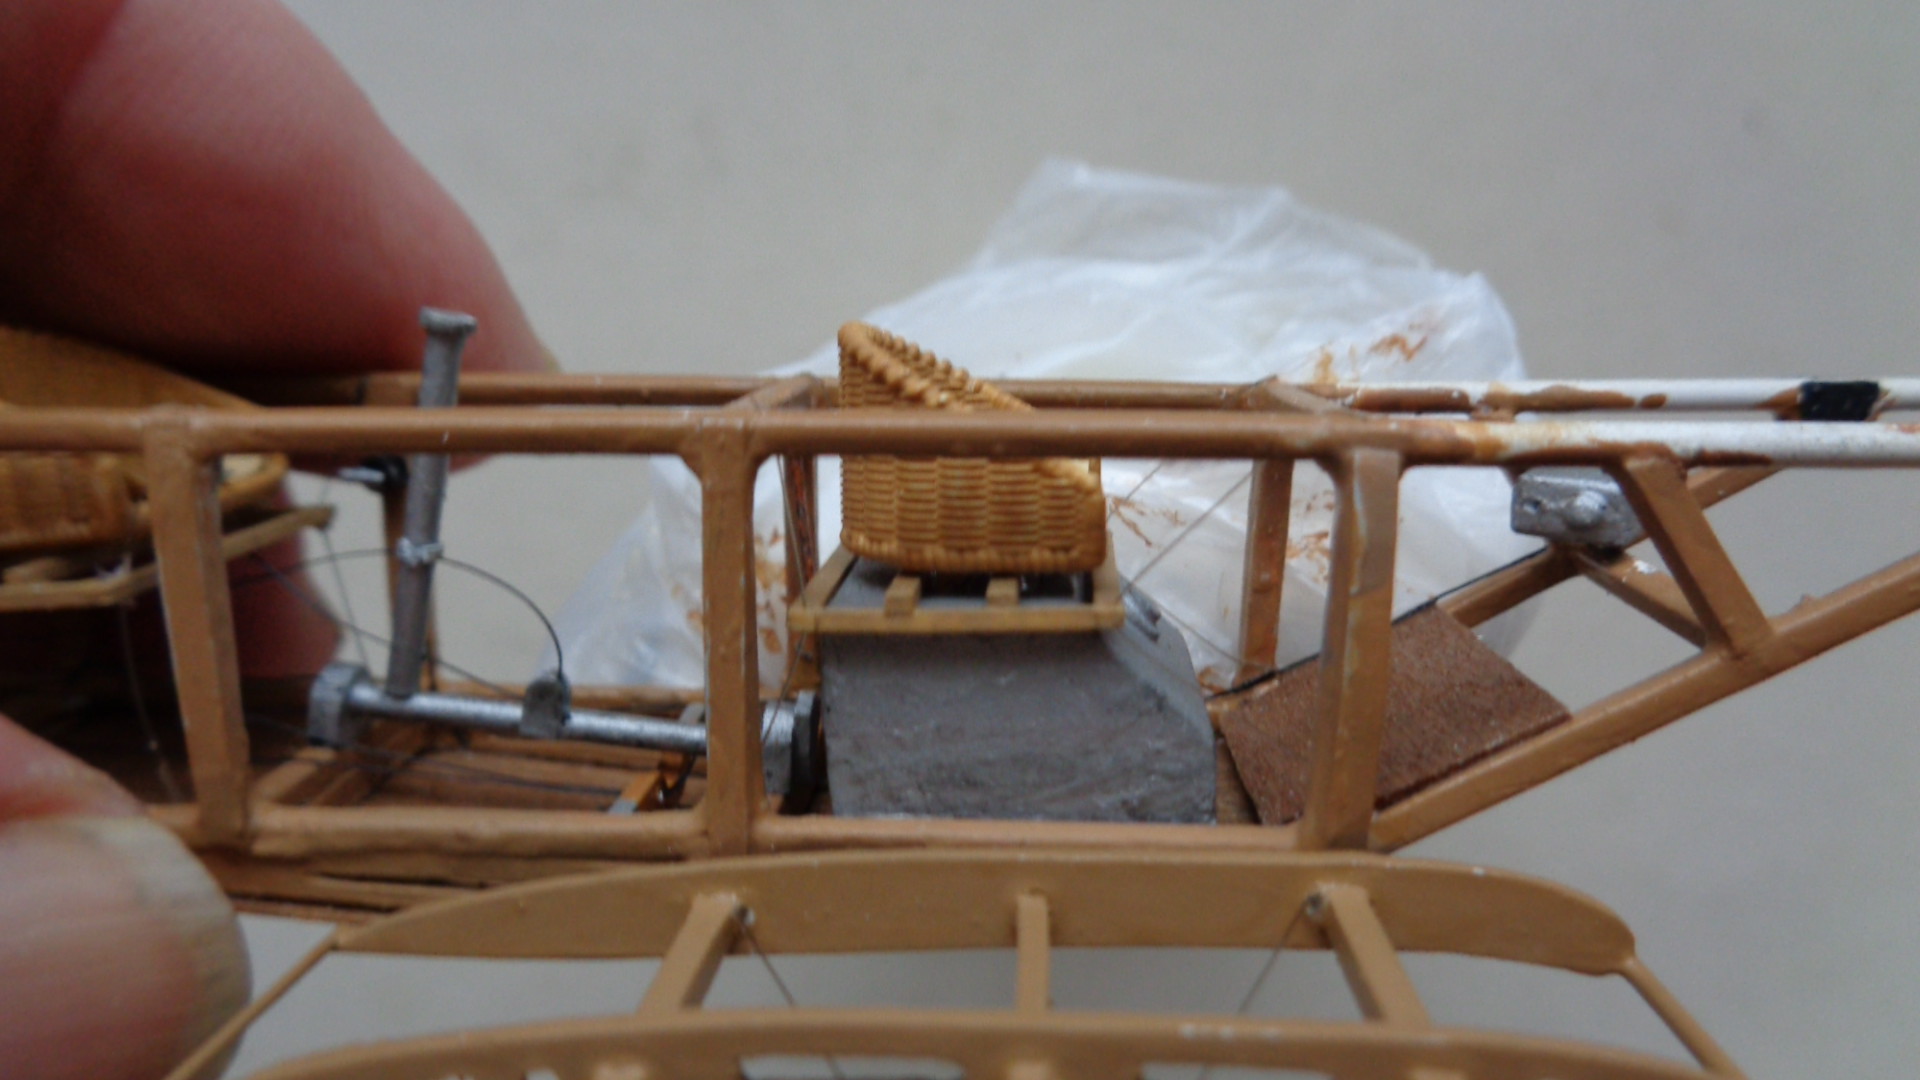
The fuel pipe and throttle control from the pilot's cockpit were made from thin rod and wire respectively. These were bent to shape and fixed to the carburetor which was located on the cross member just behind the engine:
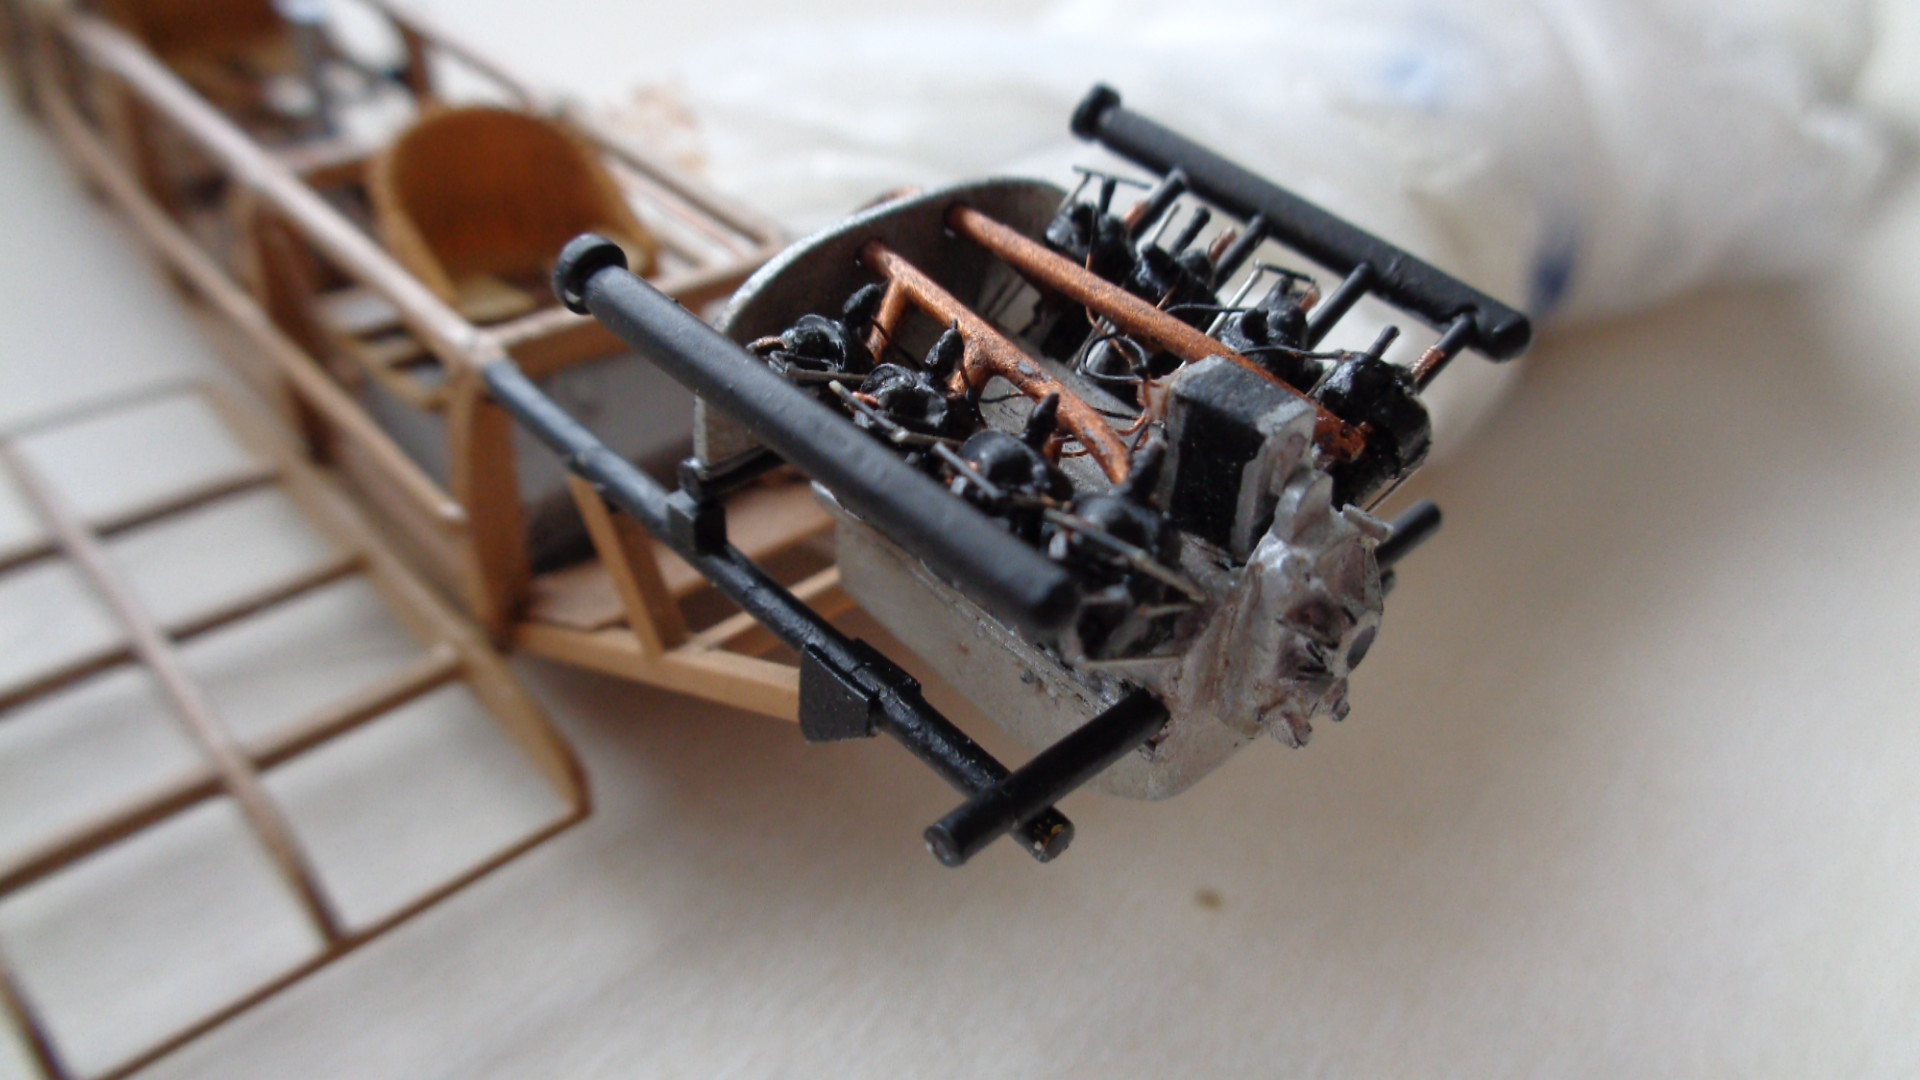
I took some time deciding the order of construction for these sub-assemblies and considered that completing the engine would be a sensible next stage. First I drilled lots of holes into the cylinders to take the additional details, and then added the engine back plate (with holes for the inlet pipes from the carburetor), and spark plugs:

I put in the inlet pipes after I had painted them but forgot to take a photo of that stage. The ignition wires from the magneto to the spark plugs were made from thin copper wire. The exhaust valve gear was very prominent on these engines so I had to make up some valve springs. I tried using what I thought was thin copper wire but when I tried them on the model I decided that they were out of scale so I made some more from 44 SWG wire. The difference in size of the two attempts can be seen here:
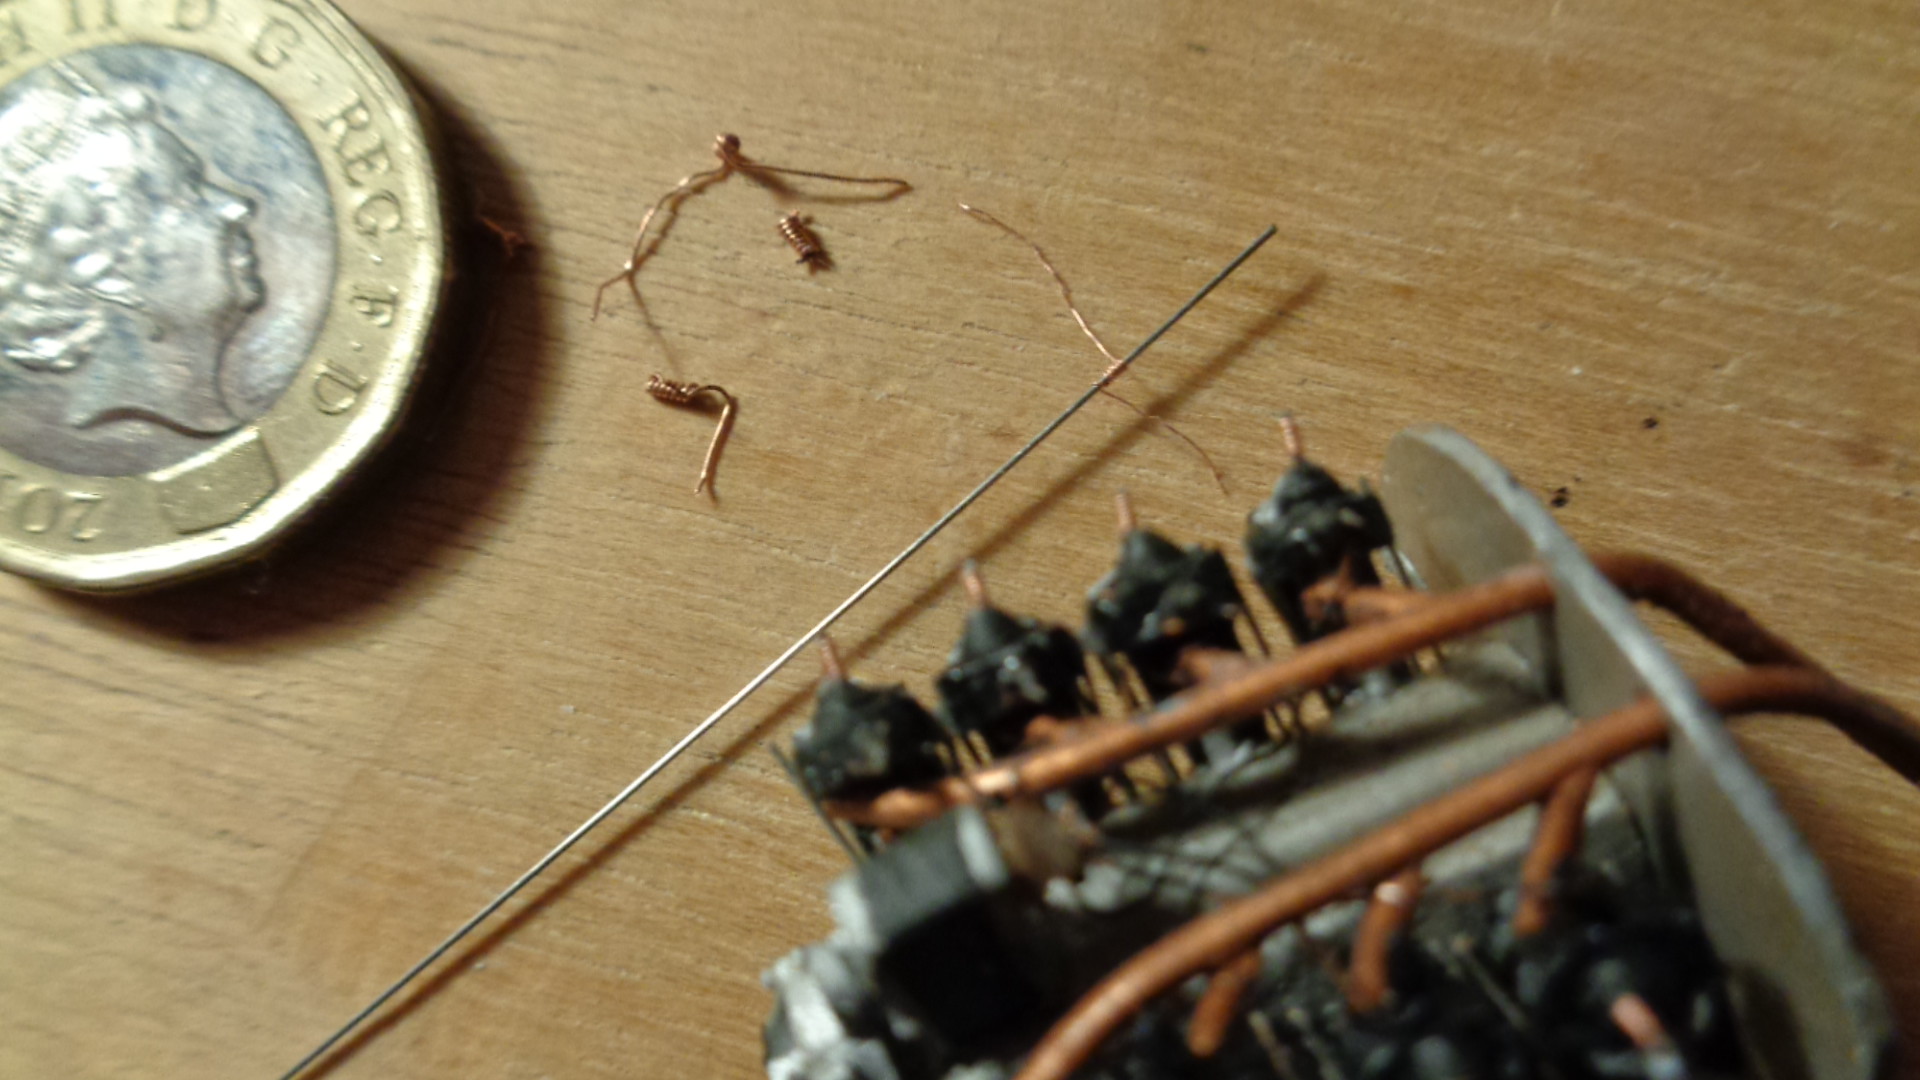
The springs were made by twisting the copper wire around a thin guitar string and cutting the guitar wire slightly longer than the spring: this left a short pice to CA into the top of the engine cylinder. The wire of the spring was trimmed with a knife before I added the springs to the model. The tappets were cut from guitar wire and CA'd on to the sides of the cylinder tops, and the rocker post and arm were cut from rod and cemented in place. The results were not quite as tidy as I had wished, but they pass the one foot rule so that is good enough. Finally I added the exhaust outlet pipes to the heads of the cylinders and the larger horizontal pipes to the outlets:

Apart from some touching in of the inlet pipes at the rear of the engine, and adding the flywheel this sub-assembly is now ready to be fixed to the model. However I have decided that it will certainly be damaged if not knocked off completely while I continue with construction of the fuselage and upper wing, so the engine has been put on one side for the time being:
 [
[

Now I will start working on adding the fuselage upper decking and horizontal tail unit and completing the control wires to the rear.
Thanks for looking.
Stevef.
Recently I have been working on the fuselage innards and engine - all fiddly and time consuming but not particularly difficult, but I hope the results will be worth looking at. I will describe in detail what I have done so that readers will see that most steps were relatively simple.
The controls and cables were the first items to add to the fuselage. I started with the rudder bar and the control cables which run the length of the fuselage: the cables are EZ line and were threaded through the rudder bar. View from front:
and rear:
Next in was the control column and rod actuator:
The elevator cables run rearwards from the cockpit: at the front end of the actuator rod there is a rounded piece - that was a mechanism which pulled on the wing wires which caused the outer trailing edges of the wings to flex as ailerons were not fitted to these early machines. Later I will add two springs, one on each side of the control column: they were to help the pilot keep the control column upright in level flight. The pilot's seat was next. I had added the lap belts and had glued the seat to a wooden frame (made from plastic strip). The seat frame was suspended by wires to the corners of the fuselage uprights and longerons:
The wires on the model are part EZ line and part monofilament thread. The observer sat over the main fuel tank and had a board to rest his feet on: the latter was made from wood and CA'd into place first, followed by the fuel tank:
The observer's seat followed and this too was suspended by wires. In this case I simply glued the seat frame to the top of the fuel tank and used monofilament thread for the support wires:
The fuel pipe and throttle control from the pilot's cockpit were made from thin rod and wire respectively. These were bent to shape and fixed to the carburetor which was located on the cross member just behind the engine:
I took some time deciding the order of construction for these sub-assemblies and considered that completing the engine would be a sensible next stage. First I drilled lots of holes into the cylinders to take the additional details, and then added the engine back plate (with holes for the inlet pipes from the carburetor), and spark plugs:
I put in the inlet pipes after I had painted them but forgot to take a photo of that stage. The ignition wires from the magneto to the spark plugs were made from thin copper wire. The exhaust valve gear was very prominent on these engines so I had to make up some valve springs. I tried using what I thought was thin copper wire but when I tried them on the model I decided that they were out of scale so I made some more from 44 SWG wire. The difference in size of the two attempts can be seen here:
The springs were made by twisting the copper wire around a thin guitar string and cutting the guitar wire slightly longer than the spring: this left a short pice to CA into the top of the engine cylinder. The wire of the spring was trimmed with a knife before I added the springs to the model. The tappets were cut from guitar wire and CA'd on to the sides of the cylinder tops, and the rocker post and arm were cut from rod and cemented in place. The results were not quite as tidy as I had wished, but they pass the one foot rule so that is good enough. Finally I added the exhaust outlet pipes to the heads of the cylinders and the larger horizontal pipes to the outlets:
Apart from some touching in of the inlet pipes at the rear of the engine, and adding the flywheel this sub-assembly is now ready to be fixed to the model. However I have decided that it will certainly be damaged if not knocked off completely while I continue with construction of the fuselage and upper wing, so the engine has been put on one side for the time being:
Now I will start working on adding the fuselage upper decking and horizontal tail unit and completing the control wires to the rear.
Thanks for looking.
Stevef.
Please Log in to join the conversation.
3 years 4 months ago #417
by Stevef
Replied by Stevef on topic 1/32 Scratch Build Royal Aircraft Factory BE 2a
Evening All,
Progress has been slow but I am nearly ready to start detailed planning for mounting the top wing. In the meantime more details have been added to the fuselage frame.
The fuselage was made of a conventional (for the time), wire braced box structure so I have had to add the rigging to the sides as this will be very visible:

There were longerons along the cockpit sides - these were added from 20 x 30 thou plastic strip after the rigging was complete. The rear fuselage side bays were wood covered - small pieces of marquetry were cut and CA'd in place to represent the wood:


When I was rigging the sides I found that I had somehow managed to tangle the control cables in the rear fuselage which meant drawing one of the elevator threads out of its brass ferrule, untangling it and re-inserting. Later I had to adjust the lower elevator cables: much interesting language was used to help relieve stress during those protracted operations......
The undercarriage skids were made from two narrow strips of marquetry wood with a third short strip at the rear end. These were allowed to dry overnight and then sanded and filed to shape:
Sometimes it is nice to make a simple and quick piece and have something to show for the effort in a short time.
I have placed the engine on the nose just to see what it will look like when the model is finished and to help get the correct dimensions for the various pieces of the exhaust system:

Next I will mount the upper fuselage decking betweeen the pilot and observer and drill the slots for the cabane struts. Hopefully the model will then be ready to take on the upper wing.
Thanks for looking.
Stevef.
Progress has been slow but I am nearly ready to start detailed planning for mounting the top wing. In the meantime more details have been added to the fuselage frame.
The fuselage was made of a conventional (for the time), wire braced box structure so I have had to add the rigging to the sides as this will be very visible:
There were longerons along the cockpit sides - these were added from 20 x 30 thou plastic strip after the rigging was complete. The rear fuselage side bays were wood covered - small pieces of marquetry were cut and CA'd in place to represent the wood:
When I was rigging the sides I found that I had somehow managed to tangle the control cables in the rear fuselage which meant drawing one of the elevator threads out of its brass ferrule, untangling it and re-inserting. Later I had to adjust the lower elevator cables: much interesting language was used to help relieve stress during those protracted operations......
The undercarriage skids were made from two narrow strips of marquetry wood with a third short strip at the rear end. These were allowed to dry overnight and then sanded and filed to shape:
Sometimes it is nice to make a simple and quick piece and have something to show for the effort in a short time.
I have placed the engine on the nose just to see what it will look like when the model is finished and to help get the correct dimensions for the various pieces of the exhaust system:
Next I will mount the upper fuselage decking betweeen the pilot and observer and drill the slots for the cabane struts. Hopefully the model will then be ready to take on the upper wing.
Thanks for looking.
Stevef.
Please Log in to join the conversation.
3 years 4 months ago #418
by Stevef
Replied by Stevef on topic 1/32 Scratch Build Royal Aircraft Factory BE 2a
Evening All,
I wanted to drill the upper fuselage decking so that I could insert the cabane struts later, but when I started to work on the wood it split.... It had dried out since I steamed it to shape (see earlier post), and I was unsure what to do. I tried twice to cut and start to shape a new piece of wood but they split as well, so I decided to do what I had intended to do after I had originally made the piece - I put in a piece of 10 thou clear acetate and glued the two halves together. I was then able to drill the holes for the struts using a new drill bit and a fine round file. I also reduced the size of the struts where they entered the holes to keep the holes as small as possible. Two very narrow strips of wood were CA'd to the top of the fuselage frame and the decking CA'd to the wood strips and frame.


And then I realised that I had not put in the instrument board......aaaaarrrrrggggghhhh! After a lot of filing and fiddling I managed to get the board into place under the decking: it cannot be seen very clearly which is just as well as it is not quite in the correct place, but as they say in scratch building, close enough is good enough, (especially when it is partially obscured!)

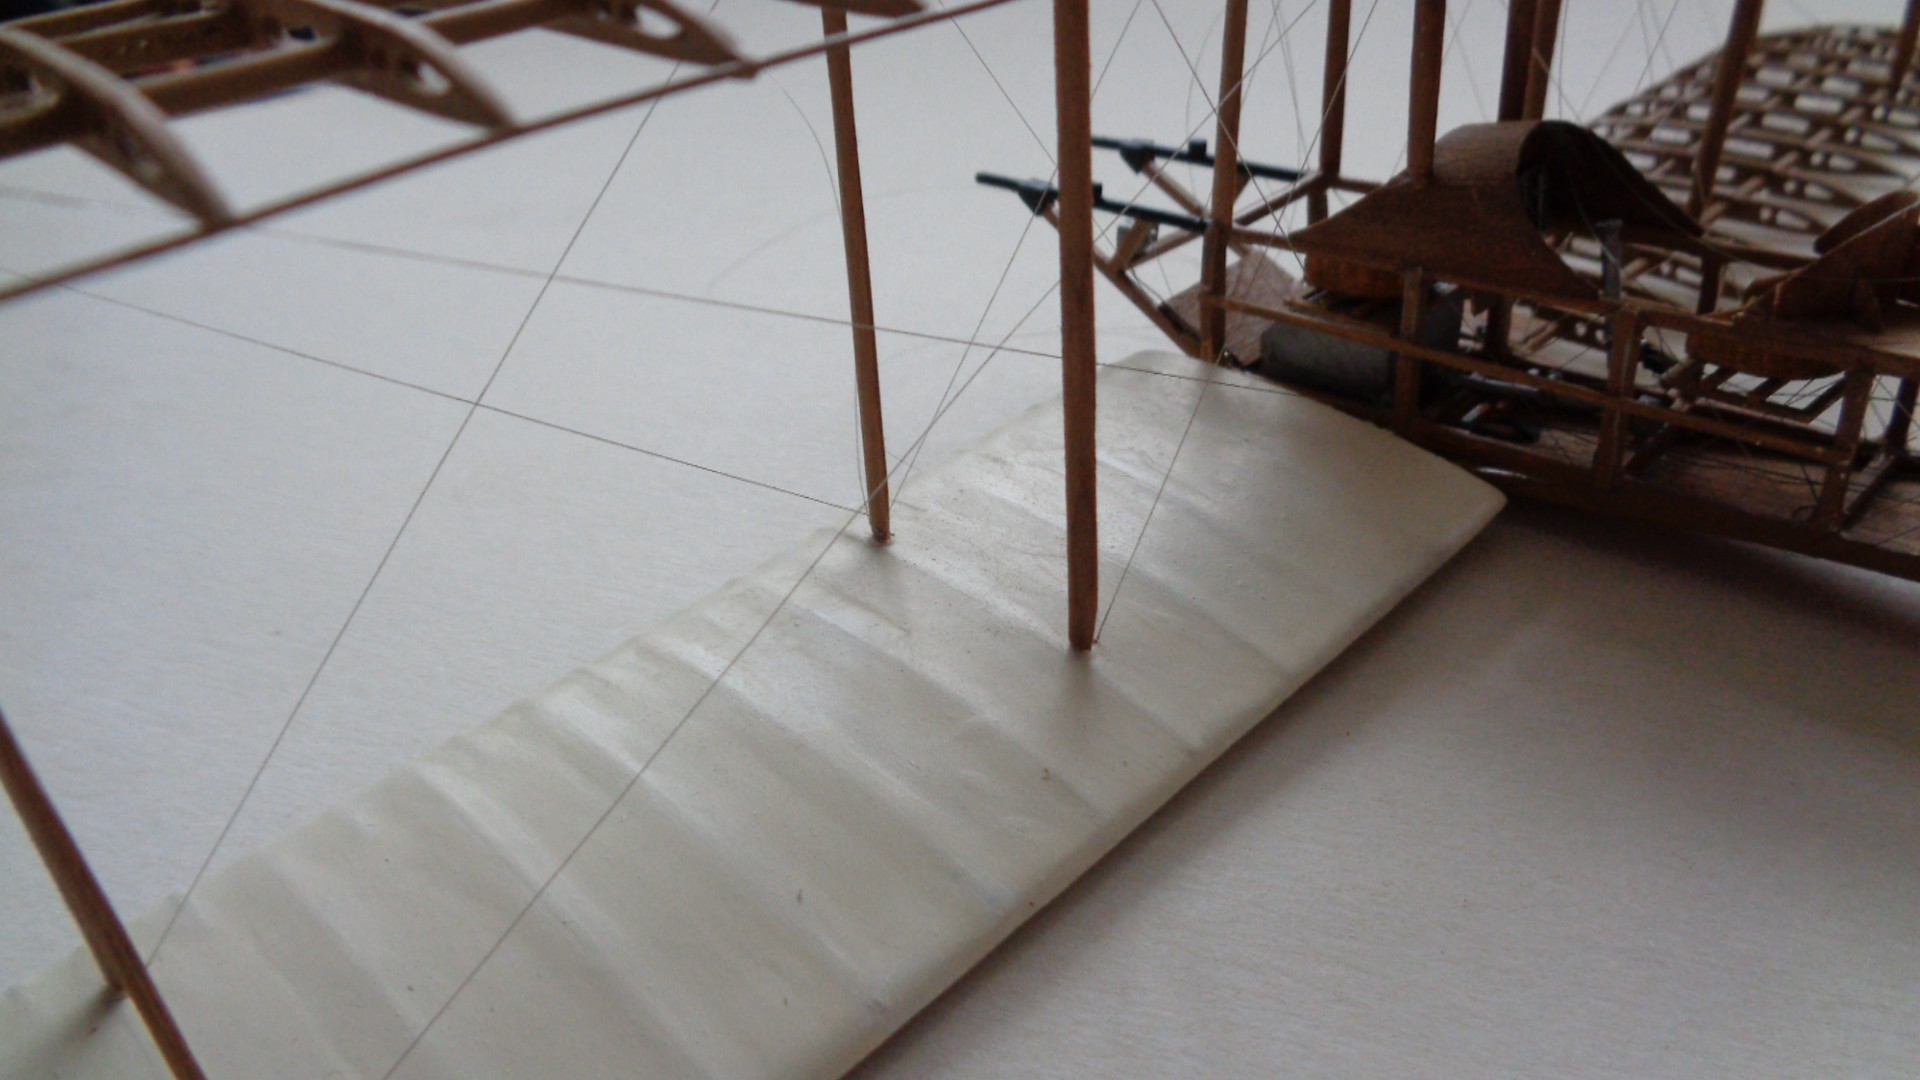
Adding the top wing is probably the most trying part of building biplanes in any scale, and with a model as large as this one, jigs are necessary. The model also needs to be stable while fitting struts and wings, so I dug out my old jig which I had used previously for my Gunbus and D. H. 1A: a board with three nails in it. The spar on the exposed lower wing can be slotted over the nails and a third nail used to lock the leading edge of the covered wing: the model was then rigid and stable. Two card jigs were cut to support the upper wing while struts were put into place. The struts were made from two laminated sheets of marquetry wood: individual struts were cut as strips and then shaped with a file and glass paper:

I am using the same sheet of wood for all of the wood parts on this model which is why I was concerned about the upper decking on the fuselage: I have a relatively limited supply left and I still have to cut the fuselage frame pieces behind the pilot's cockpit.
One end of the struts was drilled so that I could insert a thin wire to fit into holes drilled in the solid parts of the wings: the other end was CA'd straight on to the exposed ribs. I put the four outer struts in first to create a stable structure:
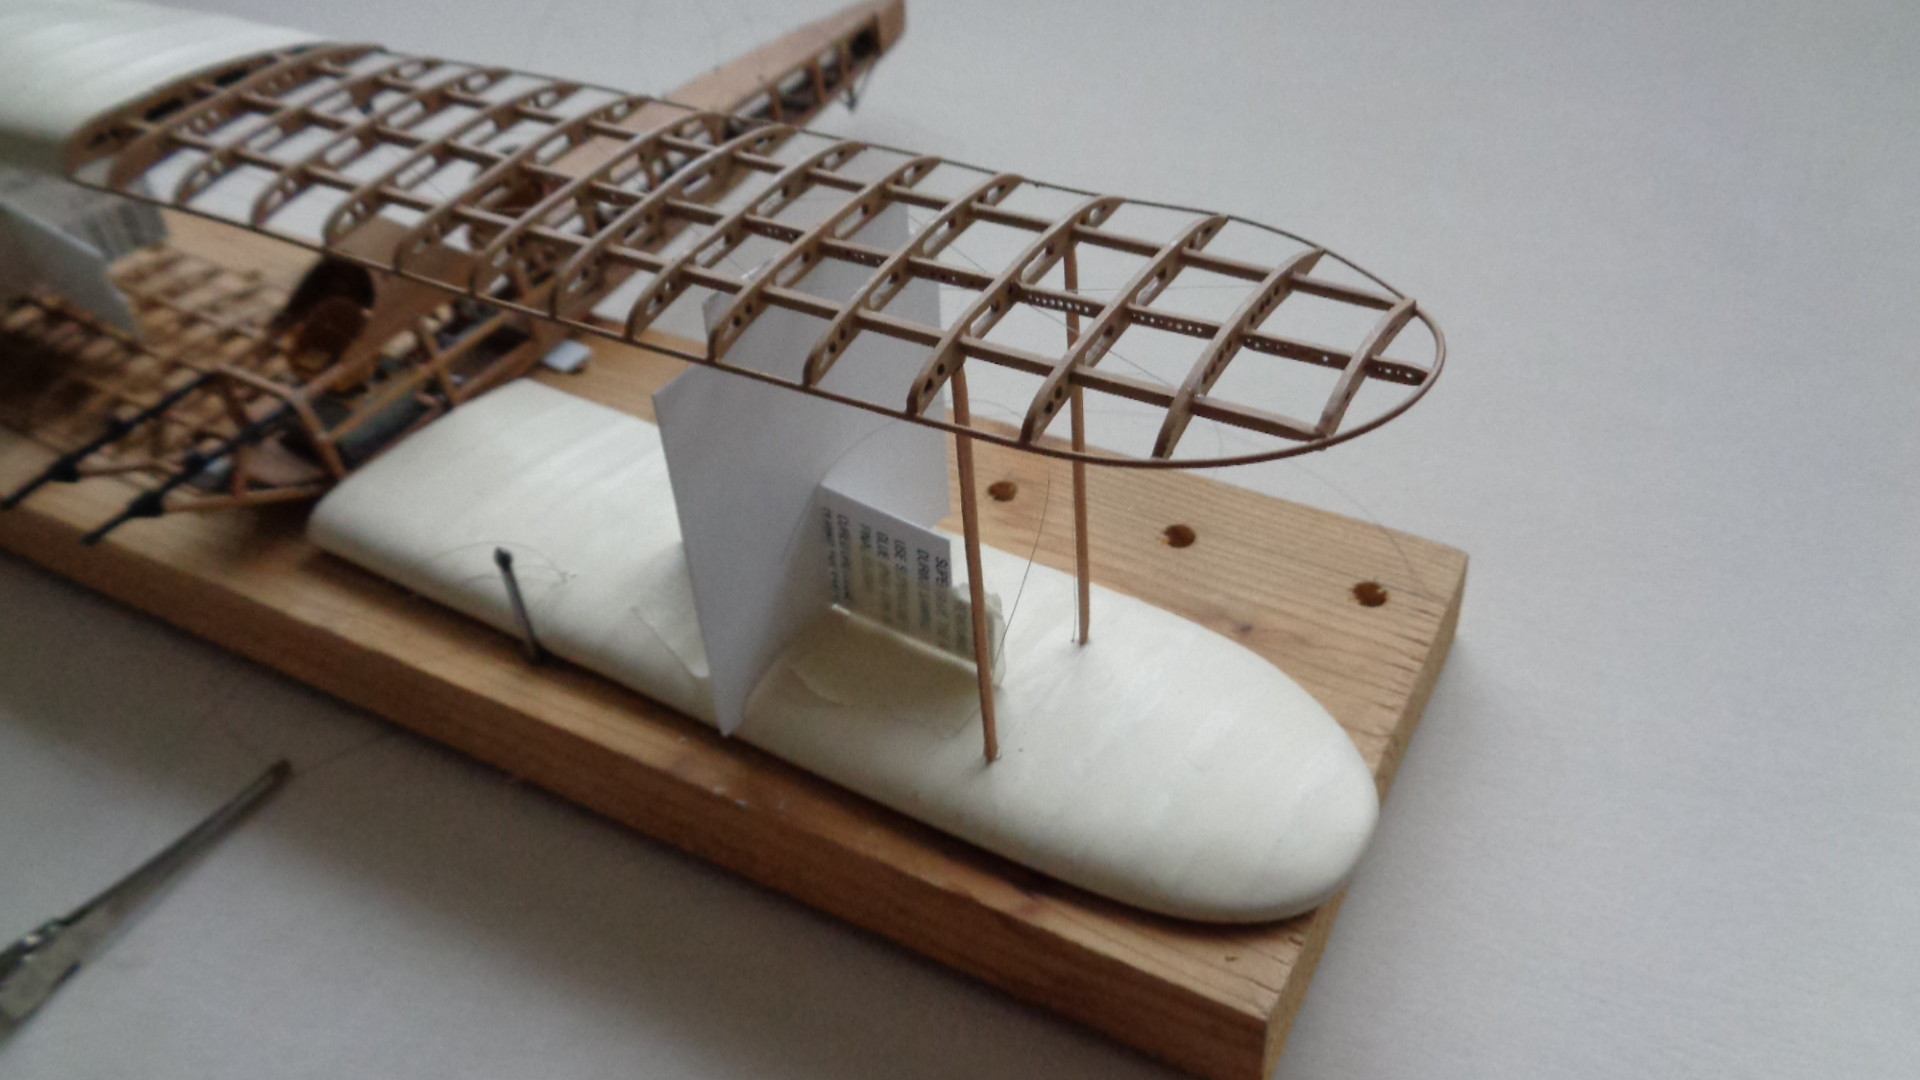
The inner wing struts made the structure stronger and more stable, and finally the cabanes were fixed to complete the strut work:

There were lots of threads sticking/hanging from the wings so these were sorted out and the wing rigging and warping wires put into place and the ends trimmed. I had made life a bit easier by wherever possible attaching one end into the covered wing sections - it meant that those ends were firmly anchored and all I had to do was attach the opposite end to the relevant part of the exposed wing. The pulleys for the warping wires had already been put into place. (This aircraft, like many early types, did not have ailerons but used a technique called wing warping. The outer trailing edges of the main planes were distorted using wires attached to the control column. This meant that there was no fore-aft bracing between the wing struts and no lateral bracing in the rear outer strut bays). Having fixed the strut and control threads there still remain many drag wires hanging from the wings...but at least there are fewer loose ends than previously.

The horizontal tail stabilizer and bracing struts were added to the rear fuselage. This was a simple exercise in applying CA and holding in place while it set, followed by two pieces of 25 thou rod to represent the underside bracing:


The next stage will involve fixing the engine and exhaust pipes and the undercarriage.
Thanks for looking.
Stevef.
I wanted to drill the upper fuselage decking so that I could insert the cabane struts later, but when I started to work on the wood it split.... It had dried out since I steamed it to shape (see earlier post), and I was unsure what to do. I tried twice to cut and start to shape a new piece of wood but they split as well, so I decided to do what I had intended to do after I had originally made the piece - I put in a piece of 10 thou clear acetate and glued the two halves together. I was then able to drill the holes for the struts using a new drill bit and a fine round file. I also reduced the size of the struts where they entered the holes to keep the holes as small as possible. Two very narrow strips of wood were CA'd to the top of the fuselage frame and the decking CA'd to the wood strips and frame.
And then I realised that I had not put in the instrument board......aaaaarrrrrggggghhhh! After a lot of filing and fiddling I managed to get the board into place under the decking: it cannot be seen very clearly which is just as well as it is not quite in the correct place, but as they say in scratch building, close enough is good enough, (especially when it is partially obscured!)
Adding the top wing is probably the most trying part of building biplanes in any scale, and with a model as large as this one, jigs are necessary. The model also needs to be stable while fitting struts and wings, so I dug out my old jig which I had used previously for my Gunbus and D. H. 1A: a board with three nails in it. The spar on the exposed lower wing can be slotted over the nails and a third nail used to lock the leading edge of the covered wing: the model was then rigid and stable. Two card jigs were cut to support the upper wing while struts were put into place. The struts were made from two laminated sheets of marquetry wood: individual struts were cut as strips and then shaped with a file and glass paper:
I am using the same sheet of wood for all of the wood parts on this model which is why I was concerned about the upper decking on the fuselage: I have a relatively limited supply left and I still have to cut the fuselage frame pieces behind the pilot's cockpit.
One end of the struts was drilled so that I could insert a thin wire to fit into holes drilled in the solid parts of the wings: the other end was CA'd straight on to the exposed ribs. I put the four outer struts in first to create a stable structure:
The inner wing struts made the structure stronger and more stable, and finally the cabanes were fixed to complete the strut work:
There were lots of threads sticking/hanging from the wings so these were sorted out and the wing rigging and warping wires put into place and the ends trimmed. I had made life a bit easier by wherever possible attaching one end into the covered wing sections - it meant that those ends were firmly anchored and all I had to do was attach the opposite end to the relevant part of the exposed wing. The pulleys for the warping wires had already been put into place. (This aircraft, like many early types, did not have ailerons but used a technique called wing warping. The outer trailing edges of the main planes were distorted using wires attached to the control column. This meant that there was no fore-aft bracing between the wing struts and no lateral bracing in the rear outer strut bays). Having fixed the strut and control threads there still remain many drag wires hanging from the wings...but at least there are fewer loose ends than previously.
The horizontal tail stabilizer and bracing struts were added to the rear fuselage. This was a simple exercise in applying CA and holding in place while it set, followed by two pieces of 25 thou rod to represent the underside bracing:
The next stage will involve fixing the engine and exhaust pipes and the undercarriage.
Thanks for looking.
Stevef.
Please Log in to join the conversation.
3 years 3 months ago #419
by Stevef
Replied by Stevef on topic 1/32 Scratch Build Royal Aircraft Factory BE 2a
Evening All,
The gravity tank in these machines was placed on a bracket in front of the observer - I represented this with laminated card and made the brackets from 20 x 30 strip:


I made the exhaust pipes in sections from 30 thou rod with 60 thou rod filed to shape to represent the silencers. A heater box was attached to one of the pipes to direct the exhaust gases to the carburetor to stop the latter from icing. The heater box was made from 80 thou card filed to shape and a heater pipe added to the rear of the box:

The image above also shows the propellor hub, which when painted black was added to the propellor:

The exhaust pipes were assembled and painted and added to the ends of the manifolds on the engine and fixed to pieces of rod under the fuselage:

I made control horns for the rudder and elevators from scrap wood left over from other parts of the build. Here one has been fitted to the rudder:


The undercarriage consisted of two skids (to protect the propellor in case of a heavy landing), and supporting struts. All of these were made from wood and varnished, and the axle was made from brass rod. The axle was CA'd to the skids and the bungy cords represented with thread:

I drilled the ends of the struts and inserted thin wire to strengthen the joints: the legs were CA'd into place starting with the front and rear struts on both sides, followed by the centre struts:


I rigged the undercarriage with a mixture of EZ line for the cross pieces on the front and middle struts, and monofilament thread for the remainder. The cross pieces had small rings in the centre so to represent them I used some small bezels from the HGW bezel set and attached the EZ line with CA:

I have started to put on the upper fuselage longeron structure. The bulkheads were cut from wood and varnished. Some of these had holes on the original aircraft while others were solid:

The remaining parts to add are the wing skids, wheels, tail control surfaces, tail skid and some rigging. I hope to be able to complete that shortly and show photos of the completed model in the next post.
Thanks for looking.
Stevef.
The gravity tank in these machines was placed on a bracket in front of the observer - I represented this with laminated card and made the brackets from 20 x 30 strip:
I made the exhaust pipes in sections from 30 thou rod with 60 thou rod filed to shape to represent the silencers. A heater box was attached to one of the pipes to direct the exhaust gases to the carburetor to stop the latter from icing. The heater box was made from 80 thou card filed to shape and a heater pipe added to the rear of the box:
The image above also shows the propellor hub, which when painted black was added to the propellor:
The exhaust pipes were assembled and painted and added to the ends of the manifolds on the engine and fixed to pieces of rod under the fuselage:
I made control horns for the rudder and elevators from scrap wood left over from other parts of the build. Here one has been fitted to the rudder:
The undercarriage consisted of two skids (to protect the propellor in case of a heavy landing), and supporting struts. All of these were made from wood and varnished, and the axle was made from brass rod. The axle was CA'd to the skids and the bungy cords represented with thread:
I drilled the ends of the struts and inserted thin wire to strengthen the joints: the legs were CA'd into place starting with the front and rear struts on both sides, followed by the centre struts:
I rigged the undercarriage with a mixture of EZ line for the cross pieces on the front and middle struts, and monofilament thread for the remainder. The cross pieces had small rings in the centre so to represent them I used some small bezels from the HGW bezel set and attached the EZ line with CA:
I have started to put on the upper fuselage longeron structure. The bulkheads were cut from wood and varnished. Some of these had holes on the original aircraft while others were solid:
The remaining parts to add are the wing skids, wheels, tail control surfaces, tail skid and some rigging. I hope to be able to complete that shortly and show photos of the completed model in the next post.
Thanks for looking.
Stevef.
Please Log in to join the conversation.
3 years 3 months ago #420
by Stevef
Replied by Stevef on topic 1/32 Scratch Build Royal Aircraft Factory BE 2a
Evening All,
I used thin strips of marquetry wood for the ribs behind the pilot's cockpit: I varnished them first to make them slightly more rigid. I also lightly sanded the cut edges to remove any small pieces which had not cut cleanly. The ribs were applied with superglue - centre first and then one side followed by the other:


The tail skid was next. I had already made the pillar and supports so all I had to do was carve a skid from wood and make a spring from thin copper wire wrapped around another thin piece of wire, and superglue the parts into place:


I also fixed the wing skids while the model was inverted.
The elevators were straightforward to fit - some small holes and thin wire in the solid one to help hold it in place. The open structure was simply cemented in place. On both I had added wood horns before fixing to the model. The rigging was completed - the control wires to the elevators and the remaining anti-drag wires to the front and rear: that was a relief as it removed all but two of those dangling threads which seem to invariably get in the way. I was just thinking about adding the wheels and propellor when I noticed a major omission..... I had completely forgotten to add the leading edge riblets to the exposed wing structures!! This was a consequence of the fug which affected me when I was making the wings - I had lost concentration and was so relieved to be back working on the model at the time that these were overlooked. Fortunately they were easy to put into place and paint, but it could have been a much more serious an oh dear moment. They were made from 10 x 30 thou strip which had been curved by running them through the tip of a pair of tweezers:

I drilled the tyres on the wheels to insert two small pieces of rod: these will be inserted into holes in the base on which the model will stand and stop it from moving about when the model is in transit around the house or on longer journeys. The wheels and propellor were put into place and now the model is finally finished......
 [
[


This one has been nearly 17 months in the making - a record for me when a model has not become a shelf queen, which this one so nearly did. But I have finished it in the end!
Stevef.
I used thin strips of marquetry wood for the ribs behind the pilot's cockpit: I varnished them first to make them slightly more rigid. I also lightly sanded the cut edges to remove any small pieces which had not cut cleanly. The ribs were applied with superglue - centre first and then one side followed by the other:
The tail skid was next. I had already made the pillar and supports so all I had to do was carve a skid from wood and make a spring from thin copper wire wrapped around another thin piece of wire, and superglue the parts into place:
I also fixed the wing skids while the model was inverted.
The elevators were straightforward to fit - some small holes and thin wire in the solid one to help hold it in place. The open structure was simply cemented in place. On both I had added wood horns before fixing to the model. The rigging was completed - the control wires to the elevators and the remaining anti-drag wires to the front and rear: that was a relief as it removed all but two of those dangling threads which seem to invariably get in the way. I was just thinking about adding the wheels and propellor when I noticed a major omission..... I had completely forgotten to add the leading edge riblets to the exposed wing structures!! This was a consequence of the fug which affected me when I was making the wings - I had lost concentration and was so relieved to be back working on the model at the time that these were overlooked. Fortunately they were easy to put into place and paint, but it could have been a much more serious an oh dear moment. They were made from 10 x 30 thou strip which had been curved by running them through the tip of a pair of tweezers:
I drilled the tyres on the wheels to insert two small pieces of rod: these will be inserted into holes in the base on which the model will stand and stop it from moving about when the model is in transit around the house or on longer journeys. The wheels and propellor were put into place and now the model is finally finished......
This one has been nearly 17 months in the making - a record for me when a model has not become a shelf queen, which this one so nearly did. But I have finished it in the end!
Stevef.
Please Log in to join the conversation.
Time to create page: 0.248 seconds
- You are here:
-
Home

-
Forum
-
Work in progress
-
Airfield
- 1/32 Scratch Build Royal Aircraft Factory BE 2a