1/72 Societa Italiana Aviazione (SIA) Savoja Pomilio (SP) 2

5 years 2 months ago #330
by Stevef
The Societa Italiana Aviazione (SIA) Savoja Pomilio (SP) 2 was a pusher design derived from the Maurice Farman MF 11. It looked like this (scroll down the page to the second photograph):
www.ww1-planes.com/Italy/Savoia.php;
or nearly like this:

because the cover illustrates an SP 3 which had a different shaped nacelle and reduced wingspan. This is also the subject of vacuform models. The SP 2 has been on my list of possible models for some time now, so I thought that perhaps it was time to give it a try, the more so as I only have one other Italian model in my collection: this one will help to keep it company.
I have not made much for the reasons given above, but making wings and tail surfaces means that with a little effort and in a relatively short time there is something to show. I cut and shaped the wing blanks from 30 thou plastic card which had been inserted into in a length of drainpipe and hot water poured in. The tail surfaces were also cut and shaped from 30 thou card:

I marked off the ribs on the wings and horizontal tail surfaces and added 10x20 thou strip:

These are awaiting being sanded down. I also decided to make the two prominent radiators which will be attached to the sides of the fuselage nacelle. I glued together some scrap card and filed it to shape and after scoring the sides added pieces of 10x20 thou strip to represent the metal straps around the cooling pipes:

I will start to make a nacelle next to alleviate the tedium of sanding down the ribs on the flying surfaces and to give me something to show for my efforts.
Thanks for looking.
Stevef.
www.ww1-planes.com/Italy/Savoia.php;
or nearly like this:
because the cover illustrates an SP 3 which had a different shaped nacelle and reduced wingspan. This is also the subject of vacuform models. The SP 2 has been on my list of possible models for some time now, so I thought that perhaps it was time to give it a try, the more so as I only have one other Italian model in my collection: this one will help to keep it company.
I have not made much for the reasons given above, but making wings and tail surfaces means that with a little effort and in a relatively short time there is something to show. I cut and shaped the wing blanks from 30 thou plastic card which had been inserted into in a length of drainpipe and hot water poured in. The tail surfaces were also cut and shaped from 30 thou card:
I marked off the ribs on the wings and horizontal tail surfaces and added 10x20 thou strip:
These are awaiting being sanded down. I also decided to make the two prominent radiators which will be attached to the sides of the fuselage nacelle. I glued together some scrap card and filed it to shape and after scoring the sides added pieces of 10x20 thou strip to represent the metal straps around the cooling pipes:
I will start to make a nacelle next to alleviate the tedium of sanding down the ribs on the flying surfaces and to give me something to show for my efforts.
Thanks for looking.
Stevef.
Please Log in to join the conversation.
5 years 2 months ago #331
by Stevef
Replied by Stevef on topic 1/72 Societa Italiana Aviazione (SIA) Savoja Pomilio (SP) 2
Evening All,
I finished sanding down the ribs on the horizontal surfaces and then turned to constructing the nacelle. My original intention was to push mould it in two halves, so I dutifully carved the male mould from basswood and after a couple of attempts I had two halves. Then I saw the problems which I had not given sufficient thought to, namely that I had a seam down the nose and the leading edge on the nose was rather blunt. I then did what I should have done at the start - look at a similar nacelle which I had made for a previous build. I refer to a Voisin III model which I made some years ago which has similarities in shape with this one:

The leading edge of the nacelle is sharp and the sides are flat so that the angles are quite sharp. The front of the nacelle is slightly curved and very prominent - any joint there is going to be a b.... to fill and hide. When I looked up how I had made the nacelle the answer was a blinding flash of the b.....obvious:

Make the sides and bottom from flat card and mould the top surface! This method means that the sharp edges of the lower part of the nacelle are easily reproduced, (no rounded corners resulting form the push mould which have to be sharpened), and the top surface has no seams! Easy when a little thought is given to the problem, or even simpler if I look up how I did something in the past....!
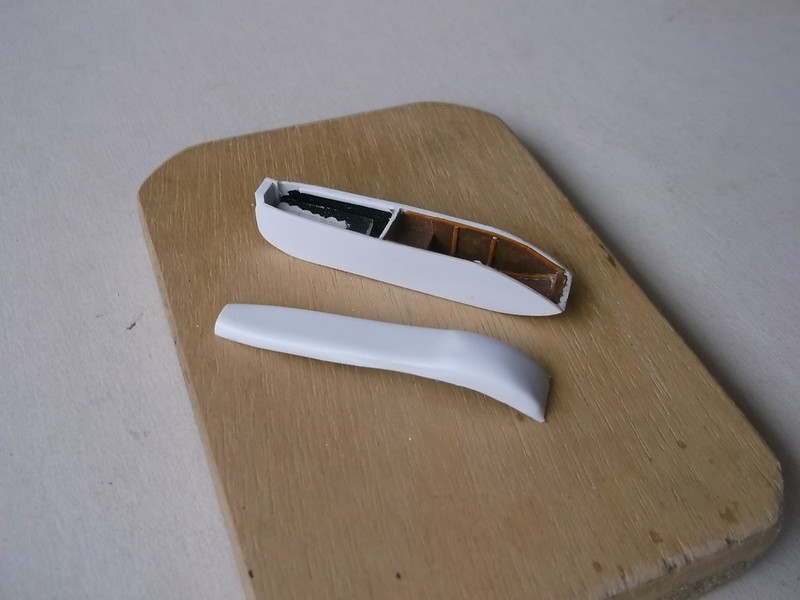
So back to square one and start again... by making the sides and bottom from 30 and 20 thou card respectively. This also made the cutting of the two rectangular and one round window in the bottom of the nacelle easy - no trying to match holes on each half of a nacelle moulding. I could curve the rear of the underside by repeatedly bending it with a pair of tweezers. I put some supports along the fuselage sides to hold the floor in the correct place, added some simple framing, painted the insides, made a blanking piece which represents the fuel tank behind the observer and a throttle quadrant, and it was ready to be assembled:

The seat in the image is a spare resin from Barracuda - I am not sure if it is accurate but as nobody is likely to see it I am not too concerned. Similarly I have left the interior details to a minimum - I will add an IP and control wheel but nothing else will be visible. The fuel tank blank helps to support the fuselage sides until I can fix the top in place. The rear of the fuselage was blanked off with 60 thou card to allow for the necessary filing and shaping. Filler will be needed here later too.
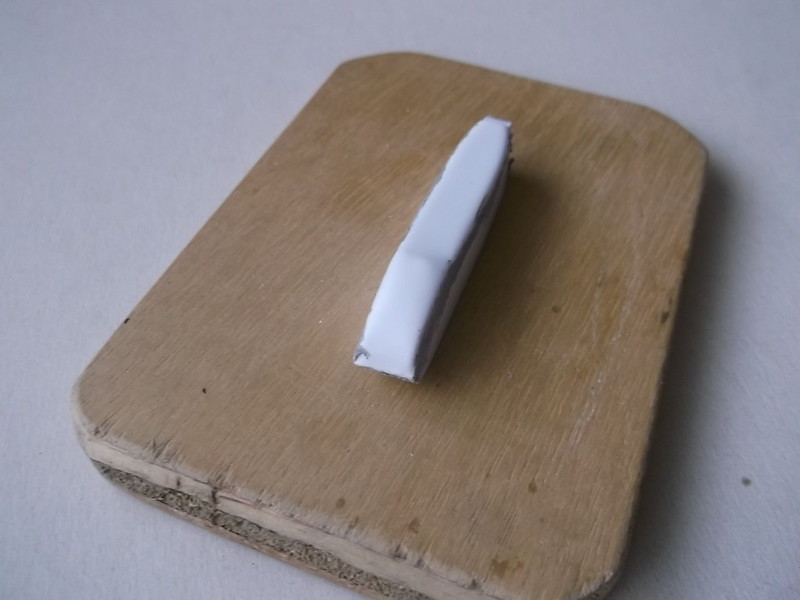
I moulded the top using the male fuselage mould and a new hole cut in plywood sheet. At this point I again ran into problems. Generally I can get a decent mould after two or three tries - not this time. Male moulds made from balsa wood seems to need a smaller gap than those made from basswood so I had to keep sanding down the male mould. Then I could not get the front of the nacelle to mould properly: I was close to putting this project on hold and starting something else. I decided that I would give it one more try and slightly change the angle when I pushed the male mould into the plastic sheet - and it worked immediately! I think that I am beginning to lose my touch with this moulding process as I have never had quite so many failures before.
Quite a lot of plastic had to be removed but that was straightforward so that I am at last at this stage:

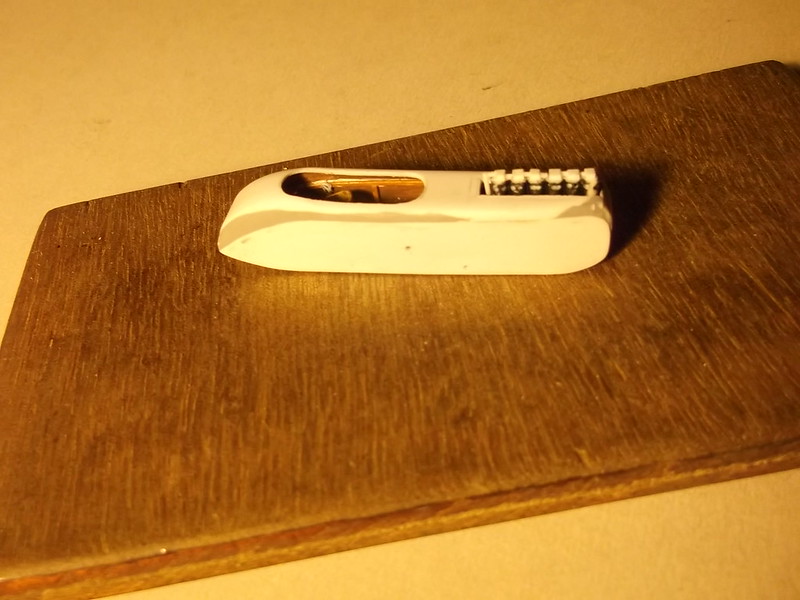
The engine will consist of a row of rod pieces glued together with the top of the engine detail: I do not intend to make the lower parts as they will be completely concealed on the finished model. This was dropped into the fuselage so that I could measure the size of the hole which I need to cut into the moulding later.
I am hoping that I can now complete the nacelle and engine details and proceed with painting.
Thanks for looking.
Stevef.
I finished sanding down the ribs on the horizontal surfaces and then turned to constructing the nacelle. My original intention was to push mould it in two halves, so I dutifully carved the male mould from basswood and after a couple of attempts I had two halves. Then I saw the problems which I had not given sufficient thought to, namely that I had a seam down the nose and the leading edge on the nose was rather blunt. I then did what I should have done at the start - look at a similar nacelle which I had made for a previous build. I refer to a Voisin III model which I made some years ago which has similarities in shape with this one:
The leading edge of the nacelle is sharp and the sides are flat so that the angles are quite sharp. The front of the nacelle is slightly curved and very prominent - any joint there is going to be a b.... to fill and hide. When I looked up how I had made the nacelle the answer was a blinding flash of the b.....obvious:
Make the sides and bottom from flat card and mould the top surface! This method means that the sharp edges of the lower part of the nacelle are easily reproduced, (no rounded corners resulting form the push mould which have to be sharpened), and the top surface has no seams! Easy when a little thought is given to the problem, or even simpler if I look up how I did something in the past....!
So back to square one and start again... by making the sides and bottom from 30 and 20 thou card respectively. This also made the cutting of the two rectangular and one round window in the bottom of the nacelle easy - no trying to match holes on each half of a nacelle moulding. I could curve the rear of the underside by repeatedly bending it with a pair of tweezers. I put some supports along the fuselage sides to hold the floor in the correct place, added some simple framing, painted the insides, made a blanking piece which represents the fuel tank behind the observer and a throttle quadrant, and it was ready to be assembled:
The seat in the image is a spare resin from Barracuda - I am not sure if it is accurate but as nobody is likely to see it I am not too concerned. Similarly I have left the interior details to a minimum - I will add an IP and control wheel but nothing else will be visible. The fuel tank blank helps to support the fuselage sides until I can fix the top in place. The rear of the fuselage was blanked off with 60 thou card to allow for the necessary filing and shaping. Filler will be needed here later too.
I moulded the top using the male fuselage mould and a new hole cut in plywood sheet. At this point I again ran into problems. Generally I can get a decent mould after two or three tries - not this time. Male moulds made from balsa wood seems to need a smaller gap than those made from basswood so I had to keep sanding down the male mould. Then I could not get the front of the nacelle to mould properly: I was close to putting this project on hold and starting something else. I decided that I would give it one more try and slightly change the angle when I pushed the male mould into the plastic sheet - and it worked immediately! I think that I am beginning to lose my touch with this moulding process as I have never had quite so many failures before.
Quite a lot of plastic had to be removed but that was straightforward so that I am at last at this stage:
The engine will consist of a row of rod pieces glued together with the top of the engine detail: I do not intend to make the lower parts as they will be completely concealed on the finished model. This was dropped into the fuselage so that I could measure the size of the hole which I need to cut into the moulding later.
I am hoping that I can now complete the nacelle and engine details and proceed with painting.
Thanks for looking.
Stevef.
Please Log in to join the conversation.
5 years 2 months ago #332
by Stevef
Replied by Stevef on topic 1/72 Societa Italiana Aviazione (SIA) Savoja Pomilio (SP) 2
Evening All,
I glued the new nacelle top to the sides while the rear of the nacelle was blocked off with thick card and filed to shape. A liberal amount of filler was applied to the joint between the moulding on the top of the nacelle and the sides and rear where the fit was not perfect. The obligatory sanding and filling followed...


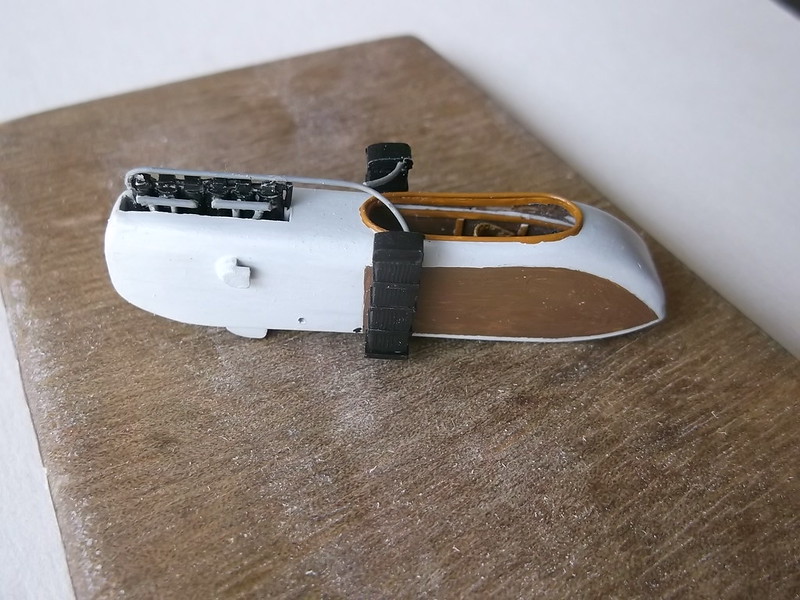
The nose now has the sharp edge and corners similar to those I managed to achieve on the Voisin. I have opened up the apertures for the cockpit and engine compartment in the nacelle. I cut around the outline of the openings with a new scalpel and finished the edges by carefully scarping and filing. The latter was a bit delicate as I did not want to damage the interior of the cockpit, although the pilot's seat was not in place at the time:


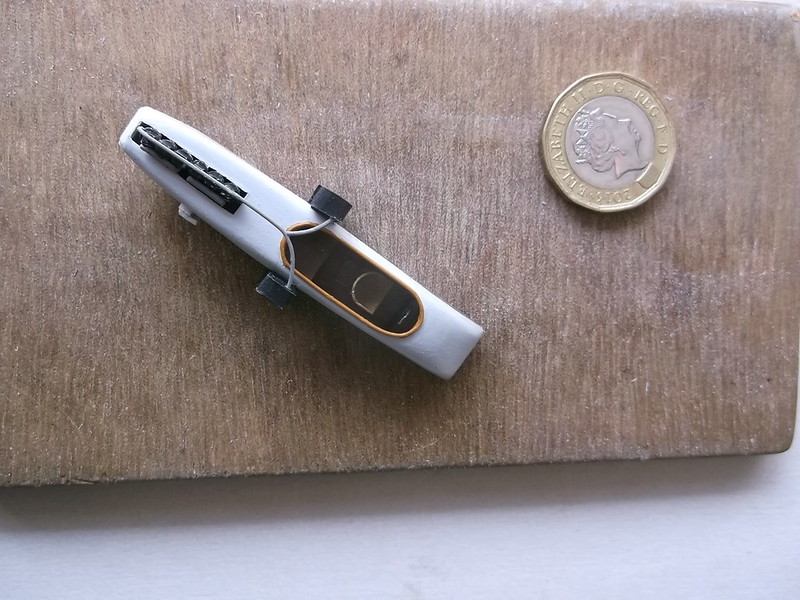
After fitting the pilot's seat I added some detail to the top of the engine: ie the part that will be just visible on the completed model. Basically I added the cam shaft from small pieces of rod between small cubes of card, the latter representing the housing for the valves on the top of the cylinders. Some thin pieces of rod on the side of the cylinders represent the carburretor intakes and I have drilled holes on the opposite side to take rod for the exhausts later. The engine was fixed into the rear of the nacelle so that I can now start painting.

Thanks for looking.
Stevef.
I glued the new nacelle top to the sides while the rear of the nacelle was blocked off with thick card and filed to shape. A liberal amount of filler was applied to the joint between the moulding on the top of the nacelle and the sides and rear where the fit was not perfect. The obligatory sanding and filling followed...
The nose now has the sharp edge and corners similar to those I managed to achieve on the Voisin. I have opened up the apertures for the cockpit and engine compartment in the nacelle. I cut around the outline of the openings with a new scalpel and finished the edges by carefully scarping and filing. The latter was a bit delicate as I did not want to damage the interior of the cockpit, although the pilot's seat was not in place at the time:
After fitting the pilot's seat I added some detail to the top of the engine: ie the part that will be just visible on the completed model. Basically I added the cam shaft from small pieces of rod between small cubes of card, the latter representing the housing for the valves on the top of the cylinders. Some thin pieces of rod on the side of the cylinders represent the carburretor intakes and I have drilled holes on the opposite side to take rod for the exhausts later. The engine was fixed into the rear of the nacelle so that I can now start painting.
Thanks for looking.
Stevef.
Please Log in to join the conversation.
5 years 2 months ago #333
by Stevef
Replied by Stevef on topic 1/72 Societa Italiana Aviazione (SIA) Savoja Pomilio (SP) 2
Evening All,
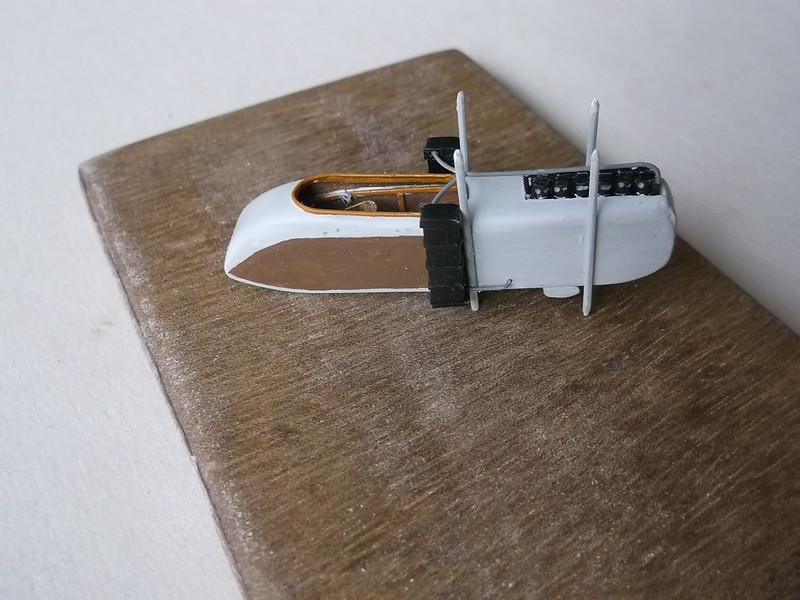
I had to make a new top wing as the old one suffered badly from banana syndrome and I was quite unable to straighten it out: the one in the photo has been discarded and the new wing is still being painted. A coaming was added around the cockpit from 20 thou rod and I have carved a propellor from wood.
I have been coating plastic with acrylic paints over the past week - mainly mixed colours (Revell white and beige 314) for the CDL on the wings and flying surfaces and white and Mittlegrau (46) for the struts and nacelle. The wood sides of the nacelle are Revell brown (381). I applied many coats of the CDL and grey (probably 10 on the flying surfaces and nearly as many for the grey on the nacelle), to build up a solid layer of colour which has a smooth semi-matt finish. The national colours were Humbrol enamel red (60) which also needed several coats as the paint is rather thin, and Humbrol enamel Dragoon Green (MC 7) which I have had since the mid-1970's! The national colours may not be an exact match but given the variations in pigments and fading which took place, I am claiming that these are probably close enough to be acceptable. The tyres were Mittlegrau.
I have received the serial transfers from Arctic Decals and will apply them to the fuselage before I continue with construction.


When the new wing is finished (hopefully tomorrow), I can start on the final construction phase - wings, tail unit and undercarriage.
Thanks for looking.
Stevef.
I had to make a new top wing as the old one suffered badly from banana syndrome and I was quite unable to straighten it out: the one in the photo has been discarded and the new wing is still being painted. A coaming was added around the cockpit from 20 thou rod and I have carved a propellor from wood.
I have been coating plastic with acrylic paints over the past week - mainly mixed colours (Revell white and beige 314) for the CDL on the wings and flying surfaces and white and Mittlegrau (46) for the struts and nacelle. The wood sides of the nacelle are Revell brown (381). I applied many coats of the CDL and grey (probably 10 on the flying surfaces and nearly as many for the grey on the nacelle), to build up a solid layer of colour which has a smooth semi-matt finish. The national colours were Humbrol enamel red (60) which also needed several coats as the paint is rather thin, and Humbrol enamel Dragoon Green (MC 7) which I have had since the mid-1970's! The national colours may not be an exact match but given the variations in pigments and fading which took place, I am claiming that these are probably close enough to be acceptable. The tyres were Mittlegrau.
I have received the serial transfers from Arctic Decals and will apply them to the fuselage before I continue with construction.
When the new wing is finished (hopefully tomorrow), I can start on the final construction phase - wings, tail unit and undercarriage.
Thanks for looking.
Stevef.
Please Log in to join the conversation.
5 years 2 months ago #334
by Stevef
Replied by Stevef on topic 1/72 Societa Italiana Aviazione (SIA) Savoja Pomilio (SP) 2
Evening All,
Construction has restarted and I have now made the nacelle ready to be fixed to the lower wing. I have thought long and hard about the order of assembly of the major components and have decided to follow the sequence described here. More will follow later.
The first step was to put the radiators on to the sides of the nacelle. I had pre-drilled holes in the nacelle and radiators to take small pins to provide a strong joint, so a drop of cement and they were on. This was followed by the pipes to the top of the engine which were made from 20 thou rod which had been bent to shape and then painted:

The cabane struts were cemented to the fuselage sides and allowed to set properly. The length of these is the same but the front end of the nacelle is supposed to be slightly lower when mounted to the wing - getting the lengths right was a bit of a fiddle. Having got the cabanes in place there were awkward cross struts to add between the lower parts of the cabanes - I used 10 x 20 thou strip for those. The return pipes from the bottom of the radiators to the engine had to be added to the bottom of the nacelle after the struts were in place as the pipes ran outside of the struts:

The serlal was now fixed in place - it was from Arctic Decals and made to order. It is slightly oversize (my fault, not Arctic Decals!), but I do not think anyone will notice if I do not mention it. I also added the exhaust pipes but some of these are too long and I will have to remove and trim them later before I fix the top wing i place.
Now to mount the booms and tail. This is what I have been thinking about for some time. I have decided that the method I am about to describe is as good as any, but it varies somewhat form the method that I have used before. The rear of the booms were fixed to the rudder posts and the horizontal tail section sat on a cross member between the lower booms. The rudder posts passed through the horizontal tail surface, so I soldered two small rudder posts to the ends of the lower booms. I drilled two holes in the horizontal tail surface and squared these with the end of a small file and made sure that the posts would pass through properly.
The lower booms were epoxied to the slots in the rear of the lower wing and the correct angle achieved by using a standard boom jig - the height had been measured from the plans as described in previous build articles:
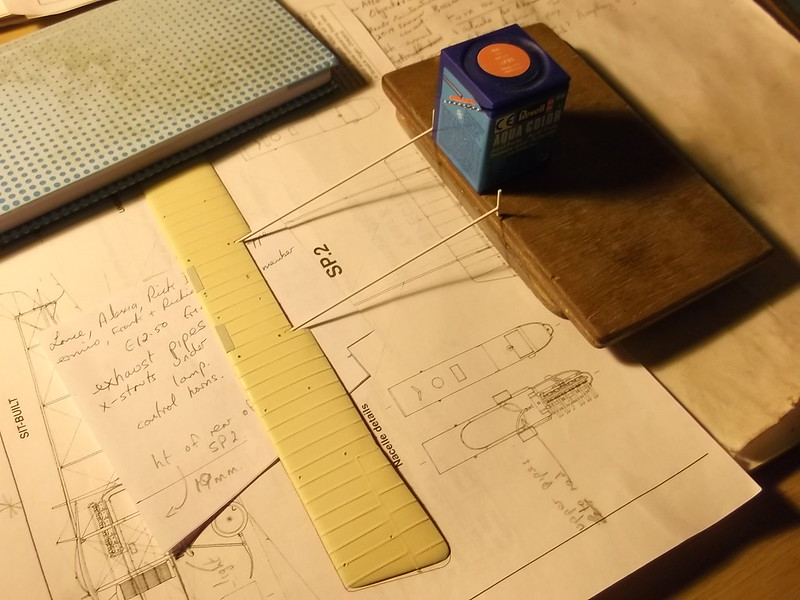
The above shows the booms set ready to be epoxied, the paint pot was to help keep the rudder posts upright while I fiddled and checked that everything was square and true. After the expoxy had been applied and cured I had this:


In the images there is a piece of paper with a line and arrow with 19mm written on it: the line represents the height of the booms at the tail end relative to the rear of the wing - the edge of the paper was used to measure the height of the wood blocks that make the jig. The wing and booms were laid over plans to get accurate alignments. Simple and effective - scratch building does not have to be complicated or difficult. A simple check of the newly installed booms with the horizontal tail surface showed that the rudder posts would pass through the holes in the tail, so the horizontal bar between the rear of the booms was inserted. This was a piece of 20 x 30 thou strip:
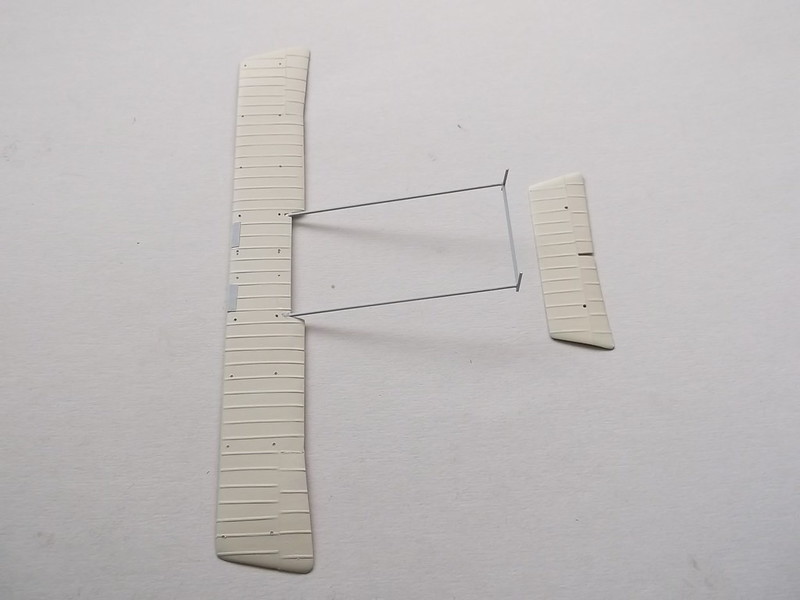
The nacelle sub-assembly was cemented to the lower wing and the boom bracing at the rear painted. Finally the horizontal tail surface was CA'd to the rudder posts and booms:
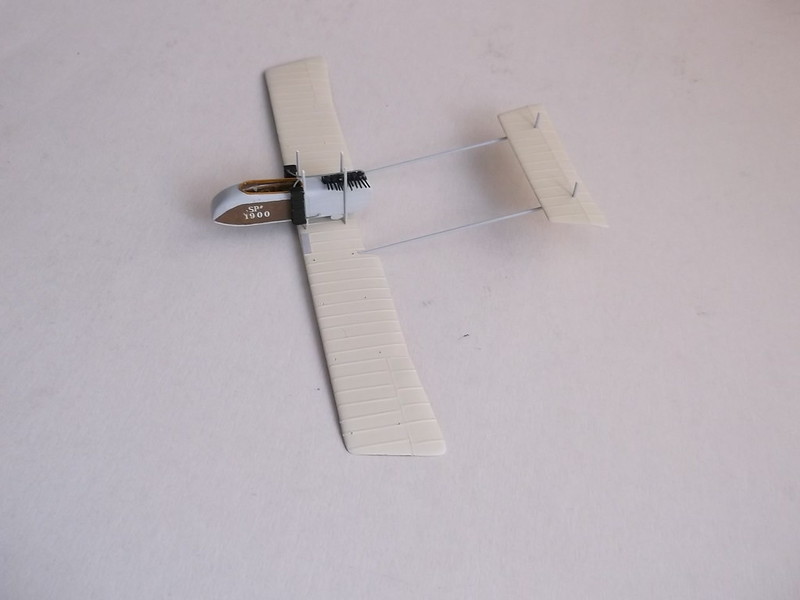

I have worked out how I intend to fix the upper booms to the top wing and then wing to the above asembly and will describe the process in the next update when I have completed that stage.
Thanks for looking.
Stevef.
Construction has restarted and I have now made the nacelle ready to be fixed to the lower wing. I have thought long and hard about the order of assembly of the major components and have decided to follow the sequence described here. More will follow later.
The first step was to put the radiators on to the sides of the nacelle. I had pre-drilled holes in the nacelle and radiators to take small pins to provide a strong joint, so a drop of cement and they were on. This was followed by the pipes to the top of the engine which were made from 20 thou rod which had been bent to shape and then painted:
The cabane struts were cemented to the fuselage sides and allowed to set properly. The length of these is the same but the front end of the nacelle is supposed to be slightly lower when mounted to the wing - getting the lengths right was a bit of a fiddle. Having got the cabanes in place there were awkward cross struts to add between the lower parts of the cabanes - I used 10 x 20 thou strip for those. The return pipes from the bottom of the radiators to the engine had to be added to the bottom of the nacelle after the struts were in place as the pipes ran outside of the struts:
The serlal was now fixed in place - it was from Arctic Decals and made to order. It is slightly oversize (my fault, not Arctic Decals!), but I do not think anyone will notice if I do not mention it. I also added the exhaust pipes but some of these are too long and I will have to remove and trim them later before I fix the top wing i place.
Now to mount the booms and tail. This is what I have been thinking about for some time. I have decided that the method I am about to describe is as good as any, but it varies somewhat form the method that I have used before. The rear of the booms were fixed to the rudder posts and the horizontal tail section sat on a cross member between the lower booms. The rudder posts passed through the horizontal tail surface, so I soldered two small rudder posts to the ends of the lower booms. I drilled two holes in the horizontal tail surface and squared these with the end of a small file and made sure that the posts would pass through properly.
The lower booms were epoxied to the slots in the rear of the lower wing and the correct angle achieved by using a standard boom jig - the height had been measured from the plans as described in previous build articles:
The above shows the booms set ready to be epoxied, the paint pot was to help keep the rudder posts upright while I fiddled and checked that everything was square and true. After the expoxy had been applied and cured I had this:
In the images there is a piece of paper with a line and arrow with 19mm written on it: the line represents the height of the booms at the tail end relative to the rear of the wing - the edge of the paper was used to measure the height of the wood blocks that make the jig. The wing and booms were laid over plans to get accurate alignments. Simple and effective - scratch building does not have to be complicated or difficult. A simple check of the newly installed booms with the horizontal tail surface showed that the rudder posts would pass through the holes in the tail, so the horizontal bar between the rear of the booms was inserted. This was a piece of 20 x 30 thou strip:
The nacelle sub-assembly was cemented to the lower wing and the boom bracing at the rear painted. Finally the horizontal tail surface was CA'd to the rudder posts and booms:
I have worked out how I intend to fix the upper booms to the top wing and then wing to the above asembly and will describe the process in the next update when I have completed that stage.
Thanks for looking.
Stevef.
Please Log in to join the conversation.
Time to create page: 0.165 seconds
- You are here:
-
Home

-
Forum
-
Show & Tell
-
Aircraft
- 1/72 Societa Italiana Aviazione (SIA) Savoja Pomilio (SP) 2