Scratch built Voisin III LAS

9 years 2 weeks ago #103
by Stevef
Scratch built Voisin III LAS was created by Stevef
Evening All
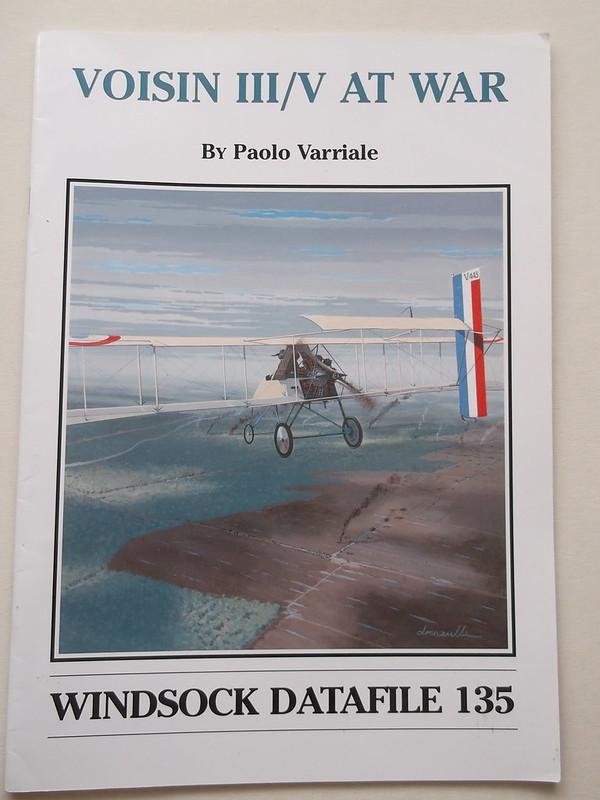
I have had a severe attack of pusher withdrawal symptoms again: time to start another one! This will be a French design but I will finish it in RNAS markings. Voisin machines were very numerous during the first part of WW1 as they were employed by French, British and Italian air forces, some were sent to Russia and others were built there, so it was an important allied type. As it is a pusher it is seriously under-represented in the kit market: there is a vacuform kit by Flashback for which Stevehed gave a super demo build. Now I will try to show how to make one from scratch using plastic card and florists wire. I am going to cheat a little because I have acquired from Dave Bardo a spare rotary engine from a Roden kit which I will modify to represent the Salmson of the Voisin. I suppose this is the scratch builder's version of an aftermarket part. I will be using genuine aftermarket parts in the form of a set of Eduard PE wire wheels: my first experience of this medium. The plans will come from the DataFile no 135.
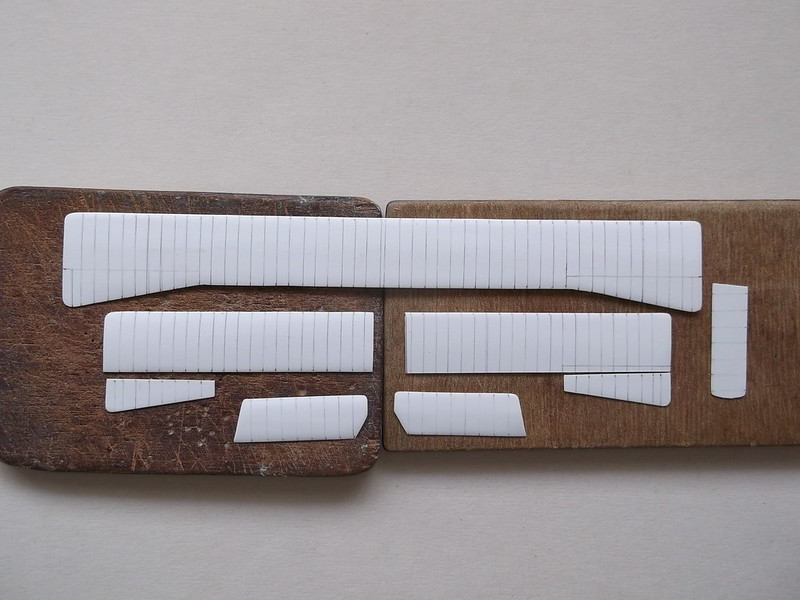
I started by bending some 30 thou plastic card in a piece of drain pipe which had been plugged at one end. (Again I have to thank Stevehed on Airfix Tribute Forum for this idea). I placed the card in the pipe and held it with a wooden spoon handle while I poured in boiling water. After 10 seconds I drained out the hot water and poured in cold water. The card was then suitably bent so that I could cut out the wing blanks. I also cut out some ailerons and horizontal tail stabilisers, and a rudder. I have marked these in pencil to show where the ribs will be added in the form of 10 x 20 thou Evergreen strip.
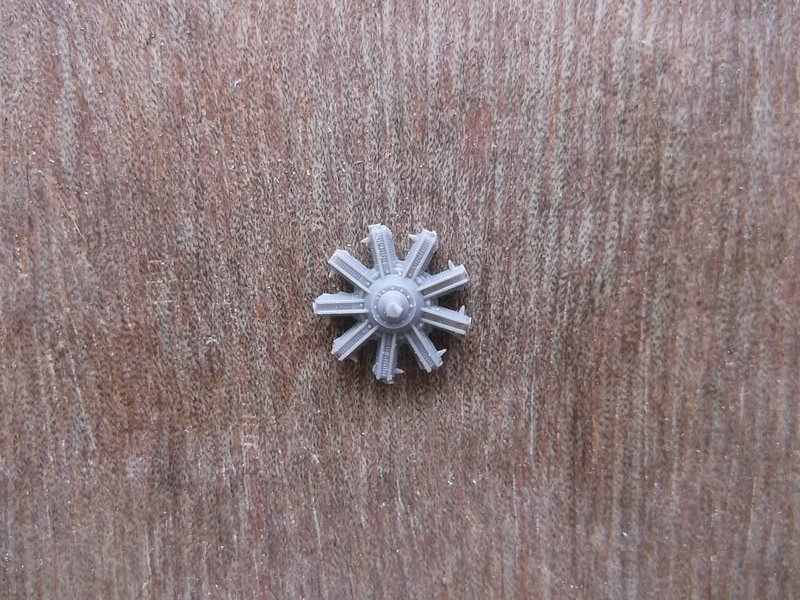
The engine looked like this:
so the first change was to get rid of those awful moulded push rods and replace them with some new ones from thin copper wire.

An exhaust pipe was made from plastic rod and glued to the rear of the engine:
and finally an extended drive shaft also made from thick rod which had been filed to shape and glued to the front.
More to follow.
Thanks for looking.
I have had a severe attack of pusher withdrawal symptoms again: time to start another one! This will be a French design but I will finish it in RNAS markings. Voisin machines were very numerous during the first part of WW1 as they were employed by French, British and Italian air forces, some were sent to Russia and others were built there, so it was an important allied type. As it is a pusher it is seriously under-represented in the kit market: there is a vacuform kit by Flashback for which Stevehed gave a super demo build. Now I will try to show how to make one from scratch using plastic card and florists wire. I am going to cheat a little because I have acquired from Dave Bardo a spare rotary engine from a Roden kit which I will modify to represent the Salmson of the Voisin. I suppose this is the scratch builder's version of an aftermarket part. I will be using genuine aftermarket parts in the form of a set of Eduard PE wire wheels: my first experience of this medium. The plans will come from the DataFile no 135.
I started by bending some 30 thou plastic card in a piece of drain pipe which had been plugged at one end. (Again I have to thank Stevehed on Airfix Tribute Forum for this idea). I placed the card in the pipe and held it with a wooden spoon handle while I poured in boiling water. After 10 seconds I drained out the hot water and poured in cold water. The card was then suitably bent so that I could cut out the wing blanks. I also cut out some ailerons and horizontal tail stabilisers, and a rudder. I have marked these in pencil to show where the ribs will be added in the form of 10 x 20 thou Evergreen strip.
The engine looked like this:
so the first change was to get rid of those awful moulded push rods and replace them with some new ones from thin copper wire.
An exhaust pipe was made from plastic rod and glued to the rear of the engine:
and finally an extended drive shaft also made from thick rod which had been filed to shape and glued to the front.
More to follow.
Thanks for looking.
Please Log in to join the conversation.
9 years 2 weeks ago #104
by Stevef
Replied by Stevef on topic Scratch built Voisin III LAS
Evening All,
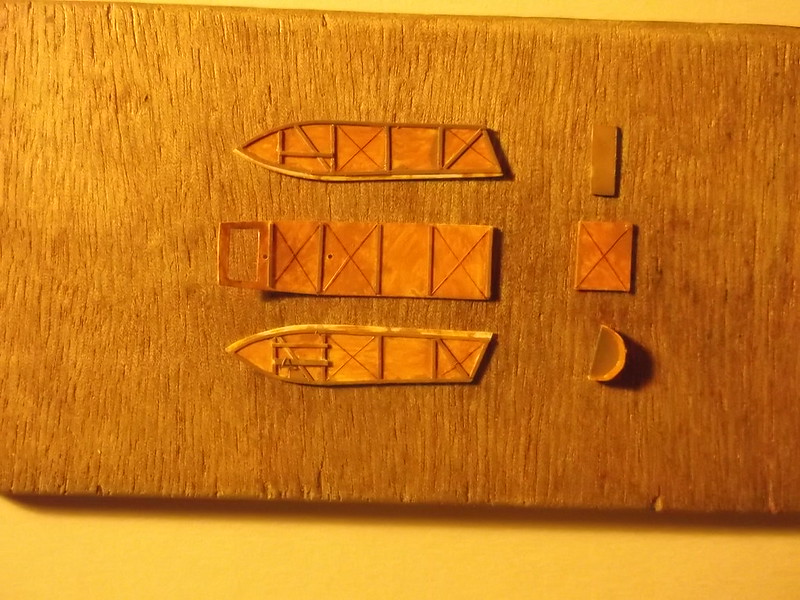
I made the fuselage sides and floor from 20thou plastic card and painted the interior with Revell semi-matt natural wood (SM 382) which is close enough for this model. Very little will be visible when the fuselage is closed so I am not too concerned about the colour. I added some framing from Evergreen strip and interior wire bracing - the latter is rolled copper wire.
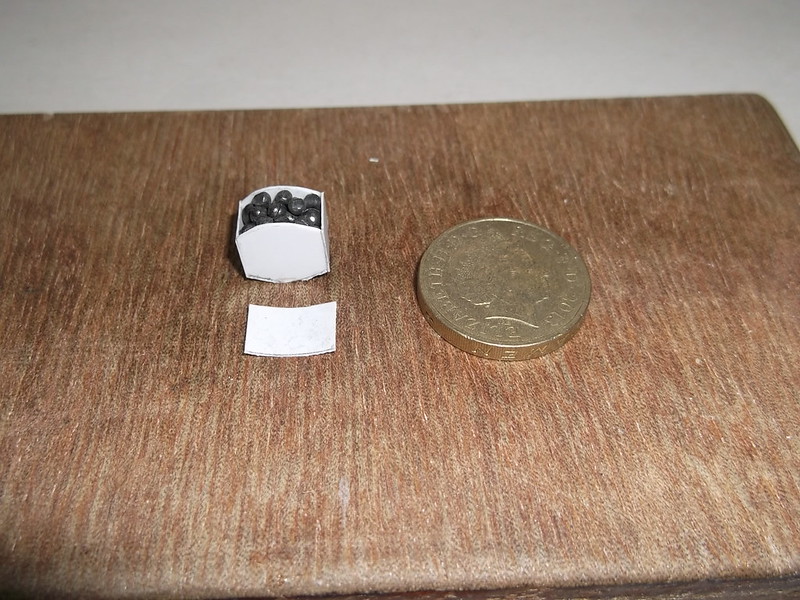
I also made a fuel tank from 20thou plastic card and filled it with some old lead fishing weights that I found stored in the roof from my earlier incarnation as a modeller: lead weights are no longer available in the UK. This aircraft had so much lead in its petrol that its exhaust fumes would have poisoned half of the troops that it flew over, never mind the ground crews!! This model will be a nose sitter so I need to add a lot of weight - there are few places to put it without it being visible. Just to make sure I am going to put more under the observer's seat too.
 [/url
[/url
[
The fuel tank was painted brass but I am not sure that much will be visible when the top of the fuselage is in place. The shelf behind the fuel tank also has lead shot underneath it - extra weight which I hope will help to pull the nose down. (There was no such shelf on the real aircraft but this will not be visible on the completed model).
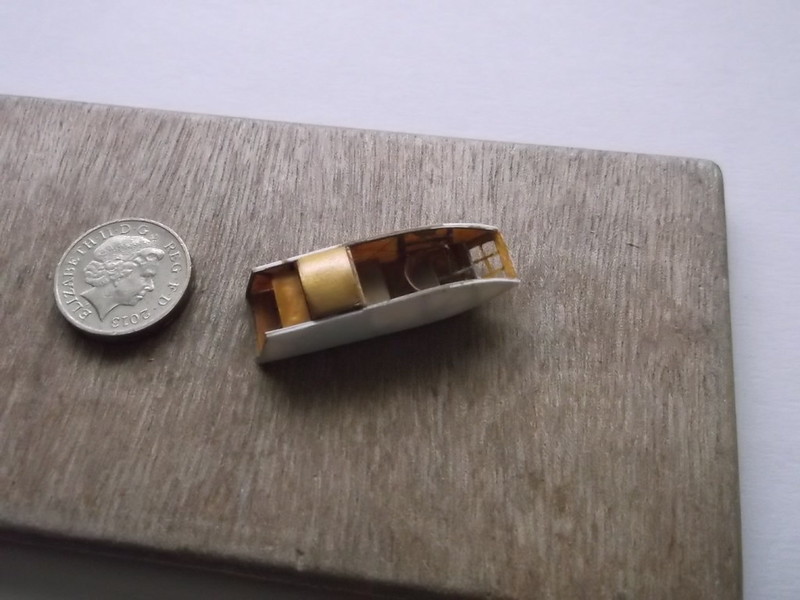
The pilots' seat was made from card together with a control column (rod) and rudder bar and pedals. The window in the floor at the front of the nacelle was added from a small piece of acetate cut from an old blister pack which I keep for this purpose.
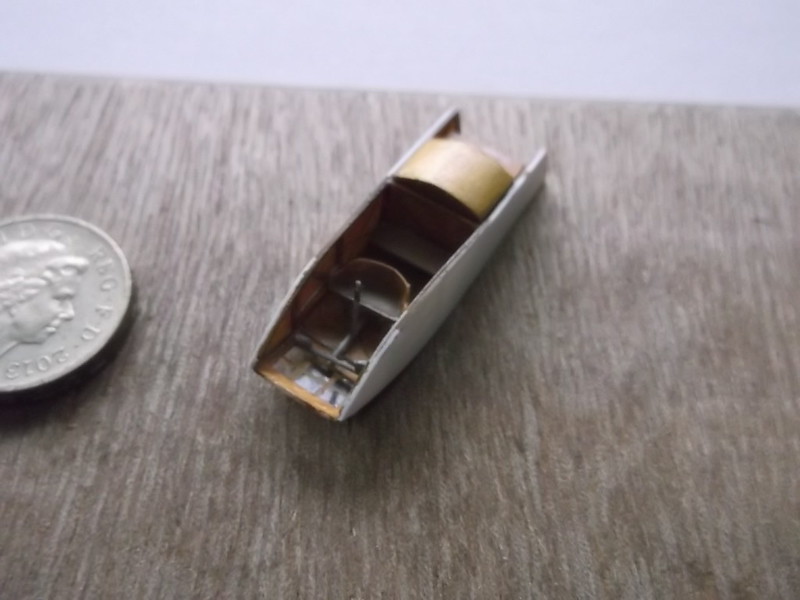
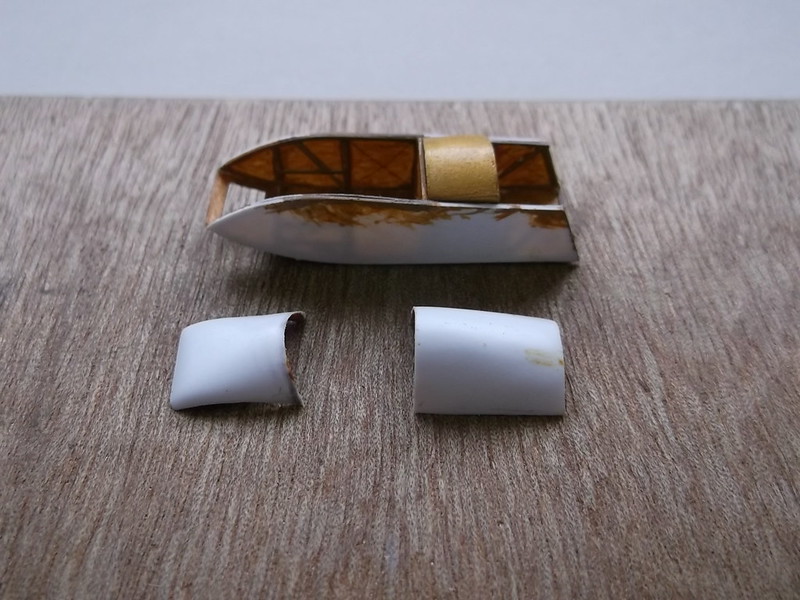
I moulded the top sections of the fuselage (front and rear) from 30 thou card. These will be glued into place next - I have been away for the Easter break and have not done that yet.
Thanks for looking.
I made the fuselage sides and floor from 20thou plastic card and painted the interior with Revell semi-matt natural wood (SM 382) which is close enough for this model. Very little will be visible when the fuselage is closed so I am not too concerned about the colour. I added some framing from Evergreen strip and interior wire bracing - the latter is rolled copper wire.
I also made a fuel tank from 20thou plastic card and filled it with some old lead fishing weights that I found stored in the roof from my earlier incarnation as a modeller: lead weights are no longer available in the UK. This aircraft had so much lead in its petrol that its exhaust fumes would have poisoned half of the troops that it flew over, never mind the ground crews!! This model will be a nose sitter so I need to add a lot of weight - there are few places to put it without it being visible. Just to make sure I am going to put more under the observer's seat too.
[
The fuel tank was painted brass but I am not sure that much will be visible when the top of the fuselage is in place. The shelf behind the fuel tank also has lead shot underneath it - extra weight which I hope will help to pull the nose down. (There was no such shelf on the real aircraft but this will not be visible on the completed model).
The pilots' seat was made from card together with a control column (rod) and rudder bar and pedals. The window in the floor at the front of the nacelle was added from a small piece of acetate cut from an old blister pack which I keep for this purpose.
I moulded the top sections of the fuselage (front and rear) from 30 thou card. These will be glued into place next - I have been away for the Easter break and have not done that yet.
Thanks for looking.
Please Log in to join the conversation.
9 years 2 weeks ago #105
by DaveB
Replied by DaveB on topic Scratch built Voisin III LAS
Hello, Steve -
Sorry I've missed this build log - I'll follow with interest and I've actually heard of this machine!
Looking good so far, mate. What is the next stage of your project?
Dave
Sorry I've missed this build log - I'll follow with interest and I've actually heard of this machine!
Looking good so far, mate. What is the next stage of your project?
Dave
Please Log in to join the conversation.
9 years 1 week ago #106
by Stevef
Replied by Stevef on topic Scratch built Voisin III LAS
Evening All,
Thanks Dave for dropping by - glad you know about this type. Yes it is another pusher but you know me well enough now: I have a special fondness for pushers and any aircraft that has a complex rear end!!
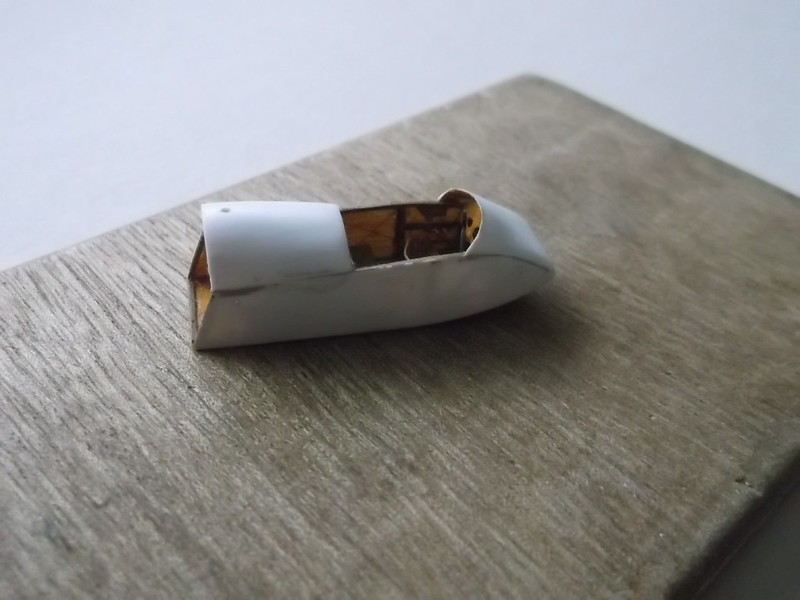
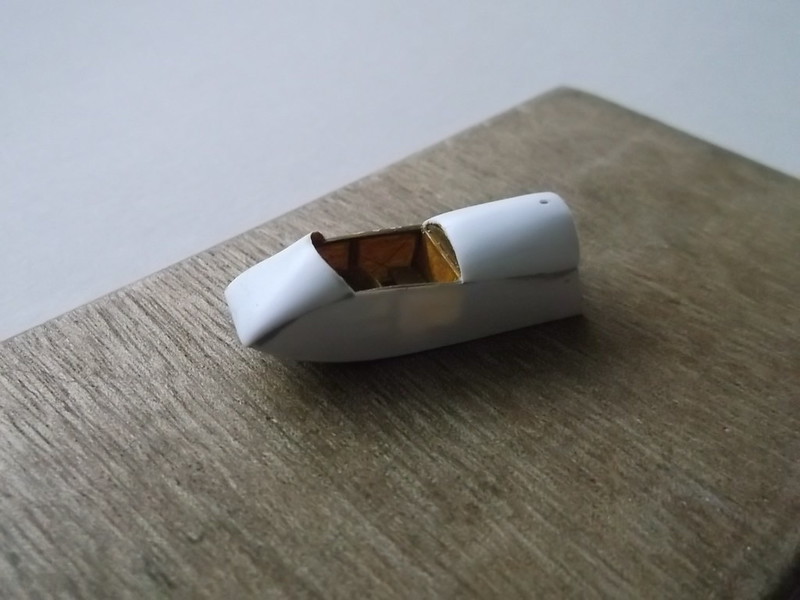
I have attached the moulded upper parts of the fuselage nacelle to the main body and cleaned up the joints. I also drilled the holes in the top rear where the water pipe from the radiators will enter.
The radiators have been made from 2 x 60thou laminated card which was scribed to represent the vertical pipes with thin strip glued for the binding pieces. Holes have been drilled where the pipes will enter and leave.
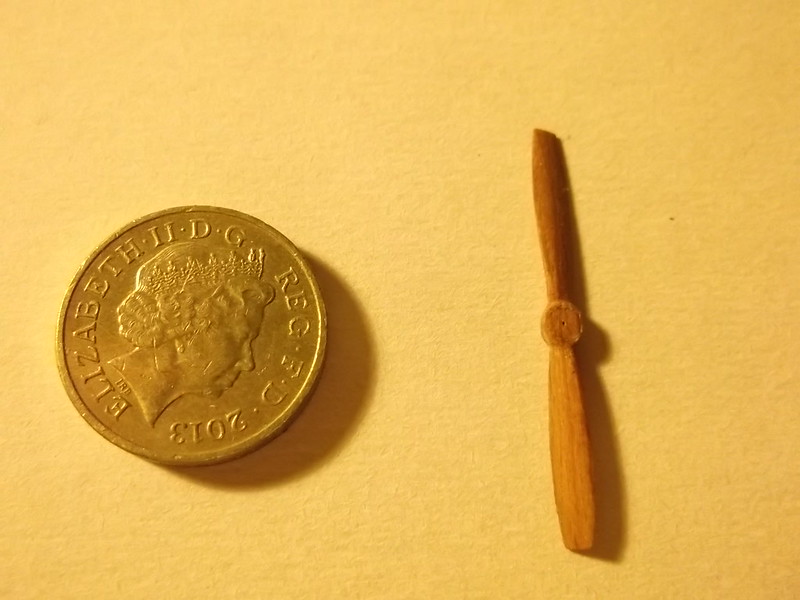
The propellor has been carved from wood and I have added the ribs to the flying surfaces from 10 x 20 thou Evergreen strip.
The next stage will be to glue the lower wings to the nacelle and then the booms to the wings: more later.
Thanks for looking.
Thanks Dave for dropping by - glad you know about this type. Yes it is another pusher but you know me well enough now: I have a special fondness for pushers and any aircraft that has a complex rear end!!
I have attached the moulded upper parts of the fuselage nacelle to the main body and cleaned up the joints. I also drilled the holes in the top rear where the water pipe from the radiators will enter.
The radiators have been made from 2 x 60thou laminated card which was scribed to represent the vertical pipes with thin strip glued for the binding pieces. Holes have been drilled where the pipes will enter and leave.
The propellor has been carved from wood and I have added the ribs to the flying surfaces from 10 x 20 thou Evergreen strip.
The next stage will be to glue the lower wings to the nacelle and then the booms to the wings: more later.
Thanks for looking.
Please Log in to join the conversation.
9 years 5 days ago #107
by Stevef
Replied by Stevef on topic Scratch built Voisin III LAS
Evening All,
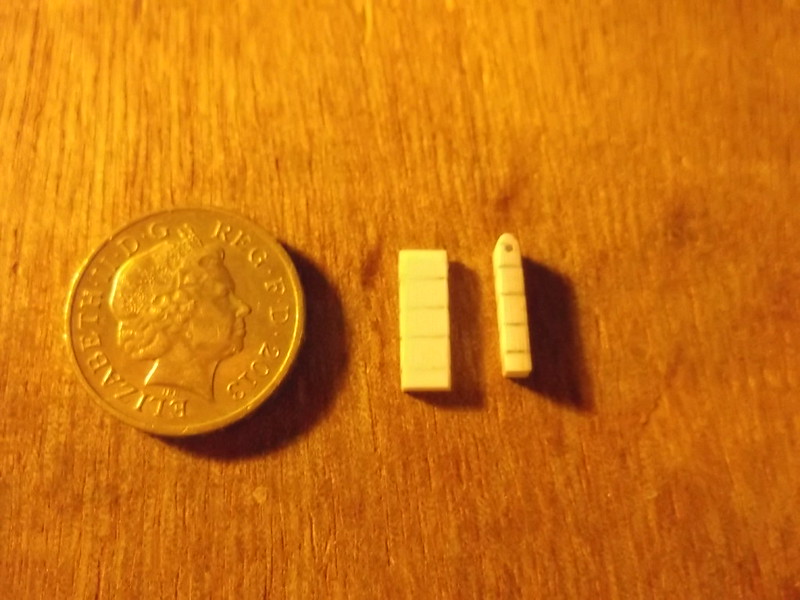
I have added the ribs to the wings from 10 x 20 thou Evergreen strip attached with liquid glue. These were then sanded down to take off the edges. I have also added the ailerons to the lower wings.
Many of you are aware that when it comes to pushers, both conversions and scratch builds, I have considerable form. However some may not know of the method that I use to construct the booms, so I will describe the method in detail here and in a later post. What follows is part one of a process - part 2 will follow after I have completed painting the wings, fuselage, tail units, etc. The problem with pushers is that the boom assembly must fit the wing trailing edges exactly. In some cases the horizontal boom arms may not be parallel, nor are they in line with the top of the wings. If the booms are assembled first from a side elevation drawing of the model, the spacing of the wings has to be absolutely precise or problems will arise when trying to attach the front ends of the complete booms to the trailing edges of the wings. I avoid this problem by attaching the horizontal arms of the booms to the wings before I put the top wing into place.
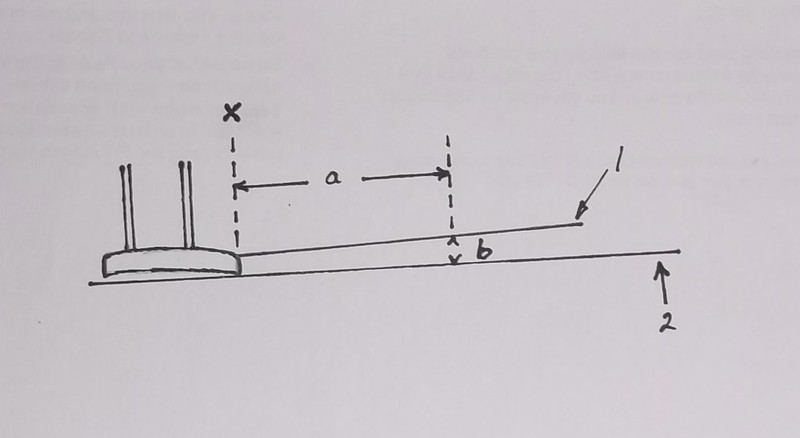
The drawing shows the wings and how to measure the angles of the booms. Line ' 2 ' is the horizontal which touches the front and rear of the underside of the wing, (not as in the drawing where it has missed the front edge - I know, I cannot draw properly!) Distance ' a' is measured to a convenient distance from the trailing edge of the wing - make it as far back as possible while at the same time being easy to measure, e.g. 5.5cm rather than 5.7cm. Height b is measured from the scale drawing: it is the difference between line ' 2 ' and the line of the boom ' 1 ' at the measured distance from the trailing edge of the wing: in this case 5.5cm. Height ' b ' tells you how high the support for the boom will need to be at 5.5cm from the trailing edge of the wing when the wing is lying flat on the desk/modelling bench. Now you can put your two supports, e g a piece of plastic card of the thickness ' b', at distance ' a ' (in this case 5.5cm), one for each boom, behind the trailing edge of the model wing. When you attach the booms to the top of the wing rest them on the supports while they dry out, and you will have the correct angle between the boom and the wing. NB the distance ' b ' may not be the same for both wings: you must measure each wing separately. I use Araldite to attach the booms to the wing because it sets very hard but gives me some wriggle time if needed. I make my booms from florists wire because it is about the right diameter and it is easy to roll straight but is also rigid and does not sag later. I file out a groove in the top of the wing trailing edges with a round file into which I can place the boom: this gives a better join between the wire of the boom and the plastic of the wing.
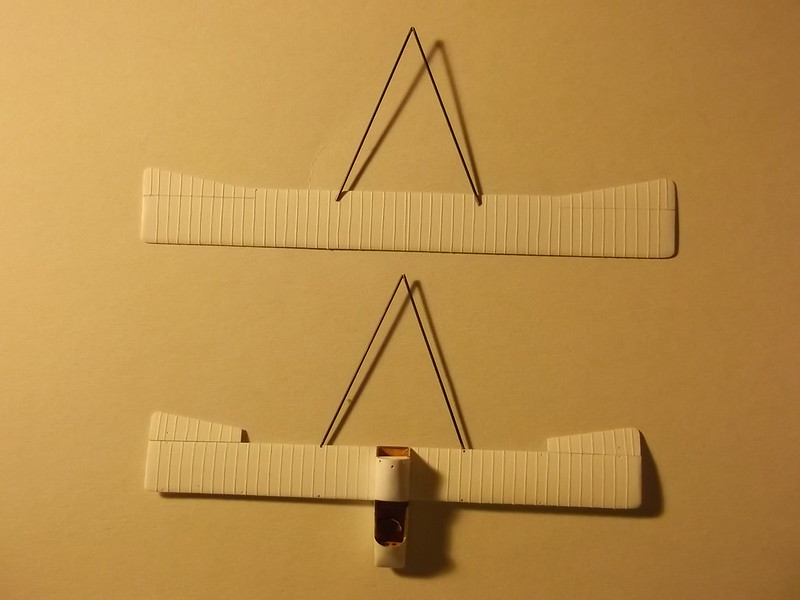
Above are the two sets of booms, one on each wing, for the Voisin which is currently under construction. Note that I joined the ends of the booms with superglue as this sets quickly and gives the structure a little additional support while the epoxy cures. The shadows show that the booms do not lie flat but are above the desk top: this is because I used the method described above, and this will ensure that when I put the top wing on to the lower one and join the rear of the booms to the rudder, they will be at the correct vertical distance apart. In a later post I will describe how I assemble the top wing and the remainder of the boom strut assembly. But first I must paint the above assemblies and add the markings.
Thanks for looking.
I have added the ribs to the wings from 10 x 20 thou Evergreen strip attached with liquid glue. These were then sanded down to take off the edges. I have also added the ailerons to the lower wings.
Many of you are aware that when it comes to pushers, both conversions and scratch builds, I have considerable form. However some may not know of the method that I use to construct the booms, so I will describe the method in detail here and in a later post. What follows is part one of a process - part 2 will follow after I have completed painting the wings, fuselage, tail units, etc. The problem with pushers is that the boom assembly must fit the wing trailing edges exactly. In some cases the horizontal boom arms may not be parallel, nor are they in line with the top of the wings. If the booms are assembled first from a side elevation drawing of the model, the spacing of the wings has to be absolutely precise or problems will arise when trying to attach the front ends of the complete booms to the trailing edges of the wings. I avoid this problem by attaching the horizontal arms of the booms to the wings before I put the top wing into place.
The drawing shows the wings and how to measure the angles of the booms. Line ' 2 ' is the horizontal which touches the front and rear of the underside of the wing, (not as in the drawing where it has missed the front edge - I know, I cannot draw properly!) Distance ' a' is measured to a convenient distance from the trailing edge of the wing - make it as far back as possible while at the same time being easy to measure, e.g. 5.5cm rather than 5.7cm. Height b is measured from the scale drawing: it is the difference between line ' 2 ' and the line of the boom ' 1 ' at the measured distance from the trailing edge of the wing: in this case 5.5cm. Height ' b ' tells you how high the support for the boom will need to be at 5.5cm from the trailing edge of the wing when the wing is lying flat on the desk/modelling bench. Now you can put your two supports, e g a piece of plastic card of the thickness ' b', at distance ' a ' (in this case 5.5cm), one for each boom, behind the trailing edge of the model wing. When you attach the booms to the top of the wing rest them on the supports while they dry out, and you will have the correct angle between the boom and the wing. NB the distance ' b ' may not be the same for both wings: you must measure each wing separately. I use Araldite to attach the booms to the wing because it sets very hard but gives me some wriggle time if needed. I make my booms from florists wire because it is about the right diameter and it is easy to roll straight but is also rigid and does not sag later. I file out a groove in the top of the wing trailing edges with a round file into which I can place the boom: this gives a better join between the wire of the boom and the plastic of the wing.
Above are the two sets of booms, one on each wing, for the Voisin which is currently under construction. Note that I joined the ends of the booms with superglue as this sets quickly and gives the structure a little additional support while the epoxy cures. The shadows show that the booms do not lie flat but are above the desk top: this is because I used the method described above, and this will ensure that when I put the top wing on to the lower one and join the rear of the booms to the rudder, they will be at the correct vertical distance apart. In a later post I will describe how I assemble the top wing and the remainder of the boom strut assembly. But first I must paint the above assemblies and add the markings.
Thanks for looking.
Please Log in to join the conversation.
8 years 11 months ago #108
by Stevef
Replied by Stevef on topic Scratch built Voisin III LAS
Evening All,
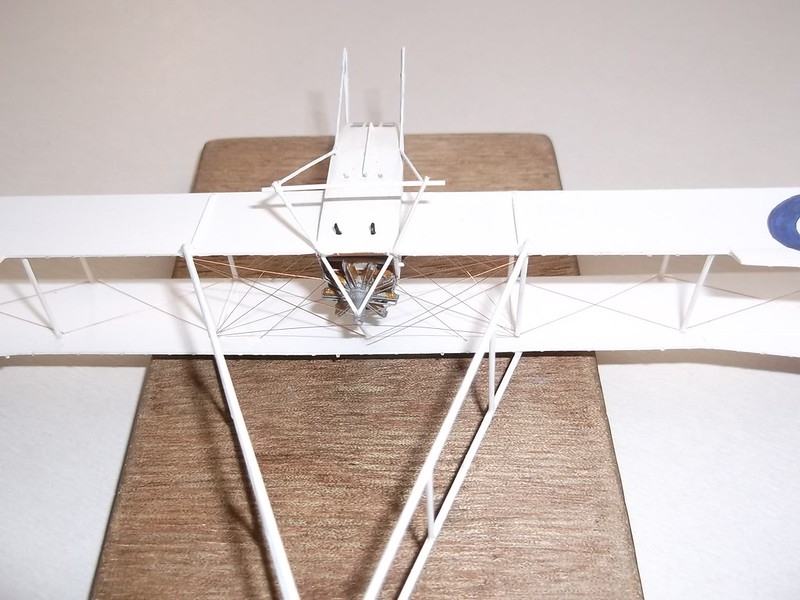
I have painted the model and the markings: the latter were hand painted. To put on the roundels I scored the circles with a pair of dividers and then painted the red and blue circles allowing the paint to fill the grooves. The serial number on the nacelle was printed on my home computer.
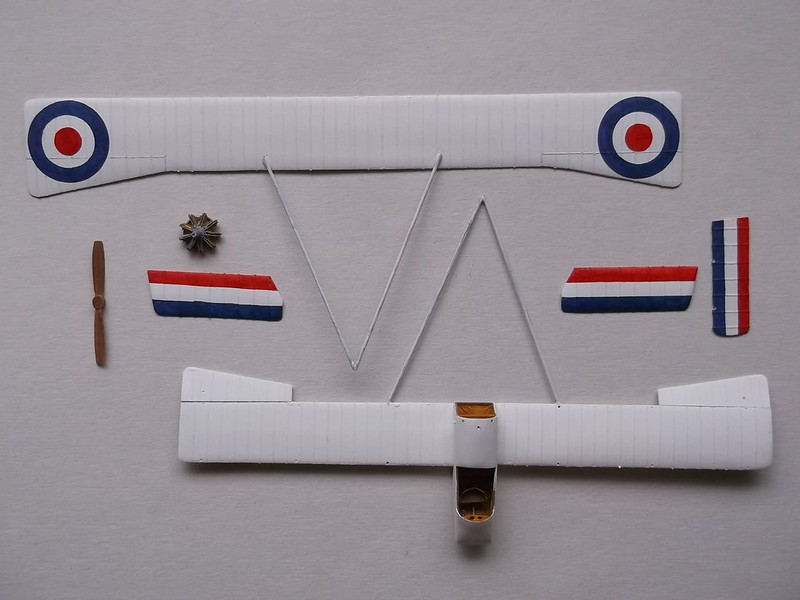
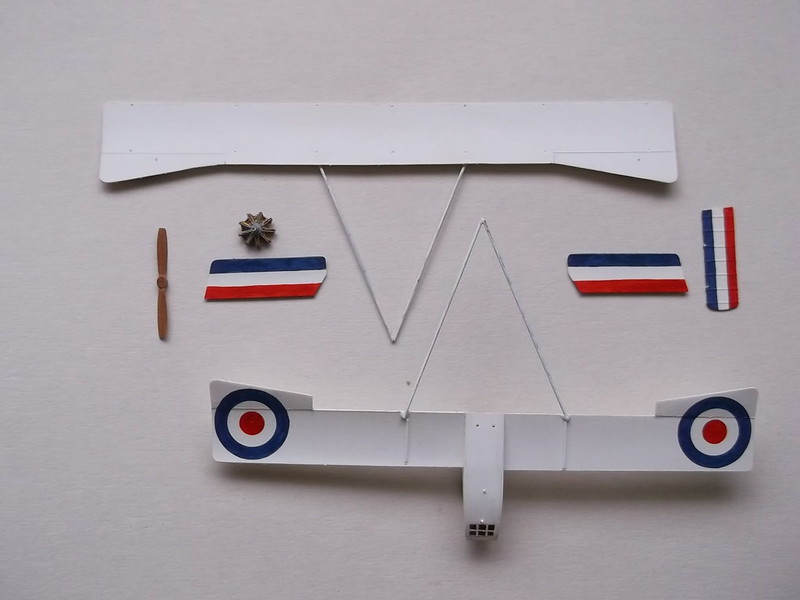
I have been drilling holes in the nacelle to take the various pipes and parts which are attached to it: this seems to have more holes than a Tilsiter cheese!
The engine was fixed via a pin from the rear of the engine which was put into a hole in the horizontal bar which crosses the rear of the nacelle. Then the braces from the rear end of the drive shaft to the bottom rear of the nacelle could be fixed. The small exhaust pipes which lead from the ring on the rear into the rear of the nacelle were made from bent 30 thou card and inserted into some of the holes mentioned above.
The radiators have been put into place and the pipes to and from the engine. The pipes were made from 20 thou rod and were fixed to the holes drilled in the fuselage and sides of the radiator blocks.
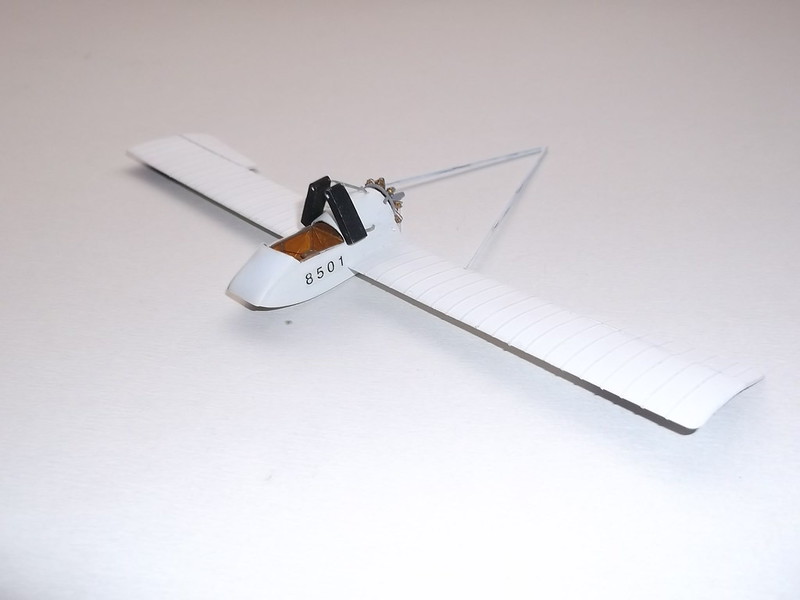
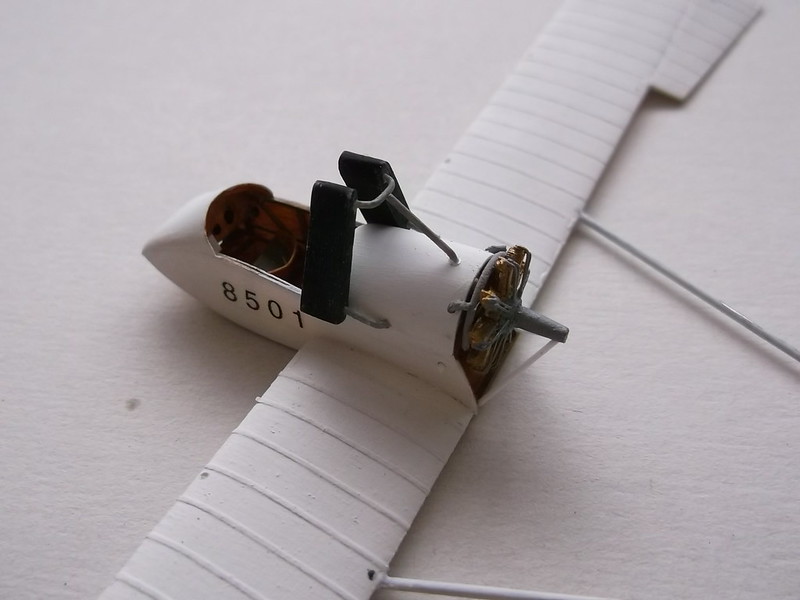

The next stage will be to add the top wing.
Thanks for looking.
I have painted the model and the markings: the latter were hand painted. To put on the roundels I scored the circles with a pair of dividers and then painted the red and blue circles allowing the paint to fill the grooves. The serial number on the nacelle was printed on my home computer.
I have been drilling holes in the nacelle to take the various pipes and parts which are attached to it: this seems to have more holes than a Tilsiter cheese!
The engine was fixed via a pin from the rear of the engine which was put into a hole in the horizontal bar which crosses the rear of the nacelle. Then the braces from the rear end of the drive shaft to the bottom rear of the nacelle could be fixed. The small exhaust pipes which lead from the ring on the rear into the rear of the nacelle were made from bent 30 thou card and inserted into some of the holes mentioned above.
The radiators have been put into place and the pipes to and from the engine. The pipes were made from 20 thou rod and were fixed to the holes drilled in the fuselage and sides of the radiator blocks.
The next stage will be to add the top wing.
Thanks for looking.
Please Log in to join the conversation.
8 years 11 months ago #109
by Stevef
Replied by Stevef on topic Scratch built Voisin III LAS
Evening All,
I have put on the top wing and rudder and all of the wing and boom struts. I will now describe part two of how I fix a wing and booms on a pusher in such a way that I ensure that the boom struts and rudder fit correctly first time.
I started this particular assembly by cutting two small indents in the leading edge of the rudder where the boom struts would join. (In reality the ends of the booms were attached to the rudder post by hinges but that is not easy to model in this scale so I compromised). The rudder was glued to the V of the lower boom with superglue and held in position while the glue dried. I had already measured accurately from the plans the inner wing struts: these were glued to the lower wing. While they were still pliable I lowered the top wing on to the struts having first put small blobs of cement into the holes on the underside of the top wing so that the struts could be eased into position and the wing lined up with the one underneath. The V of the upper boom was then edged into the slot on the leading edge of the rudder and superglued in place, making sure that the leading edge of the rudder was vertical. Now I supported the upper wing with some square Revell acrylic paint pots to make sure that nothing moved while the wing strut cement set hard.
The structure may look weak but in fact when it is properly dry it is quite easy to handle provided one is careful not to strike it hard or drop it.
I will describe the rest of the assembly in the next post.
Steve.
Please Log in to join the conversation.
8 years 11 months ago #110
by Stevef
Replied by Stevef on topic Scratch built Voisin III LAS
Evening All,
Now for the remainder of the assembly of the top wing and booms.
Adding the rest of the wing struts was very simple - they were eased into place one at a time after cement had been placed in the relevant holes in the wings. The outer struts are angled outwards on this model which is why I fixed the innermost struts first - the wings were rigid when I came to add the outer ones and they could therefore be put in place fairly easily: on other pushers I normally add the outer struts first when putting on the top wing because it makes a larger and more stable triangular structure. The boom struts could be cut to the exact length having been measured from the model with a pair of dividers: these were fixed with superglue. The cabane struts under the leading edges of the radiators and the single strut from the end of the engine drive shaft to the top wing completed the exercise.

This method has many advantages among which was that I was not trying to do too many operations simultaneously and could therefore focus on getting the alignments right. Once the inner wing struts had set I had a strong but slightly flexible structure to work with. The booms structures were essentially made to measure while the wings can be properly aligned and the rudder made vertical in relation to the thrust line of the aircraft. The outer wing struts being angled outwards did not cause a problem because the others were already in place holding the wings rigid. Now I can rig the underside of the top wing before I tackle the undercarriage.
Thanks for looking.
Steve.
Now for the remainder of the assembly of the top wing and booms.
Adding the rest of the wing struts was very simple - they were eased into place one at a time after cement had been placed in the relevant holes in the wings. The outer struts are angled outwards on this model which is why I fixed the innermost struts first - the wings were rigid when I came to add the outer ones and they could therefore be put in place fairly easily: on other pushers I normally add the outer struts first when putting on the top wing because it makes a larger and more stable triangular structure. The boom struts could be cut to the exact length having been measured from the model with a pair of dividers: these were fixed with superglue. The cabane struts under the leading edges of the radiators and the single strut from the end of the engine drive shaft to the top wing completed the exercise.
This method has many advantages among which was that I was not trying to do too many operations simultaneously and could therefore focus on getting the alignments right. Once the inner wing struts had set I had a strong but slightly flexible structure to work with. The booms structures were essentially made to measure while the wings can be properly aligned and the rudder made vertical in relation to the thrust line of the aircraft. The outer wing struts being angled outwards did not cause a problem because the others were already in place holding the wings rigid. Now I can rig the underside of the top wing before I tackle the undercarriage.
Thanks for looking.
Steve.
Please Log in to join the conversation.
8 years 11 months ago #111
by Stevef
Replied by Stevef on topic Scratch built Voisin III LAS
Evening All,
I have rigged the underside of the top wing as this will be much less accessible later, and I do not want to knock bits off the undercarriage assembly and have to put them all back again at a later stage. I have also put the undercarriage legs on: this aircraft had a pair of nose wheels which was unusual for the time. I made the rear most struts from 20 x 30 thou card which had been filed to aerofoil section, and the oleo legs for the front were made in the same way. The remaining struts were made from rolled wire as this was both stronger and represented better the steel tube of the original aircraft. The axle was made from plastic rod. The wire struts were glued into place using superglue. Holes had been drilled through the ends of the rear struts to take the axle which is held with liquid cement. The black pipes on the underside rear in the photos are the bottoms of the exhaust pipes. I have also put on the control rod from the cockpit - this ran under the fuselage between the undercarriage legs.
Those with sharp eyes will also have noticed that I have started to rig the rear bay between the fuselage nacelle and inner struts: this is because these are some of the most difficult wires to put into place and once again I am trying to put in parts with the minimum chance of knocking off something else. I have also put in the control lines under the fuselage nacelle as these too are going to be less accessible later, plus I am spreading out the rigging process between other operations so that I can at least retain some sanity when I try to complete this model.
Thanks for looking.
Please Log in to join the conversation.
8 years 10 months ago #113
by Stevef
Replied by Stevef on topic Scratch built Voisin III LAS
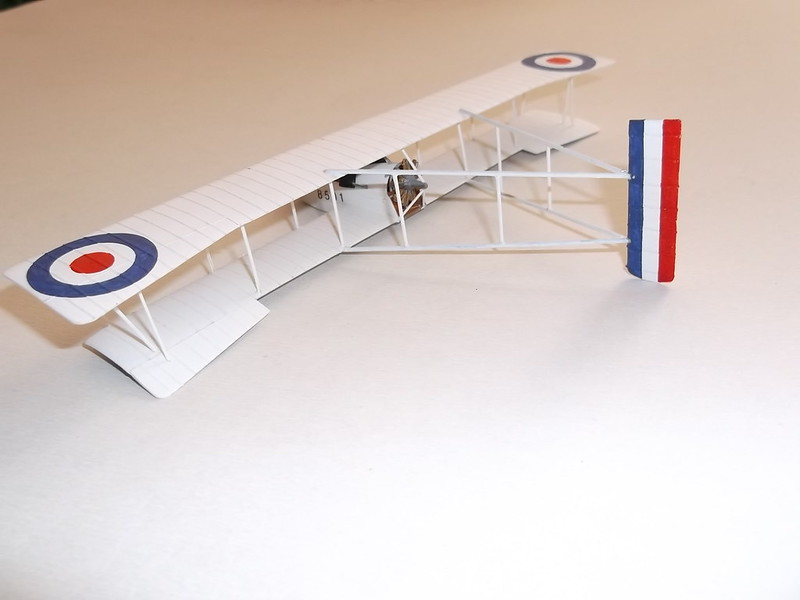
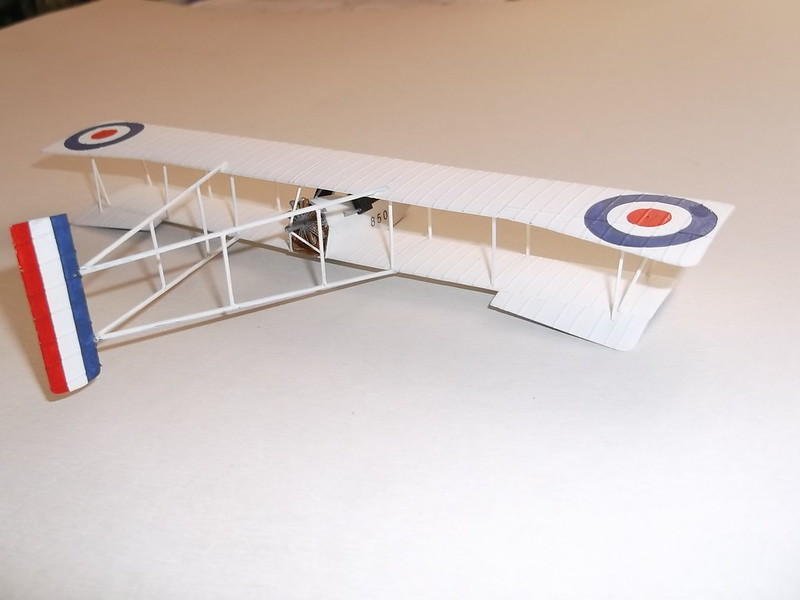
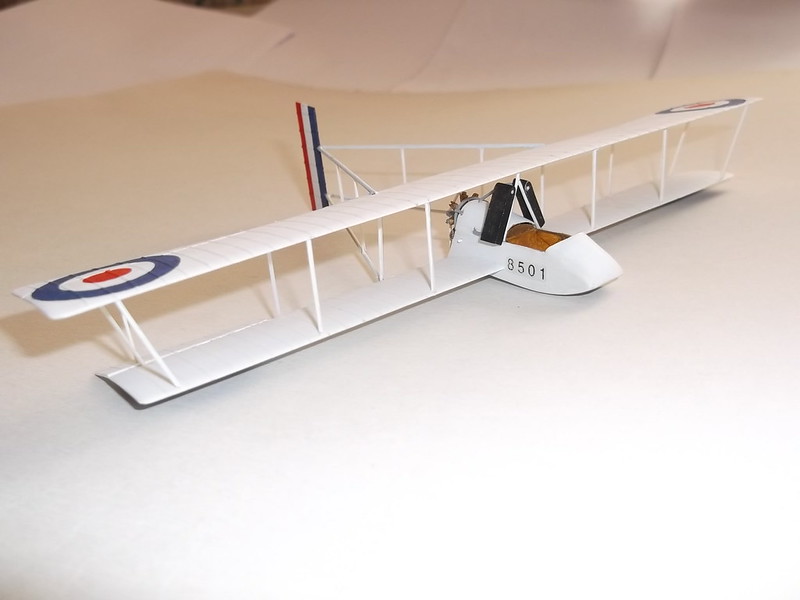
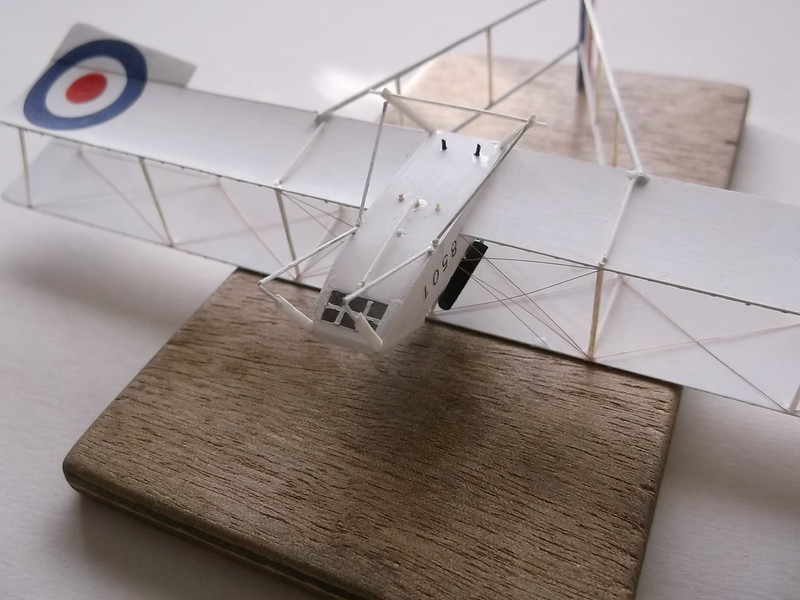
Evening All,
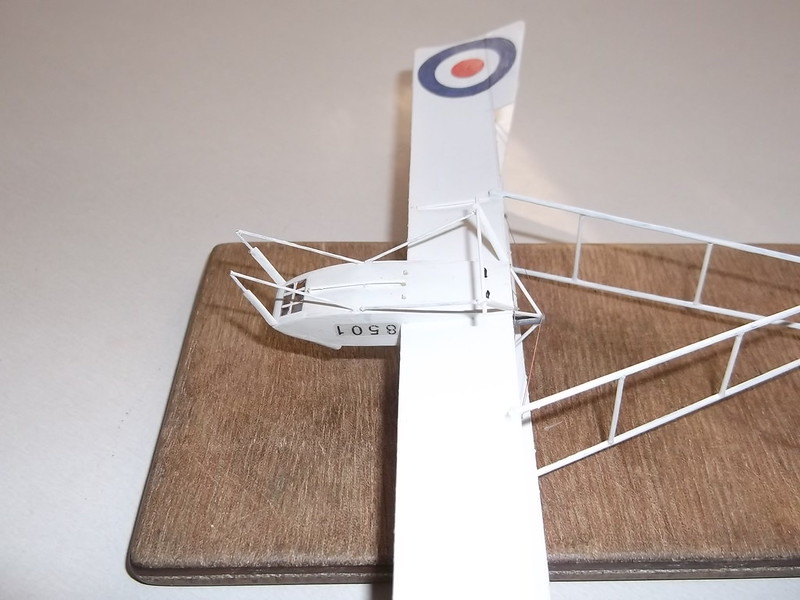
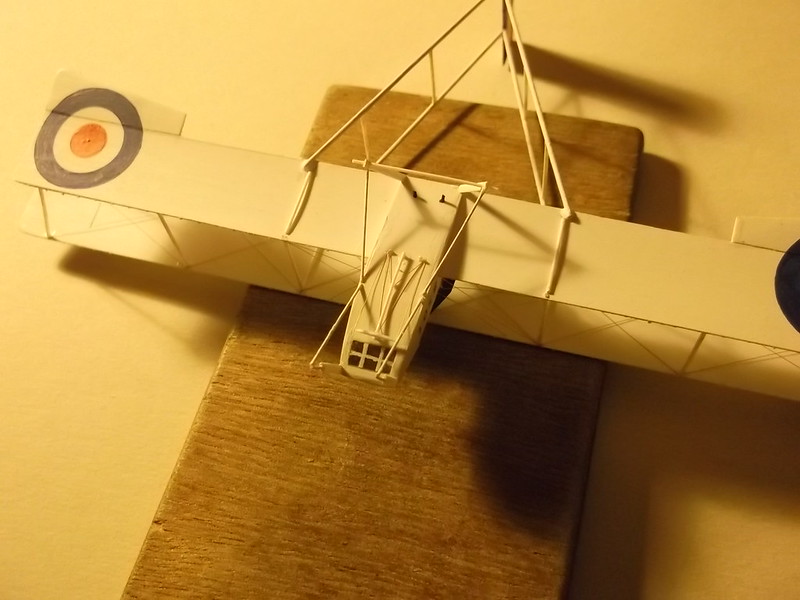
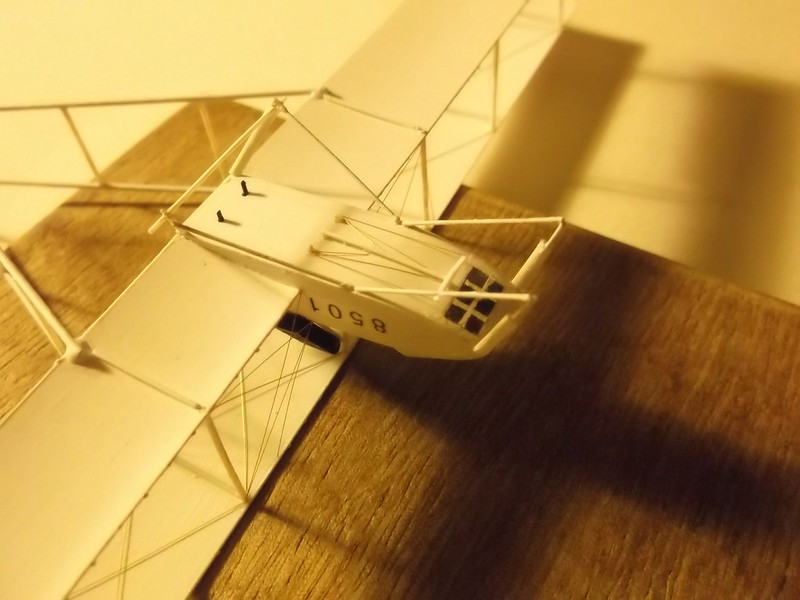
Some of you will have seen this at the recent annual club Open Day, others in the club newsletter, but this post describes how I put the last parts of the model together and rigged it.
The first parts to be fitted were the horizontal tail surfaces and rudder bumper: the latter was made from a small piece of wire which came from a telephone cable. Having fitted the tail surfaces the moment of truth arrived - would it be a nose sitter with all the weight that I had added or would it fall on to its tail? Well......... the d****d thing sat on its tail!!!!! B*****R!! Plan B had to be brought into action as I will describe later.
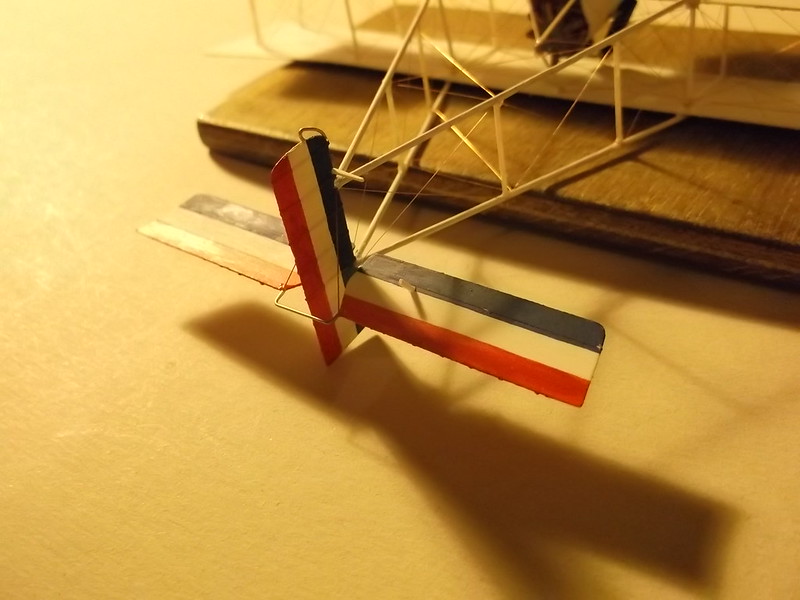
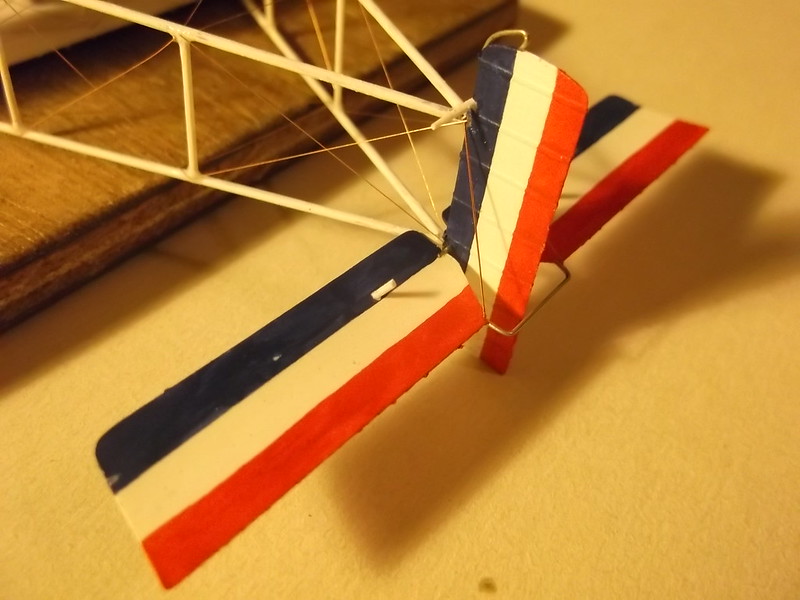
I also added the control horns from rod and the joining unit which kept the elevators in unison - also from wire from the telephone.
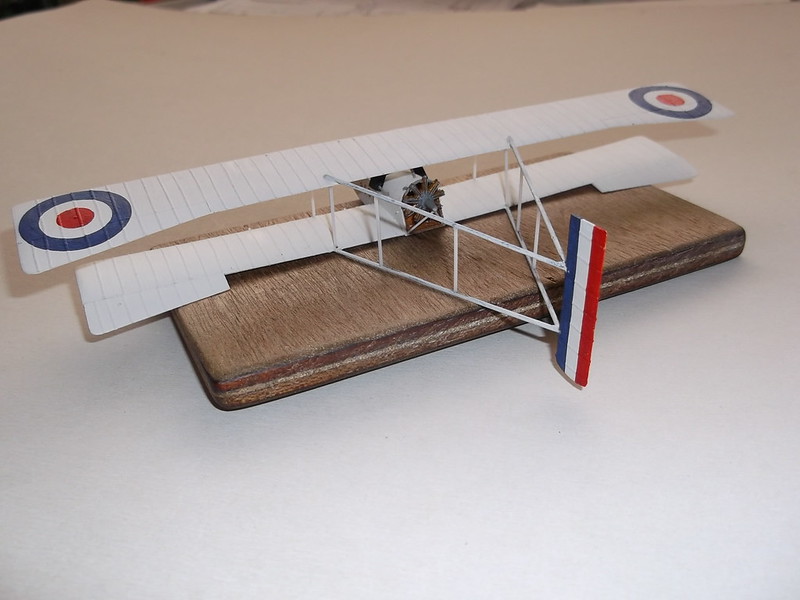
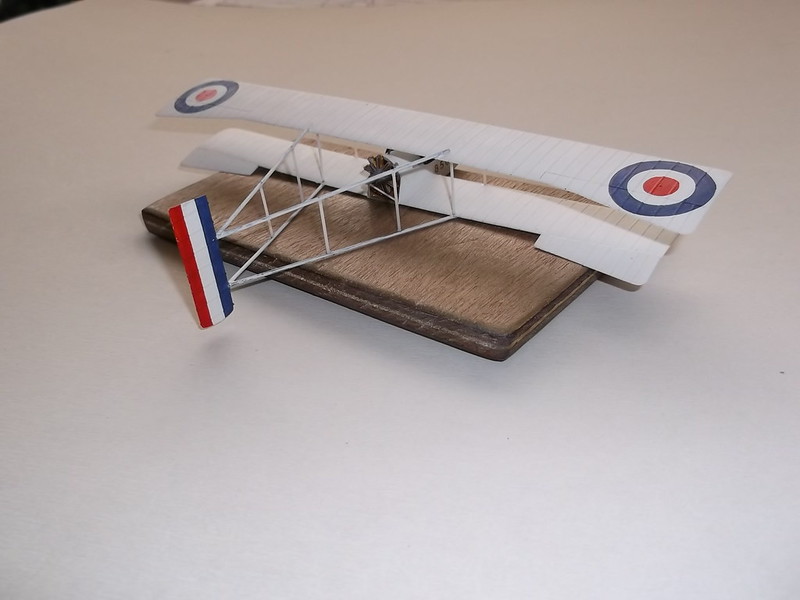
The rigging took longer than expected because there was rather a lot of it. Voisins had the bracing wires for the wings set on the undersides so these had to be added because otherwise the wings would look very bare. The remainder was as per any other pusher and I rigged it using a sequence that I have developed over many models: starting with the fore-aft wires between the wing struts, then the rear of the bays, front of bays, booms, tail controls, wing controls and finally undercarriage and anti-drag wires at the front. This usually means that I do not have wires getting in the way of where I want to pick up the model and thereby getting damaged. I use rolled 40 SWG copper wire and attach the ends with superglue: touching in some of the glue points finished the job.
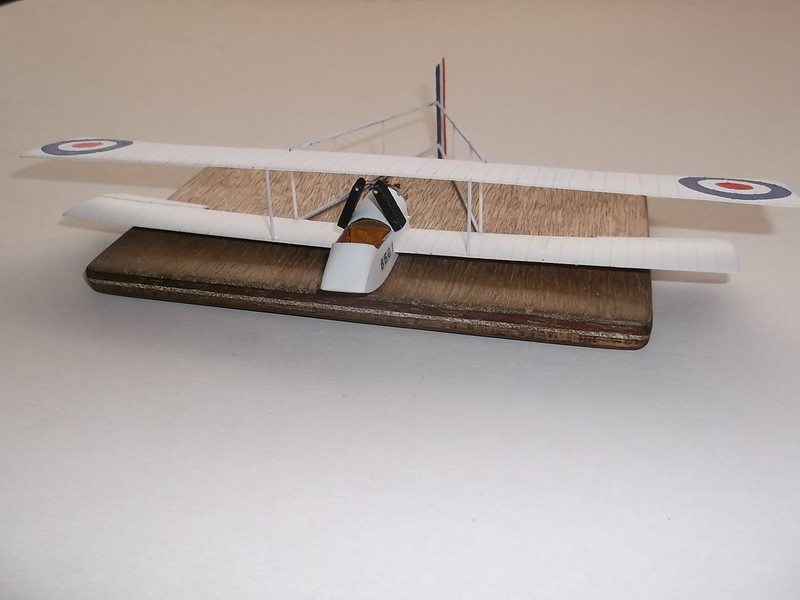
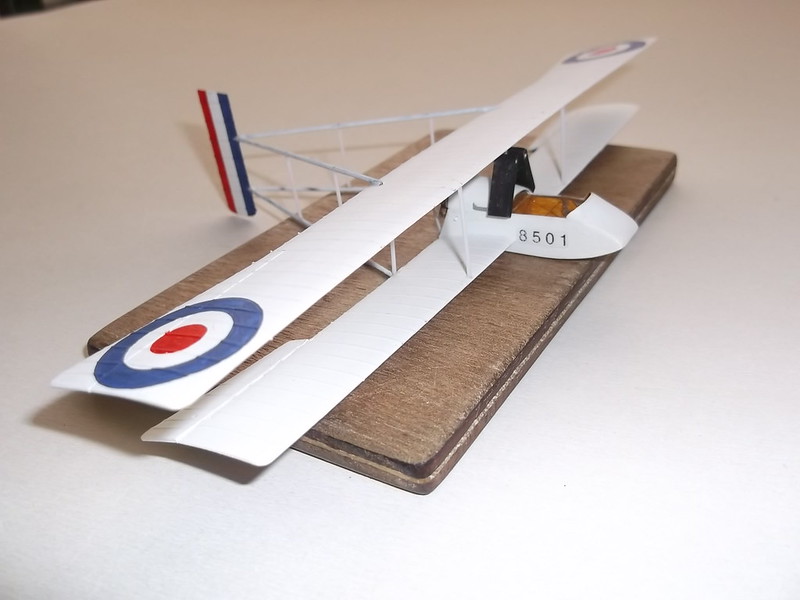
Last thing was the wheels. The main wheels had been scratched by winding a length of 20 thou rod around a paintbrush handle and immersing it in boiling water for about 10 seconds. I could then cut "tyres" according to length. The diameter of the paintbrush handle was slightly smaller than the diameter of the wheel so that the "tyre" is sprung on to the edge of the wheel disc: the latter was shaped from 60 thou card. I scribe a circle on the card with a pair of dividers and then cut the circle out roughly, finishing it with a file and glass-paper. The assembly is held with liquid cement. The front wheels were made from Eduard PE as the wheels were spoked and without covers and I have yet to try to make these individually as per the Old Man. The mudguards on the main wheels were cut form plastic card and the Lewis gun came from Aeroclub. After the wheels were glued into place and had dried I brought Plan B into action to make the model sit on its nose wheels. I made a simple block base from a piece of scrap hardwood that was a leftover from some book shelves, varnished it and stuck a piece of felt on to represent grass - nothing elaborate - and superglue did the rest. This one will not sit on its tail again for a long time!
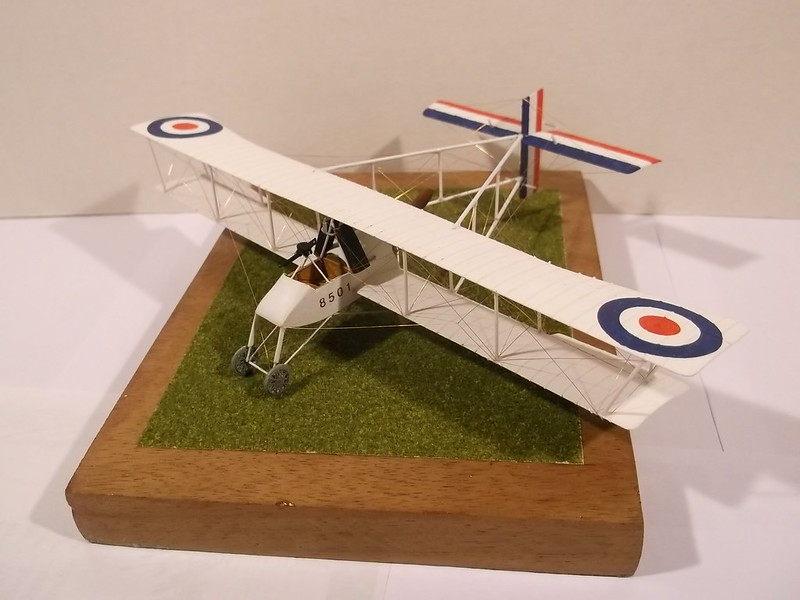
There are more pictures of the completed model in the gallery if you are interested.
Thanks for looking.
Some of you will have seen this at the recent annual club Open Day, others in the club newsletter, but this post describes how I put the last parts of the model together and rigged it.
The first parts to be fitted were the horizontal tail surfaces and rudder bumper: the latter was made from a small piece of wire which came from a telephone cable. Having fitted the tail surfaces the moment of truth arrived - would it be a nose sitter with all the weight that I had added or would it fall on to its tail? Well......... the d****d thing sat on its tail!!!!! B*****R!! Plan B had to be brought into action as I will describe later.
I also added the control horns from rod and the joining unit which kept the elevators in unison - also from wire from the telephone.
The rigging took longer than expected because there was rather a lot of it. Voisins had the bracing wires for the wings set on the undersides so these had to be added because otherwise the wings would look very bare. The remainder was as per any other pusher and I rigged it using a sequence that I have developed over many models: starting with the fore-aft wires between the wing struts, then the rear of the bays, front of bays, booms, tail controls, wing controls and finally undercarriage and anti-drag wires at the front. This usually means that I do not have wires getting in the way of where I want to pick up the model and thereby getting damaged. I use rolled 40 SWG copper wire and attach the ends with superglue: touching in some of the glue points finished the job.
Last thing was the wheels. The main wheels had been scratched by winding a length of 20 thou rod around a paintbrush handle and immersing it in boiling water for about 10 seconds. I could then cut "tyres" according to length. The diameter of the paintbrush handle was slightly smaller than the diameter of the wheel so that the "tyre" is sprung on to the edge of the wheel disc: the latter was shaped from 60 thou card. I scribe a circle on the card with a pair of dividers and then cut the circle out roughly, finishing it with a file and glass-paper. The assembly is held with liquid cement. The front wheels were made from Eduard PE as the wheels were spoked and without covers and I have yet to try to make these individually as per the Old Man. The mudguards on the main wheels were cut form plastic card and the Lewis gun came from Aeroclub. After the wheels were glued into place and had dried I brought Plan B into action to make the model sit on its nose wheels. I made a simple block base from a piece of scrap hardwood that was a leftover from some book shelves, varnished it and stuck a piece of felt on to represent grass - nothing elaborate - and superglue did the rest. This one will not sit on its tail again for a long time!
There are more pictures of the completed model in the gallery if you are interested.
Thanks for looking.
Please Log in to join the conversation.
Time to create page: 0.199 seconds
- You are here:
-
Home

-
Forum
-
Work in progress
-
Airfield
-
Archive
- Scratch built Voisin III LAS