Siemens Schuckert Werke (SSW) Rs 1: scratch build 1/72

9 years 1 month ago #24
by Stevef
Siemens Schuckert Werke (SSW) Rs 1: scratch build 1/72 was created by Stevef
Evening All
I had hoped to be the first to get this section off the ground but owing to my complete inability to do anything with computers I was unable to load pictures. I have now accidentally found out how to so I can start posting!
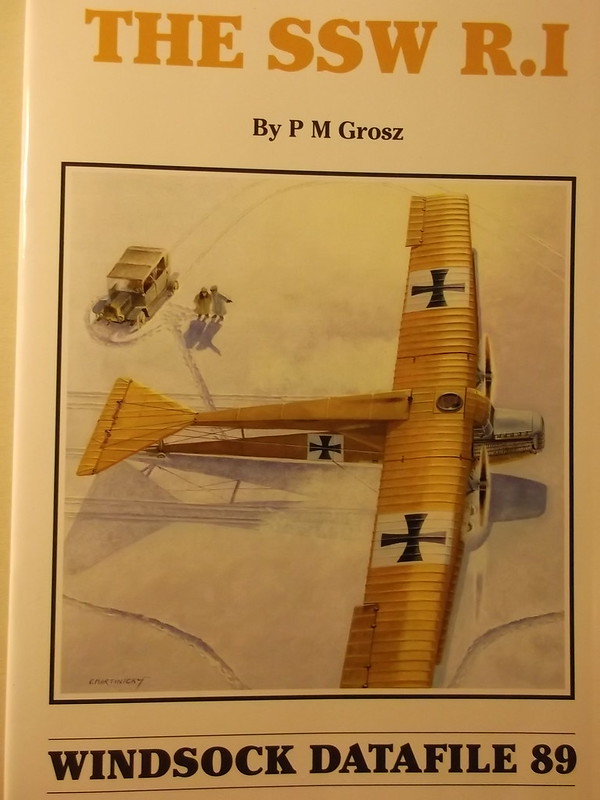
Recently I did some research on early large German machines: the best source is The German Giants by P Grosz and G Haddow, some of which is available of the net. Then I found that DataFile no 89 is about the first of these machines, the Seimens-Schuckert R.1 (Riesenfleugzeug - giant aircraft), which was first flown in May 1915. I decided that here was a project which would be worth following because it is larger than any of my other scratch builds but still small enough to fit into my display cabinet. There will no doubt be some interesting problems to resolve as I proceed but that is part of the fun and challenge of scratch building.
For those like me who are not familiar with this design here is what it looks like (and of course this contains a set of plans in 1/72 scale which might prove to be useful).
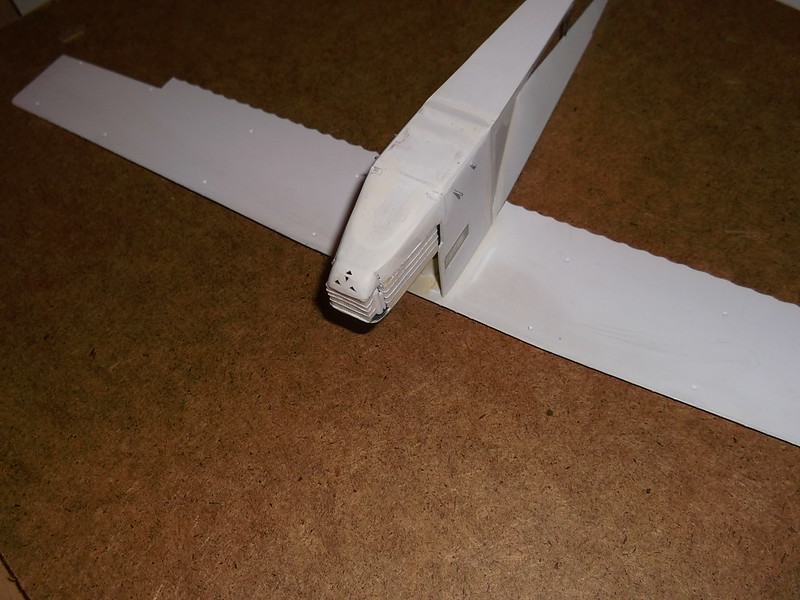
I decided to start with the nose which looks like the front of a very large lorry with three radiators - one in the front and one on each side with a bonnet over them all. There were three engines in the front of these machines, two of which were between the side radiators and a third beneath and behind the pilots. I do not intend to make the engines as they cannot be seen on the completed model unless the top of the nose is left off. I cut three pieces of 30 thou card and glued lengths of 10 thou rod onto the faces of the card to represent the radiator pipes.
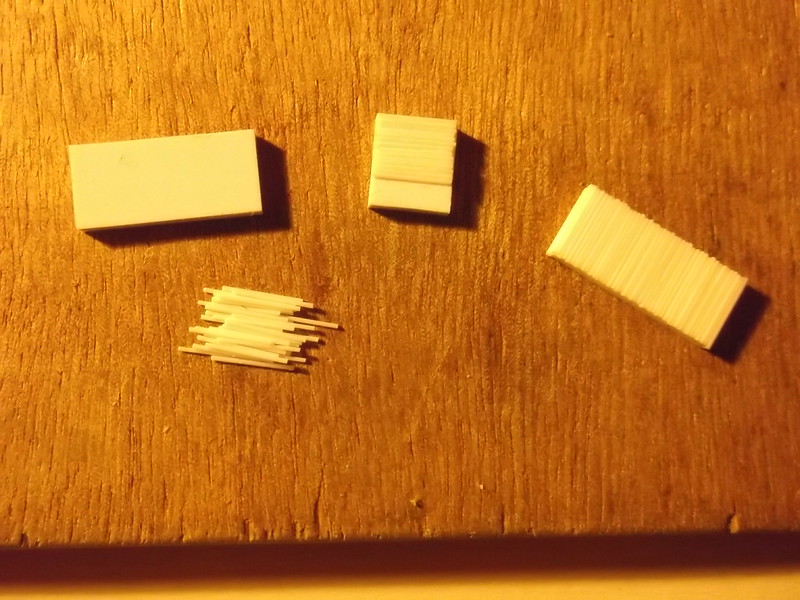
Strips of stretched sprue represent the steel bands holding the pipes in place.
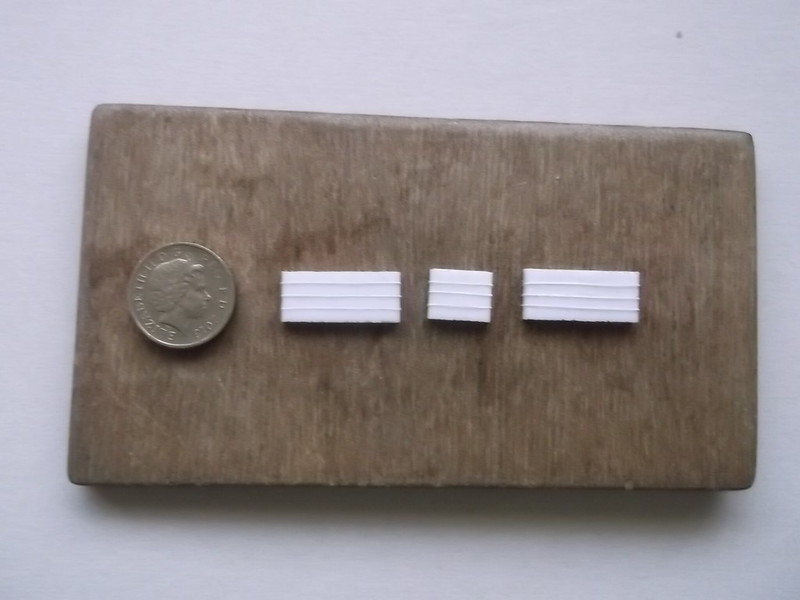
Then I made a top and bottom plate to which I could attach the three radiators.

Thanks for looking.
I had hoped to be the first to get this section off the ground but owing to my complete inability to do anything with computers I was unable to load pictures. I have now accidentally found out how to so I can start posting!
Recently I did some research on early large German machines: the best source is The German Giants by P Grosz and G Haddow, some of which is available of the net. Then I found that DataFile no 89 is about the first of these machines, the Seimens-Schuckert R.1 (Riesenfleugzeug - giant aircraft), which was first flown in May 1915. I decided that here was a project which would be worth following because it is larger than any of my other scratch builds but still small enough to fit into my display cabinet. There will no doubt be some interesting problems to resolve as I proceed but that is part of the fun and challenge of scratch building.
For those like me who are not familiar with this design here is what it looks like (and of course this contains a set of plans in 1/72 scale which might prove to be useful).
I decided to start with the nose which looks like the front of a very large lorry with three radiators - one in the front and one on each side with a bonnet over them all. There were three engines in the front of these machines, two of which were between the side radiators and a third beneath and behind the pilots. I do not intend to make the engines as they cannot be seen on the completed model unless the top of the nose is left off. I cut three pieces of 30 thou card and glued lengths of 10 thou rod onto the faces of the card to represent the radiator pipes.
Strips of stretched sprue represent the steel bands holding the pipes in place.
Then I made a top and bottom plate to which I could attach the three radiators.
Thanks for looking.
Please Log in to join the conversation.
9 years 1 month ago #26
by Stevef
Replied by Stevef on topic Siemens Schuckert Werke (SSW) Rs 1: scratch build 1/72
Evening All,
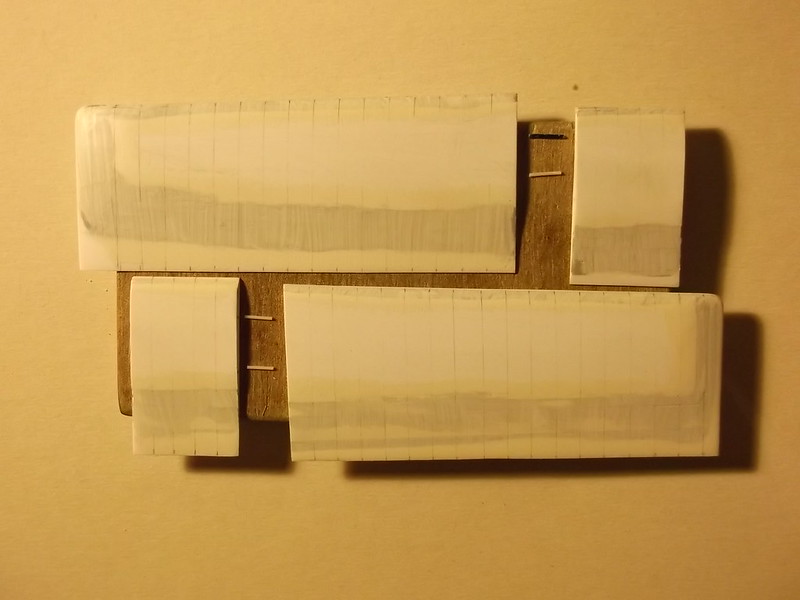
I decided to tackle the wings next as these will be an important part of the centre section structure. I am presently thinking of buildiing the nose and tail sections as units and then joining these to the centre section. In order that the latter is both strong and square I will need to have a top wing ready. Wings can be tedious and time consuming to make as I discovered with the Caudron when I had to laminate sheets of plastic and then use filler before I even started on the ribs. These wings will also need to be laminated and filled - so a long process is involved. I started by bending some 40 thou card to start the aerofoil shape and then glued a strip of 30 thou and 20 thou card to the top. The upper wings are in two halves because the card I have is not long enough to make the whole span in one piece. Similarly the lower wings are in two parts, this time because there is a marked dihedral and I cannot bend the card to achieve this.
The top wing halves were assembled first and when the glue was dry I sanded the top surfaces where I had glued the card so that an aerofoil section was achieved. I filled the uneven surfaces of the card joins with copious Mr Surfacer until everything was smooth. The process was repeated for the lower wing sections.
When the lower wing sections were ready I filed the butt joint surfaces until I had the correct angle for the dihedral. Then I drilled two holes in each joint surface and cut four pieces of rod to insert into the holes: these strengthen the joint. The rod was glued into the holes in the wings and the sections joined using ordinary cement. I added liquid cement to the joints just to make sure. When all was thoroughly dry I used Mr Surfacer again to fill any small cracks.

Final sanding gave the following result. I have also drilled the ends of the lower wing halves to insert metal pins which will help to strengthen the joint when they are glued together.
Thanks for looking.
I decided to tackle the wings next as these will be an important part of the centre section structure. I am presently thinking of buildiing the nose and tail sections as units and then joining these to the centre section. In order that the latter is both strong and square I will need to have a top wing ready. Wings can be tedious and time consuming to make as I discovered with the Caudron when I had to laminate sheets of plastic and then use filler before I even started on the ribs. These wings will also need to be laminated and filled - so a long process is involved. I started by bending some 40 thou card to start the aerofoil shape and then glued a strip of 30 thou and 20 thou card to the top. The upper wings are in two halves because the card I have is not long enough to make the whole span in one piece. Similarly the lower wings are in two parts, this time because there is a marked dihedral and I cannot bend the card to achieve this.
The top wing halves were assembled first and when the glue was dry I sanded the top surfaces where I had glued the card so that an aerofoil section was achieved. I filled the uneven surfaces of the card joins with copious Mr Surfacer until everything was smooth. The process was repeated for the lower wing sections.
When the lower wing sections were ready I filed the butt joint surfaces until I had the correct angle for the dihedral. Then I drilled two holes in each joint surface and cut four pieces of rod to insert into the holes: these strengthen the joint. The rod was glued into the holes in the wings and the sections joined using ordinary cement. I added liquid cement to the joints just to make sure. When all was thoroughly dry I used Mr Surfacer again to fill any small cracks.
Final sanding gave the following result. I have also drilled the ends of the lower wing halves to insert metal pins which will help to strengthen the joint when they are glued together.
Thanks for looking.
Please Log in to join the conversation.
9 years 1 month ago #27
by Stevef
Replied by Stevef on topic Siemens Schuckert Werke (SSW) Rs 1: scratch build 1/72
Evening All,
I have been away over the holiday break visiting relatives but this is where I had got to before I left. I had joined the lower wing sections and added the ribs to the wings, ailerons and horizontal tail surfaces from 10 x 20 thou strip. The centre rib was missing from the tail surface when the photo was taken - that is now in place.

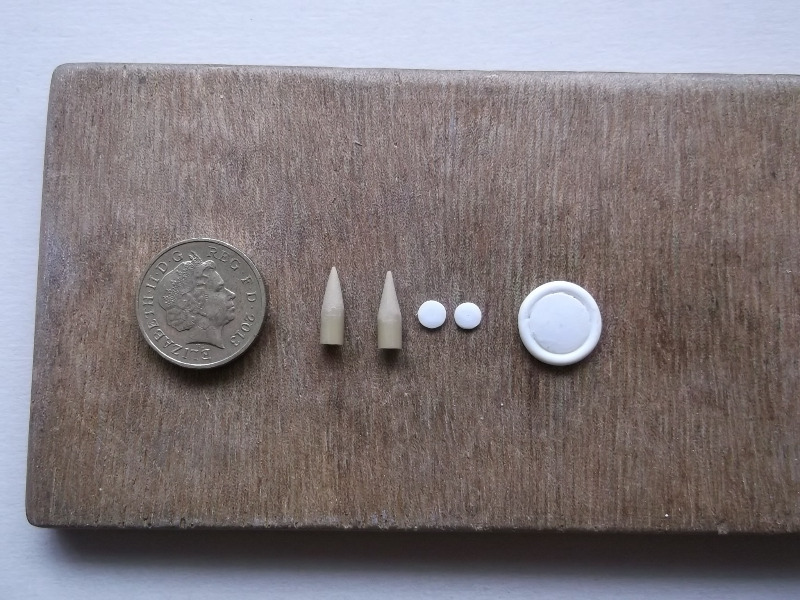
While I was away I decided to take a small box of tools and bits with me so that I could make some parts for this build in the evenings when the relative i visit has gone to bed. This was an experiment which I will now repeat as I was able to make the small wheel discs for the rear wheels and the gearbox housings where the drive shafts from the engines are connected to the propellor shafts. These were small tasks that did not require large amounts of materials or time but kept me happy! The image shows the housings which were made from sprue, and the wheel discs made from 30 thou card with one of the main wheels which I have also completed. The tyres for the small wheels will be made from 30 thou rod wound around a thin paintbrush handle and dipped into hot water. The main wheel was made in this way from 100 thou card shaped with a file and 80 thou rod for the tyre.
Thanks for looking.
I have been away over the holiday break visiting relatives but this is where I had got to before I left. I had joined the lower wing sections and added the ribs to the wings, ailerons and horizontal tail surfaces from 10 x 20 thou strip. The centre rib was missing from the tail surface when the photo was taken - that is now in place.
While I was away I decided to take a small box of tools and bits with me so that I could make some parts for this build in the evenings when the relative i visit has gone to bed. This was an experiment which I will now repeat as I was able to make the small wheel discs for the rear wheels and the gearbox housings where the drive shafts from the engines are connected to the propellor shafts. These were small tasks that did not require large amounts of materials or time but kept me happy! The image shows the housings which were made from sprue, and the wheel discs made from 30 thou card with one of the main wheels which I have also completed. The tyres for the small wheels will be made from 30 thou rod wound around a thin paintbrush handle and dipped into hot water. The main wheel was made in this way from 100 thou card shaped with a file and 80 thou rod for the tyre.
Thanks for looking.
Please Log in to join the conversation.
9 years 1 month ago #28
by Stevef
Replied by Stevef on topic Siemens Schuckert Werke (SSW) Rs 1: scratch build 1/72
Evening All,
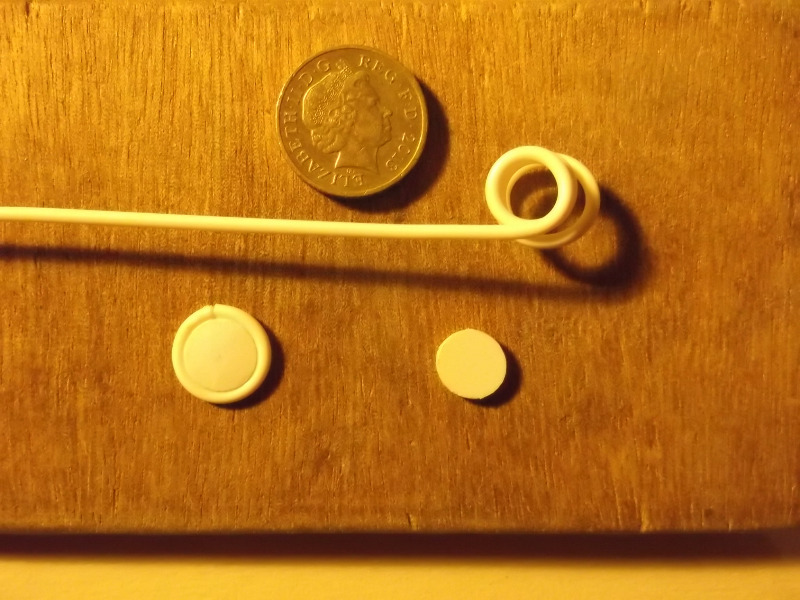
I have finished making the wheels. For those who have not seen my method before here is a short explanation of how I make them. I start by marking out a circle the diameter of which is the wheel minus the tyre on a piece of card of suitable thickness: because these are large wheels I laminated two pieces of 40 thou card. I cut out a square of card with the circle on it and trim and file the disc using the groove as a guide for when to stop. I file the edge of one face of the disc to represent the wheel cover, the other side is left flat. Then I take a piece of rod, in this case 80 thou, to match the size of the tyre and wind this round a paintbrush handle or piece of dowel. The diameter of the handle or dowel needs to be slightly smaller than the wheel disc so that the tyre will cling on to the disc. Hold the rod tightly on the handle before plunging the rod and handle into boiling water for a few seconds. Withdraw the rod from the water and either plunge it into cold water or simply wait for it to cool, still holding it tightly while doing so. Slide the rod from the handle and you will have a plastic coil from which you can measure and cut lengths which can then be placed around the edge of the disc. You will need to bend the rod gently to make the two ends join properly before wrapping around the disc. Secure the rod tyre with liquid glue and if necessary apply a little filler to any small gaps.
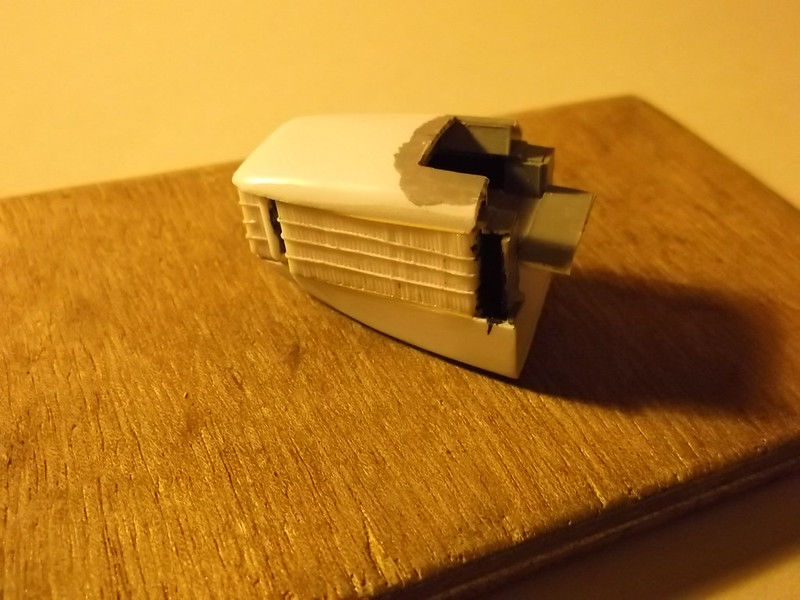
I moulded the chin piece below the nose using the standard plunge moulding technique. This was a small piece so I added a handle to the male mould. When the piece had been cut and trimmed I was able to cut the small vent holes using a very small drill and tip of a new scalpel blade and then cemented it to the underside of the nose. At the same time I shaped a mould for the cover above the engines and cut this out ready to fit later.

Thanks for looking.
I have finished making the wheels. For those who have not seen my method before here is a short explanation of how I make them. I start by marking out a circle the diameter of which is the wheel minus the tyre on a piece of card of suitable thickness: because these are large wheels I laminated two pieces of 40 thou card. I cut out a square of card with the circle on it and trim and file the disc using the groove as a guide for when to stop. I file the edge of one face of the disc to represent the wheel cover, the other side is left flat. Then I take a piece of rod, in this case 80 thou, to match the size of the tyre and wind this round a paintbrush handle or piece of dowel. The diameter of the handle or dowel needs to be slightly smaller than the wheel disc so that the tyre will cling on to the disc. Hold the rod tightly on the handle before plunging the rod and handle into boiling water for a few seconds. Withdraw the rod from the water and either plunge it into cold water or simply wait for it to cool, still holding it tightly while doing so. Slide the rod from the handle and you will have a plastic coil from which you can measure and cut lengths which can then be placed around the edge of the disc. You will need to bend the rod gently to make the two ends join properly before wrapping around the disc. Secure the rod tyre with liquid glue and if necessary apply a little filler to any small gaps.
I moulded the chin piece below the nose using the standard plunge moulding technique. This was a small piece so I added a handle to the male mould. When the piece had been cut and trimmed I was able to cut the small vent holes using a very small drill and tip of a new scalpel blade and then cemented it to the underside of the nose. At the same time I shaped a mould for the cover above the engines and cut this out ready to fit later.
Thanks for looking.
Please Log in to join the conversation.
9 years 1 month ago #29
by Stevef
Replied by Stevef on topic Siemens Schuckert Werke (SSW) Rs 1: scratch build 1/72
Evening All,
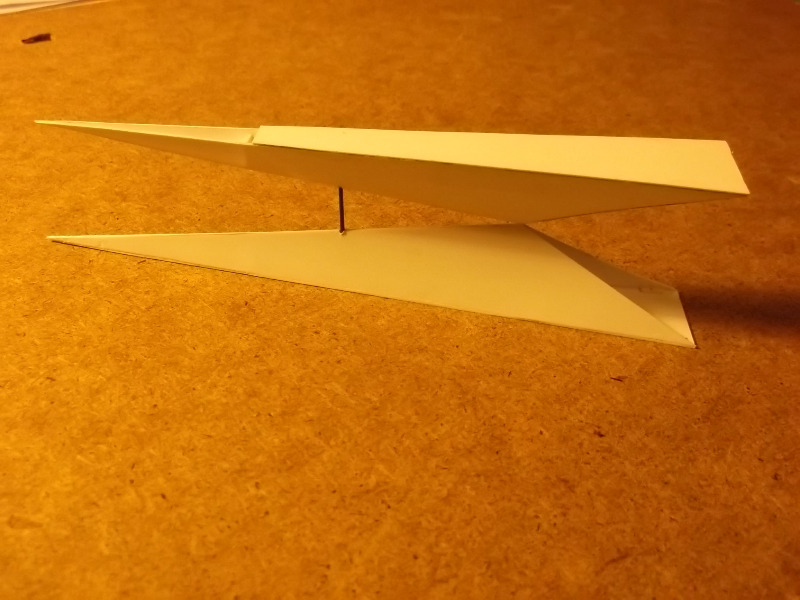
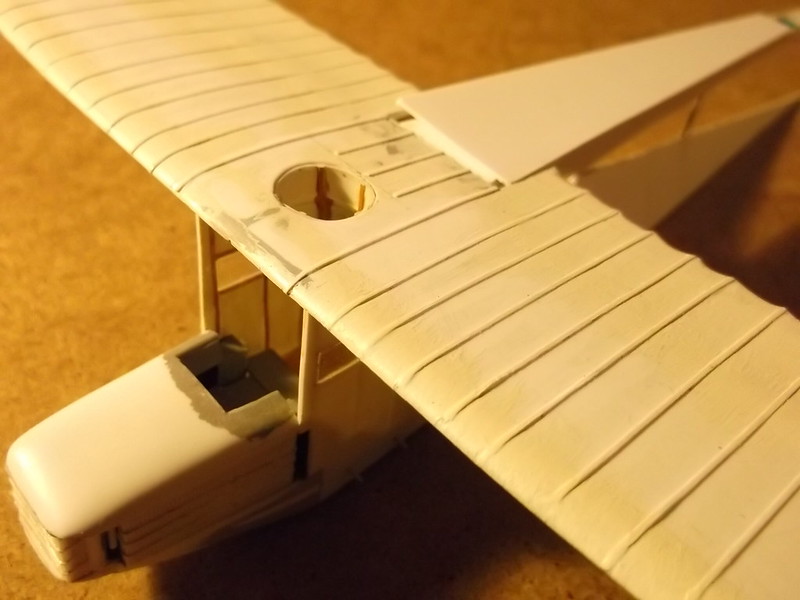
I have been working on the rear fuselage and slab sides of the centre section. However the first priority was to join the halves of the top wing as this will be needed to help to hold the sides in place when I want to attach the nose and rear sections. I drilled 2 holes in each wing half and inserted small metal pins cut from a paper clip. I do not have any brass rod - the metal in the clips is rigid enough so these were CA'd into place and then the wing joined with cement and CA. The circular hole is where the upper gun position will go later.

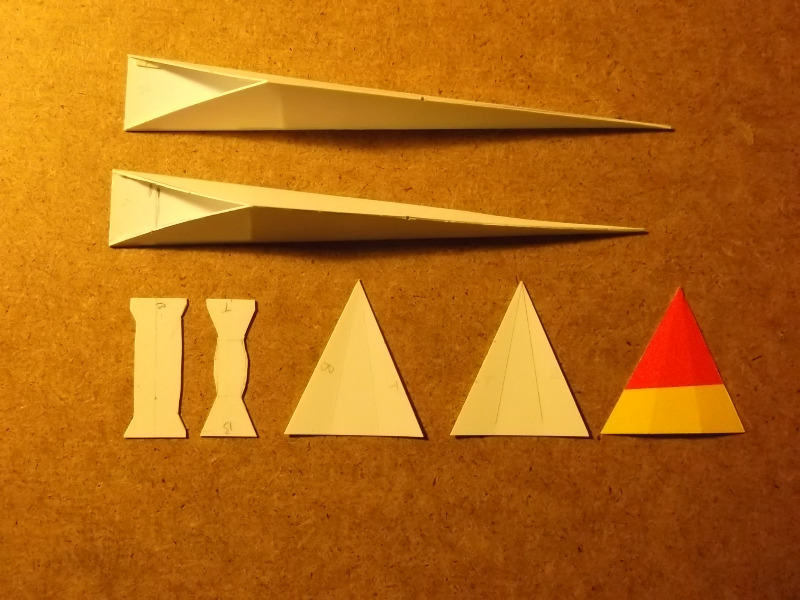
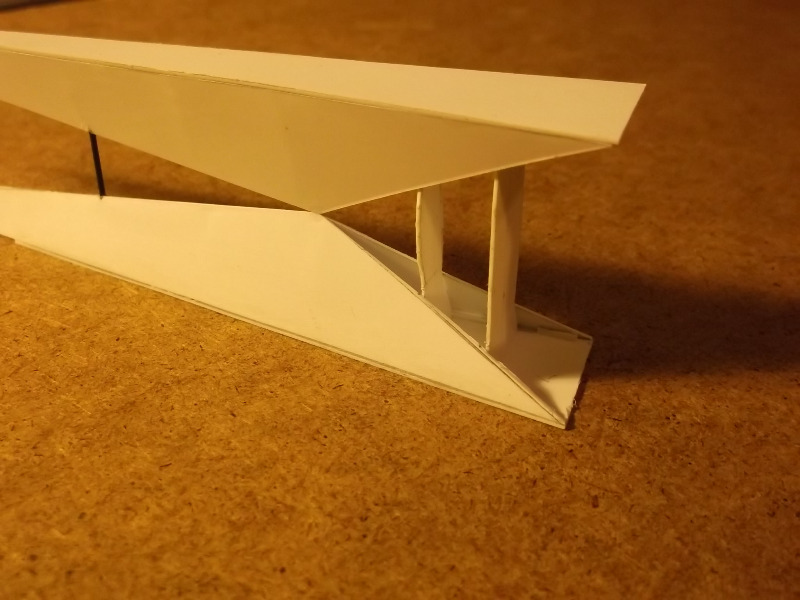
On to the rear fuselage. This consisted of two triangular sections mounted one above the other. The upper section was slightly smaller than the lower one. These were made from 20 thou card for the sides and 30 thou card for the top and bottom. I made small bulkheads from scrap card to help support the sides. Unfortunately I somehow got the dimensions wrong on the first attempt so I had to make a second pair. The top rear of the upper section was left off as the horizontal stabilizer will need to be fixed there later. Holes were drilled in the apex of each triangle to allow for a piece of wire to be inserted later to represent a bracing strut - the photos show what I mean.

I now made the triangular side sections which fill the gap between the rear sections of fuselage and the slab sided centre section. The drawings show these to be flat but the shadows on photographs show that they were divided into three surfaces at a small angle to each other. To get the correct size I cut out a card template and bent this gently to make sure that this was the correct size. When I had got this right I cut two pieces of 20 thou card and scored and bent these to shape. Finally I cut and shaped two bulkheads which will help to join the front ends of the rear fuselage triangles and hold the side pieces in place.
Now I could assemble the rear triangular sections. I did this by inserting the wire into the holes in the apexes and CA'd that in place while at the same time cementing the front of the triangular sections where they met.
The bulkheads were then fixed to the front end of the rear fuselage sub-assembly.
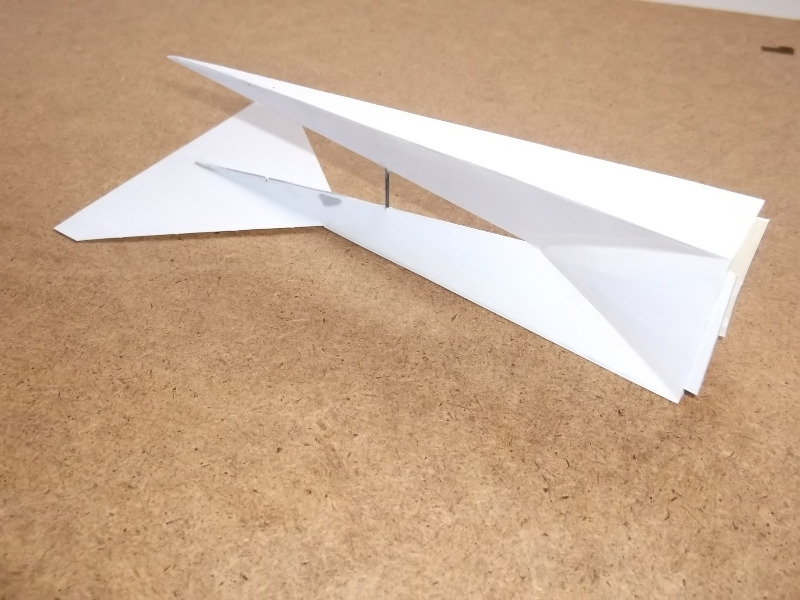
Finally I added the sides and filled any small gaps. The next stage will be to put the sides on to the top wing and then join the rear fuselage and nose assemblies: more on that later when I have got that far.
Thanks for looking.
I have been working on the rear fuselage and slab sides of the centre section. However the first priority was to join the halves of the top wing as this will be needed to help to hold the sides in place when I want to attach the nose and rear sections. I drilled 2 holes in each wing half and inserted small metal pins cut from a paper clip. I do not have any brass rod - the metal in the clips is rigid enough so these were CA'd into place and then the wing joined with cement and CA. The circular hole is where the upper gun position will go later.
On to the rear fuselage. This consisted of two triangular sections mounted one above the other. The upper section was slightly smaller than the lower one. These were made from 20 thou card for the sides and 30 thou card for the top and bottom. I made small bulkheads from scrap card to help support the sides. Unfortunately I somehow got the dimensions wrong on the first attempt so I had to make a second pair. The top rear of the upper section was left off as the horizontal stabilizer will need to be fixed there later. Holes were drilled in the apex of each triangle to allow for a piece of wire to be inserted later to represent a bracing strut - the photos show what I mean.
I now made the triangular side sections which fill the gap between the rear sections of fuselage and the slab sided centre section. The drawings show these to be flat but the shadows on photographs show that they were divided into three surfaces at a small angle to each other. To get the correct size I cut out a card template and bent this gently to make sure that this was the correct size. When I had got this right I cut two pieces of 20 thou card and scored and bent these to shape. Finally I cut and shaped two bulkheads which will help to join the front ends of the rear fuselage triangles and hold the side pieces in place.
Now I could assemble the rear triangular sections. I did this by inserting the wire into the holes in the apexes and CA'd that in place while at the same time cementing the front of the triangular sections where they met.
The bulkheads were then fixed to the front end of the rear fuselage sub-assembly.
Finally I added the sides and filled any small gaps. The next stage will be to put the sides on to the top wing and then join the rear fuselage and nose assemblies: more on that later when I have got that far.
Thanks for looking.
Please Log in to join the conversation.
9 years 1 month ago - 9 years 1 month ago #30
by Stevef
Replied by Stevef on topic Siemens Schuckert Werke (SSW) Rs 1: scratch build 1/72
Evening All,
Sometimes things happen in modelling - at least they do to me. Often we run into minor mishaps but usually I do not bother to post them because they are not significant and are easily and quickly remedied. Not so this time. Just as I thought that I was getting on well with this model……………………………. catastrophe.
I had glued the rear fuselage assembly to the top wing using a tab of card because this would otherwise be a butt joint and would be far too weak. Having allowed the cement to set I proceeded happily on my way to glue the sides of the central fuselage section to the underside of the top wing. This was so that the sides had something to hold them square and they would be rigid enough to take another sheet of 30 thou card across the bottom to make the underside of the fuselage. Here I hit what I mistakenly thought was a small problem - the fuselage sides were too high - the rear assembly did not fit properly. So I merrily trimmed the fuselage a bit until the rear section did fit, and afterwards I glued the bottom plate into place. I then added a small extra piece of 20 thou card to the bottom to get the correct depth and filed the edges and added some filler etc and all was going well ….. Holes were drilled in the bottom of the fuselage sides to take the two pins (made from a paper clip), which would go into the wing roots and strengthen those joints later. I added some cross bracing to make this area stronger and made and painted an interior floor plate to cover it all up.
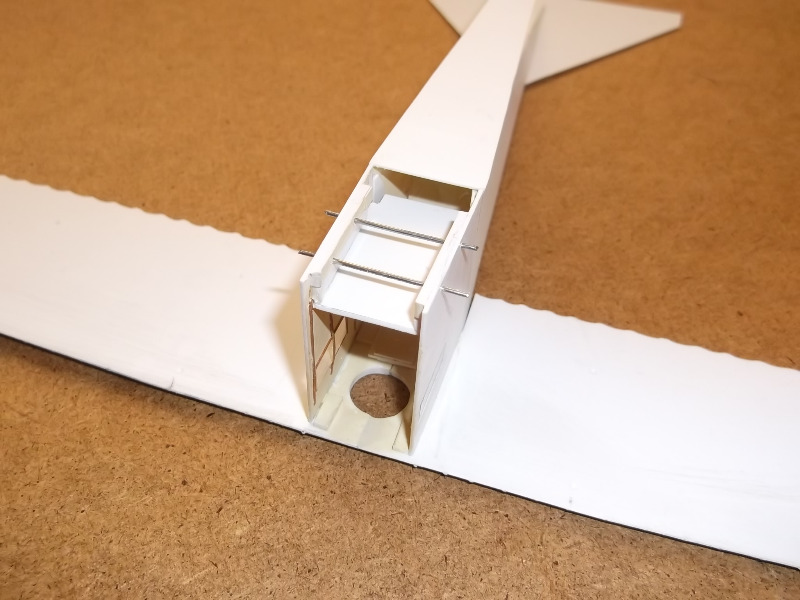
The upper gunners cylindrical position was made from 20 thou card wrapped around a thick piece of dowel and held with a piece of clear selotape - this will not be seen on the completed model and it holds the unit in shape - otherwise the joint will spring apart. This was glued into the top wing. Finally I added the nose sub-assembly to the front end of the fuselage and cleaned up all of the joints.
Now I was ready to start making the mould for the windscreen and canopy over the cockpit and I noticed something was not quite right but I could not see what it was…….. I carefully measured the drawings and the the model….. and found that the gap between the top of the nose in front of the cockpit and the top of the upper wing was 7mm TOO SMALLl!!!! Aaaaaaaaaarrrrrrrrrrgggggggggghhhhhhhh******!!!***!!!******* (The rest has been censored to save the administrator a job!)
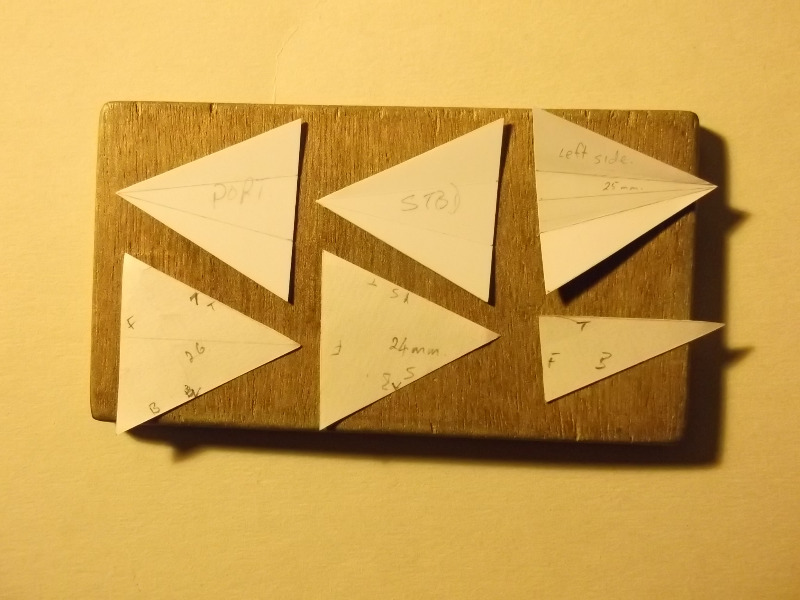
What to do? I sat for a full hour trying to work out what had gone wrong. At first I thought that it was the drawings - it was in part: they do not match in cross section and side elevation - there is a 2mm discrepancy, but that was not the entire problem. Somehow I had lost 7mm - I had cut off about 3-4mm from the sides as described above but even that was not sufficient to explain what had happened. The only answer that I could think of was that the side elevation drawings were not accurate because the triangular sides of the rear fuselage slope inwards and therefore using these as templates was not going to work. In the end I cut paper templates to try to determine what the dimensions of the triangular fillet immediately behind the vertical fuselage sides would be. According to the side elevation in the drawings in the DatatFile, at point B they should be 24mm. From the cross section drawing this section should be 26mm but the sides are shown as flat when it is clear from photos (including those in the DataFile), that they were not: they had three faces with a slight angle between them. If 2mm does not seem much I can assure you that it translates into a significant difference in the length of the side of the triangle that joins the flat fuselage section. After cutting out paper templates of 24mm and 26mm I found that neither matched the vertical side of the central part of the fuselage. The actual size was 25mm according to my experiments, allowing for the angles of the faces, but I am still not sure whether that is going to fit when I assemble this thing again.
One of the advantages of scratch building is that you can always start again, so I dismantled the assembly to retrieve the top wing and the nose section. I have totally discarded the rear and central fuselage assembly and will make new ones. I think that I can restore the top of the nose which was slightly damaged but I may have to mould a new one of those too.
I will now rewrite the instructions to try to ensure that all of the parts fit properly. I have worked out that the dimensions of the upper and lower triangular sections of the rear fuselage are correct but that the triangular side panels between them and the flat fuselage sides will have to be cut to fit after the rear has been attached. I will also ensure that the junction between the top wing and the upper triangular rear fuselage section is at the correct angle - that is where the missing 2-3mm went on the first attempt. So the assembly sequence will need to be completely different and I will need to make a panel to fit into the rear of the flat fuselage section to hold the sides rigid as I will start construction from the bottom rather than the top. All will be revealed in the next post…..or not!
This time round I should be successful - the only problem is that I am having to go on one of my regular journeys this week so you may have to wait for a while to find out. More to follow.
Thanks for looking.
Sometimes things happen in modelling - at least they do to me. Often we run into minor mishaps but usually I do not bother to post them because they are not significant and are easily and quickly remedied. Not so this time. Just as I thought that I was getting on well with this model……………………………. catastrophe.
I had glued the rear fuselage assembly to the top wing using a tab of card because this would otherwise be a butt joint and would be far too weak. Having allowed the cement to set I proceeded happily on my way to glue the sides of the central fuselage section to the underside of the top wing. This was so that the sides had something to hold them square and they would be rigid enough to take another sheet of 30 thou card across the bottom to make the underside of the fuselage. Here I hit what I mistakenly thought was a small problem - the fuselage sides were too high - the rear assembly did not fit properly. So I merrily trimmed the fuselage a bit until the rear section did fit, and afterwards I glued the bottom plate into place. I then added a small extra piece of 20 thou card to the bottom to get the correct depth and filed the edges and added some filler etc and all was going well ….. Holes were drilled in the bottom of the fuselage sides to take the two pins (made from a paper clip), which would go into the wing roots and strengthen those joints later. I added some cross bracing to make this area stronger and made and painted an interior floor plate to cover it all up.
The upper gunners cylindrical position was made from 20 thou card wrapped around a thick piece of dowel and held with a piece of clear selotape - this will not be seen on the completed model and it holds the unit in shape - otherwise the joint will spring apart. This was glued into the top wing. Finally I added the nose sub-assembly to the front end of the fuselage and cleaned up all of the joints.
Now I was ready to start making the mould for the windscreen and canopy over the cockpit and I noticed something was not quite right but I could not see what it was…….. I carefully measured the drawings and the the model….. and found that the gap between the top of the nose in front of the cockpit and the top of the upper wing was 7mm TOO SMALLl!!!! Aaaaaaaaaarrrrrrrrrrgggggggggghhhhhhhh******!!!***!!!******* (The rest has been censored to save the administrator a job!)
What to do? I sat for a full hour trying to work out what had gone wrong. At first I thought that it was the drawings - it was in part: they do not match in cross section and side elevation - there is a 2mm discrepancy, but that was not the entire problem. Somehow I had lost 7mm - I had cut off about 3-4mm from the sides as described above but even that was not sufficient to explain what had happened. The only answer that I could think of was that the side elevation drawings were not accurate because the triangular sides of the rear fuselage slope inwards and therefore using these as templates was not going to work. In the end I cut paper templates to try to determine what the dimensions of the triangular fillet immediately behind the vertical fuselage sides would be. According to the side elevation in the drawings in the DatatFile, at point B they should be 24mm. From the cross section drawing this section should be 26mm but the sides are shown as flat when it is clear from photos (including those in the DataFile), that they were not: they had three faces with a slight angle between them. If 2mm does not seem much I can assure you that it translates into a significant difference in the length of the side of the triangle that joins the flat fuselage section. After cutting out paper templates of 24mm and 26mm I found that neither matched the vertical side of the central part of the fuselage. The actual size was 25mm according to my experiments, allowing for the angles of the faces, but I am still not sure whether that is going to fit when I assemble this thing again.
One of the advantages of scratch building is that you can always start again, so I dismantled the assembly to retrieve the top wing and the nose section. I have totally discarded the rear and central fuselage assembly and will make new ones. I think that I can restore the top of the nose which was slightly damaged but I may have to mould a new one of those too.
I will now rewrite the instructions to try to ensure that all of the parts fit properly. I have worked out that the dimensions of the upper and lower triangular sections of the rear fuselage are correct but that the triangular side panels between them and the flat fuselage sides will have to be cut to fit after the rear has been attached. I will also ensure that the junction between the top wing and the upper triangular rear fuselage section is at the correct angle - that is where the missing 2-3mm went on the first attempt. So the assembly sequence will need to be completely different and I will need to make a panel to fit into the rear of the flat fuselage section to hold the sides rigid as I will start construction from the bottom rather than the top. All will be revealed in the next post…..or not!
This time round I should be successful - the only problem is that I am having to go on one of my regular journeys this week so you may have to wait for a while to find out. More to follow.
Thanks for looking.
Last edit: 9 years 1 month ago by Stevef.
Please Log in to join the conversation.
9 years 1 month ago #39
by DaveB
Replied by DaveB on topic Siemens Schuckert Werke (SSW) Rs 1: scratch build 1/72
Wow! quick work here, Steve.
Coming on a treat - a bit different for you as it is not a pusher this time!
Look forward to seeing this one come together.
Regards
Dave
Coming on a treat - a bit different for you as it is not a pusher this time!
Look forward to seeing this one come together.
Regards
Dave
Please Log in to join the conversation.
- Clive Creer
-

- Offline
- Administrator
-

Less
More
- Posts: 35
- Thank you received: 2
9 years 1 month ago #41
by Clive Creer
I love the smell of Tamiya Extra Thin in the morning!
Replied by Clive Creer on topic Siemens Schuckert Werke (SSW) Rs 1: scratch build 1/72
Oh Steve, I do feel your pain! Well, you know what they say - "If at first you don't succeed". I'm sure that all will be right at the end of the day, with a craftsman such as yourself on the job.
Looking forward to the next instalment.
Looking forward to the next instalment.
I love the smell of Tamiya Extra Thin in the morning!
Please Log in to join the conversation.
9 years 1 month ago #51
by Stevef
Replied by Stevef on topic Siemens Schuckert Werke (SSW) Rs 1: scratch build 1/72
Evening All,
Thanks Dave for the compliment. Yes I ocassionaly stray from the straight and narrow way and build tractor biplanes and even other types that need rigging!
Thank you Clive for your sympathetic remark and your belief in my modelling skills. I just hope that this next section does not disappoint you.
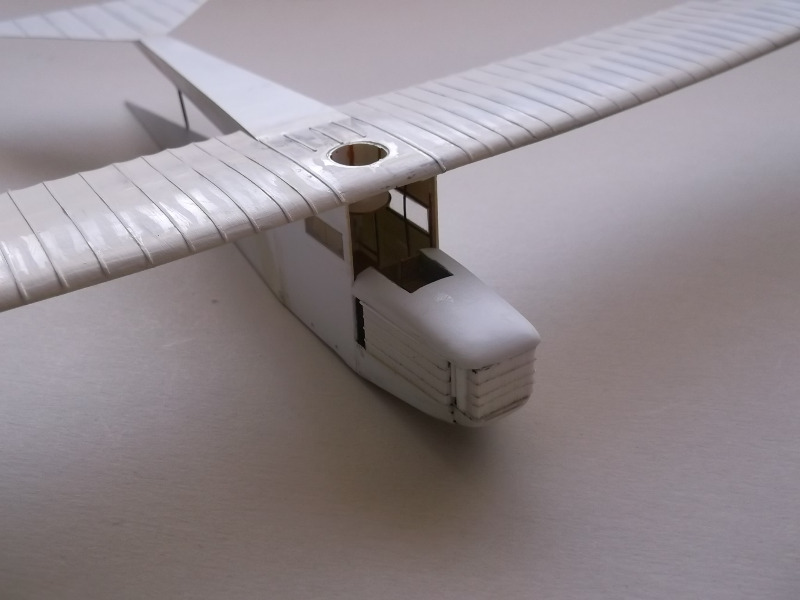
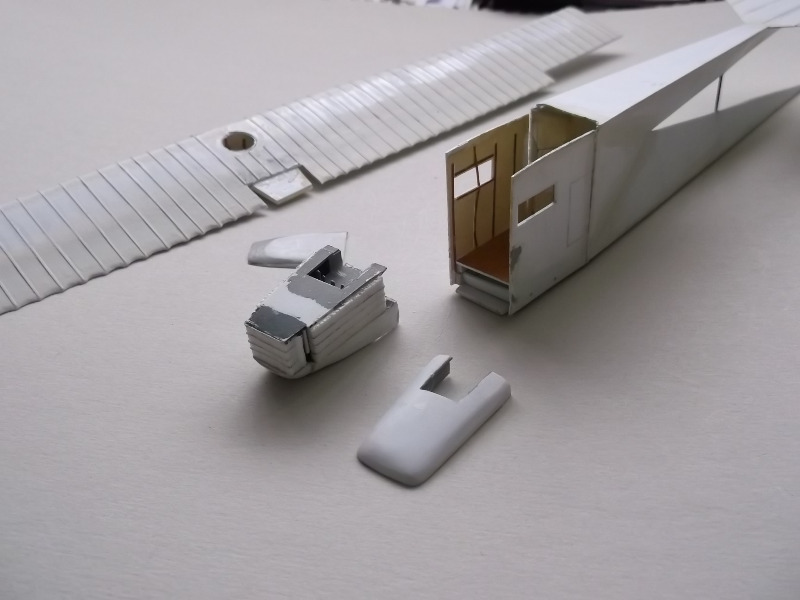
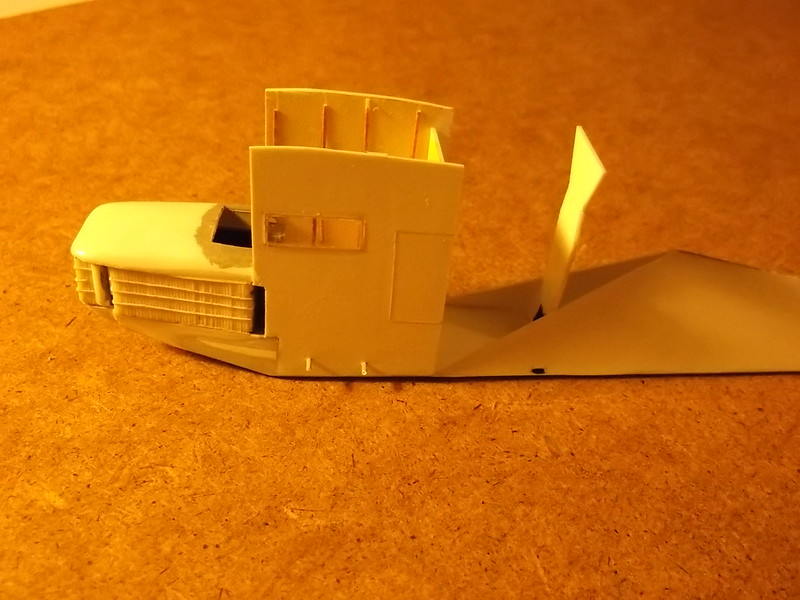
Right. I have rewritten the instructions for this build and proceeded to start again with the fuselage behind the nose. I also had to make a new engine cover and re-assemble the remaining parts of the nose as these had come off when I dismantled the disaster as illustrated in the last post.
I made new sides and added some internal detail in the form of framing etc, a new floor and a rear panel - the latter was not on the real machine but I need one to hold the sides when I assemble all of the parts. Without a rear panel the sides will wave about and not stay square. 60-thou strips were glued to the lower parts of the cockpit sides as two pieces of paper clip have to be passed through - these will form pins to help strengthen the butt joints of the lower wings to fuselage. New triangular fuselage sections were constructed, this time the lower section will extend under the cockpit and join the base of the nose. A new bulkhead which will hold the front ends of the triangular fuselage sections was also made.
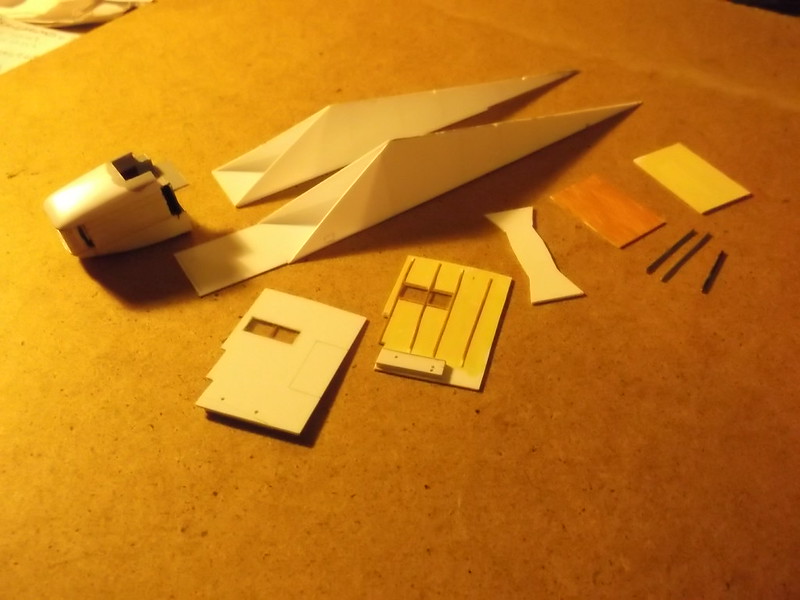
I should have made two bulkheads really as on the first attempt but I was frustrated and in a hurry - more haste less speed…! The horizontal tail surface was not attached to the upper fuselage triangle because it would get in the way later. The fronts of the cockpit sides were cut to fit into the rear of the nose section.
Now I could start construction again, but this time following a different sequence. First the cockpit sides were glued to the front of the lower fuselage triangle, and the rear panel inserted to stop the sides from falling about. Two reinforcing strips were added to the front of the fuselage panel to strengthen it ready to add some more card on the underside later. Then the cockpit floor could be put in, this rests on the small blocks added to the bottoms of the cockpit sides earlier. The cockpit floor will conceal the reinforcing pins for the wings which were added later.
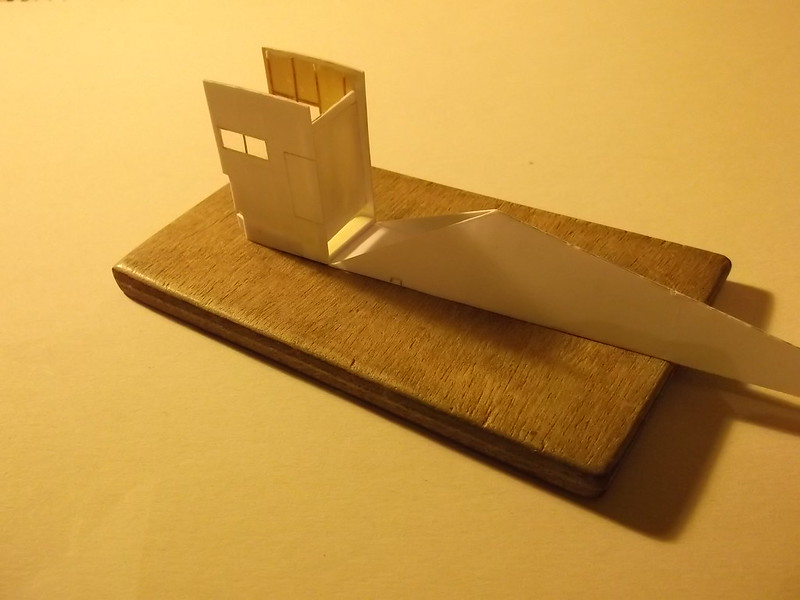
The bulkhead was glued into the lower triangular fuselage section.
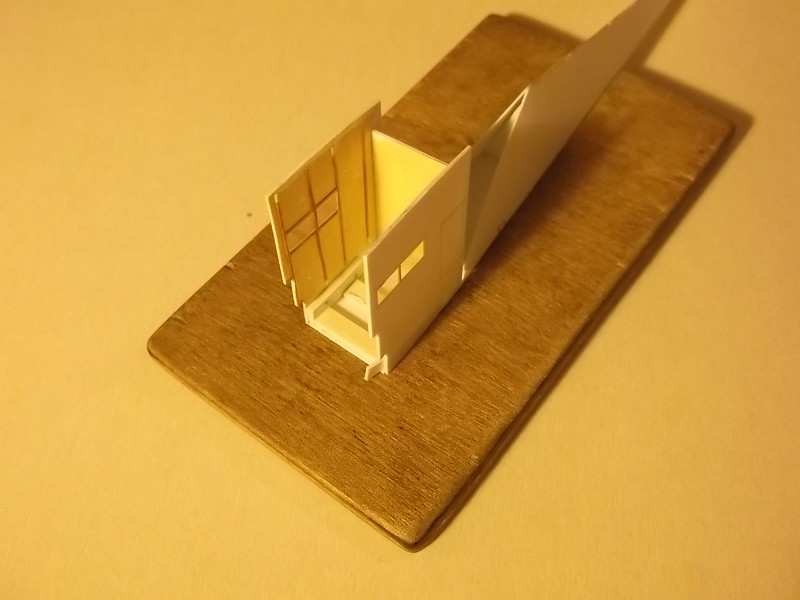
Pins from an old paper clip were inserted through the holes in the bottom of the cockpit sides and superglued into place, followed by the nose section
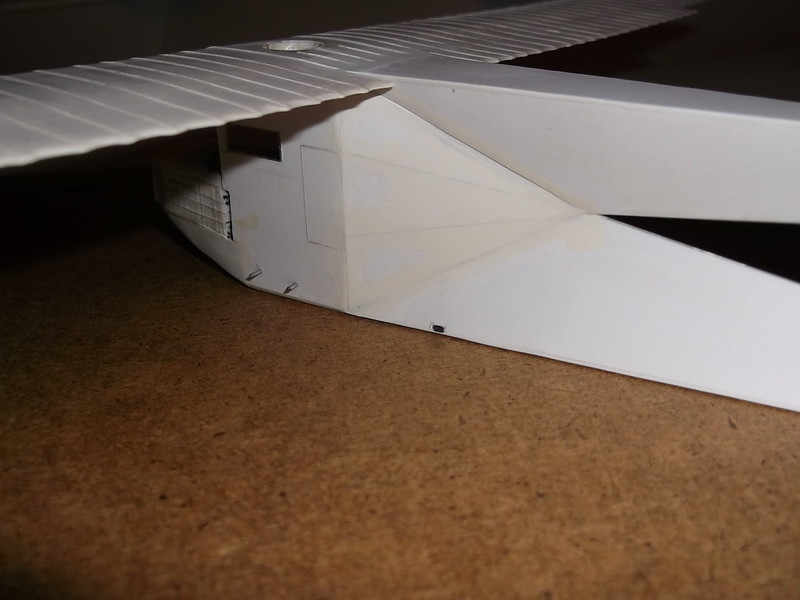
The upper fuselage triangular section could now be lowered over the bulkhead and the wire support strut inserted into upper and lower rear fuselage units.
Now the upper and lower sections could be joined so that the top of the rear upper unit lined with the rear of the top wing.

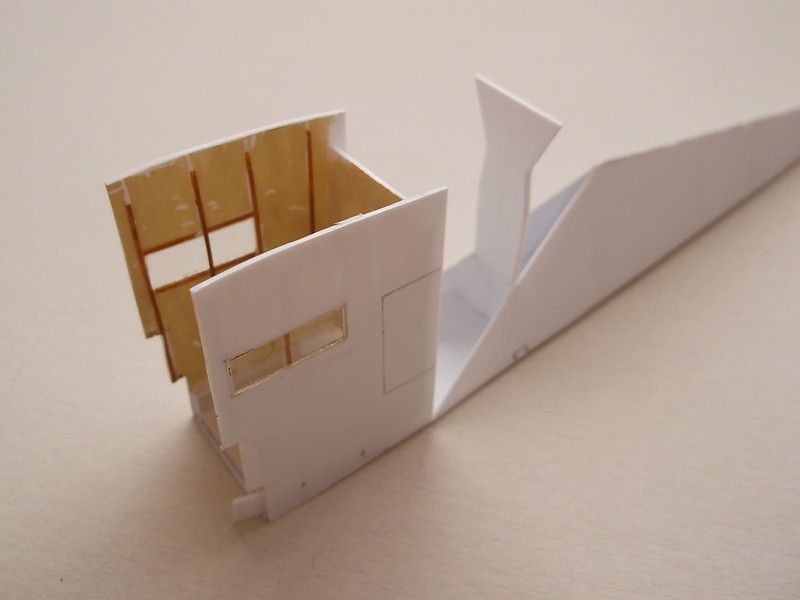
Finally the triangular pieces which fill the gaps behind the cockpit were cut to fit - each had to be trimmed and adjusted from the pieces which I had previously made from using the card patterns illustrated above. These were then touched in with some filler. Last the fuselage under the nose had a piece of 30 thou card glued and sanded to shape when it was dry and all the joints were treated with filler.
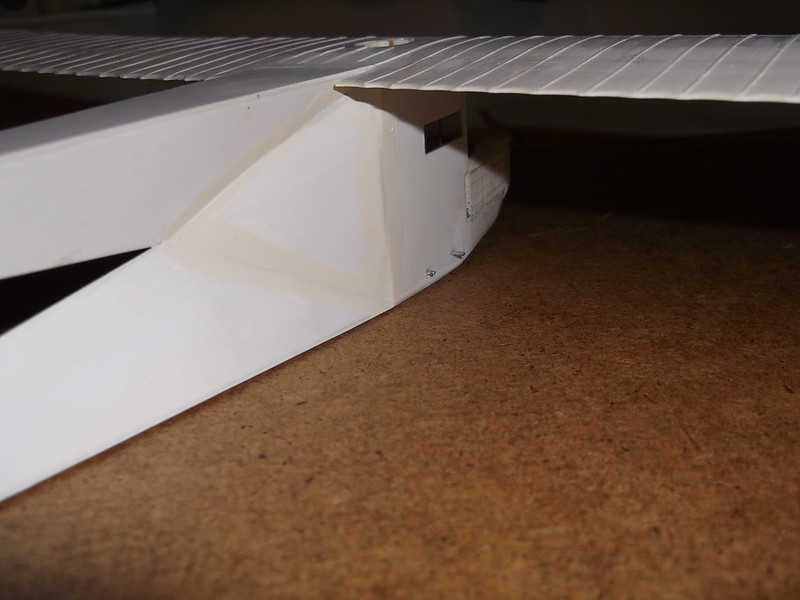
Last the fuselage under the nose had a piece of 30 thou card glued and sanded to shape when it was dry and all the joints were treated with filler.
This assembly sequence works: certainly the gap for the front of the cockpit is now the correct size and the windscreen will not look too small when I get to fit it later.
Thanks for looking.
Thanks Dave for the compliment. Yes I ocassionaly stray from the straight and narrow way and build tractor biplanes and even other types that need rigging!
Thank you Clive for your sympathetic remark and your belief in my modelling skills. I just hope that this next section does not disappoint you.
Right. I have rewritten the instructions for this build and proceeded to start again with the fuselage behind the nose. I also had to make a new engine cover and re-assemble the remaining parts of the nose as these had come off when I dismantled the disaster as illustrated in the last post.
I made new sides and added some internal detail in the form of framing etc, a new floor and a rear panel - the latter was not on the real machine but I need one to hold the sides when I assemble all of the parts. Without a rear panel the sides will wave about and not stay square. 60-thou strips were glued to the lower parts of the cockpit sides as two pieces of paper clip have to be passed through - these will form pins to help strengthen the butt joints of the lower wings to fuselage. New triangular fuselage sections were constructed, this time the lower section will extend under the cockpit and join the base of the nose. A new bulkhead which will hold the front ends of the triangular fuselage sections was also made.
I should have made two bulkheads really as on the first attempt but I was frustrated and in a hurry - more haste less speed…! The horizontal tail surface was not attached to the upper fuselage triangle because it would get in the way later. The fronts of the cockpit sides were cut to fit into the rear of the nose section.
Now I could start construction again, but this time following a different sequence. First the cockpit sides were glued to the front of the lower fuselage triangle, and the rear panel inserted to stop the sides from falling about. Two reinforcing strips were added to the front of the fuselage panel to strengthen it ready to add some more card on the underside later. Then the cockpit floor could be put in, this rests on the small blocks added to the bottoms of the cockpit sides earlier. The cockpit floor will conceal the reinforcing pins for the wings which were added later.
The bulkhead was glued into the lower triangular fuselage section.
Pins from an old paper clip were inserted through the holes in the bottom of the cockpit sides and superglued into place, followed by the nose section
The upper fuselage triangular section could now be lowered over the bulkhead and the wire support strut inserted into upper and lower rear fuselage units.
Now the upper and lower sections could be joined so that the top of the rear upper unit lined with the rear of the top wing.
Finally the triangular pieces which fill the gaps behind the cockpit were cut to fit - each had to be trimmed and adjusted from the pieces which I had previously made from using the card patterns illustrated above. These were then touched in with some filler. Last the fuselage under the nose had a piece of 30 thou card glued and sanded to shape when it was dry and all the joints were treated with filler.
Last the fuselage under the nose had a piece of 30 thou card glued and sanded to shape when it was dry and all the joints were treated with filler.
This assembly sequence works: certainly the gap for the front of the cockpit is now the correct size and the windscreen will not look too small when I get to fit it later.
Thanks for looking.
Please Log in to join the conversation.
- Clive Creer
-
- Offline
- Administrator
-
Less
More
- Posts: 35
- Thank you received: 2
9 years 1 month ago #61
by Clive Creer
I love the smell of Tamiya Extra Thin in the morning!
Replied by Clive Creer on topic Siemens Schuckert Werke (SSW) Rs 1: scratch build 1/72
Steve, your progress on this one is fantastic, it is looking really good. I'm looking forward to seeing the completed model.
I love the smell of Tamiya Extra Thin in the morning!
Please Log in to join the conversation.
Time to create page: 0.215 seconds
- You are here:
-
Home

-
Forum
-
Work in progress
-
Airfield
-
Archive
- Siemens Schuckert Werke (SSW) Rs 1: scratch build 1/72