1/72 Hansa Brandenburg W 13

6 years 9 months ago #248
by Stevef
1/72 Hansa Brandenburg W 13 was created by Stevef
Evening All,
Time to start another project. This time I am building a flying boat as there is currently a GB on floaty things on Britmodeller.
The subject which I have chosen has long been on my to do list - the scratch builder's equivalent of a stash - but I have refrained from tackling it because the underside of the hull forward of the step has a double concave curve and I am not sure how to tackle that part yet. I have decided to have a go anyway and if I am not very successful I will hide it away using the carriage that these machines were transported on when out of the water!
For those who do not know what one of these aircraft looked like, or did know but have forgotten, here is a picture to help/remind you:

I have also bought my kit and will use the plans in the DataFile above as my instructions. Here is my kit:

I am not sure how many parts this model will have but I will find out as I go along. As it will be another CBSB, (classic British scratch build), the number will be moderate.
Thanks for looking.
Stevef.
Time to start another project. This time I am building a flying boat as there is currently a GB on floaty things on Britmodeller.
The subject which I have chosen has long been on my to do list - the scratch builder's equivalent of a stash - but I have refrained from tackling it because the underside of the hull forward of the step has a double concave curve and I am not sure how to tackle that part yet. I have decided to have a go anyway and if I am not very successful I will hide it away using the carriage that these machines were transported on when out of the water!
For those who do not know what one of these aircraft looked like, or did know but have forgotten, here is a picture to help/remind you:
I have also bought my kit and will use the plans in the DataFile above as my instructions. Here is my kit:
I am not sure how many parts this model will have but I will find out as I go along. As it will be another CBSB, (classic British scratch build), the number will be moderate.
Thanks for looking.
Stevef.
Please Log in to join the conversation.
6 years 9 months ago #249
by Stevef
Replied by Stevef on topic 1/72 Hansa Brandenburg W 13
Evening All,
The first stages of the build have been completed. I frequently start my builds by cutting out the blanks for the wings and other flying surfaces. These were cut from 30thou card which had been placed in a length of 4 inch drain pipe and then had boiling water poured over it: the resultant curved plastic sheet is ideal for wings. The upper wing of these machines had a shallow sweep-back so I will have to make it in three sections. The lower wings and horizontal tail surface are also shown here:

I cut out the hull sides and top and bottom of the rear also from 30 thou card. I have also cut some bulkheads - these will be inserted to keep the structure square:

I have focussed on the fuselage first as I wanted to try to solve problem of the double concave curve on the underside of the hull. I had been thinking about it on and off for a time and eventually came up with a simple answer as I hope to show here. First though I had to make the hull - a simple procedure whereby the bulkheads were glued to the bottom of the hull and allowed to set. While that was happening I glued strips along the edges of the hull sides so that when I come to cement the top and bottom faces later they have something to keep them square and even:

Making up the rear section of the hull was a straightforward case of gluing each side to the bottom face and finishing by gluing the top face in place. The assembly was held firmly by state of the art clamps while the glue set:

Note that the nose section was not glued yet - making the hull in stages like this is easier and means that the final result is square and even. Only after the rear end was fully set, (after 12 hours), were the front bulkheads added in the nose section and the nose joined - a small piece of rod helped to reinforce the narrow tip of the bow joint:

There were now two holes at the front: one above and one below. The one below was tackled first as it is this that has the double concave curve in it. I started by cutting a piece of 60 thou card shaped to fit the hole and then used a pair of tweezers to bend it to fit the curvature of the lower hull towards the nose. That was done by gently bending the plastic repeatedly, working backwards and forwards along the curve with two gentle twists of the tweezers at the front for every one towards the rear:

It does not matter if the curve of the bottom is not quite precise as it will be pushed into the hole and held by the plastic strips thoughtfully attached to the hull sides as described above: the bulkheads add extra support and also help prevent the bottom plate from being pushed too far into the hole. To make sure that I do not file/sand right through the plastic, I glued a short section of 30 thou card at the rear of the new hull bottom prior to cementing the new hull bottom:

The next step was to mark the centre line of the new hull bottom, two perpendicular transverse lines, and fill the side gaps with filler. The transverse lines mark the point where the concave curvature ceases at the front, and a marker for a small jig which I had made from card to test the depths of the curve to keep them even.

Now the filing/sanding could begin. I started by using a larger diameter round file to make a shallow groove just forward of the hull step. This could then be slowly and steadily enlarged with fine grade glass paper wrapped around a piece of dowel. By putting slightly more pressure on the rear and by keeping the glasspaper and dowel almost parallel with the hull top I was able to gradually scoop out the required curve under the left side of the hull base. The centre line was used as a guide to prevent me making the curve too wide. The process was repeated for the right side:


What I thought was going to be difficult turned out to be relatively easy: there must therefore be hidden problems waiting for me further into this build....
If you have been, thanks for looking.
Stevef
The first stages of the build have been completed. I frequently start my builds by cutting out the blanks for the wings and other flying surfaces. These were cut from 30thou card which had been placed in a length of 4 inch drain pipe and then had boiling water poured over it: the resultant curved plastic sheet is ideal for wings. The upper wing of these machines had a shallow sweep-back so I will have to make it in three sections. The lower wings and horizontal tail surface are also shown here:
I cut out the hull sides and top and bottom of the rear also from 30 thou card. I have also cut some bulkheads - these will be inserted to keep the structure square:
I have focussed on the fuselage first as I wanted to try to solve problem of the double concave curve on the underside of the hull. I had been thinking about it on and off for a time and eventually came up with a simple answer as I hope to show here. First though I had to make the hull - a simple procedure whereby the bulkheads were glued to the bottom of the hull and allowed to set. While that was happening I glued strips along the edges of the hull sides so that when I come to cement the top and bottom faces later they have something to keep them square and even:
Making up the rear section of the hull was a straightforward case of gluing each side to the bottom face and finishing by gluing the top face in place. The assembly was held firmly by state of the art clamps while the glue set:
Note that the nose section was not glued yet - making the hull in stages like this is easier and means that the final result is square and even. Only after the rear end was fully set, (after 12 hours), were the front bulkheads added in the nose section and the nose joined - a small piece of rod helped to reinforce the narrow tip of the bow joint:
There were now two holes at the front: one above and one below. The one below was tackled first as it is this that has the double concave curve in it. I started by cutting a piece of 60 thou card shaped to fit the hole and then used a pair of tweezers to bend it to fit the curvature of the lower hull towards the nose. That was done by gently bending the plastic repeatedly, working backwards and forwards along the curve with two gentle twists of the tweezers at the front for every one towards the rear:
It does not matter if the curve of the bottom is not quite precise as it will be pushed into the hole and held by the plastic strips thoughtfully attached to the hull sides as described above: the bulkheads add extra support and also help prevent the bottom plate from being pushed too far into the hole. To make sure that I do not file/sand right through the plastic, I glued a short section of 30 thou card at the rear of the new hull bottom prior to cementing the new hull bottom:
The next step was to mark the centre line of the new hull bottom, two perpendicular transverse lines, and fill the side gaps with filler. The transverse lines mark the point where the concave curvature ceases at the front, and a marker for a small jig which I had made from card to test the depths of the curve to keep them even.
Now the filing/sanding could begin. I started by using a larger diameter round file to make a shallow groove just forward of the hull step. This could then be slowly and steadily enlarged with fine grade glass paper wrapped around a piece of dowel. By putting slightly more pressure on the rear and by keeping the glasspaper and dowel almost parallel with the hull top I was able to gradually scoop out the required curve under the left side of the hull base. The centre line was used as a guide to prevent me making the curve too wide. The process was repeated for the right side:
What I thought was going to be difficult turned out to be relatively easy: there must therefore be hidden problems waiting for me further into this build....
If you have been, thanks for looking.
Stevef
Please Log in to join the conversation.
6 years 9 months ago #250
by Stevef
Replied by Stevef on topic 1/72 Hansa Brandenburg W 13
Evening All,
This has been a week in which I have been learning some dark arts in the use of an electric drill, (ie a Dremmel) on laminated plastic. I decided not to try to mould the upper decking of the hull as this would have meant carving a mould from basswood and then trying to push mould a piece which would sit exactly on the curved upper hull sides. I could see clearly that much frustration and wasted plastic lay on that route so I opted instead to do what I had done on the H-B CC and make the upper decking from laminated plastic. I made one piece which would sit comfortably over the gap in the upper hull:

A centre line had been drawn on the top of the new hull piece to help me to sand the correct curvature in the nose area and to make sure that the piece was properly centered on the hull. However I did not measure the thickness of the top correctly, and despite adding what I thought was adequate extra card to correct the problem I found that I still did not have enough depth and to avoid unsightly joins on the finished upper decking I decided to scrap the piece and start again.
This time I got the thicknesses right so I went ahead and scribed with a pair of dividers where the gunner's cockpit would be and traced and scribed the outline of the pilot and navigator's cockpit. However when I tried to drill out the gunner's cockpit I found that the Dremmel was so fast, (even on the slowest revs), that it melted the plastic and tore a larger hole than what I wanted! Time to make a third decking piece!
Number three was more successful: I was able to get the correct thickness and to drill holes ready to remove the plastic from the cockpit openings without gouging out an excessively large hole. I did this by drilling one hole at a time and stopping the drill to allow the bit to cool between each drilling individual holes. I also cleaned off any plastic which had stuck to the bit and made sure that the holes were not to close to the scribed edge of the cockpits. Here are the two efforts with the failed second attempt on the left:

The holes were joined with a scalpel blade so that the centre pieces of plastic fell out and the the final shaping of the cockpit openings was completed with a round and half-round file. A long and somewhat laborious process but as I learned the hard way, one which cannot be rushed.

With the cockpit openings complete I added some basic cockpit details - seats, a control wheel, a panel between the pilot and navigator seats and a seat for the gunner. Very little of this will be visible on the completed model and I do not belong to the school of modelling which insists on adding details which will be forever hidden once the model is complete. I am happy to know that those details are missing and wish to spend more time on getting an accurate outline and detail which can be seen! I also filed the upper decking to the shape of the side profile prior to fixing it in place as this required some hard scraping which would have risked causing damage to the hull if I had glued it in place beforehand. In doing this I got a little carried away and took too much from the top of the rear deck and had to build this area up with filler - hence the large grey area in the image below. I also removed much of the excess plastic on the sides of the decking at this stage again to reduce the risk of damage to the hull sides.

The upper decking was glued to the hull and held in place overnight with the same state-of-the-art sophisticated equipment as was employed earlier to hold the hull bottom in place and described above. The centre line on the decking enabled me to get the accurate positioning for the cockpits relative to the rest of the hull. From the left (port) side the hull now looked like this:

Final shaping could now begin. First the sides of the upper decking were filed so that they were flush with the rest of hull sides and then the curved nose section in front of the pilot's cockpit was sanded to shape: I used a card template made from a cross-section diagram on the plans to achieve as close a match to the profile as I was able. The centre line and a cross line can be seen on theses images: the latter marked where the template was used to check the cross profile. You van also see the filler that I had to add to the hull sides below the decking to remove a small step caused by the thin plastic bending inwards when it should really have curved slightly outwards. I am hoping that none of this will show when the hull is painted and the wings are in place....


Having got the decking as I thought that I wanted it I checked the lower wigs against the sides of the upper decking - and found that in spite of the filler the shape was still not right....! So out with the file and remove the front end of the filler to the plastic below and glue into place a piece of 20 thou card. A file and glass paper were brought into action when the plastic was firm and the edges of the new piece of card concealed with yet more filler....

Now the wings fit without an unsightly gap. Still the hull is not complete however. I have made a fin from 60 thou card with two pieces of 20 thou card at the base. The fin of this machine was very wide at the base and tapered upwards so I had yet more filing, sanding and filling to do before it was finished:


Now I can add the gunwale along the sides of the nose and bomb rack strips to the front section of the upper hull, but more of that in a later post.
Thanks for looking.
Stevef.
This has been a week in which I have been learning some dark arts in the use of an electric drill, (ie a Dremmel) on laminated plastic. I decided not to try to mould the upper decking of the hull as this would have meant carving a mould from basswood and then trying to push mould a piece which would sit exactly on the curved upper hull sides. I could see clearly that much frustration and wasted plastic lay on that route so I opted instead to do what I had done on the H-B CC and make the upper decking from laminated plastic. I made one piece which would sit comfortably over the gap in the upper hull:
A centre line had been drawn on the top of the new hull piece to help me to sand the correct curvature in the nose area and to make sure that the piece was properly centered on the hull. However I did not measure the thickness of the top correctly, and despite adding what I thought was adequate extra card to correct the problem I found that I still did not have enough depth and to avoid unsightly joins on the finished upper decking I decided to scrap the piece and start again.
This time I got the thicknesses right so I went ahead and scribed with a pair of dividers where the gunner's cockpit would be and traced and scribed the outline of the pilot and navigator's cockpit. However when I tried to drill out the gunner's cockpit I found that the Dremmel was so fast, (even on the slowest revs), that it melted the plastic and tore a larger hole than what I wanted! Time to make a third decking piece!
Number three was more successful: I was able to get the correct thickness and to drill holes ready to remove the plastic from the cockpit openings without gouging out an excessively large hole. I did this by drilling one hole at a time and stopping the drill to allow the bit to cool between each drilling individual holes. I also cleaned off any plastic which had stuck to the bit and made sure that the holes were not to close to the scribed edge of the cockpits. Here are the two efforts with the failed second attempt on the left:
The holes were joined with a scalpel blade so that the centre pieces of plastic fell out and the the final shaping of the cockpit openings was completed with a round and half-round file. A long and somewhat laborious process but as I learned the hard way, one which cannot be rushed.
With the cockpit openings complete I added some basic cockpit details - seats, a control wheel, a panel between the pilot and navigator seats and a seat for the gunner. Very little of this will be visible on the completed model and I do not belong to the school of modelling which insists on adding details which will be forever hidden once the model is complete. I am happy to know that those details are missing and wish to spend more time on getting an accurate outline and detail which can be seen! I also filed the upper decking to the shape of the side profile prior to fixing it in place as this required some hard scraping which would have risked causing damage to the hull if I had glued it in place beforehand. In doing this I got a little carried away and took too much from the top of the rear deck and had to build this area up with filler - hence the large grey area in the image below. I also removed much of the excess plastic on the sides of the decking at this stage again to reduce the risk of damage to the hull sides.
The upper decking was glued to the hull and held in place overnight with the same state-of-the-art sophisticated equipment as was employed earlier to hold the hull bottom in place and described above. The centre line on the decking enabled me to get the accurate positioning for the cockpits relative to the rest of the hull. From the left (port) side the hull now looked like this:
Final shaping could now begin. First the sides of the upper decking were filed so that they were flush with the rest of hull sides and then the curved nose section in front of the pilot's cockpit was sanded to shape: I used a card template made from a cross-section diagram on the plans to achieve as close a match to the profile as I was able. The centre line and a cross line can be seen on theses images: the latter marked where the template was used to check the cross profile. You van also see the filler that I had to add to the hull sides below the decking to remove a small step caused by the thin plastic bending inwards when it should really have curved slightly outwards. I am hoping that none of this will show when the hull is painted and the wings are in place....
Having got the decking as I thought that I wanted it I checked the lower wigs against the sides of the upper decking - and found that in spite of the filler the shape was still not right....! So out with the file and remove the front end of the filler to the plastic below and glue into place a piece of 20 thou card. A file and glass paper were brought into action when the plastic was firm and the edges of the new piece of card concealed with yet more filler....
Now the wings fit without an unsightly gap. Still the hull is not complete however. I have made a fin from 60 thou card with two pieces of 20 thou card at the base. The fin of this machine was very wide at the base and tapered upwards so I had yet more filing, sanding and filling to do before it was finished:
Now I can add the gunwale along the sides of the nose and bomb rack strips to the front section of the upper hull, but more of that in a later post.
Thanks for looking.
Stevef.
Please Log in to join the conversation.
6 years 8 months ago #251
by Stevef
Replied by Stevef on topic 1/72 Hansa Brandenburg W 13
Evening All,
It has been a little while since the last post and I do not seem to have achieved a great deal in the interval - as usual life has got in the way. There are also times when in the course of scratch building a model a great deal of time seems to be required to achieve not very much, and then a great deal can be achieved in a short time. I am hoping that I might be moving from the former to the latter....
I have fixed the wings and horizontal tail surfaces to the hull - they are butt joined with liquid cement, (bog standard Humbrol liquid poly). Given enough time to dry properly, and supported while they dry this gives a good clean and firm joint. I then primed the fuselage with Revell acrylic ocker (88). Later I will apply oils to represent the wood of the hull:


The dark areas on the top of the mid-hull are filler but these will not show through the oil paints.
Next were the floats. Originally I thought that I would make them from card and started with sides from 30 thou card with bulkheads between. I had intended to bend some 20 thou card to make the top and bottom surfaces but because the front ends of the floats are slightly tapered this was going to cause gaps to appear and I could see disaster looming:

So I adopted instead the method which I had used on previous flying boats (Phoenix A and Hansa-Brandenburg CC) by making them from laminated card. The procedure is simple: glue together sheets of thick card with thick styrene cement from a tube and place under some books for at least 12 hours. Mark out the plan of the float:

Cut away excess plastic with a razor saw:

Shape the remaining plastic with a file and glasspaper and

there is a float with the second block of laminated card ready to be treated in the same way: and here is the pile of dust that is generated by the process:

(For those who do not know the above picture shows the corner of the old tray that I use as a "bench" on which I make my models. I have had it since I started modelling when I was 10-11 years old and it is still the main surface on which I work).
The hull and floats have now been painted with oils and are currently drying in my airing cupboard: I expect them to be there for 2-3 days depending on the temperature inside the cupboard. Because watching and waiting for paint to dry is a bit tedious I started on the engine: when I laminated the plastic for the floats I also made up a piece for an engine block. This was filed and sanded to shape and the cylinders added from 80 thou rod. The insides of the "cylinders" were drilled so that I can add the inlet manifolds from 20 thou rod, one of which has been inserted (but not cemented):


More to follow in due course.
Thanks for looking.
Stevef.
It has been a little while since the last post and I do not seem to have achieved a great deal in the interval - as usual life has got in the way. There are also times when in the course of scratch building a model a great deal of time seems to be required to achieve not very much, and then a great deal can be achieved in a short time. I am hoping that I might be moving from the former to the latter....
I have fixed the wings and horizontal tail surfaces to the hull - they are butt joined with liquid cement, (bog standard Humbrol liquid poly). Given enough time to dry properly, and supported while they dry this gives a good clean and firm joint. I then primed the fuselage with Revell acrylic ocker (88). Later I will apply oils to represent the wood of the hull:
The dark areas on the top of the mid-hull are filler but these will not show through the oil paints.
Next were the floats. Originally I thought that I would make them from card and started with sides from 30 thou card with bulkheads between. I had intended to bend some 20 thou card to make the top and bottom surfaces but because the front ends of the floats are slightly tapered this was going to cause gaps to appear and I could see disaster looming:
So I adopted instead the method which I had used on previous flying boats (Phoenix A and Hansa-Brandenburg CC) by making them from laminated card. The procedure is simple: glue together sheets of thick card with thick styrene cement from a tube and place under some books for at least 12 hours. Mark out the plan of the float:
Cut away excess plastic with a razor saw:
Shape the remaining plastic with a file and glasspaper and
there is a float with the second block of laminated card ready to be treated in the same way: and here is the pile of dust that is generated by the process:
(For those who do not know the above picture shows the corner of the old tray that I use as a "bench" on which I make my models. I have had it since I started modelling when I was 10-11 years old and it is still the main surface on which I work).
The hull and floats have now been painted with oils and are currently drying in my airing cupboard: I expect them to be there for 2-3 days depending on the temperature inside the cupboard. Because watching and waiting for paint to dry is a bit tedious I started on the engine: when I laminated the plastic for the floats I also made up a piece for an engine block. This was filed and sanded to shape and the cylinders added from 80 thou rod. The insides of the "cylinders" were drilled so that I can add the inlet manifolds from 20 thou rod, one of which has been inserted (but not cemented):
More to follow in due course.
Thanks for looking.
Stevef.
Please Log in to join the conversation.
6 years 8 months ago - 6 years 8 months ago #252
by Stevef
Replied by Stevef on topic 1/72 Hansa Brandenburg W 13
Evening All,
Painting and decorating is almost complete now: there is more to do as I add pieces here and there but they will be done when the correct time arises - in the meantime the main components are finished. The hull was painted with oils - burnt siennsa with a small amount of raw sienna, and the whole dried for three days in a warm airing cupboard. Then two thin coats of Revell clear orange varnish completed that part. The wings were painted with many coats of Revell white with a small amount of Humbrol 103 linen. I mix the paints with water until they have the consistency of milk and draw the brush in alternate directions across the wing and along the wing with each coat. This ensures an even coating each time - the last coat is always in the direction of airflow - ie from front to back. The red/white wing, tail and rudder bands were matt Humbrol enamels (34 and 60). The transfers were printed for me by Arctic Decals: I could have printed the crosses but not the numerals so I gave an order for both and can say that I am very pleased indeed with both the quality of the transfers and the very prompt service. I will definitely be using them again:

So the model parts now look like this form the top:
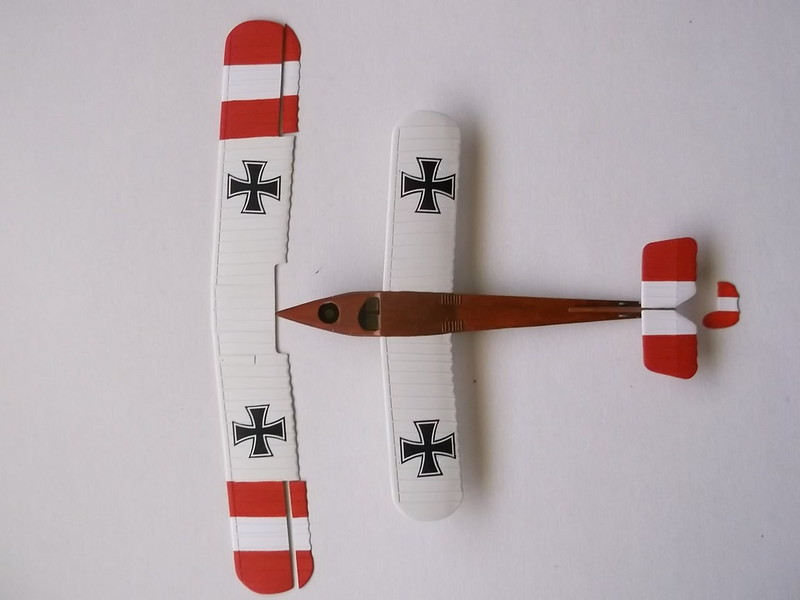
and this from under:

From the sides:


The cross on the nose was hand painted as I could not think of a way of making a transfer(s) that would fit. The crosses on the fuselage sides were home printed.
I have also been working on the engine while paint has been drying and this is now nearly complete - I may add a couple of small items to the sides when it is fixed to the platform on the model as they are difficult to fit and there is a real risk that they will be knocked off:


That is all for now. More updates when I have the engine assembly on the fuselage.
Thanks for looking.
Stevef.
Painting and decorating is almost complete now: there is more to do as I add pieces here and there but they will be done when the correct time arises - in the meantime the main components are finished. The hull was painted with oils - burnt siennsa with a small amount of raw sienna, and the whole dried for three days in a warm airing cupboard. Then two thin coats of Revell clear orange varnish completed that part. The wings were painted with many coats of Revell white with a small amount of Humbrol 103 linen. I mix the paints with water until they have the consistency of milk and draw the brush in alternate directions across the wing and along the wing with each coat. This ensures an even coating each time - the last coat is always in the direction of airflow - ie from front to back. The red/white wing, tail and rudder bands were matt Humbrol enamels (34 and 60). The transfers were printed for me by Arctic Decals: I could have printed the crosses but not the numerals so I gave an order for both and can say that I am very pleased indeed with both the quality of the transfers and the very prompt service. I will definitely be using them again:
So the model parts now look like this form the top:
and this from under:
From the sides:
The cross on the nose was hand painted as I could not think of a way of making a transfer(s) that would fit. The crosses on the fuselage sides were home printed.
I have also been working on the engine while paint has been drying and this is now nearly complete - I may add a couple of small items to the sides when it is fixed to the platform on the model as they are difficult to fit and there is a real risk that they will be knocked off:
That is all for now. More updates when I have the engine assembly on the fuselage.
Thanks for looking.
Stevef.
Last edit: 6 years 8 months ago by Stevef.
Please Log in to join the conversation.
6 years 8 months ago #253
by Stevef
Replied by Stevef on topic 1/72 Hansa Brandenburg W 13
Evening All,
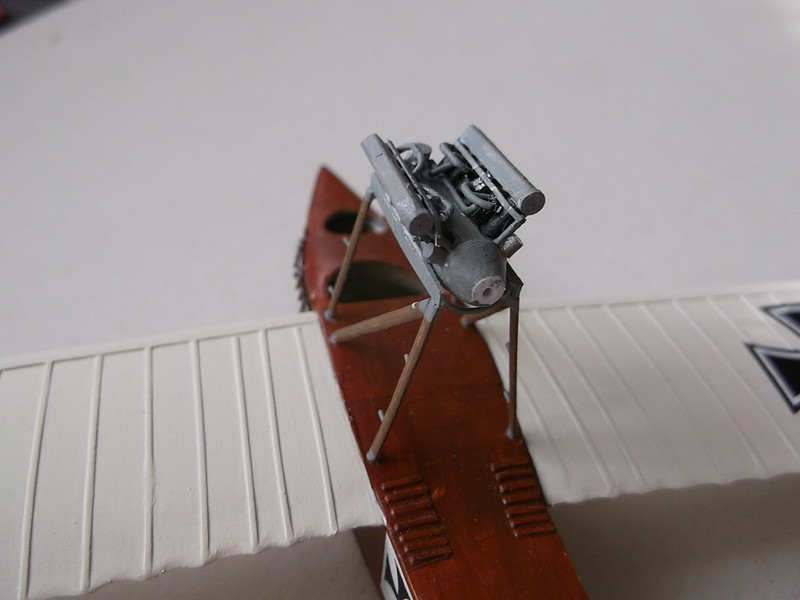
I have been working on several small units this week, starting with the bomb racks which were fixed to frames which ran along the top side of the hull. I made the frames from 10 x 20 thou strip and added the crutches with pieces of rod. They are difficult to simulate accurately so my rather crude representation will have to do. The I pressed on with the engine platform: This was a simple structure on the original aircraft which was fabricated from steel tube which had thin sheet steel wrapped around it to make it appear like a conventional wood strut. These were painted to look like wood. The arms were shaped from 30 x 40 thou strip and cut to length. The forward pair were glued into place with Revell Contacta Professional and allowed to set for about 30 seconds. Then I added the front cross piece from a piece of 30 thou scrap and the tops glued. The length of the front bar was taken from the width of the engine sump which has to sit in the gap between two horizontal bars which run between the tops of the front and rear pairs of supports. While the glue was still not set I aligned the front struts so that they were vertical. When these had set (after 30 minutes) I repeated the operation for the rear struts, but this time I added the longitudinal bar between the front and rear pairs while the glue was setting: the horizontal bars had to be parallel. This was then set aside to dry overnight. The next day I could add the curved bar between the rear struts - this was made from 30 thou rod. The two angled struts on the side of the frame were fitted last:

The engine was then test fitted:


I had also done some work on the engine including adding some more pipes on the sides, a couple of small units which I could see in photos, (all from rod), and small supports on the sides of the sump which would stop the engine falling through the gap between the horizontal bars. I also drilled holes for the exhaust stubs which will be fixed later. The engine frame was painted and the small steps added to the vertical struts.


Fixing the engine was now a simple matter of applying glue and after fitting, allowing the assembly to set:


Before i fix the top wing I decided to put the wing floats on otherwise I have to invert and support the model while some fiddly work is done. On reflection I should have fitted the floats before I attached the engine but I did manage to avoid knocking it off. First the 4 vertical struts were located and cemented into holes drilled into the tops of the floats and while the cement was still not set I placed the other ends of the struts into holes drilled in the wing. The cement on the floats was allowed to set for half an hour before I cemented the struts to the holes in the wings. This was again left to dry out thoroughly, before I added the side, front and rear cross struts:

Now I am ready, (well almost), to fit the top wing. The wing will need support while struts are added and dry out because the wing struts form an open V and this will collapse easily. So a pair of jigs were cut from card:

The centre pieces were measured from the plans - they will fill the gap between the wings. The side pieces are there to keep the spacers upright and stable while the struts are inserted and dry out:

These were tested before use and found to be wholly satisfactory:

Jigs do not need to be complex or expensive - I regularly make use of everyday items on or near my desk and find that with a little ingenuity much can be achieved at minimal cost.
Next step is to fix the main struts which I hope to show in the next update.
Thanks for looking.
Stevef.
I have been working on several small units this week, starting with the bomb racks which were fixed to frames which ran along the top side of the hull. I made the frames from 10 x 20 thou strip and added the crutches with pieces of rod. They are difficult to simulate accurately so my rather crude representation will have to do. The I pressed on with the engine platform: This was a simple structure on the original aircraft which was fabricated from steel tube which had thin sheet steel wrapped around it to make it appear like a conventional wood strut. These were painted to look like wood. The arms were shaped from 30 x 40 thou strip and cut to length. The forward pair were glued into place with Revell Contacta Professional and allowed to set for about 30 seconds. Then I added the front cross piece from a piece of 30 thou scrap and the tops glued. The length of the front bar was taken from the width of the engine sump which has to sit in the gap between two horizontal bars which run between the tops of the front and rear pairs of supports. While the glue was still not set I aligned the front struts so that they were vertical. When these had set (after 30 minutes) I repeated the operation for the rear struts, but this time I added the longitudinal bar between the front and rear pairs while the glue was setting: the horizontal bars had to be parallel. This was then set aside to dry overnight. The next day I could add the curved bar between the rear struts - this was made from 30 thou rod. The two angled struts on the side of the frame were fitted last:
The engine was then test fitted:
I had also done some work on the engine including adding some more pipes on the sides, a couple of small units which I could see in photos, (all from rod), and small supports on the sides of the sump which would stop the engine falling through the gap between the horizontal bars. I also drilled holes for the exhaust stubs which will be fixed later. The engine frame was painted and the small steps added to the vertical struts.
Fixing the engine was now a simple matter of applying glue and after fitting, allowing the assembly to set:
Before i fix the top wing I decided to put the wing floats on otherwise I have to invert and support the model while some fiddly work is done. On reflection I should have fitted the floats before I attached the engine but I did manage to avoid knocking it off. First the 4 vertical struts were located and cemented into holes drilled into the tops of the floats and while the cement was still not set I placed the other ends of the struts into holes drilled in the wing. The cement on the floats was allowed to set for half an hour before I cemented the struts to the holes in the wings. This was again left to dry out thoroughly, before I added the side, front and rear cross struts:
Now I am ready, (well almost), to fit the top wing. The wing will need support while struts are added and dry out because the wing struts form an open V and this will collapse easily. So a pair of jigs were cut from card:
The centre pieces were measured from the plans - they will fill the gap between the wings. The side pieces are there to keep the spacers upright and stable while the struts are inserted and dry out:
These were tested before use and found to be wholly satisfactory:
Jigs do not need to be complex or expensive - I regularly make use of everyday items on or near my desk and find that with a little ingenuity much can be achieved at minimal cost.
Next step is to fix the main struts which I hope to show in the next update.
Thanks for looking.
Stevef.
Please Log in to join the conversation.
6 years 7 months ago #254
by Stevef
Replied by Stevef on topic 1/72 Hansa Brandenburg W 13
Evening All,
I have had a "down" period recently: I had to spend nearly a week away from home and when I returned I had little energy to do anything. So a project which should really have been finished by now has only moved forward a short amount. But the top wing is in place....
I started by sitting the upper wing on the card jigs as shown in the previous post. The forward interplane struts were fitted first: that proved to be a bit tricky because I could not see clearly under the top wing to get the exact length of the struts and then fit the ends into the location holes. In fact it took about 30 minutes to get each pair of struts into place. These were left to dry overnight with the card jigs in place to provide support:


The paint pots were there to make sure that the upper wing remained in place while the glue set - the wing had a tendency to move out of alignment otherwise. Once the glue had set the problem ceased. The rear struts were be inserted one side at a time. As each pair was completed the card jig was removed - the rigid forward struts provided enough support for the rear struts to be left to set without further jigging:


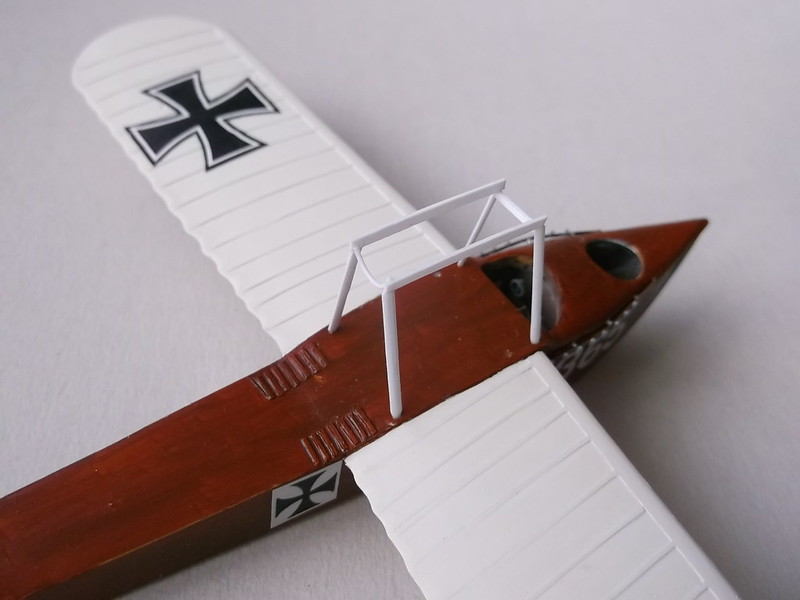
I have now also added the cabane struts but forgot to photograph them before fixing into place. They consist of 20 x 30 thou strip at the upper end and thin wire at the bottom because the struts were steel tube with a sheet of thin steel wrapped around to give an aerofoil section. The lower parts of the cabane struts were left uncovered so as not to interfere with the exhausts of the engine - hence the plastic and wire combination. These too were more tricky than anticipated and therefore took longer to fit, further discouraging me from attempting to fit them and slowing everything down. Now these tasks are completed I am hoping to be able to add the ailerons, rudder, windscreen and other small details and rig the model and complete it in reasonable time. I have started a small base to mount it on - more later.
Thanks for looking.
Stevef.
I have had a "down" period recently: I had to spend nearly a week away from home and when I returned I had little energy to do anything. So a project which should really have been finished by now has only moved forward a short amount. But the top wing is in place....
I started by sitting the upper wing on the card jigs as shown in the previous post. The forward interplane struts were fitted first: that proved to be a bit tricky because I could not see clearly under the top wing to get the exact length of the struts and then fit the ends into the location holes. In fact it took about 30 minutes to get each pair of struts into place. These were left to dry overnight with the card jigs in place to provide support:
The paint pots were there to make sure that the upper wing remained in place while the glue set - the wing had a tendency to move out of alignment otherwise. Once the glue had set the problem ceased. The rear struts were be inserted one side at a time. As each pair was completed the card jig was removed - the rigid forward struts provided enough support for the rear struts to be left to set without further jigging:
I have now also added the cabane struts but forgot to photograph them before fixing into place. They consist of 20 x 30 thou strip at the upper end and thin wire at the bottom because the struts were steel tube with a sheet of thin steel wrapped around to give an aerofoil section. The lower parts of the cabane struts were left uncovered so as not to interfere with the exhausts of the engine - hence the plastic and wire combination. These too were more tricky than anticipated and therefore took longer to fit, further discouraging me from attempting to fit them and slowing everything down. Now these tasks are completed I am hoping to be able to add the ailerons, rudder, windscreen and other small details and rig the model and complete it in reasonable time. I have started a small base to mount it on - more later.
Thanks for looking.
Stevef.
Please Log in to join the conversation.
6 years 6 months ago #258
by Stevef
Replied by Stevef on topic 1/72 Hansa Brandenburg W 13
Evening All,
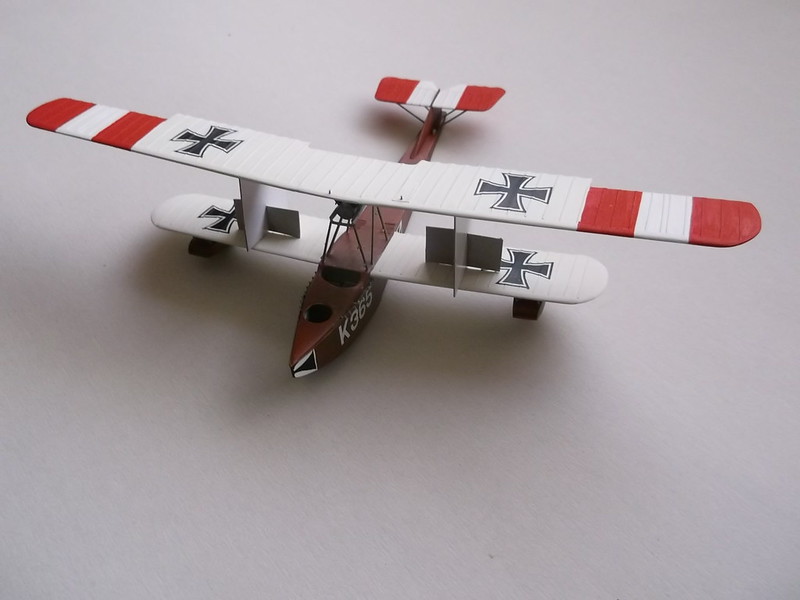
I am pleased to be able to report that I have now finished this one, including a base, but I am still not happy with the latter and will take some advice from members of my club on Saturday to see what I can do to improve it. I want to represent the concrete platform at the edge of the slipway and I have real problems representing such surfaces.
To complete the model I added the propellor, windscreen, bollards and bomb release gear on the front and rigged it with 40 SWG rolled copper wire. The base is hardbard attached to a wood frame with standard HO guage rail track. I will post some photos in the gallery with some historical notes later this evening.


This has been an enjoyable build and I now have a type in my collection that I have wanted for some time.
Thanks for looking.
Stevef
I am pleased to be able to report that I have now finished this one, including a base, but I am still not happy with the latter and will take some advice from members of my club on Saturday to see what I can do to improve it. I want to represent the concrete platform at the edge of the slipway and I have real problems representing such surfaces.
To complete the model I added the propellor, windscreen, bollards and bomb release gear on the front and rigged it with 40 SWG rolled copper wire. The base is hardbard attached to a wood frame with standard HO guage rail track. I will post some photos in the gallery with some historical notes later this evening.
This has been an enjoyable build and I now have a type in my collection that I have wanted for some time.
Thanks for looking.
Stevef
Please Log in to join the conversation.
Time to create page: 0.263 seconds
- You are here:
-
Home

-
Forum
-
Work in progress
-
Airfield
-
Archive
- 1/72 Hansa Brandenburg W 13