1/72 Zeppelin-Lindau (Dornier) Rs II scratch build
7 years 3 weeks ago #149
by DaveB
Steve
You have certainly set yourself a challenging project with this one. As said above - amazing work. This is going to be large and I imagine this is the biggest model you have put together to date?
Will really look the business when finished and on your display diorama.
Regards
Dave
You have certainly set yourself a challenging project with this one. As said above - amazing work. This is going to be large and I imagine this is the biggest model you have put together to date?
Will really look the business when finished and on your display diorama.
Regards
Dave
The following user(s) said Thank You: Stevef
Please Log in to join the conversation.
7 years 3 weeks ago #151
by Stevef
Warning: Trying to access array offset on value of type bool in /var/www/vhosts/gmms.org.uk/httpdocs/libraries/kunena/external/nbbc/nbbc.php on line 2819
Warning: Trying to access array offset on value of type bool in /var/www/vhosts/gmms.org.uk/httpdocs/libraries/kunena/external/nbbc/nbbc.php on line 2819
Evening All,
Thanks Robbo and Dave for the compliments.
Dave: yes this is by far the biggest scratch build that I have attempted - even bigger than the SSW which I built earlier this year. I just hope that I can pull of the diorama to go with the aeroplane as i have never attempted that sort of thing before, but I am getting some very helpful advice for club members so I am optimistic.
I have finished the tail surfaces by assembling the biplane elevator and making the upper halves of the fins and rudders and attaching them to the horizontal stabilizer. I used 30 thou card for the fins and rudders and cut two slots in them so that I could insert the horizontal surface. Filler had to be used to clean up the joint because unless the gap was slightly oversize the horizontal surface ribs would not pass through. Incidentally a strange feature of this part is that the ribs are on the underside and not the top as on the wings: I do not know why this was so but it is clear from photos and the drawings that this was the case.
The elevator was a biplane structure which was easily assembled using 20 thou rod for the struts. Simple holes were drilled in both surfaces, the rod cut to length and all held together with liquid cement. I still have to add the arms which joined this structure to the rear of the upper boom arms.
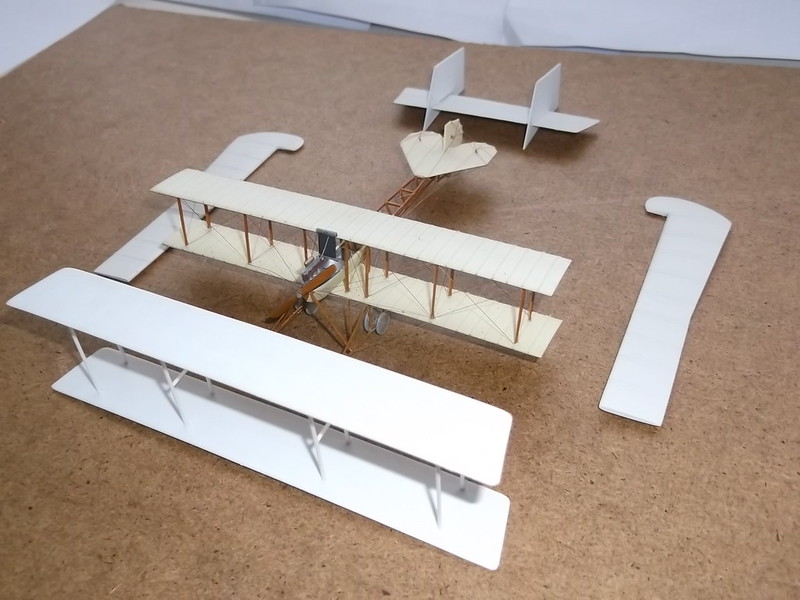
Just to illustrate again how big this aircraft was (and how big a model it will be when finished) I have put the elevator, upper fins and rudders and the ailerons around an Avro Type D biplane which is in the same scale. This aircraft was built and flew only 5 years after the Avro.

Thanks for looking.
Stevef.
Warning: Trying to access array offset on value of type bool in /var/www/vhosts/gmms.org.uk/httpdocs/libraries/kunena/external/nbbc/nbbc.php on line 2819
Warning: Trying to access array offset on value of type bool in /var/www/vhosts/gmms.org.uk/httpdocs/libraries/kunena/external/nbbc/nbbc.php on line 2819
Evening All,
Thanks Robbo and Dave for the compliments.
Dave: yes this is by far the biggest scratch build that I have attempted - even bigger than the SSW which I built earlier this year. I just hope that I can pull of the diorama to go with the aeroplane as i have never attempted that sort of thing before, but I am getting some very helpful advice for club members so I am optimistic.
I have finished the tail surfaces by assembling the biplane elevator and making the upper halves of the fins and rudders and attaching them to the horizontal stabilizer. I used 30 thou card for the fins and rudders and cut two slots in them so that I could insert the horizontal surface. Filler had to be used to clean up the joint because unless the gap was slightly oversize the horizontal surface ribs would not pass through. Incidentally a strange feature of this part is that the ribs are on the underside and not the top as on the wings: I do not know why this was so but it is clear from photos and the drawings that this was the case.
The elevator was a biplane structure which was easily assembled using 20 thou rod for the struts. Simple holes were drilled in both surfaces, the rod cut to length and all held together with liquid cement. I still have to add the arms which joined this structure to the rear of the upper boom arms.
Just to illustrate again how big this aircraft was (and how big a model it will be when finished) I have put the elevator, upper fins and rudders and the ailerons around an Avro Type D biplane which is in the same scale. This aircraft was built and flew only 5 years after the Avro.


Thanks for looking.
Stevef.
Please Log in to join the conversation.
7 years 6 days ago #153
by Stevef
Warning: Trying to access array offset on value of type bool in /var/www/vhosts/gmms.org.uk/httpdocs/libraries/kunena/external/nbbc/nbbc.php on line 2819
Warning: Trying to access array offset on value of type bool in /var/www/vhosts/gmms.org.uk/httpdocs/libraries/kunena/external/nbbc/nbbc.php on line 2819
Warning: Trying to access array offset on value of type bool in /var/www/vhosts/gmms.org.uk/httpdocs/libraries/kunena/external/nbbc/nbbc.php on line 2819
Warning: Trying to access array offset on value of type bool in /var/www/vhosts/gmms.org.uk/httpdocs/libraries/kunena/external/nbbc/nbbc.php on line 2819
Warning: Trying to access array offset on value of type bool in /var/www/vhosts/gmms.org.uk/httpdocs/libraries/kunena/external/nbbc/nbbc.php on line 2819
Evening All,
I have fixed the windshield to the hull - that was a part that I moulded and showed earlier. It was metal and I think had the instrument panel mounted behind it - at least that is how I have interpreted it. The IP was a simple piece of card painted in oils to represent wood, (although on the original it may have been duraluminium?), and then some black dots to represent instruments. As this part will barely visible on the completed model that is good enough. The joint between the windshield and hull was filled and sanded and then the whole given a coat of primer, together with the wing and tail surfaces. The brass boom was given a coat of metal primer: I am not sure how acrylics would go on to uncoated brass and I was not prepared to take the risk.
Painting and decorating followed. The first was the CDL for which I have used Revell Beige 314. Artwork is not my strong suit and I find it very difficult to mix paint and get consistent shades so I used this straight from the pot. I watered it down and applied numerous coats - I think about 12 in all - I lost count actually. The first two coats looked positively awful but after that things improved a little. For the wings and large surfaces I drew the brush across the surface for one coat and then along for the next, alternating the direction for each coat. The final coat was always from the front to the rear of the part being painted.
 [
[
Then on to the metallic areas which I have represented with Revell Hellgrau 76 again straight form the pot but again watered down and multi-coated as described above. The finish does look a bit uniform but the photographs do not show any variation and any panel lines would be too small to see in this scale anyway.
Next came the decoration: I had printed the crosses on my computer so I first cut out the white background squares from white transfer sheet and applied these:
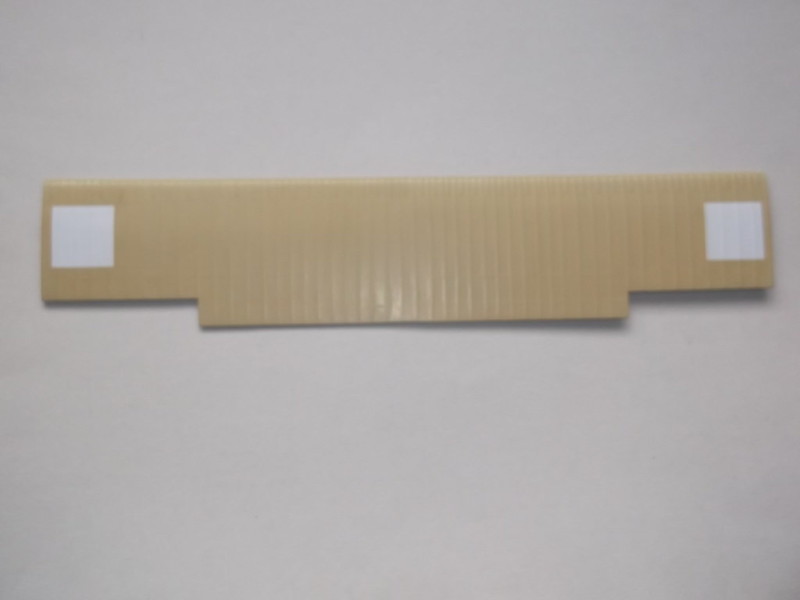
This is the top of the wing and shows what I mean - nothing special. After that was dry the crosses were applied, in this case under the wing:
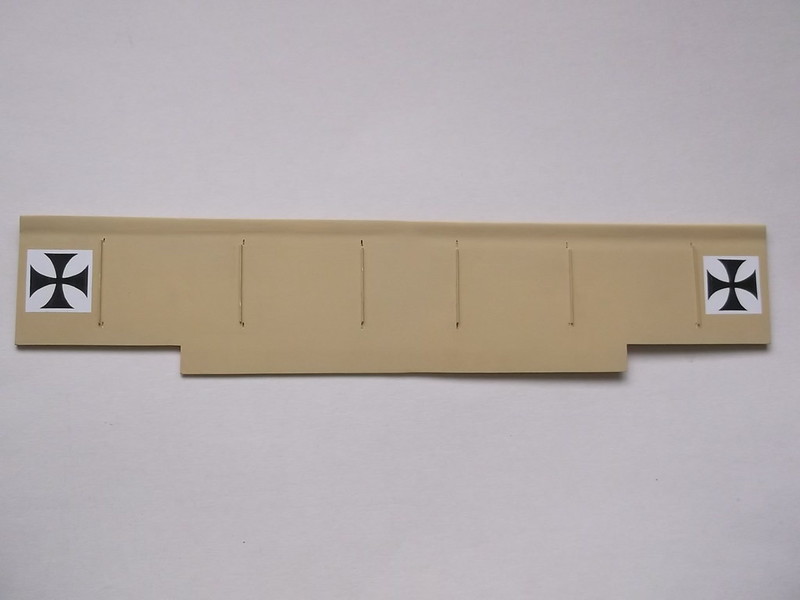
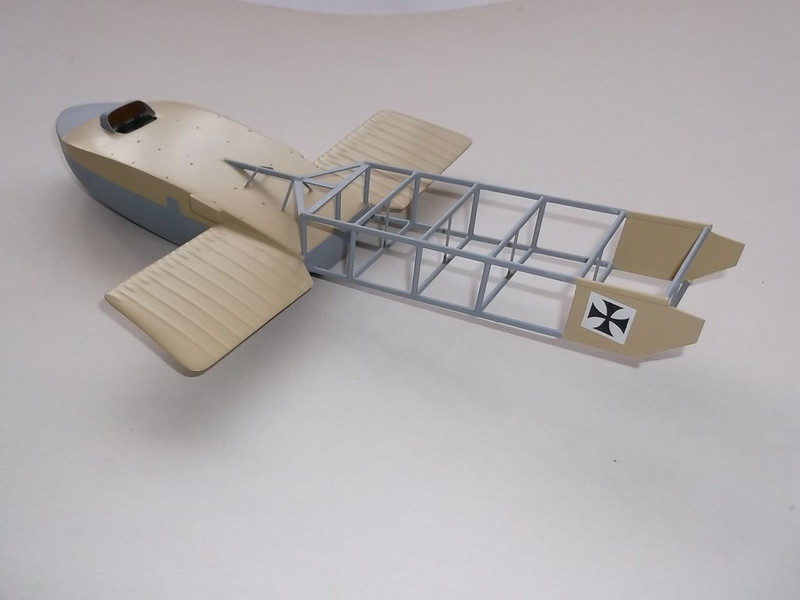
The ribs on the underside were cut from 10 x 20 thou Evergreen strip and represent reinforcing strips between the strut location points. I have since painted these grey too as these were metallic and not covered by fabric. The holes where the struts will be eventually fitted can also be seen here. The fin crosses were also applied so that the complete hull assembly now looks like this:

After all the excitement of waiting for paint to dry I can now get on with rigging the underside and inside of the boom because I am concerned about access accidentally knocking off parts because I have to invert the model in order to rig these areas. I also need to get on with those engine nacelles.....
Thanks for looking.
Stevef.
Warning: Trying to access array offset on value of type bool in /var/www/vhosts/gmms.org.uk/httpdocs/libraries/kunena/external/nbbc/nbbc.php on line 2819
Warning: Trying to access array offset on value of type bool in /var/www/vhosts/gmms.org.uk/httpdocs/libraries/kunena/external/nbbc/nbbc.php on line 2819
Warning: Trying to access array offset on value of type bool in /var/www/vhosts/gmms.org.uk/httpdocs/libraries/kunena/external/nbbc/nbbc.php on line 2819
Warning: Trying to access array offset on value of type bool in /var/www/vhosts/gmms.org.uk/httpdocs/libraries/kunena/external/nbbc/nbbc.php on line 2819
Warning: Trying to access array offset on value of type bool in /var/www/vhosts/gmms.org.uk/httpdocs/libraries/kunena/external/nbbc/nbbc.php on line 2819
Evening All,
I have fixed the windshield to the hull - that was a part that I moulded and showed earlier. It was metal and I think had the instrument panel mounted behind it - at least that is how I have interpreted it. The IP was a simple piece of card painted in oils to represent wood, (although on the original it may have been duraluminium?), and then some black dots to represent instruments. As this part will barely visible on the completed model that is good enough. The joint between the windshield and hull was filled and sanded and then the whole given a coat of primer, together with the wing and tail surfaces. The brass boom was given a coat of metal primer: I am not sure how acrylics would go on to uncoated brass and I was not prepared to take the risk.
Painting and decorating followed. The first was the CDL for which I have used Revell Beige 314. Artwork is not my strong suit and I find it very difficult to mix paint and get consistent shades so I used this straight from the pot. I watered it down and applied numerous coats - I think about 12 in all - I lost count actually. The first two coats looked positively awful but after that things improved a little. For the wings and large surfaces I drew the brush across the surface for one coat and then along for the next, alternating the direction for each coat. The final coat was always from the front to the rear of the part being painted.

Then on to the metallic areas which I have represented with Revell Hellgrau 76 again straight form the pot but again watered down and multi-coated as described above. The finish does look a bit uniform but the photographs do not show any variation and any panel lines would be too small to see in this scale anyway.
Next came the decoration: I had printed the crosses on my computer so I first cut out the white background squares from white transfer sheet and applied these:

This is the top of the wing and shows what I mean - nothing special. After that was dry the crosses were applied, in this case under the wing:

The ribs on the underside were cut from 10 x 20 thou Evergreen strip and represent reinforcing strips between the strut location points. I have since painted these grey too as these were metallic and not covered by fabric. The holes where the struts will be eventually fitted can also be seen here. The fin crosses were also applied so that the complete hull assembly now looks like this:


After all the excitement of waiting for paint to dry I can now get on with rigging the underside and inside of the boom because I am concerned about access accidentally knocking off parts because I have to invert the model in order to rig these areas. I also need to get on with those engine nacelles.....
Thanks for looking.
Stevef.
Please Log in to join the conversation.
7 years 6 days ago #154
by Stevef
Warning: Trying to access array offset on value of type bool in /var/www/vhosts/gmms.org.uk/httpdocs/libraries/kunena/external/nbbc/nbbc.php on line 2819
Warning: Trying to access array offset on value of type bool in /var/www/vhosts/gmms.org.uk/httpdocs/libraries/kunena/external/nbbc/nbbc.php on line 2819
Warning: Trying to access array offset on value of type bool in /var/www/vhosts/gmms.org.uk/httpdocs/libraries/kunena/external/nbbc/nbbc.php on line 2819
Warning: Trying to access array offset on value of type bool in /var/www/vhosts/gmms.org.uk/httpdocs/libraries/kunena/external/nbbc/nbbc.php on line 2819
Evening All,
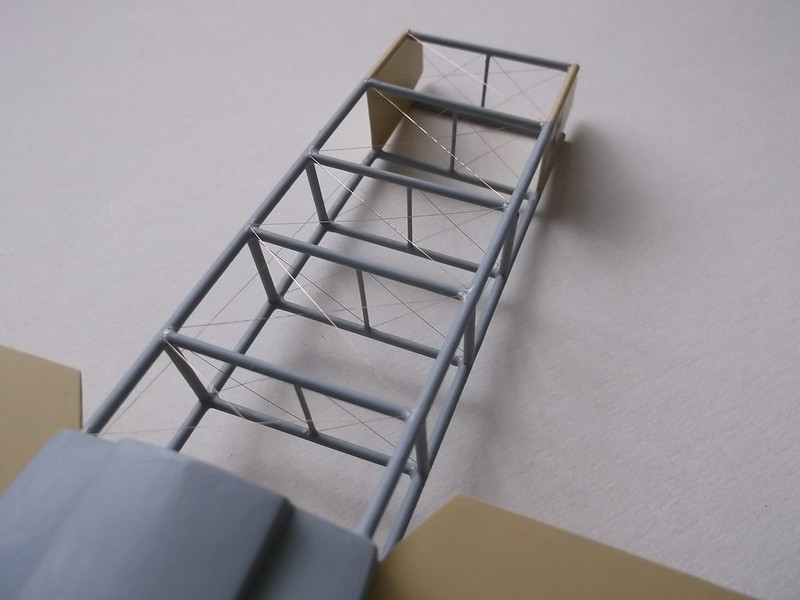
I have rigged the lower part of the tail boom together with the vertical sections as shown in the photos. Experience has taught me that rigging parts of a model like this is strongly advised as they become much less accessible later when there are large parts such as wings etc to catch on when one is trying to get the tweezers and wire into tiny spaces. I use rolled 40 SWG copper wire: I measure the length needed directly from the model using a pair of dividers. l then cut a piece of wire which is slightly longer than needed and roll it flat with a piece of brass strip on a hardwood base. The wire is offered to the space where it is supposed to fit and by the use of Mk 1 eyeball I estimate how much needs to be trimmed. A second, and if necessary third, attempt is made until the wire is the correct length. A tiny blob of CA is added to the model at both ends where the wire is to be attached and the wire carefully placed in position. The CA usually grabs the wire and holds it firm. Sometimes I will put one end on and then use tweezers or a knife blade to gently ease the other end of the wire into place if it is difficult to get to. By using wire I do not have to drill and fill lots of holes, and in the case of this boom structure which is made from brass, I do not have to drill into metal which would be extremely difficult and time consuming. The results look like this:

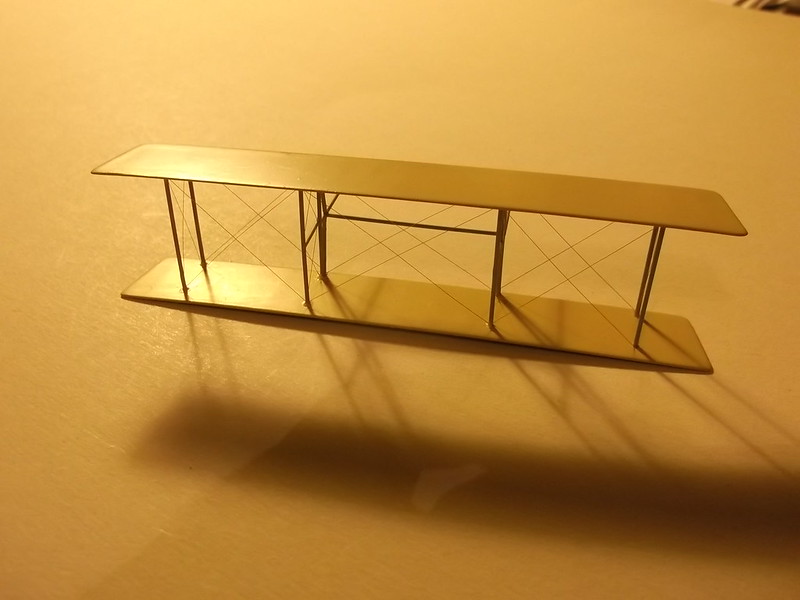
Whilst I was in rigging mode I decided to complete the elevator so that I could store it where it cannot be damaged. This will be one of the very last parts to be added to the model so I need to keep it safe in the meantime.
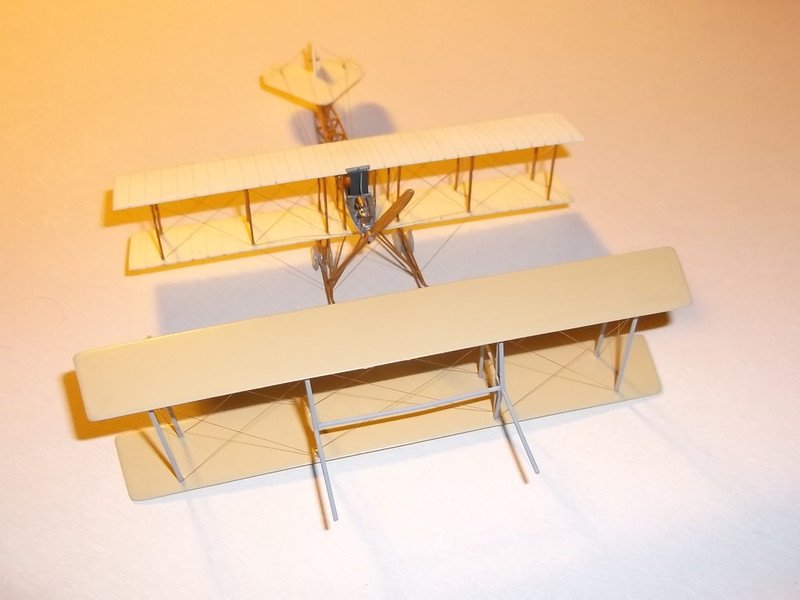
Just a reminder of size and how much rigging there is on this aeroplane, here again is the Avro biplane with the rigged and painted elevator: remember this will be at the very rear of the flying boat and is a relatively small part of it!
Thanks for looking.
Stevef.
Warning: Trying to access array offset on value of type bool in /var/www/vhosts/gmms.org.uk/httpdocs/libraries/kunena/external/nbbc/nbbc.php on line 2819
Warning: Trying to access array offset on value of type bool in /var/www/vhosts/gmms.org.uk/httpdocs/libraries/kunena/external/nbbc/nbbc.php on line 2819
Warning: Trying to access array offset on value of type bool in /var/www/vhosts/gmms.org.uk/httpdocs/libraries/kunena/external/nbbc/nbbc.php on line 2819
Warning: Trying to access array offset on value of type bool in /var/www/vhosts/gmms.org.uk/httpdocs/libraries/kunena/external/nbbc/nbbc.php on line 2819
Evening All,
I have rigged the lower part of the tail boom together with the vertical sections as shown in the photos. Experience has taught me that rigging parts of a model like this is strongly advised as they become much less accessible later when there are large parts such as wings etc to catch on when one is trying to get the tweezers and wire into tiny spaces. I use rolled 40 SWG copper wire: I measure the length needed directly from the model using a pair of dividers. l then cut a piece of wire which is slightly longer than needed and roll it flat with a piece of brass strip on a hardwood base. The wire is offered to the space where it is supposed to fit and by the use of Mk 1 eyeball I estimate how much needs to be trimmed. A second, and if necessary third, attempt is made until the wire is the correct length. A tiny blob of CA is added to the model at both ends where the wire is to be attached and the wire carefully placed in position. The CA usually grabs the wire and holds it firm. Sometimes I will put one end on and then use tweezers or a knife blade to gently ease the other end of the wire into place if it is difficult to get to. By using wire I do not have to drill and fill lots of holes, and in the case of this boom structure which is made from brass, I do not have to drill into metal which would be extremely difficult and time consuming. The results look like this:


Whilst I was in rigging mode I decided to complete the elevator so that I could store it where it cannot be damaged. This will be one of the very last parts to be added to the model so I need to keep it safe in the meantime.

Just a reminder of size and how much rigging there is on this aeroplane, here again is the Avro biplane with the rigged and painted elevator: remember this will be at the very rear of the flying boat and is a relatively small part of it!

Thanks for looking.
Stevef.
Please Log in to join the conversation.
7 years 6 days ago #155
by Stevef
Warning: Trying to access array offset on value of type bool in /var/www/vhosts/gmms.org.uk/httpdocs/libraries/kunena/external/nbbc/nbbc.php on line 2819
Warning: Trying to access array offset on value of type bool in /var/www/vhosts/gmms.org.uk/httpdocs/libraries/kunena/external/nbbc/nbbc.php on line 2819
Warning: Trying to access array offset on value of type bool in /var/www/vhosts/gmms.org.uk/httpdocs/libraries/kunena/external/nbbc/nbbc.php on line 2819
Warning: Trying to access array offset on value of type bool in /var/www/vhosts/gmms.org.uk/httpdocs/libraries/kunena/external/nbbc/nbbc.php on line 2819
Warning: Trying to access array offset on value of type bool in /var/www/vhosts/gmms.org.uk/httpdocs/libraries/kunena/external/nbbc/nbbc.php on line 2819
I have been thinking hard about how I am going to attach the large V struts under the wings to the hull sides. On the original aircraft they came to a common joint and were attached to the hull side and probably to a large piece of frame inside the hull. I do not think that it will be practical to make the ends of 4 pieces of plastic come together and simultaneously be able to fix them to the hull sides, so I have decided to make two small attachment pieces from 60 thou card, drill holes in them and the hull and attach them with wire and CA. However I needed to make the attachment pieces the correct size: the struts will be made from 120 thou x 30 thou Evergreen strip shaped to aerofiol section, (the original struts were huge as the photos show). So I cut two small pieces of strip and made a tapered joint so that they would come together with a combined width of 60 thou. I could then cut the attachment pieces to fit exactly the strut ends:

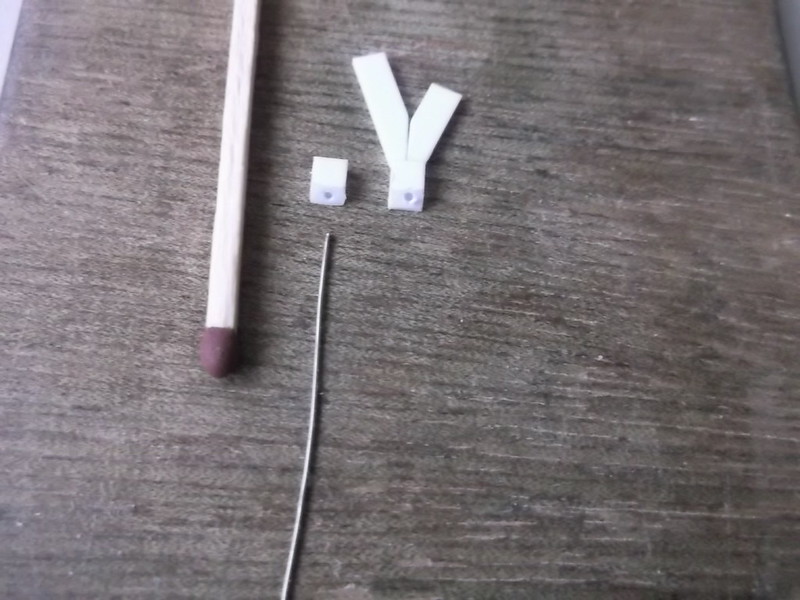
The hull attachment parts have an angled face which will be glued to the hull side and be reinforced with a piece of wire which I took from a piece of telephone cable. The opposite side will then be angled upwards so that the ends of the struts will fit directly on to it and will form a butt joint. The wing is completely rigid so the V struts should not be carrying any weight. The completed attachment lugs look like this:
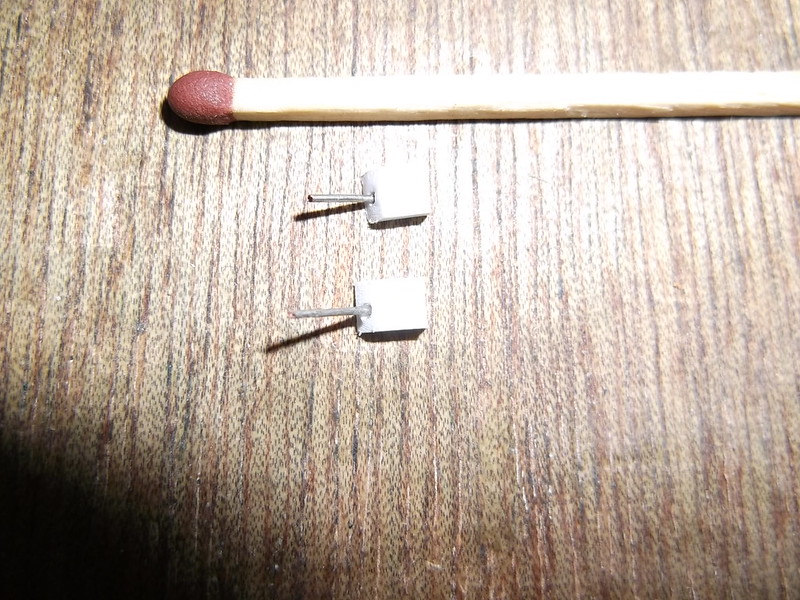
These have been CA'd to the hull.
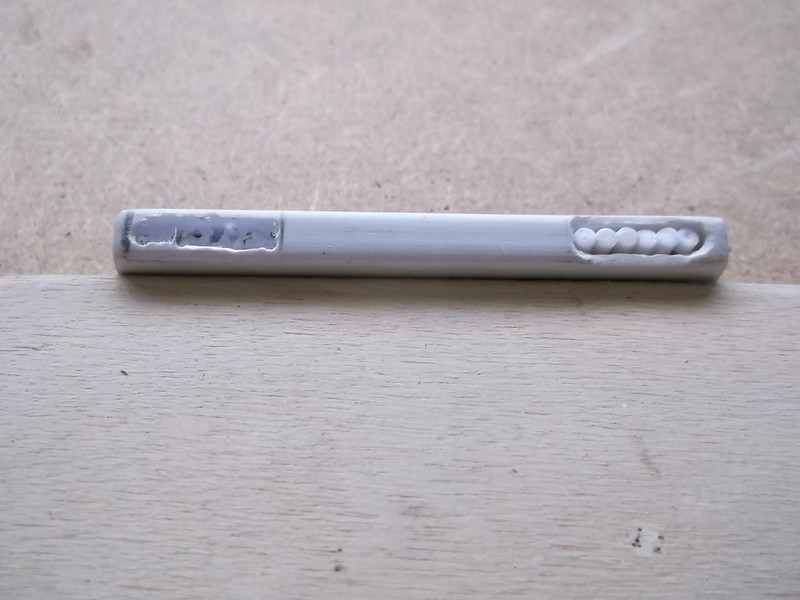
I have also done some work on the engine nacelles: by the use of a file and glass paper I have shaped them to match the drawings and then I drilled out two slots, one at each end on the top, into which I am going to insert some short pieces of 60 thou rod to represent the cylinder ends. I have called this a retro model for good reasons: I am not intending to add a huge amount of cockpit and engine detail only to cover it all up - this model will resemble some of the early Frog and Airfix models from the 1950's where there were no wheel wells, cockpit openings, or other recesses! I have also resorted to talcum powder and dope as a filler - another 1960's, pre-resin aftermarket solution to a modelling problem! The engine tops will have some detail which will hopefully disguise to all but the most serious onlooker the small liberties that I am taking with this model. The rear engines will be nearly hidden under the wing anyway and all will have radiators mounted above them which will also help to obscure the view!

 [
[
There is some tidying up to do around the edges of the slots but that will be easy to do and when paint is on they should pass muster. Various holes have been drilled in the sides and front and rear which represent various orifices on the originals, but I have no idea why they were there, they are just clearly visible in the photos
Thanks for looking.
Stevef.
Warning: Trying to access array offset on value of type bool in /var/www/vhosts/gmms.org.uk/httpdocs/libraries/kunena/external/nbbc/nbbc.php on line 2819
Warning: Trying to access array offset on value of type bool in /var/www/vhosts/gmms.org.uk/httpdocs/libraries/kunena/external/nbbc/nbbc.php on line 2819
Warning: Trying to access array offset on value of type bool in /var/www/vhosts/gmms.org.uk/httpdocs/libraries/kunena/external/nbbc/nbbc.php on line 2819
Warning: Trying to access array offset on value of type bool in /var/www/vhosts/gmms.org.uk/httpdocs/libraries/kunena/external/nbbc/nbbc.php on line 2819
Warning: Trying to access array offset on value of type bool in /var/www/vhosts/gmms.org.uk/httpdocs/libraries/kunena/external/nbbc/nbbc.php on line 2819
I have been thinking hard about how I am going to attach the large V struts under the wings to the hull sides. On the original aircraft they came to a common joint and were attached to the hull side and probably to a large piece of frame inside the hull. I do not think that it will be practical to make the ends of 4 pieces of plastic come together and simultaneously be able to fix them to the hull sides, so I have decided to make two small attachment pieces from 60 thou card, drill holes in them and the hull and attach them with wire and CA. However I needed to make the attachment pieces the correct size: the struts will be made from 120 thou x 30 thou Evergreen strip shaped to aerofiol section, (the original struts were huge as the photos show). So I cut two small pieces of strip and made a tapered joint so that they would come together with a combined width of 60 thou. I could then cut the attachment pieces to fit exactly the strut ends:


The hull attachment parts have an angled face which will be glued to the hull side and be reinforced with a piece of wire which I took from a piece of telephone cable. The opposite side will then be angled upwards so that the ends of the struts will fit directly on to it and will form a butt joint. The wing is completely rigid so the V struts should not be carrying any weight. The completed attachment lugs look like this:

These have been CA'd to the hull.
I have also done some work on the engine nacelles: by the use of a file and glass paper I have shaped them to match the drawings and then I drilled out two slots, one at each end on the top, into which I am going to insert some short pieces of 60 thou rod to represent the cylinder ends. I have called this a retro model for good reasons: I am not intending to add a huge amount of cockpit and engine detail only to cover it all up - this model will resemble some of the early Frog and Airfix models from the 1950's where there were no wheel wells, cockpit openings, or other recesses! I have also resorted to talcum powder and dope as a filler - another 1960's, pre-resin aftermarket solution to a modelling problem! The engine tops will have some detail which will hopefully disguise to all but the most serious onlooker the small liberties that I am taking with this model. The rear engines will be nearly hidden under the wing anyway and all will have radiators mounted above them which will also help to obscure the view!


There is some tidying up to do around the edges of the slots but that will be easy to do and when paint is on they should pass muster. Various holes have been drilled in the sides and front and rear which represent various orifices on the originals, but I have no idea why they were there, they are just clearly visible in the photos
Thanks for looking.
Stevef.
Please Log in to join the conversation.
7 years 3 days ago #156
by Stevef
Warning: Trying to access array offset on value of type bool in /var/www/vhosts/gmms.org.uk/httpdocs/libraries/kunena/external/nbbc/nbbc.php on line 2819
Warning: Trying to access array offset on value of type bool in /var/www/vhosts/gmms.org.uk/httpdocs/libraries/kunena/external/nbbc/nbbc.php on line 2819
Warning: Trying to access array offset on value of type bool in /var/www/vhosts/gmms.org.uk/httpdocs/libraries/kunena/external/nbbc/nbbc.php on line 2819
Warning: Trying to access array offset on value of type bool in /var/www/vhosts/gmms.org.uk/httpdocs/libraries/kunena/external/nbbc/nbbc.php on line 2819
Warning: Trying to access array offset on value of type bool in /var/www/vhosts/gmms.org.uk/httpdocs/libraries/kunena/external/nbbc/nbbc.php on line 2819
Evening All,
I have been thinking about the struts for some time now. The wing is heavy and I am concerned that plastic strip, even the size that I intend to use, 120 thou x 40 thou, will bend or flex under the weight. I have worked out the construction sequence from here on and it will be make the struts and dry fit, mount the engine nacelles on the hull, fix the cabane struts and put on the wing, add the V struts to the sides, add the tail unit and other details. This means that the cabane struts must be strong enough to hold the wing in place as I simply cannot put on those and the V struts at the same time. If the cabane struts are not strong enough the wing may collapse on to the engines and I will be a little discombombulated.....! The question that I have not been able to answer is will the cabanes be able to support the wing on their own? Do the V struts also need to be reinforced? I have held the wing in the centre and it shows no sign of sag at the ends - I would be surprised if it did because it is three sheets of 60 thou card laminated and I have found from experience that by laminating card that problem is solved. However there is still the weight problem.
So! I have made a decision. I will reinforce the cabane struts and hope for the best with the V struts. I am going to reinforce the cabanes using a method that Ian (Limeypilot) has demonstrated. I measured the lengths of 120 x 40 thou Evergreen strip from the plans and cut them slightly too long, then scraped and shaped them to aerofoil section. That did not take long and gives a better shape than the preformed aftermarket materials, plus I have the size that I want. I then cut the strip lengthwise into three equal widths. The centre piece was discarded and replaced with a length of 3/64 inch (1.19mm) brass rod. The strut was re-assembled with CA and the gaps filled with standard filler and allowed to dry out. After a couple of sessions of sanding and filling small gaps, the whole was coated with Mr Surfacer to get a nice even finish and the lot was repainted:
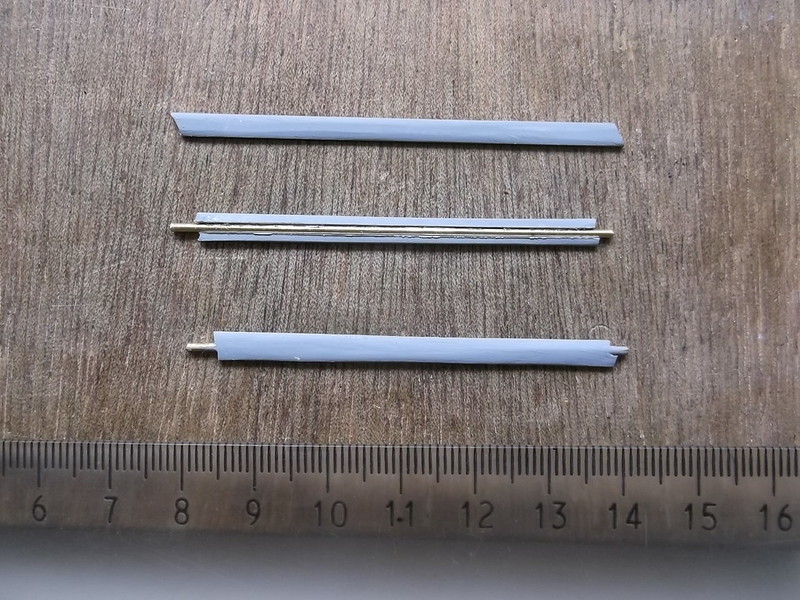
The top piece is the original strip which has been scraped and shaped and painted! (I know, I should not have bothered but....). The second shows the rod in place between the two parts of the strip which will form the front and rear of the strut. The lower piece is a completed strut. Can you see the joint? No? Good!
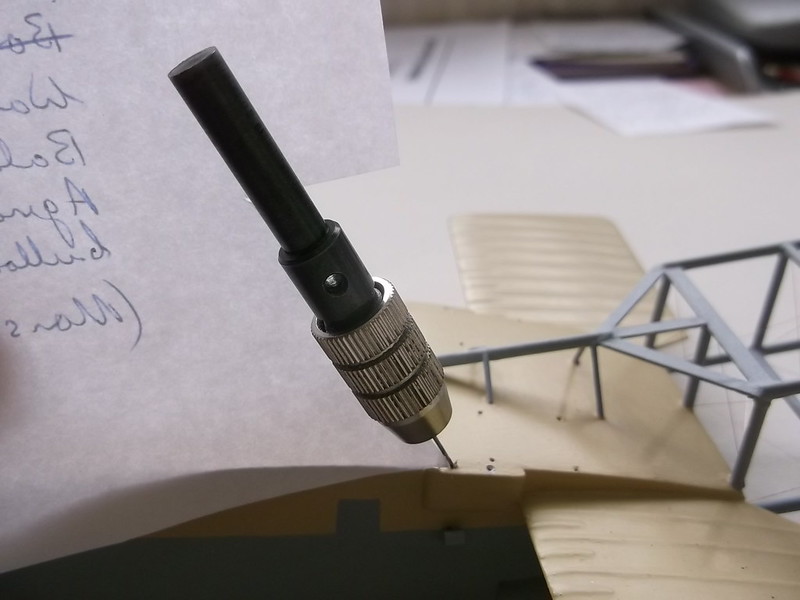
Before I start to fit the engine nacelles I must first drill the holes to take the ends of the brass rod in the hull. All three struts are angled, which means that the holes must be angled too because bending the ends of brass rod is NOT easy. So the angles of the struts were measured from the plans, a complex(!) jig was made and put into place on the hull so that I could align the drill correctly, and I held my breath 6 times as I drilled away....
Those pieces of plastic stuck to the sides of the hull are to represent some form of structure which had to be added to the sides of the hull of the machine because the hull tapers gently to the rear. In order that the front strut is exactly in line with the two at the rear they had to put a bulge at the top of the hull in this area. It is not clear from either photos or plans how this looked exactly, so I have put two pieces on which I think are sufficiently accurate.
A dry fit of the struts was then made: they are too long I know but I intend to trim them when I put the wing on: that is why the forward pair cross over. It may look messy but when I fit the wing I can sort out any small problems: for now I just want to make sure that they are at the correct angles and line up front to rear.
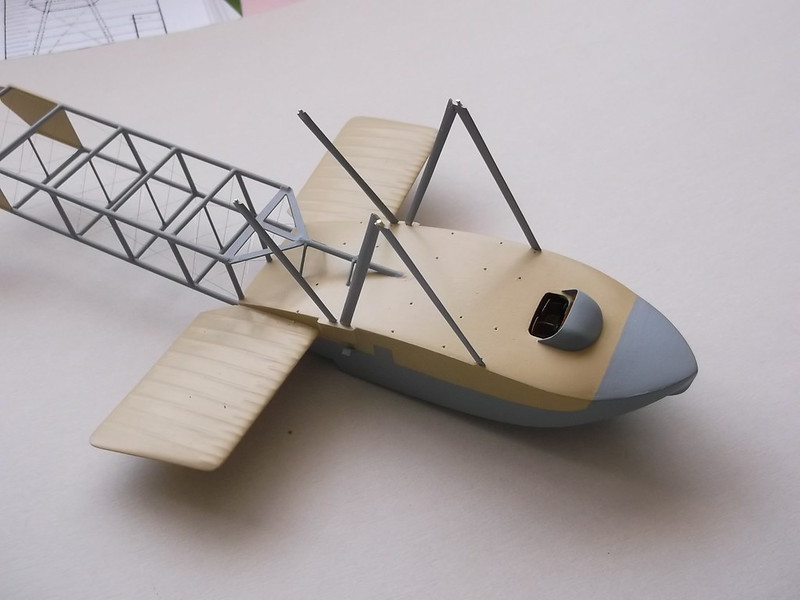
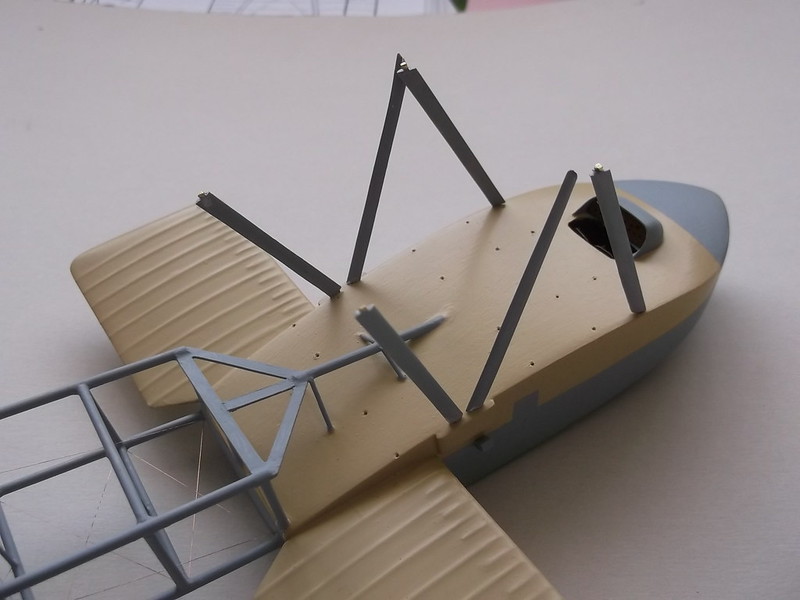
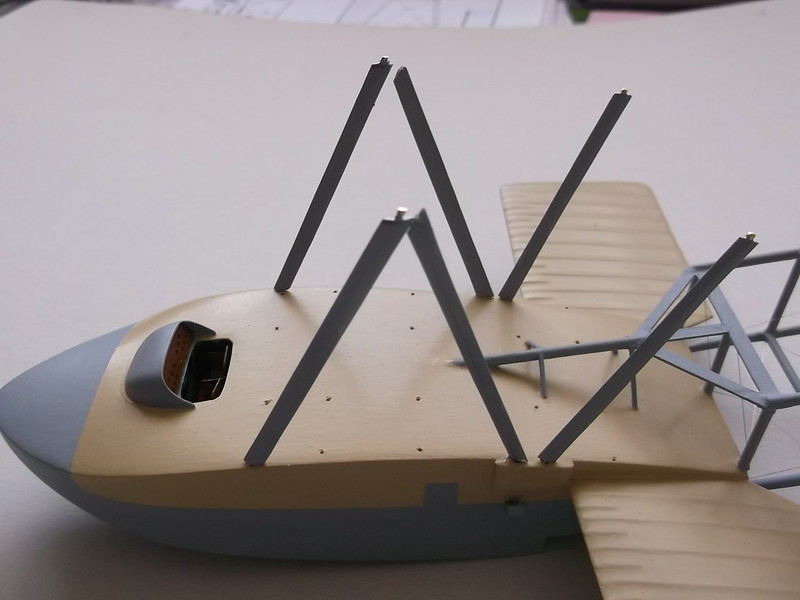
The next update will be a little delayed as I have to go on my travels again.
Thanks for looking.
Stevef.
Warning: Trying to access array offset on value of type bool in /var/www/vhosts/gmms.org.uk/httpdocs/libraries/kunena/external/nbbc/nbbc.php on line 2819
Warning: Trying to access array offset on value of type bool in /var/www/vhosts/gmms.org.uk/httpdocs/libraries/kunena/external/nbbc/nbbc.php on line 2819
Warning: Trying to access array offset on value of type bool in /var/www/vhosts/gmms.org.uk/httpdocs/libraries/kunena/external/nbbc/nbbc.php on line 2819
Warning: Trying to access array offset on value of type bool in /var/www/vhosts/gmms.org.uk/httpdocs/libraries/kunena/external/nbbc/nbbc.php on line 2819
Warning: Trying to access array offset on value of type bool in /var/www/vhosts/gmms.org.uk/httpdocs/libraries/kunena/external/nbbc/nbbc.php on line 2819
Evening All,
I have been thinking about the struts for some time now. The wing is heavy and I am concerned that plastic strip, even the size that I intend to use, 120 thou x 40 thou, will bend or flex under the weight. I have worked out the construction sequence from here on and it will be make the struts and dry fit, mount the engine nacelles on the hull, fix the cabane struts and put on the wing, add the V struts to the sides, add the tail unit and other details. This means that the cabane struts must be strong enough to hold the wing in place as I simply cannot put on those and the V struts at the same time. If the cabane struts are not strong enough the wing may collapse on to the engines and I will be a little discombombulated.....! The question that I have not been able to answer is will the cabanes be able to support the wing on their own? Do the V struts also need to be reinforced? I have held the wing in the centre and it shows no sign of sag at the ends - I would be surprised if it did because it is three sheets of 60 thou card laminated and I have found from experience that by laminating card that problem is solved. However there is still the weight problem.
So! I have made a decision. I will reinforce the cabane struts and hope for the best with the V struts. I am going to reinforce the cabanes using a method that Ian (Limeypilot) has demonstrated. I measured the lengths of 120 x 40 thou Evergreen strip from the plans and cut them slightly too long, then scraped and shaped them to aerofoil section. That did not take long and gives a better shape than the preformed aftermarket materials, plus I have the size that I want. I then cut the strip lengthwise into three equal widths. The centre piece was discarded and replaced with a length of 3/64 inch (1.19mm) brass rod. The strut was re-assembled with CA and the gaps filled with standard filler and allowed to dry out. After a couple of sessions of sanding and filling small gaps, the whole was coated with Mr Surfacer to get a nice even finish and the lot was repainted:

The top piece is the original strip which has been scraped and shaped and painted! (I know, I should not have bothered but....). The second shows the rod in place between the two parts of the strip which will form the front and rear of the strut. The lower piece is a completed strut. Can you see the joint? No? Good!
Before I start to fit the engine nacelles I must first drill the holes to take the ends of the brass rod in the hull. All three struts are angled, which means that the holes must be angled too because bending the ends of brass rod is NOT easy. So the angles of the struts were measured from the plans, a complex(!) jig was made and put into place on the hull so that I could align the drill correctly, and I held my breath 6 times as I drilled away....

Those pieces of plastic stuck to the sides of the hull are to represent some form of structure which had to be added to the sides of the hull of the machine because the hull tapers gently to the rear. In order that the front strut is exactly in line with the two at the rear they had to put a bulge at the top of the hull in this area. It is not clear from either photos or plans how this looked exactly, so I have put two pieces on which I think are sufficiently accurate.
A dry fit of the struts was then made: they are too long I know but I intend to trim them when I put the wing on: that is why the forward pair cross over. It may look messy but when I fit the wing I can sort out any small problems: for now I just want to make sure that they are at the correct angles and line up front to rear.


The next update will be a little delayed as I have to go on my travels again.
Thanks for looking.
Stevef.
Please Log in to join the conversation.
6 years 11 months ago #157
by Stevef
Warning: Trying to access array offset on value of type bool in /var/www/vhosts/gmms.org.uk/httpdocs/libraries/kunena/external/nbbc/nbbc.php on line 2819
Warning: Trying to access array offset on value of type bool in /var/www/vhosts/gmms.org.uk/httpdocs/libraries/kunena/external/nbbc/nbbc.php on line 2819
Warning: Trying to access array offset on value of type bool in /var/www/vhosts/gmms.org.uk/httpdocs/libraries/kunena/external/nbbc/nbbc.php on line 2819
Warning: Trying to access array offset on value of type bool in /var/www/vhosts/gmms.org.uk/httpdocs/libraries/kunena/external/nbbc/nbbc.php on line 2819
Warning: Trying to access array offset on value of type bool in /var/www/vhosts/gmms.org.uk/httpdocs/libraries/kunena/external/nbbc/nbbc.php on line 2819
Warning: Trying to access array offset on value of type bool in /var/www/vhosts/gmms.org.uk/httpdocs/libraries/kunena/external/nbbc/nbbc.php on line 2819
Warning: Trying to access array offset on value of type bool in /var/www/vhosts/gmms.org.uk/httpdocs/libraries/kunena/external/nbbc/nbbc.php on line 2819
Evening All, Once again I am posting two sections on recent progress as there are a lot of photographs.
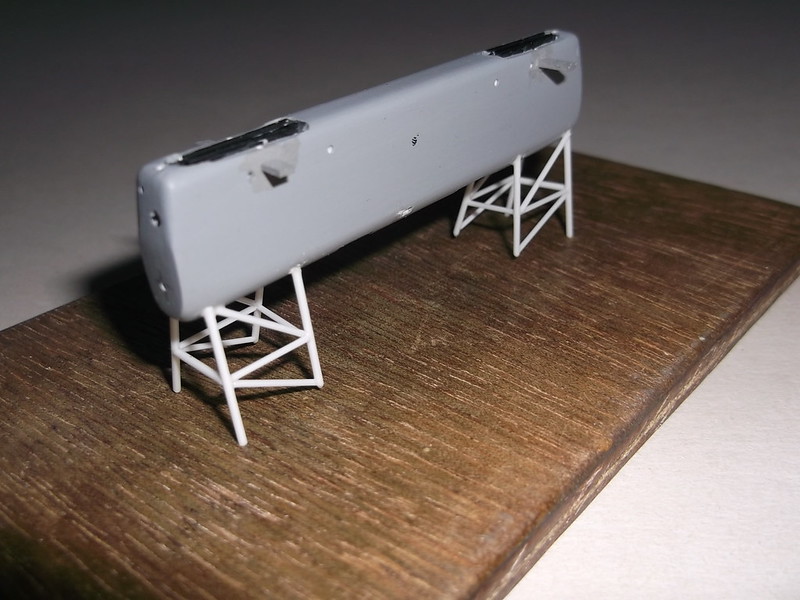
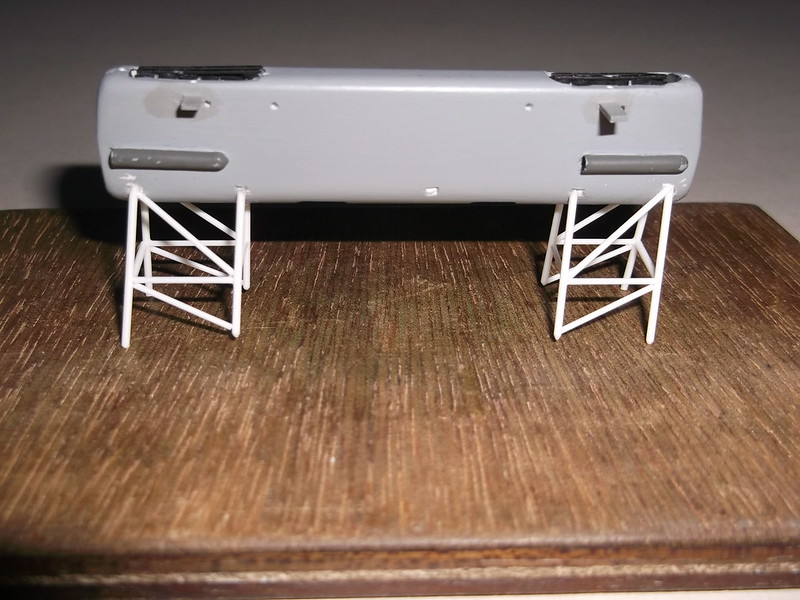
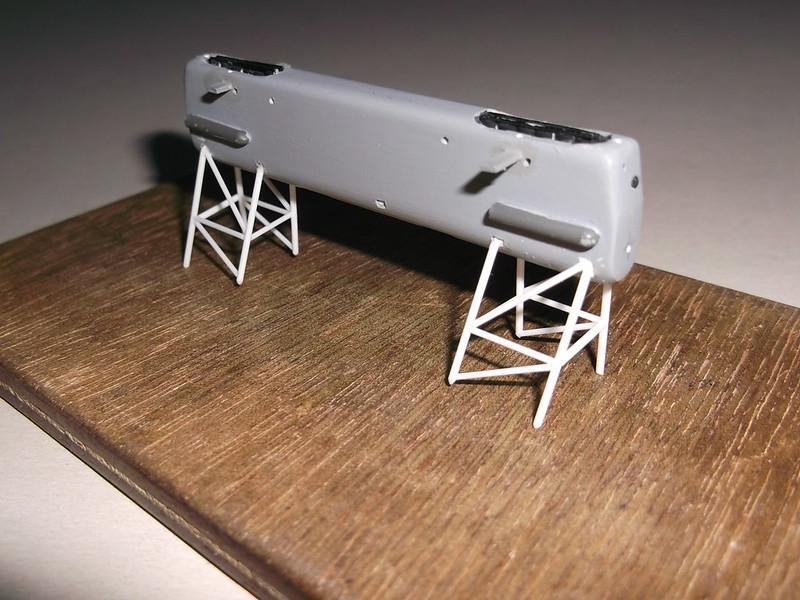
I have been away for a few days and therefore am getting behind, so I have spent longer than normal today trying to catch up, which means that other urgent tasks will have to be addressed tomorrow! Damn. Anyway I have got the engine mounts for the port (left) engine made, and I have made them so that they fit properly. A little thought when I was traveling suggested the following sequence should work - and amazingly it did!
I started by fixing the horizontal tabs to the sides of the nacelles: I have no idea what they were for but they are very clearly present in the photographs and drawings. The exhaust covers were made from 60 thou rod which had been cut to length and then filed in half, one end rounded and the rear drilled to leave a hole before the piece was glued into place. Next I measured the lengths of the legs at the front and rear of the nacelle from the plans, and cut some 30 thou rod. One end of each piece of rod was cemented to the indents in the nacelle and the cement allowed to set slightly. When the cement was stiff I placed the ends of the legs into the holes in the hull and adjusted the angles of the legs so that the nacelle was correctly aligned horizontally, vertically and laterally. This was left to dry out overnight - no jig or support was needed as the cement was sufficiently set to hold the nacelle.
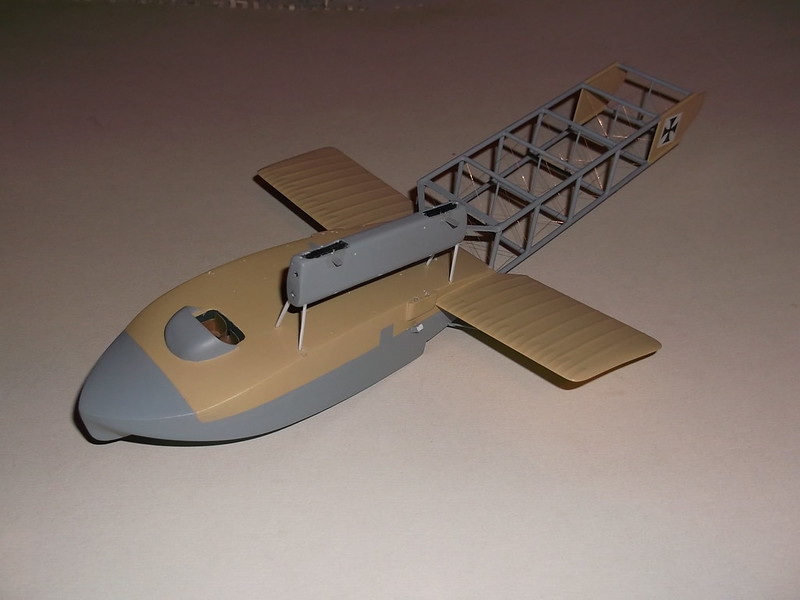
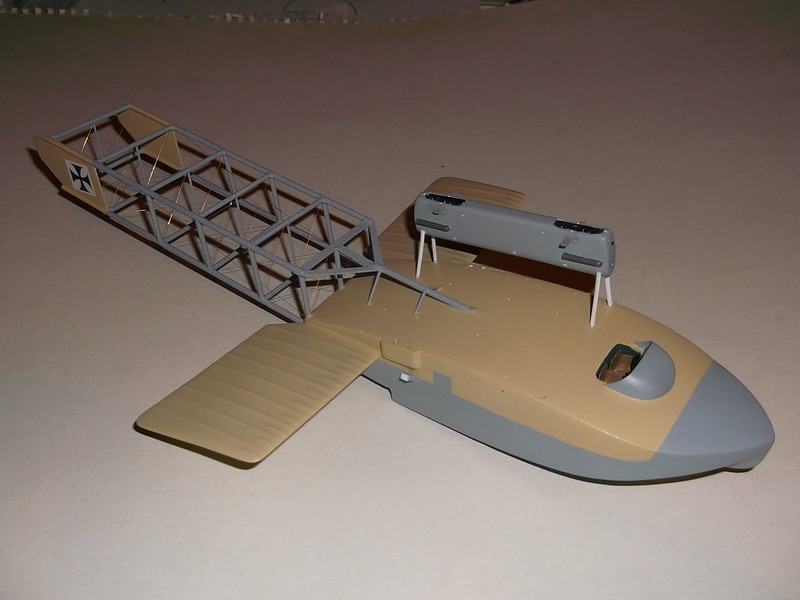

I could then add the horizontal bracing struts between the legs: this immediately gave strength to what was otherwise a weak structure. This was allowed to set for an hour just to be sure.

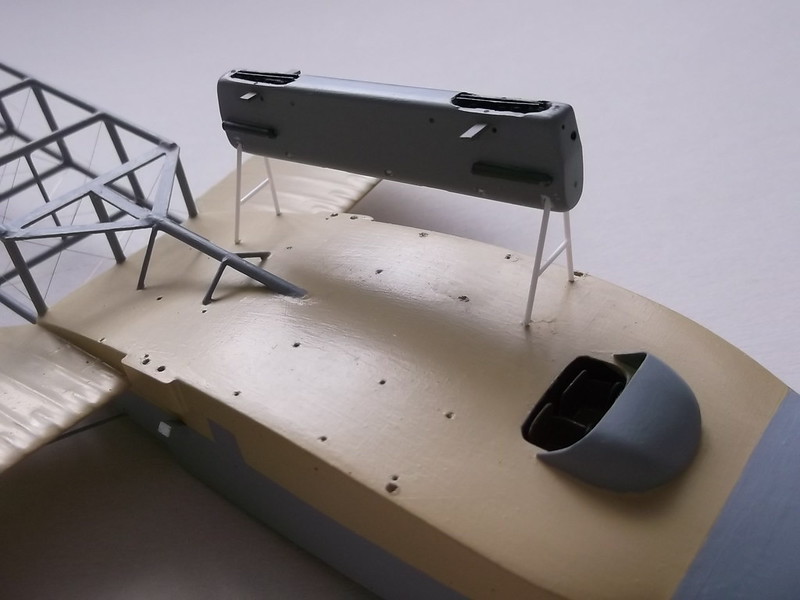
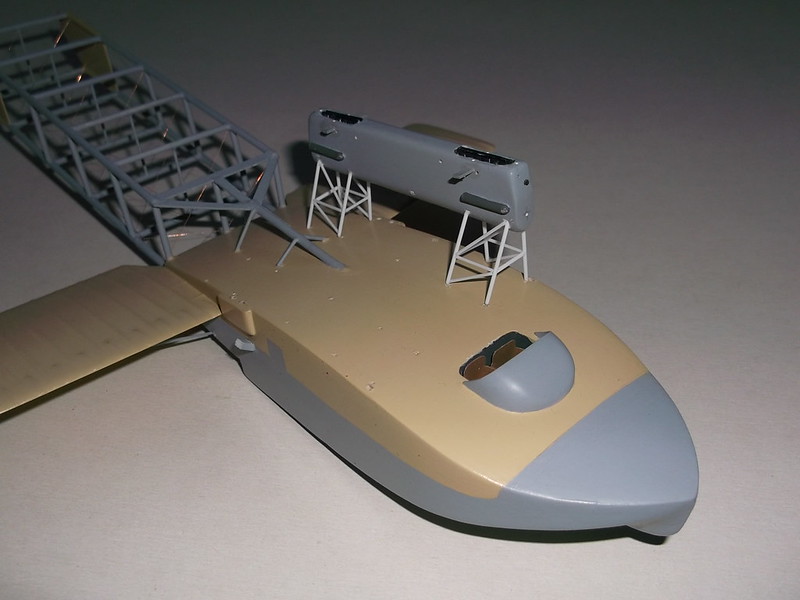
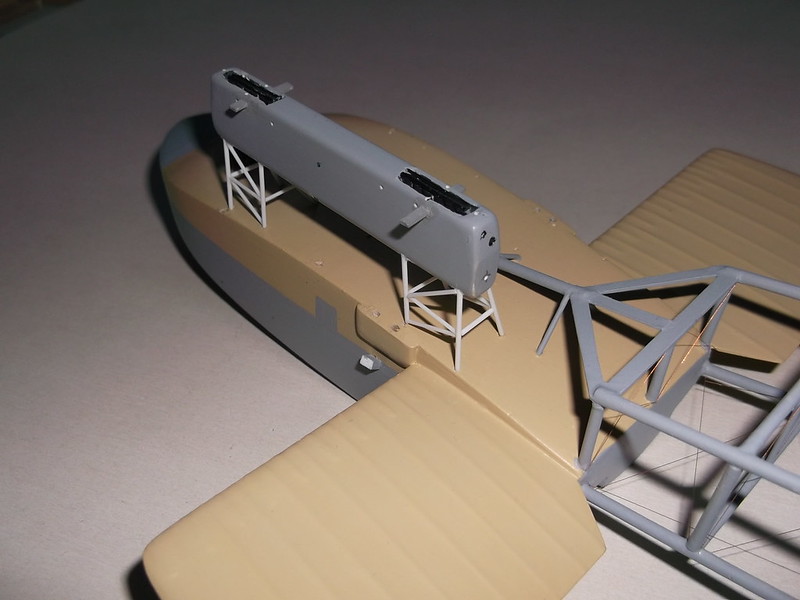
With these legs secure I could add the additional legs which make the two towers on which the front and rear of the nacelle are mounted to the hull. The horizontal cross bracing went in next, followed by the slanted pieces, all held in place with liquid cement and all measured to fit using a pair of dividers.
Warning: Trying to access array offset on value of type bool in /var/www/vhosts/gmms.org.uk/httpdocs/libraries/kunena/external/nbbc/nbbc.php on line 2819
Warning: Trying to access array offset on value of type bool in /var/www/vhosts/gmms.org.uk/httpdocs/libraries/kunena/external/nbbc/nbbc.php on line 2819
Warning: Trying to access array offset on value of type bool in /var/www/vhosts/gmms.org.uk/httpdocs/libraries/kunena/external/nbbc/nbbc.php on line 2819
Warning: Trying to access array offset on value of type bool in /var/www/vhosts/gmms.org.uk/httpdocs/libraries/kunena/external/nbbc/nbbc.php on line 2819
Warning: Trying to access array offset on value of type bool in /var/www/vhosts/gmms.org.uk/httpdocs/libraries/kunena/external/nbbc/nbbc.php on line 2819
Warning: Trying to access array offset on value of type bool in /var/www/vhosts/gmms.org.uk/httpdocs/libraries/kunena/external/nbbc/nbbc.php on line 2819
Warning: Trying to access array offset on value of type bool in /var/www/vhosts/gmms.org.uk/httpdocs/libraries/kunena/external/nbbc/nbbc.php on line 2819
Evening All, Once again I am posting two sections on recent progress as there are a lot of photographs.
I have been away for a few days and therefore am getting behind, so I have spent longer than normal today trying to catch up, which means that other urgent tasks will have to be addressed tomorrow! Damn. Anyway I have got the engine mounts for the port (left) engine made, and I have made them so that they fit properly. A little thought when I was traveling suggested the following sequence should work - and amazingly it did!
I started by fixing the horizontal tabs to the sides of the nacelles: I have no idea what they were for but they are very clearly present in the photographs and drawings. The exhaust covers were made from 60 thou rod which had been cut to length and then filed in half, one end rounded and the rear drilled to leave a hole before the piece was glued into place. Next I measured the lengths of the legs at the front and rear of the nacelle from the plans, and cut some 30 thou rod. One end of each piece of rod was cemented to the indents in the nacelle and the cement allowed to set slightly. When the cement was stiff I placed the ends of the legs into the holes in the hull and adjusted the angles of the legs so that the nacelle was correctly aligned horizontally, vertically and laterally. This was left to dry out overnight - no jig or support was needed as the cement was sufficiently set to hold the nacelle.


I could then add the horizontal bracing struts between the legs: this immediately gave strength to what was otherwise a weak structure. This was allowed to set for an hour just to be sure.


With these legs secure I could add the additional legs which make the two towers on which the front and rear of the nacelle are mounted to the hull. The horizontal cross bracing went in next, followed by the slanted pieces, all held in place with liquid cement and all measured to fit using a pair of dividers.


Please Log in to join the conversation.
6 years 11 months ago #158
by Stevef
Warning: Trying to access array offset on value of type bool in /var/www/vhosts/gmms.org.uk/httpdocs/libraries/kunena/external/nbbc/nbbc.php on line 2819
Warning: Trying to access array offset on value of type bool in /var/www/vhosts/gmms.org.uk/httpdocs/libraries/kunena/external/nbbc/nbbc.php on line 2819
Warning: Trying to access array offset on value of type bool in /var/www/vhosts/gmms.org.uk/httpdocs/libraries/kunena/external/nbbc/nbbc.php on line 2819
Warning: Trying to access array offset on value of type bool in /var/www/vhosts/gmms.org.uk/httpdocs/libraries/kunena/external/nbbc/nbbc.php on line 2819
Here is part two of recent progress following from the above.
Here is the second section of current progress, following on from the above.
When all of this was dry I could remove the nacelle and legs assembly so that I can now paint them as trying to paint these in place and not mark the hull would be beyond my ability. This means that I will now be able to put this back on to the hull and all of the legs will fit into the holes.

Next step will be to paint the legs.
Thanks for looking.
Stevef.
Warning: Trying to access array offset on value of type bool in /var/www/vhosts/gmms.org.uk/httpdocs/libraries/kunena/external/nbbc/nbbc.php on line 2819
Warning: Trying to access array offset on value of type bool in /var/www/vhosts/gmms.org.uk/httpdocs/libraries/kunena/external/nbbc/nbbc.php on line 2819
Warning: Trying to access array offset on value of type bool in /var/www/vhosts/gmms.org.uk/httpdocs/libraries/kunena/external/nbbc/nbbc.php on line 2819
Warning: Trying to access array offset on value of type bool in /var/www/vhosts/gmms.org.uk/httpdocs/libraries/kunena/external/nbbc/nbbc.php on line 2819
Here is part two of recent progress following from the above.
Here is the second section of current progress, following on from the above.
When all of this was dry I could remove the nacelle and legs assembly so that I can now paint them as trying to paint these in place and not mark the hull would be beyond my ability. This means that I will now be able to put this back on to the hull and all of the legs will fit into the holes.


Next step will be to paint the legs.
Thanks for looking.
Stevef.
Please Log in to join the conversation.
6 years 11 months ago #159
by Stevef
Warning: Trying to access array offset on value of type bool in /var/www/vhosts/gmms.org.uk/httpdocs/libraries/kunena/external/nbbc/nbbc.php on line 2819
Warning: Trying to access array offset on value of type bool in /var/www/vhosts/gmms.org.uk/httpdocs/libraries/kunena/external/nbbc/nbbc.php on line 2819
Warning: Trying to access array offset on value of type bool in /var/www/vhosts/gmms.org.uk/httpdocs/libraries/kunena/external/nbbc/nbbc.php on line 2819
Warning: Trying to access array offset on value of type bool in /var/www/vhosts/gmms.org.uk/httpdocs/libraries/kunena/external/nbbc/nbbc.php on line 2819
Evening All,
Once again this is in two posts because of the number of photographs which I am putting in.
I was supposed to iterate the procedure described in the last post for the port (left) nacelle support towers for the starboard (right) nacelle supports and all would be fine. Well that was the plan....... except that it didn't quite work that way. I assembled the starboard (right) nacelle support towers as previously described and put the right and left nacelle sub-assemblies on to the model just to see how it looked. It did not look at all right. Reason? I had somehow mis-measured the height of the horizontal struts on the right nacelle towers with a result that looked awful!
At this point I would like to remind fellow modellers that if you wish to know how to make a mistake when modelling, I am the first port of call! I could write a book on the subject! How I mis-measured I do not know, but the solution was to remove all the smaller struts, leaving just the legs in place, and start again. Fortunately the legs held and I was able to replace all of the offending parts relatively quickly....but I was a tad annoyed. Painting followed for both sides, (at which point I corrected the colour for the bits on the sides of the nacelles that I had previously painted the wrong shade of grey!), and then I glued the port (left) nacelle into place on the hull, followed by the centre legs. Rigging followed using 40 SWG rolled copper wire held in place with CA as per the tail boom. This was necessary for two reasons:
1. with the cabane struts and wing in place these nacelles would be nearly impossible to get to;
2. with one nacelle in place rigging the inner part of the second one was difficult enough.
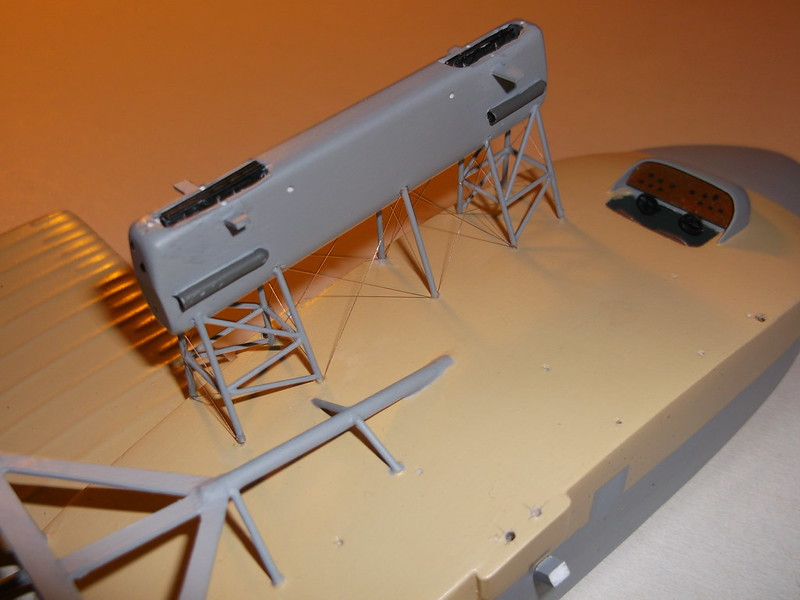
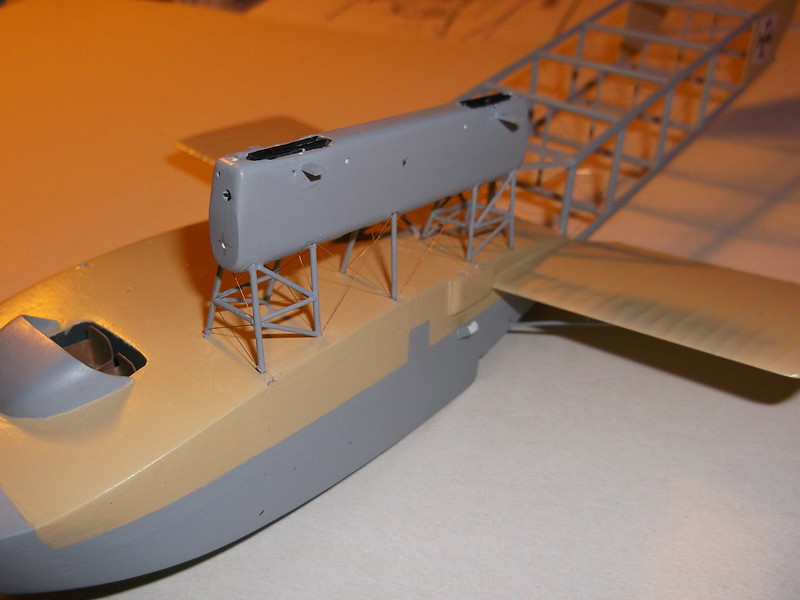

Stevef.
Warning: Trying to access array offset on value of type bool in /var/www/vhosts/gmms.org.uk/httpdocs/libraries/kunena/external/nbbc/nbbc.php on line 2819
Warning: Trying to access array offset on value of type bool in /var/www/vhosts/gmms.org.uk/httpdocs/libraries/kunena/external/nbbc/nbbc.php on line 2819
Warning: Trying to access array offset on value of type bool in /var/www/vhosts/gmms.org.uk/httpdocs/libraries/kunena/external/nbbc/nbbc.php on line 2819
Warning: Trying to access array offset on value of type bool in /var/www/vhosts/gmms.org.uk/httpdocs/libraries/kunena/external/nbbc/nbbc.php on line 2819
Evening All,
Once again this is in two posts because of the number of photographs which I am putting in.
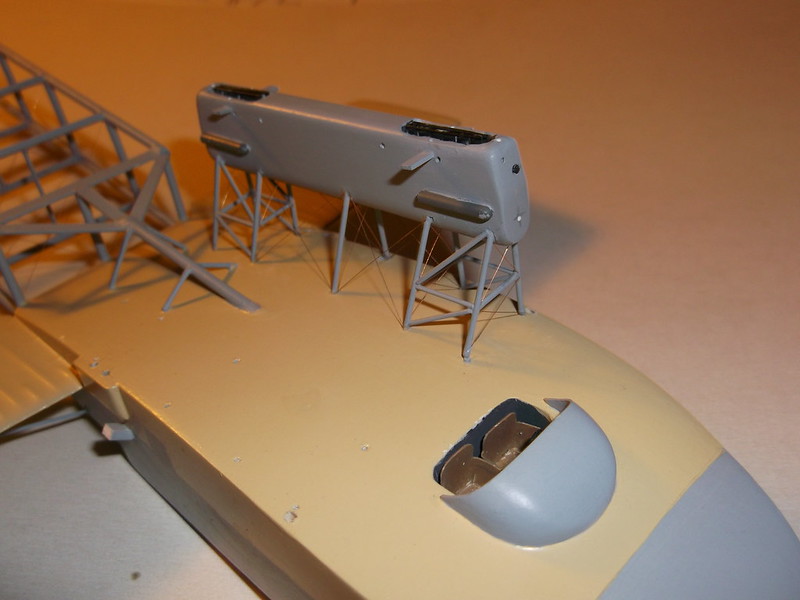
I was supposed to iterate the procedure described in the last post for the port (left) nacelle support towers for the starboard (right) nacelle supports and all would be fine. Well that was the plan....... except that it didn't quite work that way. I assembled the starboard (right) nacelle support towers as previously described and put the right and left nacelle sub-assemblies on to the model just to see how it looked. It did not look at all right. Reason? I had somehow mis-measured the height of the horizontal struts on the right nacelle towers with a result that looked awful!
At this point I would like to remind fellow modellers that if you wish to know how to make a mistake when modelling, I am the first port of call! I could write a book on the subject! How I mis-measured I do not know, but the solution was to remove all the smaller struts, leaving just the legs in place, and start again. Fortunately the legs held and I was able to replace all of the offending parts relatively quickly....but I was a tad annoyed. Painting followed for both sides, (at which point I corrected the colour for the bits on the sides of the nacelles that I had previously painted the wrong shade of grey!), and then I glued the port (left) nacelle into place on the hull, followed by the centre legs. Rigging followed using 40 SWG rolled copper wire held in place with CA as per the tail boom. This was necessary for two reasons:
1. with the cabane struts and wing in place these nacelles would be nearly impossible to get to;
2. with one nacelle in place rigging the inner part of the second one was difficult enough.


Stevef.
Please Log in to join the conversation.
6 years 11 months ago #160
by Stevef
Warning: Trying to access array offset on value of type bool in /var/www/vhosts/gmms.org.uk/httpdocs/libraries/kunena/external/nbbc/nbbc.php on line 2819
Warning: Trying to access array offset on value of type bool in /var/www/vhosts/gmms.org.uk/httpdocs/libraries/kunena/external/nbbc/nbbc.php on line 2819
Warning: Trying to access array offset on value of type bool in /var/www/vhosts/gmms.org.uk/httpdocs/libraries/kunena/external/nbbc/nbbc.php on line 2819
Warning: Trying to access array offset on value of type bool in /var/www/vhosts/gmms.org.uk/httpdocs/libraries/kunena/external/nbbc/nbbc.php on line 2819
The starboard nacelle followed, CA'd into place on the hull and rigged:

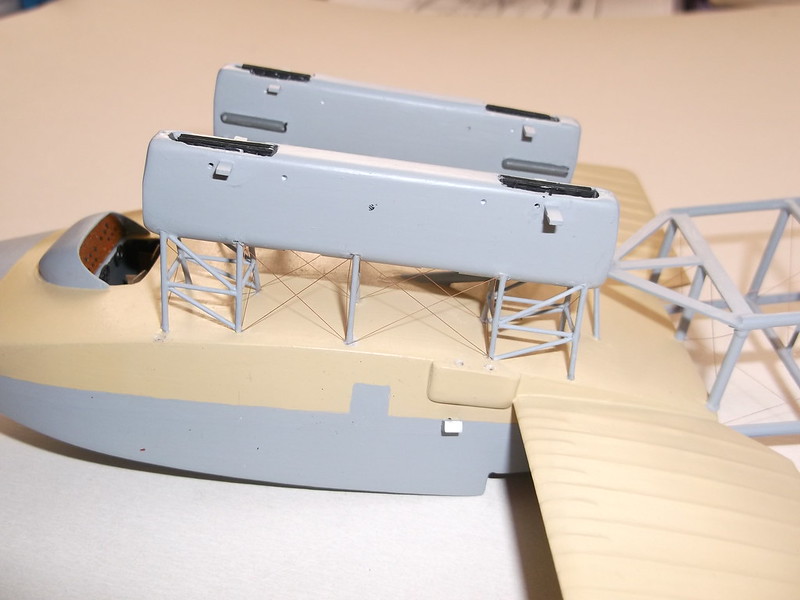
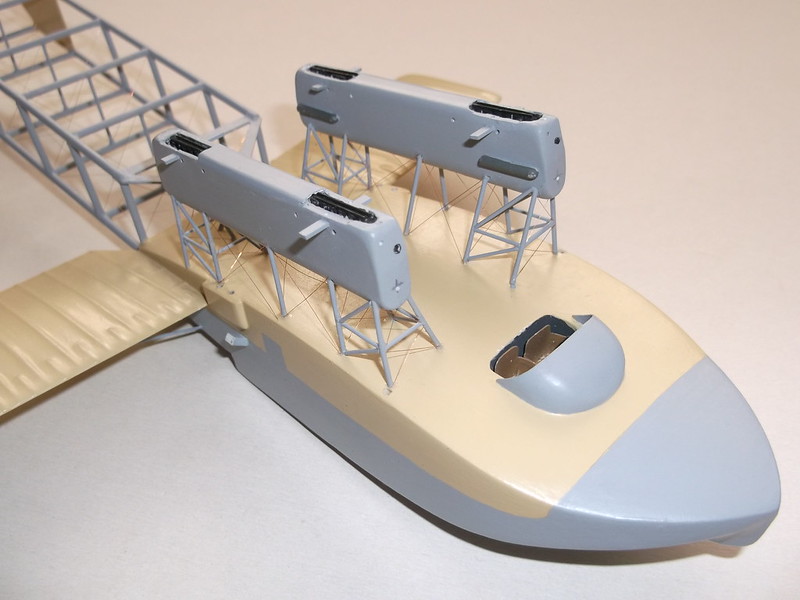
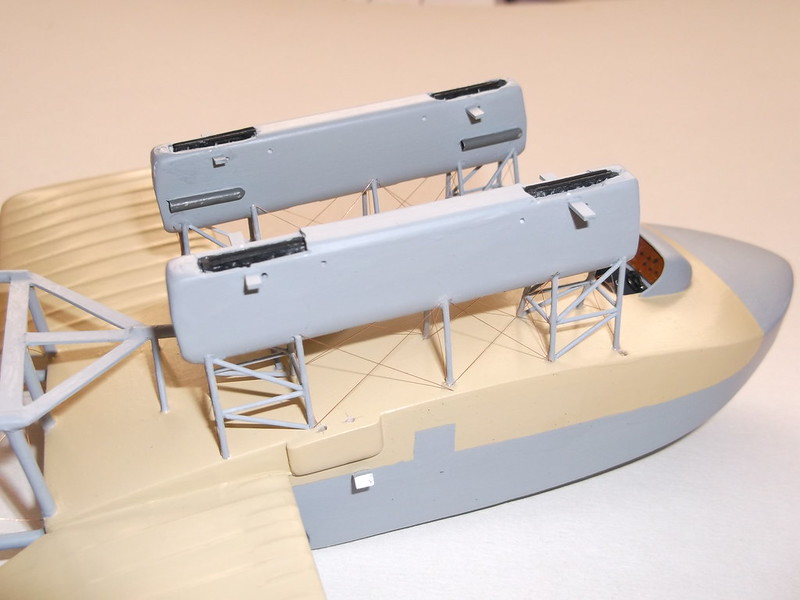
Although I did not take a photo I did try out the cabane struts just to make sure that there is a gap between them and the nacelles and that the sticking out bits on the nacelles do not foul the struts: they do not. When scratch building these small things can go wrong, (as did the strut assembly described above), and in this case the consequences would have been pretty serious if they had because simply re-positioning the sticking out pieces would have made the whole thing look odd. There was very little room for error there.
At last this is beginning to look like the machine in the photographs. There is still a lot more to do before I can think about putting the wing on: rig the boom, add engine radiators and associated pipes and bracing, check the location slots in the wing, make the large V struts, etc. More later.
Thanks for looking.
Stevef.
Warning: Trying to access array offset on value of type bool in /var/www/vhosts/gmms.org.uk/httpdocs/libraries/kunena/external/nbbc/nbbc.php on line 2819
Warning: Trying to access array offset on value of type bool in /var/www/vhosts/gmms.org.uk/httpdocs/libraries/kunena/external/nbbc/nbbc.php on line 2819
Warning: Trying to access array offset on value of type bool in /var/www/vhosts/gmms.org.uk/httpdocs/libraries/kunena/external/nbbc/nbbc.php on line 2819
Warning: Trying to access array offset on value of type bool in /var/www/vhosts/gmms.org.uk/httpdocs/libraries/kunena/external/nbbc/nbbc.php on line 2819
The starboard nacelle followed, CA'd into place on the hull and rigged:


Although I did not take a photo I did try out the cabane struts just to make sure that there is a gap between them and the nacelles and that the sticking out bits on the nacelles do not foul the struts: they do not. When scratch building these small things can go wrong, (as did the strut assembly described above), and in this case the consequences would have been pretty serious if they had because simply re-positioning the sticking out pieces would have made the whole thing look odd. There was very little room for error there.
At last this is beginning to look like the machine in the photographs. There is still a lot more to do before I can think about putting the wing on: rig the boom, add engine radiators and associated pipes and bracing, check the location slots in the wing, make the large V struts, etc. More later.
Thanks for looking.
Stevef.
Please Log in to join the conversation.
Time to create page: 0.183 seconds
- You are here:
-
Home

-
Forum

-
Work in progress

-
Airfield

- 1/72 Zeppelin-Lindau (Dornier) Rs II scratch build