Scratch build partial stripdown Vickers FB 5 Gunbus 1/32 scale

5 years 10 months ago #202
by Stevef
Warning: Trying to access array offset on value of type bool in /var/www/vhosts/gmms.org.uk/httpdocs/libraries/kunena/external/nbbc/nbbc.php on line 2819
Warning: Trying to access array offset on value of type bool in /var/www/vhosts/gmms.org.uk/httpdocs/libraries/kunena/external/nbbc/nbbc.php on line 2819
Warning: Trying to access array offset on value of type bool in /var/www/vhosts/gmms.org.uk/httpdocs/libraries/kunena/external/nbbc/nbbc.php on line 2819
Warning: Trying to access array offset on value of type bool in /var/www/vhosts/gmms.org.uk/httpdocs/libraries/kunena/external/nbbc/nbbc.php on line 2819
Warning: Trying to access array offset on value of type bool in /var/www/vhosts/gmms.org.uk/httpdocs/libraries/kunena/external/nbbc/nbbc.php on line 2819
Warning: Trying to access array offset on value of type bool in /var/www/vhosts/gmms.org.uk/httpdocs/libraries/kunena/external/nbbc/nbbc.php on line 2819
Evening All,
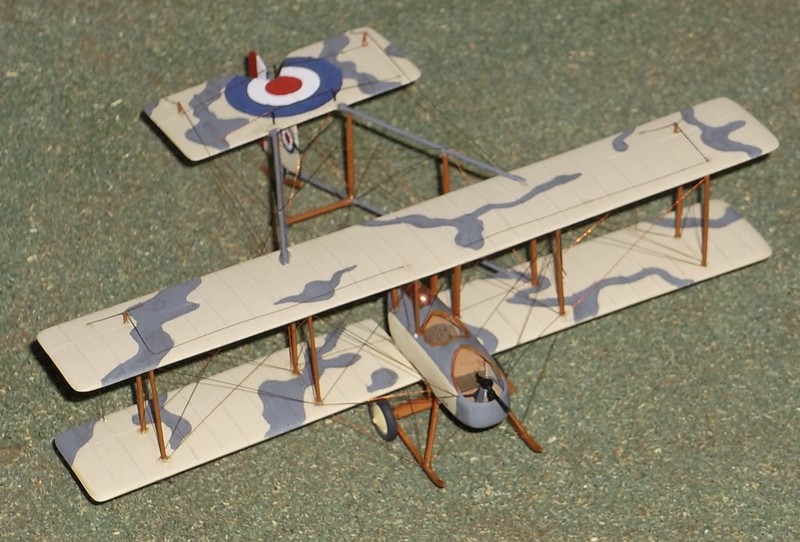
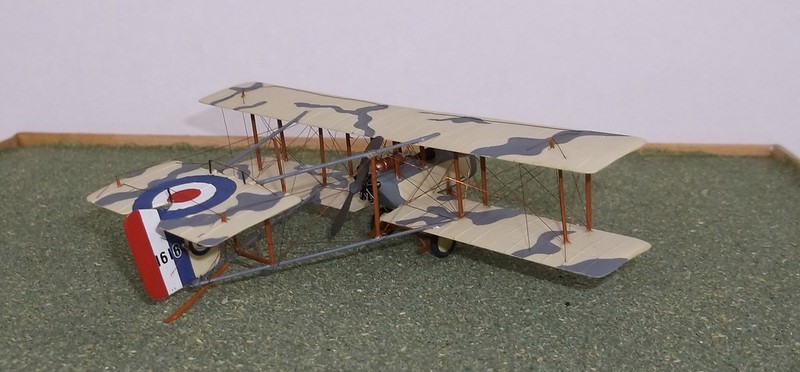
I have been through a complete loss of mojo recently: after completing the Dornier Rs II and base I was looking for a similar challenge and I had tried to continue with a 1/72 scratch build of an FE 2d, (an FE 2 with a Rolls Royce Eagle engine instead of a Beardmore), which I have been working on for about a year, but when I found that I will probably have to make a new nacelle I simply baulked at the idea: no particular reason why, just the thought was enough to put me off. I then floundered around with several different ideas and decided that perhaps a change in scale might offer a new challenge. This would mean that I would be abandoning the Sacred Scale, but I am determined that I will return to it in future as I have many interesting subjects on my “to scratch-build” list that I wish to make. I was looking for a subject to scratch build of course, and rapidly came to the (for me), obvious conclusion that it would have to be a pusher of some kind. I looked up several types but kept finding that I lacked enough information concerning the details of engines or interiors as I was thinking of 1/32 scale where details matter. In 1/72 scale I can make parts from drawings that look right, but in this larger scale I would need accurate 3D drawings and other information, and for many of the types that I considered such information could not be found. I also had the feeling of “done that” for some of the subjects I was researching. I do not usually like to make the same subject twice which may have been why I was put off the FE 2d - it is too much like the F E 2b, which I have already made.
Then I happened to find a cut-away drawing of the Vickers FB 5 Gunbus. A couple of years ago it had been suggested to me that I try a cut-away model but to do this in plastic in 1/72 scale would be very difficult and probably leave a weak model. There are several cut-away model kits in PE in 1/72 scale but I do not like PE and I am not a kit builder any more, so that idea was a non-starter. But what about a cut-away in 1/32 scale? Problem: the engine. I can scratch build or convert engines in 1/72 scale and just get away with it, but that would not be possible in this scale, so I looked around to see what engines were available as aftermarket items. I went back to some earlier ideas and thought about either a DH 1A or the FB 5 Gunbus as engine kits are available for both. In the end I decided that I could not find enough information on the interior of the DH 1A so I settled for the Gunbus. I have built a Gunbus in 1/72 scale already - it was a conversion from an Airfix DH 4 but it was one which I started in 1981 and finished 31 years later! I am not planning to take quite so long this time….
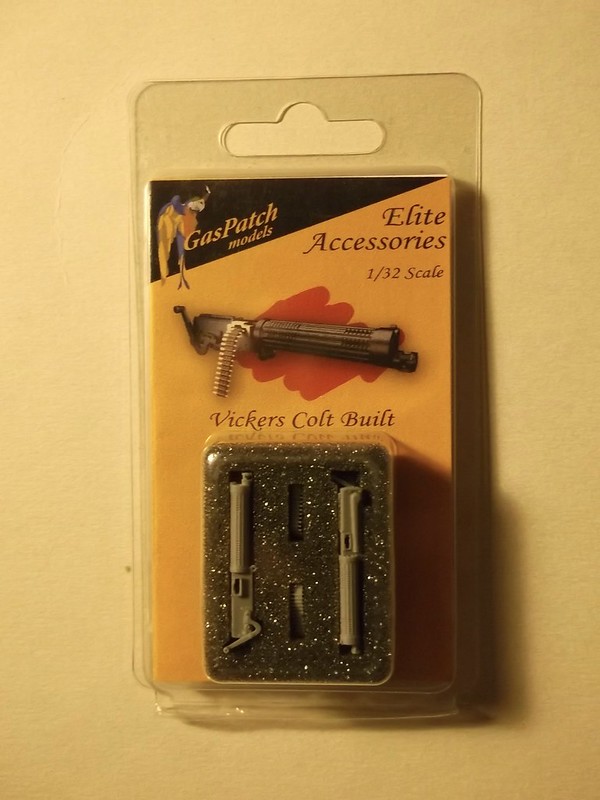
This will be a CBSB (Classic British Scratch Build), - a basic, limited run kit with some aftermarket parts. As it will be a partial strip down the parts count will probably be quite high. I frequently leave my models unarmed but on this occasion I decided that I would model an early variant with the Vickers mg so I bought one of these from Gaspatch: it is resin.
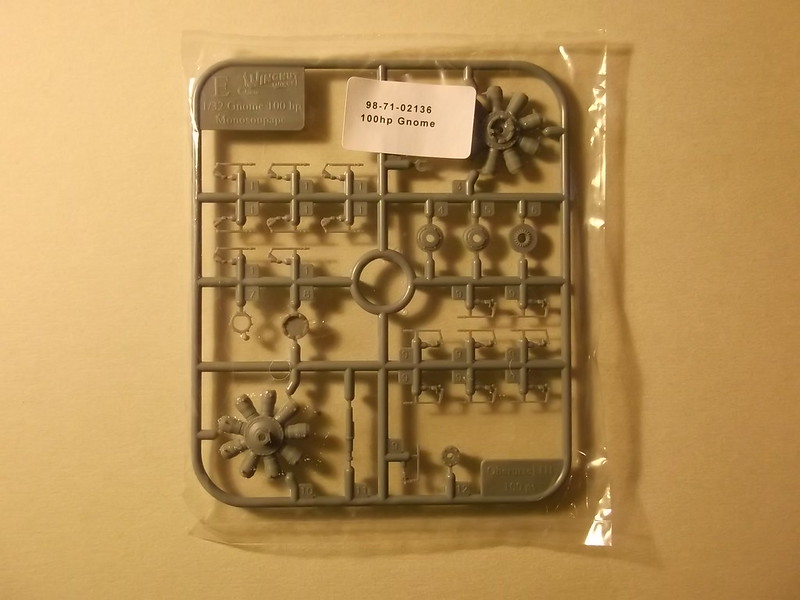
I also needed an engine - a 100hp Gnome rotary to be precise, and Wingnut Wings make a beautiful aftermarket specimen for an affordable price. (
Another difficult item to model is the wicker seat for the pilot but I found that Baracuda make one of these in resin.

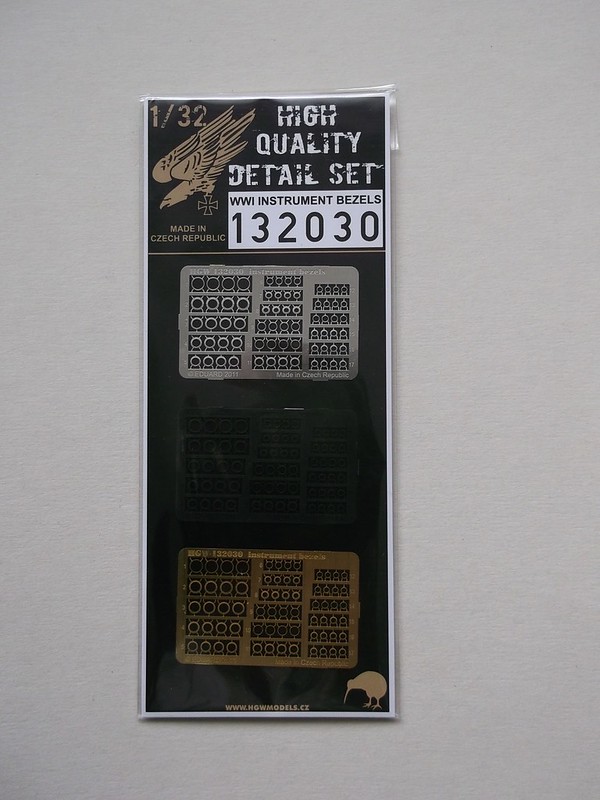
These three items are all little gems in their own right. Finally I have bought some PE instrument bezels, (I only have to cut and fit these so I can just about manage), and transfers from Airscale for the instrument faces.
The remainder of the kit will be made from the usual plastic sheet, rod, strip, wood, brass bar for the wing spars and rod for the fuselage frame and booms. The fuselage nacelle of the Gunbus was made from steel tube, as were the booms, so I am going to have to learn how to solder brass rod and bar as CA will not be strong enough.
More in the next post.
Warning: Trying to access array offset on value of type bool in /var/www/vhosts/gmms.org.uk/httpdocs/libraries/kunena/external/nbbc/nbbc.php on line 2819
Warning: Trying to access array offset on value of type bool in /var/www/vhosts/gmms.org.uk/httpdocs/libraries/kunena/external/nbbc/nbbc.php on line 2819
Warning: Trying to access array offset on value of type bool in /var/www/vhosts/gmms.org.uk/httpdocs/libraries/kunena/external/nbbc/nbbc.php on line 2819
Warning: Trying to access array offset on value of type bool in /var/www/vhosts/gmms.org.uk/httpdocs/libraries/kunena/external/nbbc/nbbc.php on line 2819
Warning: Trying to access array offset on value of type bool in /var/www/vhosts/gmms.org.uk/httpdocs/libraries/kunena/external/nbbc/nbbc.php on line 2819
Warning: Trying to access array offset on value of type bool in /var/www/vhosts/gmms.org.uk/httpdocs/libraries/kunena/external/nbbc/nbbc.php on line 2819
Evening All,
I have been through a complete loss of mojo recently: after completing the Dornier Rs II and base I was looking for a similar challenge and I had tried to continue with a 1/72 scratch build of an FE 2d, (an FE 2 with a Rolls Royce Eagle engine instead of a Beardmore), which I have been working on for about a year, but when I found that I will probably have to make a new nacelle I simply baulked at the idea: no particular reason why, just the thought was enough to put me off. I then floundered around with several different ideas and decided that perhaps a change in scale might offer a new challenge. This would mean that I would be abandoning the Sacred Scale, but I am determined that I will return to it in future as I have many interesting subjects on my “to scratch-build” list that I wish to make. I was looking for a subject to scratch build of course, and rapidly came to the (for me), obvious conclusion that it would have to be a pusher of some kind. I looked up several types but kept finding that I lacked enough information concerning the details of engines or interiors as I was thinking of 1/32 scale where details matter. In 1/72 scale I can make parts from drawings that look right, but in this larger scale I would need accurate 3D drawings and other information, and for many of the types that I considered such information could not be found. I also had the feeling of “done that” for some of the subjects I was researching. I do not usually like to make the same subject twice which may have been why I was put off the FE 2d - it is too much like the F E 2b, which I have already made.
Then I happened to find a cut-away drawing of the Vickers FB 5 Gunbus. A couple of years ago it had been suggested to me that I try a cut-away model but to do this in plastic in 1/72 scale would be very difficult and probably leave a weak model. There are several cut-away model kits in PE in 1/72 scale but I do not like PE and I am not a kit builder any more, so that idea was a non-starter. But what about a cut-away in 1/32 scale? Problem: the engine. I can scratch build or convert engines in 1/72 scale and just get away with it, but that would not be possible in this scale, so I looked around to see what engines were available as aftermarket items. I went back to some earlier ideas and thought about either a DH 1A or the FB 5 Gunbus as engine kits are available for both. In the end I decided that I could not find enough information on the interior of the DH 1A so I settled for the Gunbus. I have built a Gunbus in 1/72 scale already - it was a conversion from an Airfix DH 4 but it was one which I started in 1981 and finished 31 years later! I am not planning to take quite so long this time….
This will be a CBSB (Classic British Scratch Build), - a basic, limited run kit with some aftermarket parts. As it will be a partial strip down the parts count will probably be quite high. I frequently leave my models unarmed but on this occasion I decided that I would model an early variant with the Vickers mg so I bought one of these from Gaspatch: it is resin.
I also needed an engine - a 100hp Gnome rotary to be precise, and Wingnut Wings make a beautiful aftermarket specimen for an affordable price. (
Another difficult item to model is the wicker seat for the pilot but I found that Baracuda make one of these in resin.
These three items are all little gems in their own right. Finally I have bought some PE instrument bezels, (I only have to cut and fit these so I can just about manage), and transfers from Airscale for the instrument faces.
The remainder of the kit will be made from the usual plastic sheet, rod, strip, wood, brass bar for the wing spars and rod for the fuselage frame and booms. The fuselage nacelle of the Gunbus was made from steel tube, as were the booms, so I am going to have to learn how to solder brass rod and bar as CA will not be strong enough.
More in the next post.
Please Log in to join the conversation.
5 years 10 months ago #203
by Stevef
Warning: Trying to access array offset on value of type bool in /var/www/vhosts/gmms.org.uk/httpdocs/libraries/kunena/external/nbbc/nbbc.php on line 2819
Warning: Trying to access array offset on value of type bool in /var/www/vhosts/gmms.org.uk/httpdocs/libraries/kunena/external/nbbc/nbbc.php on line 2819
Warning: Trying to access array offset on value of type bool in /var/www/vhosts/gmms.org.uk/httpdocs/libraries/kunena/external/nbbc/nbbc.php on line 2819
Continuing the build from the previous post.
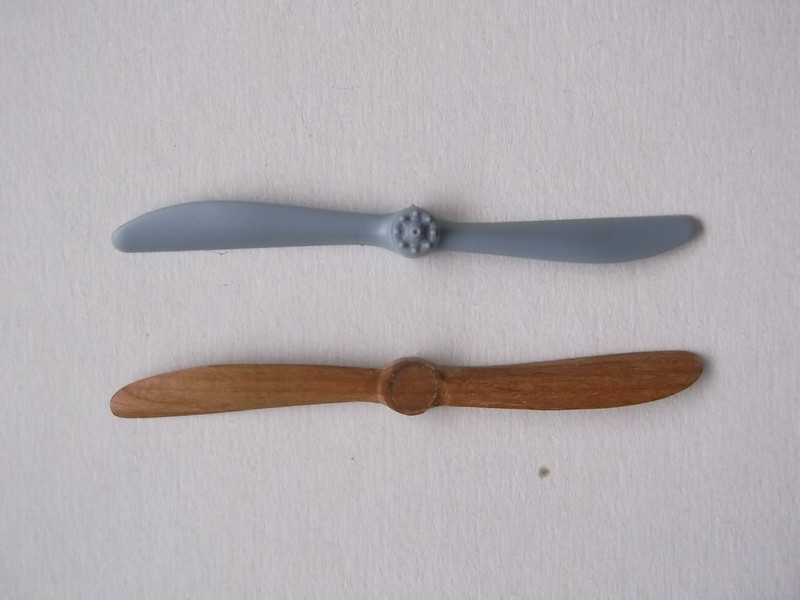
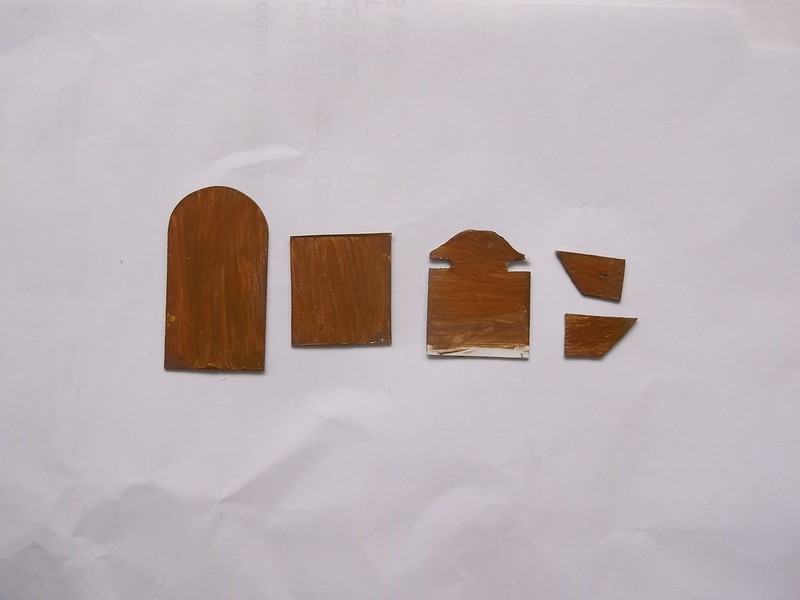
My intention is to make a model that looks similar to the drawing I found on the net, with half of it cut-away showing the underlying structure, and the other half covered. I scaled up the plans from the DataFile number 56 and ordered some plastic strip from my LMS so that I could make the wing ribs. That was a mistake: after a month the shop had still not been able to get the strip, so I cancelled the order and got some in three days by post. I will not be using my LMS in future unless they have the items I need In stock, which is annoying because I like to support local traders: unfortunately that one will not be getting much of my custom in future. While waiting I had tried to make wing ribs from bass wood but these were not particularly good - I could not make the triangular hole at the front end and the very narrow slot at the rear, and cutting square holes for the spar to go through also proved to be almost impossible, so I intend to use 180 x 40 thou plastic strip instead. In all I have had a frustrating month ordering parts and supplies but getting almost nowhere in terms of actually making anything, except that I did manage to carve a propellor. This was made from 2 pieces of hardwood, (I know not of what type), which I regularly use for propellors. Gunbus propellors seem to have been coated in a dark varnish and this wood is just the right colour. The kit propellor (grey) is an example from a Wingnut Wings kit which was Kindly lent to me by fellow modeller Epeeman. The first shot simply shows the wood:
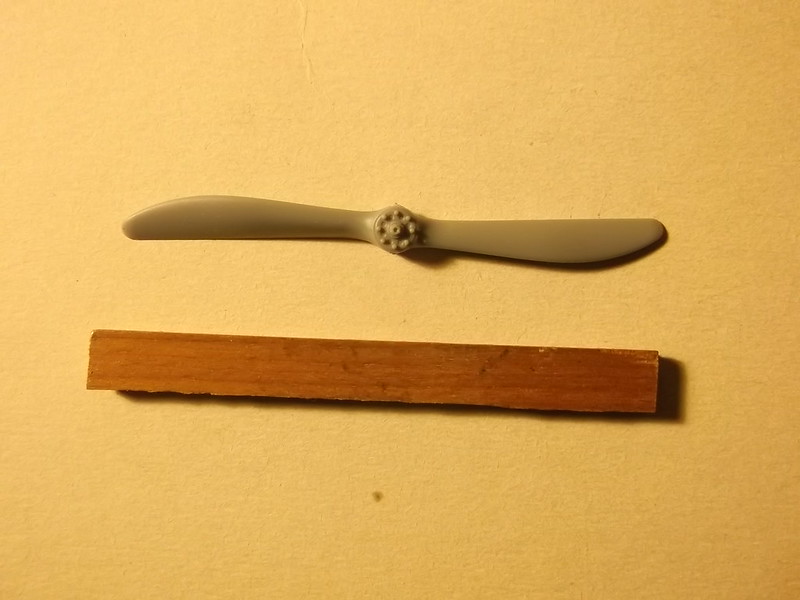
This shows the wood being carved - the blade on the left has been shaped, the one on the right has not - taken from the side of the propellor. The extra thickness for the boss was unnecessary and was removed:

The completed propellor - still to be varnished and a boss added:
So after all the frustrations and stop-starts of the past couple of months I have at last begun a project which I hope will bring some results in the not too distant future……
Thanks for looking.
Stevef.
Warning: Trying to access array offset on value of type bool in /var/www/vhosts/gmms.org.uk/httpdocs/libraries/kunena/external/nbbc/nbbc.php on line 2819
Warning: Trying to access array offset on value of type bool in /var/www/vhosts/gmms.org.uk/httpdocs/libraries/kunena/external/nbbc/nbbc.php on line 2819
Warning: Trying to access array offset on value of type bool in /var/www/vhosts/gmms.org.uk/httpdocs/libraries/kunena/external/nbbc/nbbc.php on line 2819
Continuing the build from the previous post.
My intention is to make a model that looks similar to the drawing I found on the net, with half of it cut-away showing the underlying structure, and the other half covered. I scaled up the plans from the DataFile number 56 and ordered some plastic strip from my LMS so that I could make the wing ribs. That was a mistake: after a month the shop had still not been able to get the strip, so I cancelled the order and got some in three days by post. I will not be using my LMS in future unless they have the items I need In stock, which is annoying because I like to support local traders: unfortunately that one will not be getting much of my custom in future. While waiting I had tried to make wing ribs from bass wood but these were not particularly good - I could not make the triangular hole at the front end and the very narrow slot at the rear, and cutting square holes for the spar to go through also proved to be almost impossible, so I intend to use 180 x 40 thou plastic strip instead. In all I have had a frustrating month ordering parts and supplies but getting almost nowhere in terms of actually making anything, except that I did manage to carve a propellor. This was made from 2 pieces of hardwood, (I know not of what type), which I regularly use for propellors. Gunbus propellors seem to have been coated in a dark varnish and this wood is just the right colour. The kit propellor (grey) is an example from a Wingnut Wings kit which was Kindly lent to me by fellow modeller Epeeman. The first shot simply shows the wood:
This shows the wood being carved - the blade on the left has been shaped, the one on the right has not - taken from the side of the propellor. The extra thickness for the boss was unnecessary and was removed:
The completed propellor - still to be varnished and a boss added:
So after all the frustrations and stop-starts of the past couple of months I have at last begun a project which I hope will bring some results in the not too distant future……
Thanks for looking.
Stevef.
Please Log in to join the conversation.
5 years 9 months ago #204
by Stevef
Warning: Trying to access array offset on value of type bool in /var/www/vhosts/gmms.org.uk/httpdocs/libraries/kunena/external/nbbc/nbbc.php on line 2819
Warning: Trying to access array offset on value of type bool in /var/www/vhosts/gmms.org.uk/httpdocs/libraries/kunena/external/nbbc/nbbc.php on line 2819
Warning: Trying to access array offset on value of type bool in /var/www/vhosts/gmms.org.uk/httpdocs/libraries/kunena/external/nbbc/nbbc.php on line 2819
Warning: Trying to access array offset on value of type bool in /var/www/vhosts/gmms.org.uk/httpdocs/libraries/kunena/external/nbbc/nbbc.php on line 2819
Warning: Trying to access array offset on value of type bool in /var/www/vhosts/gmms.org.uk/httpdocs/libraries/kunena/external/nbbc/nbbc.php on line 2819
Evening All,
Did I write that my previous attempt to build a Gunbus had taken 31 years? Well as things seem to be going at the moment, this one looks as though it might take about the same amount of time.....except that I do not expect to be around then! I knew when I started this project that I had things to learn, (1/32 scale presents different problems to the One True Scale), but I do not seem to be able to get things right at the moment. That, combined with many distractions, has ensured that progress has been even more glacial than usual.
I am now on my third attempt to build the frame for the fuselage nacelle: the first failed because I tried to use solder paste and it was too weak, plus I got some of the dimensions of the rod wrong! (Don't ask how, I am too embarrassed to answer.....). The second attempt failed because I got the shape of the sides wrong.......just don't ask! I am now in the process of making a third and THIS time I am going to get it right...... Soldering by the way has proved to be much easier than I anticipated - pictures will follow later when I finally get the frame right.
I have tried to make some of the wing ribs from plastic strip and have had some success, but it is a slow and rather tedious process.
 [
[
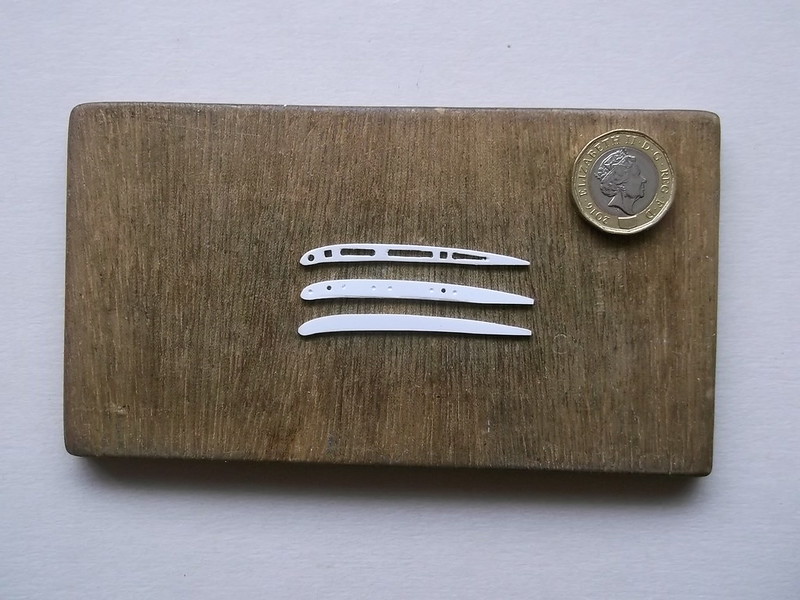
The image above shows the basic process from bottom to top:
cut and shape the strip;
drill holes at the points were the spars will be, and drill holes at the ends of the rib slots;
cut the slots out using a sharp scalpel and clean up the holes with a needle file and fine glasspaper.
There will need to be about 30 of these, so I may be a little time before I complete making these parts. They will then have to be mounted on to brass bar spars.
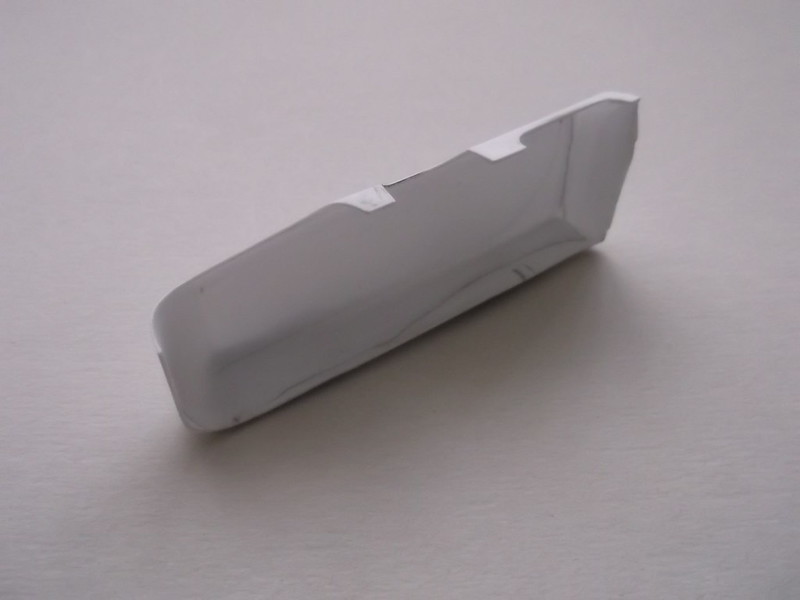
I carved the moulds for the fuselage side which will represent the covered part, using basswood for the male and plywood for the female mould. The result was fine - after several attempts. I have not moulded a piece as large as this before and had difficulty pushing the male into the female to get a large enough piece. In the end I managed to get one after repeatedly reheating the plastic:
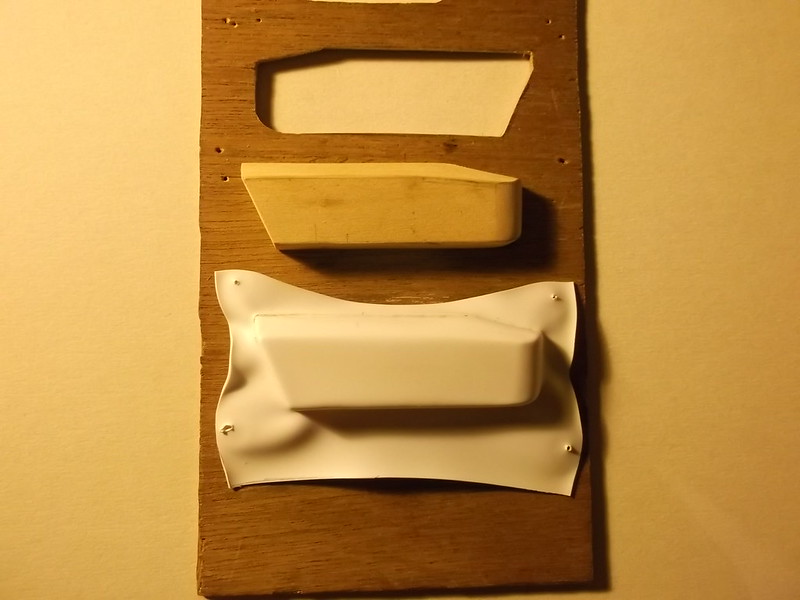
That has been cut out and the cockpit openings cut and sanded. There is a lot more work to do on this yet, so it is a long way from being ready but it is a start.
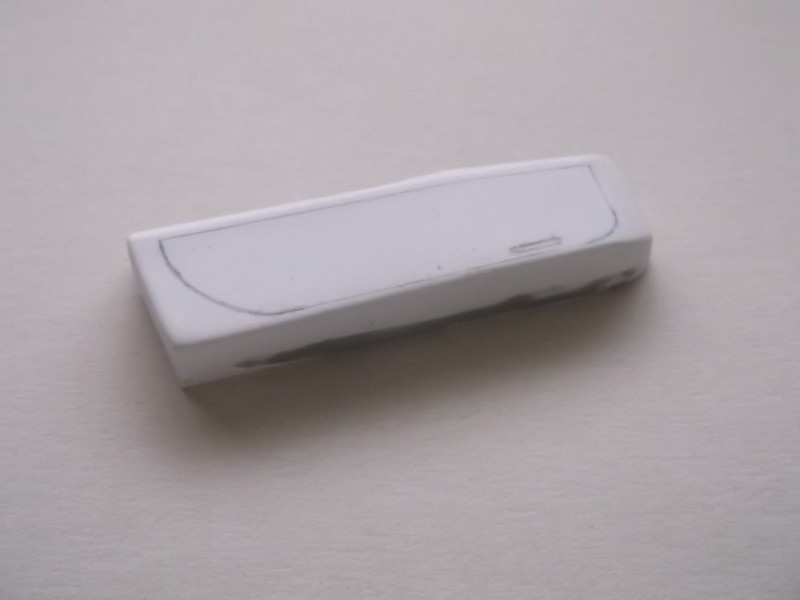
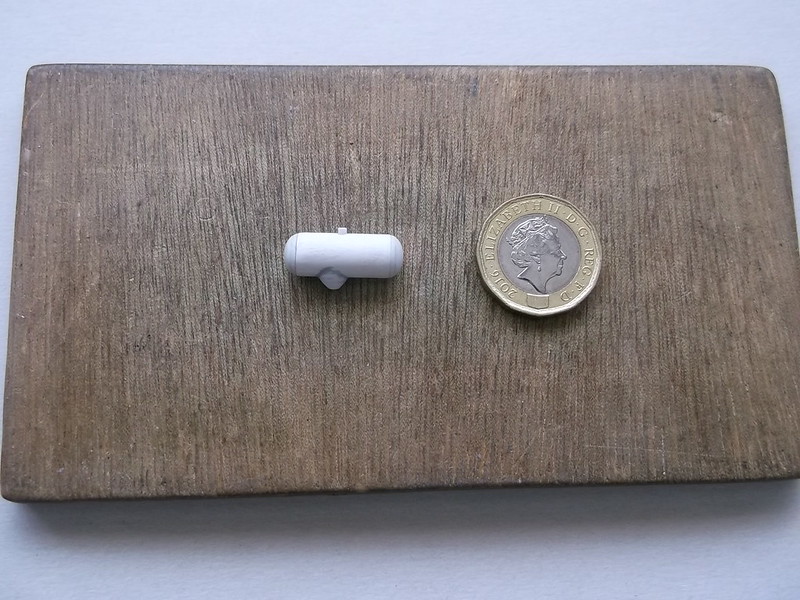
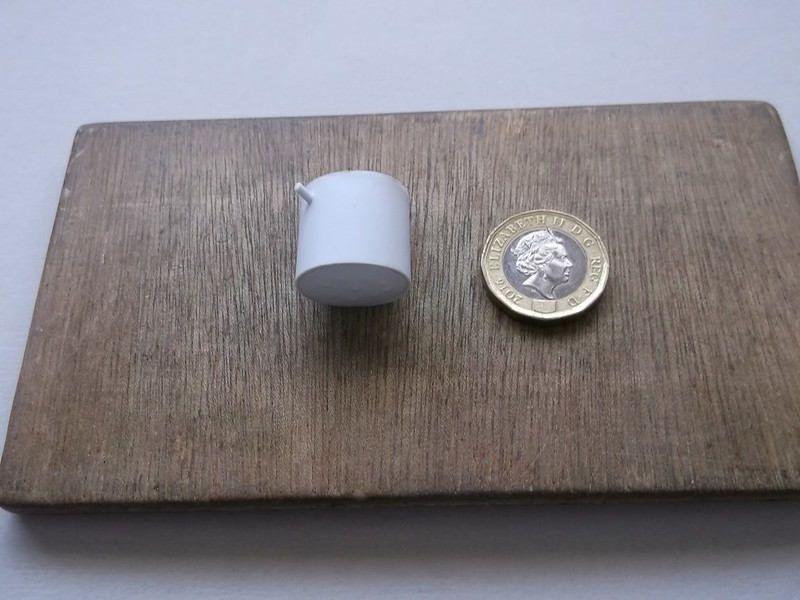
In frustration I have turned to making the oil tank. This was made from a piece of plastic tube which just happens to be the correct diameter, so I cut a length using a pipe cutter:
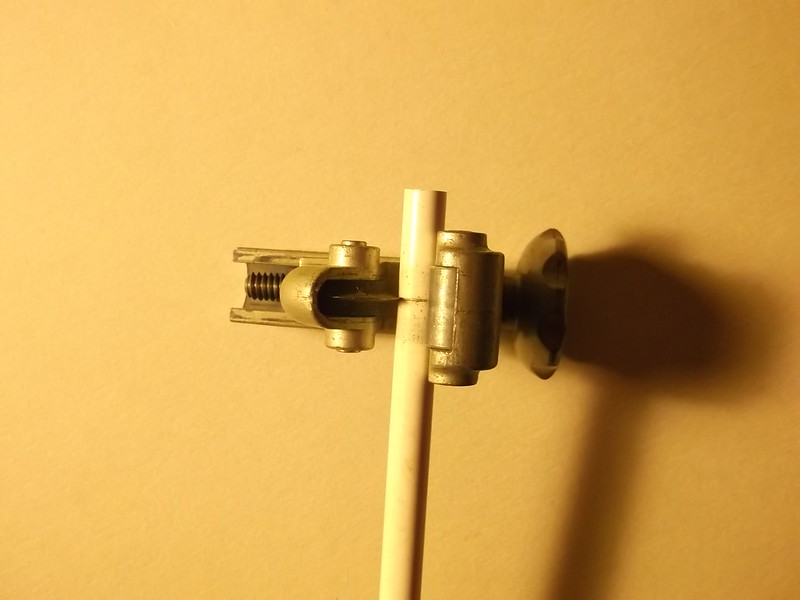
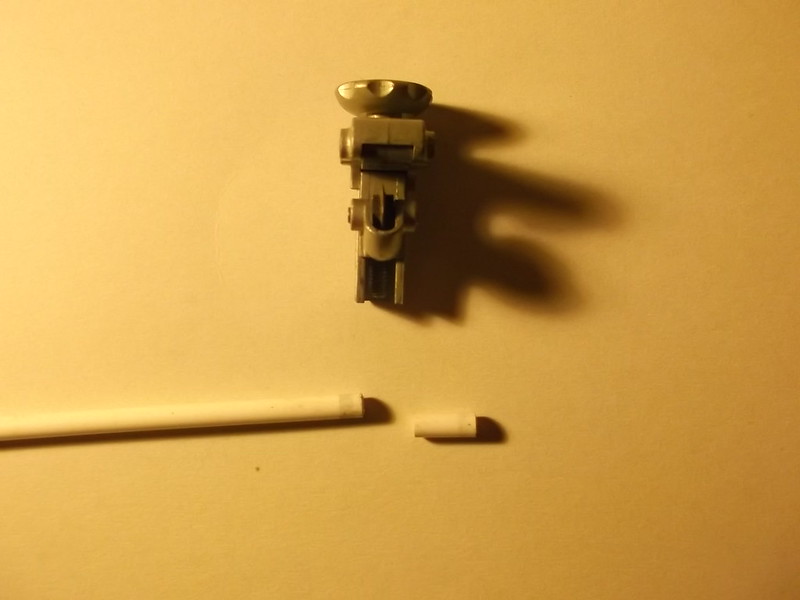
The ends of the tank were blocked with pieces of 60 thou card. When the cement had dried I could round off the ends with a file and glass paper. Now I only need to add the filler pipe at the top and outlet pipe underneath but at least this part looks as though it will be useable.

I have also spent a good deal of time thinking about the order of assembly and manufacture of parts, which has also proved to be a useful way of avoiding tackling new techniques, (like soldering), or even making anything at all. However experience has taught me that sometimes this indecisiveness is a good idea as it reduces the chances of really making a mess of things further down the line. Scratch builders will recognise what I mean. More to follow in what I hope will be the not too distant future.
Thanks for looking.
Stevef.
Warning: Trying to access array offset on value of type bool in /var/www/vhosts/gmms.org.uk/httpdocs/libraries/kunena/external/nbbc/nbbc.php on line 2819
Warning: Trying to access array offset on value of type bool in /var/www/vhosts/gmms.org.uk/httpdocs/libraries/kunena/external/nbbc/nbbc.php on line 2819
Warning: Trying to access array offset on value of type bool in /var/www/vhosts/gmms.org.uk/httpdocs/libraries/kunena/external/nbbc/nbbc.php on line 2819
Warning: Trying to access array offset on value of type bool in /var/www/vhosts/gmms.org.uk/httpdocs/libraries/kunena/external/nbbc/nbbc.php on line 2819
Warning: Trying to access array offset on value of type bool in /var/www/vhosts/gmms.org.uk/httpdocs/libraries/kunena/external/nbbc/nbbc.php on line 2819
Evening All,
Did I write that my previous attempt to build a Gunbus had taken 31 years? Well as things seem to be going at the moment, this one looks as though it might take about the same amount of time.....except that I do not expect to be around then! I knew when I started this project that I had things to learn, (1/32 scale presents different problems to the One True Scale), but I do not seem to be able to get things right at the moment. That, combined with many distractions, has ensured that progress has been even more glacial than usual.
I am now on my third attempt to build the frame for the fuselage nacelle: the first failed because I tried to use solder paste and it was too weak, plus I got some of the dimensions of the rod wrong! (Don't ask how, I am too embarrassed to answer.....). The second attempt failed because I got the shape of the sides wrong.......just don't ask! I am now in the process of making a third and THIS time I am going to get it right...... Soldering by the way has proved to be much easier than I anticipated - pictures will follow later when I finally get the frame right.
I have tried to make some of the wing ribs from plastic strip and have had some success, but it is a slow and rather tedious process.
The image above shows the basic process from bottom to top:
cut and shape the strip;
drill holes at the points were the spars will be, and drill holes at the ends of the rib slots;
cut the slots out using a sharp scalpel and clean up the holes with a needle file and fine glasspaper.
There will need to be about 30 of these, so I may be a little time before I complete making these parts. They will then have to be mounted on to brass bar spars.
I carved the moulds for the fuselage side which will represent the covered part, using basswood for the male and plywood for the female mould. The result was fine - after several attempts. I have not moulded a piece as large as this before and had difficulty pushing the male into the female to get a large enough piece. In the end I managed to get one after repeatedly reheating the plastic:
That has been cut out and the cockpit openings cut and sanded. There is a lot more work to do on this yet, so it is a long way from being ready but it is a start.
In frustration I have turned to making the oil tank. This was made from a piece of plastic tube which just happens to be the correct diameter, so I cut a length using a pipe cutter:
The ends of the tank were blocked with pieces of 60 thou card. When the cement had dried I could round off the ends with a file and glass paper. Now I only need to add the filler pipe at the top and outlet pipe underneath but at least this part looks as though it will be useable.
I have also spent a good deal of time thinking about the order of assembly and manufacture of parts, which has also proved to be a useful way of avoiding tackling new techniques, (like soldering), or even making anything at all. However experience has taught me that sometimes this indecisiveness is a good idea as it reduces the chances of really making a mess of things further down the line. Scratch builders will recognise what I mean. More to follow in what I hope will be the not too distant future.
Thanks for looking.
Stevef.
Please Log in to join the conversation.
5 years 9 months ago #205
by Stevef
Warning: Trying to access array offset on value of type bool in /var/www/vhosts/gmms.org.uk/httpdocs/libraries/kunena/external/nbbc/nbbc.php on line 2819
Warning: Trying to access array offset on value of type bool in /var/www/vhosts/gmms.org.uk/httpdocs/libraries/kunena/external/nbbc/nbbc.php on line 2819
Warning: Trying to access array offset on value of type bool in /var/www/vhosts/gmms.org.uk/httpdocs/libraries/kunena/external/nbbc/nbbc.php on line 2819
Warning: Trying to access array offset on value of type bool in /var/www/vhosts/gmms.org.uk/httpdocs/libraries/kunena/external/nbbc/nbbc.php on line 2819
Warning: Trying to access array offset on value of type bool in /var/www/vhosts/gmms.org.uk/httpdocs/libraries/kunena/external/nbbc/nbbc.php on line 2819
Warning: Trying to access array offset on value of type bool in /var/www/vhosts/gmms.org.uk/httpdocs/libraries/kunena/external/nbbc/nbbc.php on line 2819
Warning: Trying to access array offset on value of type bool in /var/www/vhosts/gmms.org.uk/httpdocs/libraries/kunena/external/nbbc/nbbc.php on line 2819
This project is, I think, getting under way at last, but that does not mean that I will have all of the answers in future, so any suggestions would be welcomed.
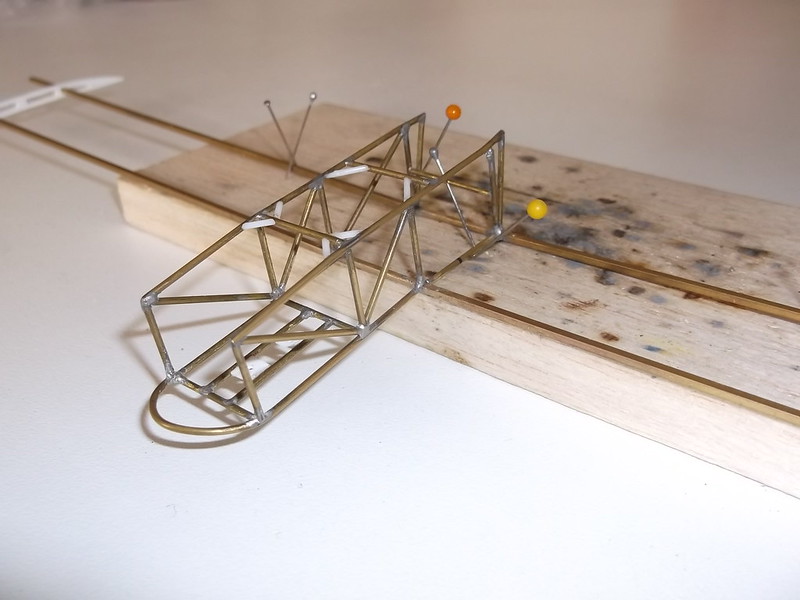
I have completed the main parts of the fuselage frame at last: it took three attempts to get it right, but here it is as of now:
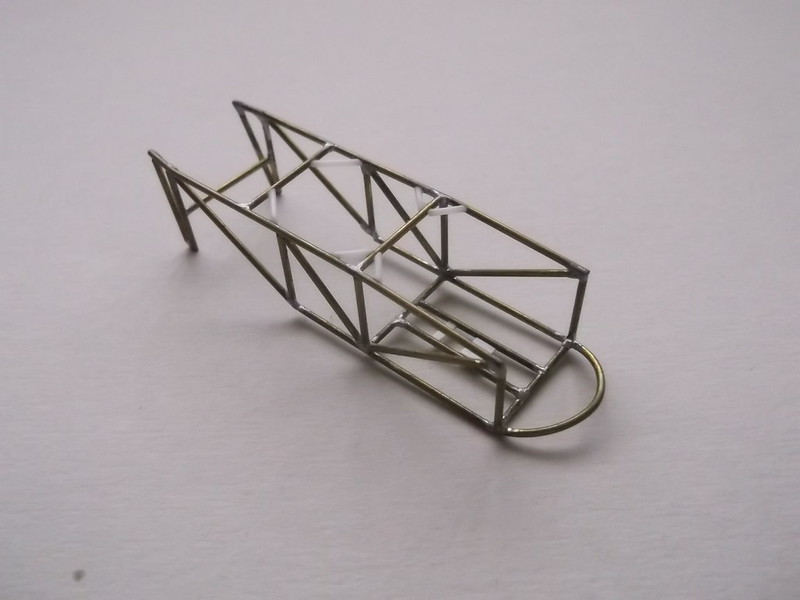
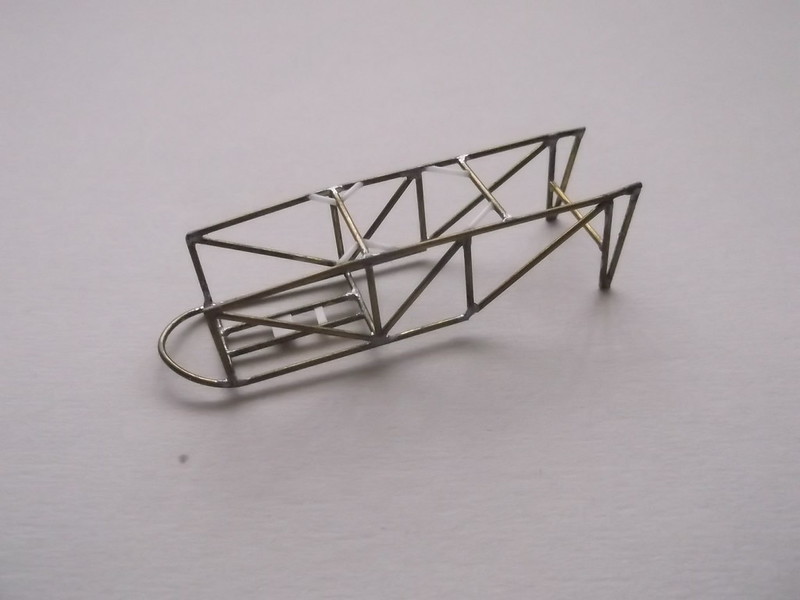
It is made from 3/64 in brass rod and plastic rod bracing which has been superglued into position: I originally tried brass tube and intended to use connectors, but found that there were so many pieces on some joints that I could not get the correct angles to the frame, so I gave up and used rod instead. For the benefit of those who do not have experience of building structures like this here is how I tackled mine. NB. I also use this method when constructing frames with plastic rod and cement.
I started by bending the nose of the floor around a piece of copper pipe - it just happened to be the right diameter (22mm). I then soldered the cross pieces to the sides of the frame. I placed the floor section on to a piece of balsa which I use to pin the brass pieces while I am soldering, and laid the pieces of one of the fuselage sides so that they aligned exactly with the floor, and then held the side pieces in place with pins. This means that the side will fit exactly later.

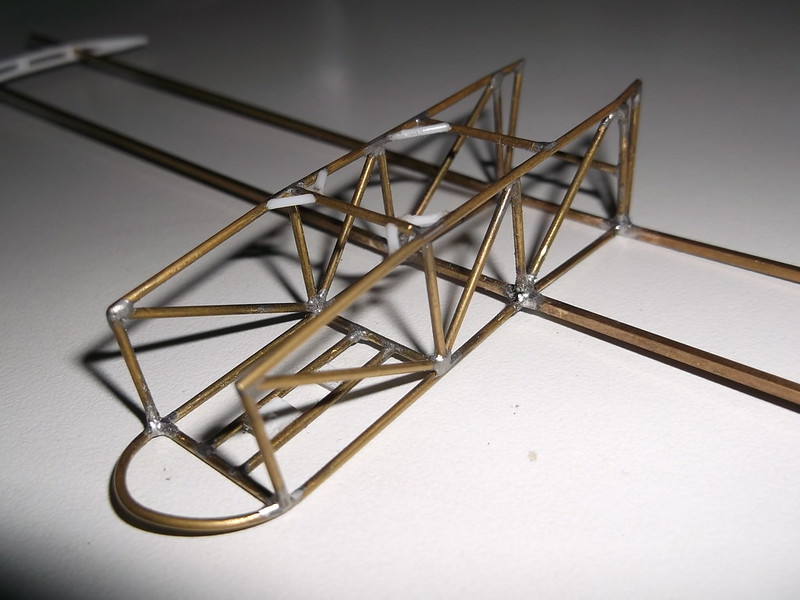
Remove the floor section and solder the joints of the side: the pins hold everything in place:
The image above shows that the side piece and floor section to align as required. Unfortunately these images are of my first attempt which I had to abandon later.... however the pinciple worked as shown by the results above of the third attempt show.
Having made the frame at last I then had to make a second fuselage shell in plastic as the first attempt was slightly too small. The marking on the outside are for later reference as they delineate the metal and fabric parts. I have also used Mr Surfacer to fill the marks from the wood mould on the underside of the shell.
I feel now that I can start to make the internal parts of the nacelle while I continue to make ribs for the wings.
Thanks for looking.
Stevef.
Warning: Trying to access array offset on value of type bool in /var/www/vhosts/gmms.org.uk/httpdocs/libraries/kunena/external/nbbc/nbbc.php on line 2819
Warning: Trying to access array offset on value of type bool in /var/www/vhosts/gmms.org.uk/httpdocs/libraries/kunena/external/nbbc/nbbc.php on line 2819
Warning: Trying to access array offset on value of type bool in /var/www/vhosts/gmms.org.uk/httpdocs/libraries/kunena/external/nbbc/nbbc.php on line 2819
Warning: Trying to access array offset on value of type bool in /var/www/vhosts/gmms.org.uk/httpdocs/libraries/kunena/external/nbbc/nbbc.php on line 2819
Warning: Trying to access array offset on value of type bool in /var/www/vhosts/gmms.org.uk/httpdocs/libraries/kunena/external/nbbc/nbbc.php on line 2819
Warning: Trying to access array offset on value of type bool in /var/www/vhosts/gmms.org.uk/httpdocs/libraries/kunena/external/nbbc/nbbc.php on line 2819
Warning: Trying to access array offset on value of type bool in /var/www/vhosts/gmms.org.uk/httpdocs/libraries/kunena/external/nbbc/nbbc.php on line 2819
This project is, I think, getting under way at last, but that does not mean that I will have all of the answers in future, so any suggestions would be welcomed.
I have completed the main parts of the fuselage frame at last: it took three attempts to get it right, but here it is as of now:
It is made from 3/64 in brass rod and plastic rod bracing which has been superglued into position: I originally tried brass tube and intended to use connectors, but found that there were so many pieces on some joints that I could not get the correct angles to the frame, so I gave up and used rod instead. For the benefit of those who do not have experience of building structures like this here is how I tackled mine. NB. I also use this method when constructing frames with plastic rod and cement.
I started by bending the nose of the floor around a piece of copper pipe - it just happened to be the right diameter (22mm). I then soldered the cross pieces to the sides of the frame. I placed the floor section on to a piece of balsa which I use to pin the brass pieces while I am soldering, and laid the pieces of one of the fuselage sides so that they aligned exactly with the floor, and then held the side pieces in place with pins. This means that the side will fit exactly later.
Remove the floor section and solder the joints of the side: the pins hold everything in place:
The image above shows that the side piece and floor section to align as required. Unfortunately these images are of my first attempt which I had to abandon later.... however the pinciple worked as shown by the results above of the third attempt show.
Having made the frame at last I then had to make a second fuselage shell in plastic as the first attempt was slightly too small. The marking on the outside are for later reference as they delineate the metal and fabric parts. I have also used Mr Surfacer to fill the marks from the wood mould on the underside of the shell.
I feel now that I can start to make the internal parts of the nacelle while I continue to make ribs for the wings.
Thanks for looking.
Stevef.
Please Log in to join the conversation.
5 years 8 months ago - 5 years 5 months ago #206
by Stevef
Warning: Trying to access array offset on value of type bool in /var/www/vhosts/gmms.org.uk/httpdocs/libraries/kunena/external/nbbc/nbbc.php on line 2819
Warning: Trying to access array offset on value of type bool in /var/www/vhosts/gmms.org.uk/httpdocs/libraries/kunena/external/nbbc/nbbc.php on line 2819
Warning: Trying to access array offset on value of type bool in /var/www/vhosts/gmms.org.uk/httpdocs/libraries/kunena/external/nbbc/nbbc.php on line 2819
Warning: Trying to access array offset on value of type bool in /var/www/vhosts/gmms.org.uk/httpdocs/libraries/kunena/external/nbbc/nbbc.php on line 2819
Warning: Trying to access array offset on value of type bool in /var/www/vhosts/gmms.org.uk/httpdocs/libraries/kunena/external/nbbc/nbbc.php on line 2819
Warning: Trying to access array offset on value of type bool in /var/www/vhosts/gmms.org.uk/httpdocs/libraries/kunena/external/nbbc/nbbc.php on line 2819
Evening All,
Thanks Steve, Hakan, Jon and Dave for your encouraging comments. Yes Jon I can blame Dave for persisting with this one because I did think at one stage that it might be easier to make the model as a complete strip down - Dave convinced me to keep going when we met recently at a local club meeting. However progress has been rather slow for a combination of reasons, some of which concern how I am going to make the wings and tail unit: while I think that I may have solved the tail unit problem I am still not quite sure about the wings but I will give that more thought later.
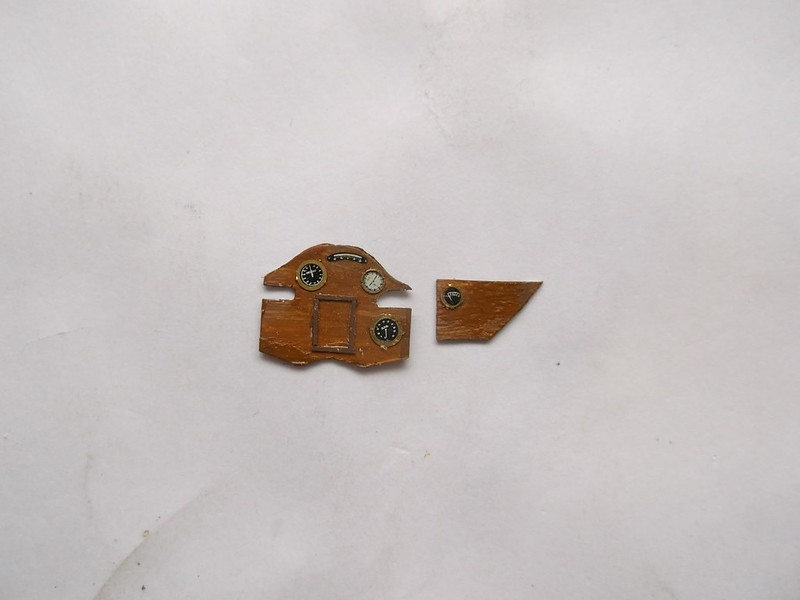
In the meantime I have made a little progress with the ribs and some internal fuselage details. I made the cockpit control panels and floors with 20thou card and painted them with Revell acrylic brown 381 as a base coat, and then raw sienna oil paint as the top coat.
The main instrument panel was deliberately made too large so that it could be cut down after I had added the instrument dials and bezels: the former were from the Airdecal sheet and the latter from HGW models WW1 instrument bezel set. The map holder was cut from 10 x 20 thou Evergreen strip. The barograph on the port (left) side panel was added in the same way:
I also finished the oil tank:
and then made a fuel tank from 30 thou card rolled around a piece of dowel and immersed in very hot water. The sides were cut from 20 thou card and the embossing was achieved by holding the pointed end of a round file against the plastic and striking the other end with a pair of pliers. One or two taps were enough to get the desired effect. Filler and drain pipes were made from 30 thou rod:
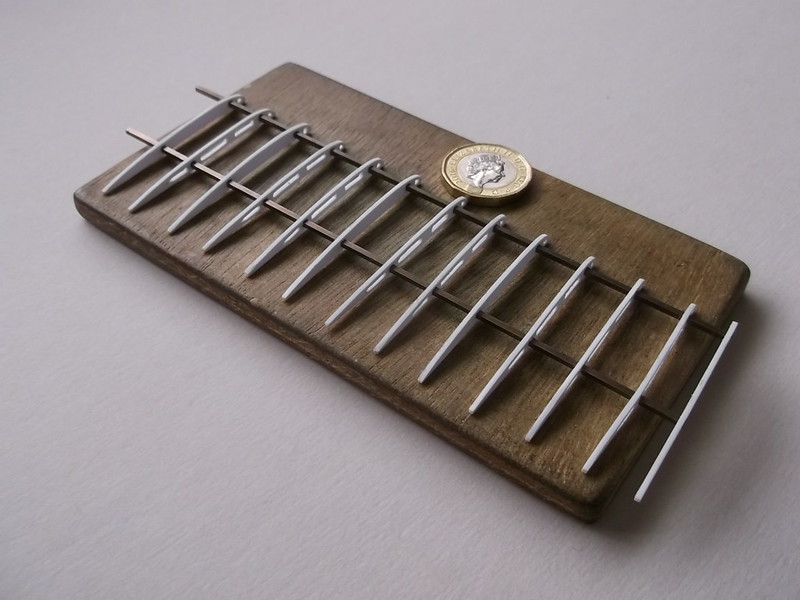
I have also been working away on the ribs for the wings. These come in two types, those with lightening slots and those without.

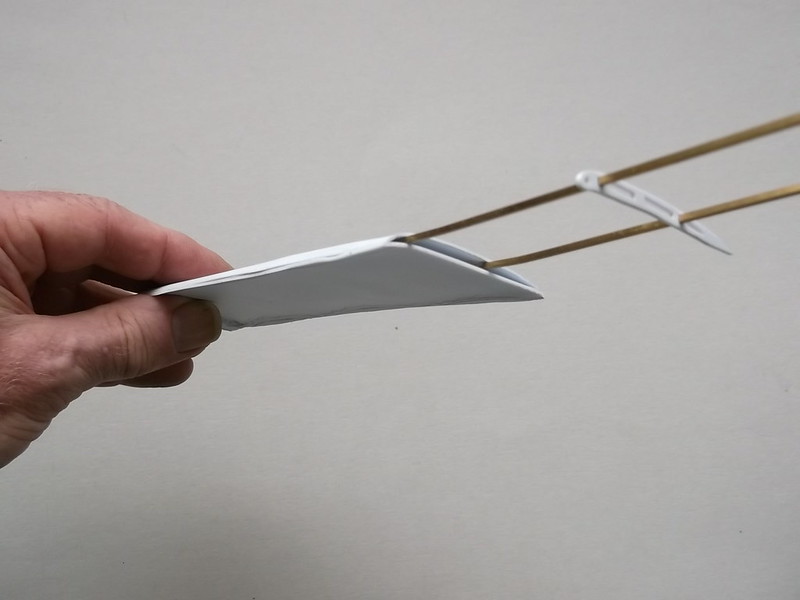
I have made up enough for both the top and lower wing halves, but to ensure that the holes for the spars were in the correct locations I threaded them on to a pair of brass bars. The lower wing will look a little like this when they are in place:
Thanks for looking.
Stevef.
Warning: Trying to access array offset on value of type bool in /var/www/vhosts/gmms.org.uk/httpdocs/libraries/kunena/external/nbbc/nbbc.php on line 2819
Warning: Trying to access array offset on value of type bool in /var/www/vhosts/gmms.org.uk/httpdocs/libraries/kunena/external/nbbc/nbbc.php on line 2819
Warning: Trying to access array offset on value of type bool in /var/www/vhosts/gmms.org.uk/httpdocs/libraries/kunena/external/nbbc/nbbc.php on line 2819
Warning: Trying to access array offset on value of type bool in /var/www/vhosts/gmms.org.uk/httpdocs/libraries/kunena/external/nbbc/nbbc.php on line 2819
Warning: Trying to access array offset on value of type bool in /var/www/vhosts/gmms.org.uk/httpdocs/libraries/kunena/external/nbbc/nbbc.php on line 2819
Warning: Trying to access array offset on value of type bool in /var/www/vhosts/gmms.org.uk/httpdocs/libraries/kunena/external/nbbc/nbbc.php on line 2819
Evening All,
Thanks Steve, Hakan, Jon and Dave for your encouraging comments. Yes Jon I can blame Dave for persisting with this one because I did think at one stage that it might be easier to make the model as a complete strip down - Dave convinced me to keep going when we met recently at a local club meeting. However progress has been rather slow for a combination of reasons, some of which concern how I am going to make the wings and tail unit: while I think that I may have solved the tail unit problem I am still not quite sure about the wings but I will give that more thought later.
In the meantime I have made a little progress with the ribs and some internal fuselage details. I made the cockpit control panels and floors with 20thou card and painted them with Revell acrylic brown 381 as a base coat, and then raw sienna oil paint as the top coat.
The main instrument panel was deliberately made too large so that it could be cut down after I had added the instrument dials and bezels: the former were from the Airdecal sheet and the latter from HGW models WW1 instrument bezel set. The map holder was cut from 10 x 20 thou Evergreen strip. The barograph on the port (left) side panel was added in the same way:
I also finished the oil tank:
and then made a fuel tank from 30 thou card rolled around a piece of dowel and immersed in very hot water. The sides were cut from 20 thou card and the embossing was achieved by holding the pointed end of a round file against the plastic and striking the other end with a pair of pliers. One or two taps were enough to get the desired effect. Filler and drain pipes were made from 30 thou rod:
I have also been working away on the ribs for the wings. These come in two types, those with lightening slots and those without.
I have made up enough for both the top and lower wing halves, but to ensure that the holes for the spars were in the correct locations I threaded them on to a pair of brass bars. The lower wing will look a little like this when they are in place:
Thanks for looking.
Stevef.
Last Edit: 5 years 5 months ago by Stevef. Reason: forgot to sign!
Please Log in to join the conversation.
5 years 8 months ago #207
by Stevef
Warning: Trying to access array offset on value of type bool in /var/www/vhosts/gmms.org.uk/httpdocs/libraries/kunena/external/nbbc/nbbc.php on line 2819
Warning: Trying to access array offset on value of type bool in /var/www/vhosts/gmms.org.uk/httpdocs/libraries/kunena/external/nbbc/nbbc.php on line 2819
Evening All,
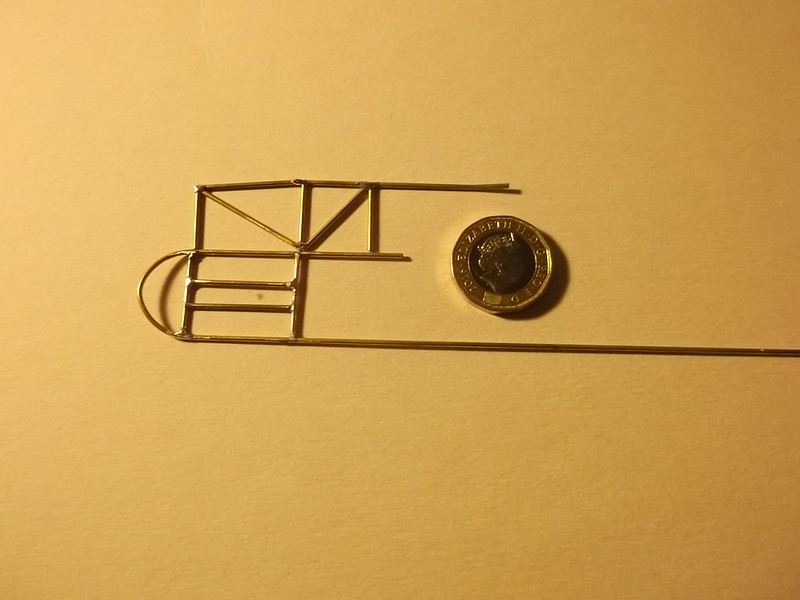
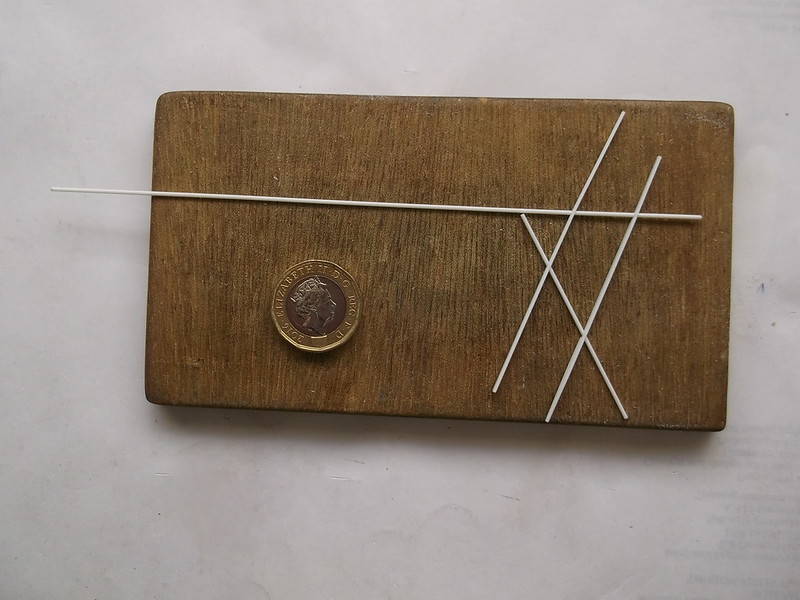
The solid part of the horizontal tail unit was easy to construct as it was simply two pieces of 30 thou card with Evergreen strip ribs. The strip was sanded to a rounded profile - an easy procedure:

The frame of the stripped down half of the horizontal tail unit has been made from 20 x 30 thou strip and 20thou rod. The strip makes up the spars and the rod a strut which joins them and the boom to the wing. The boom to the wing in the photo is the long piece extending to the left: the vertical pieces are the spars. The ends of the spars will be inserted into slots which I will cut into the solid half of the horizontal tail. The ribs have been cut from 20 x 30 strip and are not shown: the elevator will also consist of ribs and a single spar - again not shown here. The boom in the photo is currently plastic rod but I am hoping to be able to replace it with brass - the only problem being that the brass is slightly larger diameter than the plastic so the holes have to be bigger and the brass may be just too large. More experimentation needed here - it is one of the reasons why this build is proving to be so slow.
Thanks for looking.
Stevef.
Warning: Trying to access array offset on value of type bool in /var/www/vhosts/gmms.org.uk/httpdocs/libraries/kunena/external/nbbc/nbbc.php on line 2819
Warning: Trying to access array offset on value of type bool in /var/www/vhosts/gmms.org.uk/httpdocs/libraries/kunena/external/nbbc/nbbc.php on line 2819
Evening All,
The solid part of the horizontal tail unit was easy to construct as it was simply two pieces of 30 thou card with Evergreen strip ribs. The strip was sanded to a rounded profile - an easy procedure:
The frame of the stripped down half of the horizontal tail unit has been made from 20 x 30 thou strip and 20thou rod. The strip makes up the spars and the rod a strut which joins them and the boom to the wing. The boom to the wing in the photo is the long piece extending to the left: the vertical pieces are the spars. The ends of the spars will be inserted into slots which I will cut into the solid half of the horizontal tail. The ribs have been cut from 20 x 30 strip and are not shown: the elevator will also consist of ribs and a single spar - again not shown here. The boom in the photo is currently plastic rod but I am hoping to be able to replace it with brass - the only problem being that the brass is slightly larger diameter than the plastic so the holes have to be bigger and the brass may be just too large. More experimentation needed here - it is one of the reasons why this build is proving to be so slow.
Thanks for looking.
Stevef.
Please Log in to join the conversation.
5 years 7 months ago #208
by Stevef
Warning: Trying to access array offset on value of type bool in /var/www/vhosts/gmms.org.uk/httpdocs/libraries/kunena/external/nbbc/nbbc.php on line 2819
Warning: Trying to access array offset on value of type bool in /var/www/vhosts/gmms.org.uk/httpdocs/libraries/kunena/external/nbbc/nbbc.php on line 2819
Warning: Trying to access array offset on value of type bool in /var/www/vhosts/gmms.org.uk/httpdocs/libraries/kunena/external/nbbc/nbbc.php on line 2819
Warning: Trying to access array offset on value of type bool in /var/www/vhosts/gmms.org.uk/httpdocs/libraries/kunena/external/nbbc/nbbc.php on line 2819
Warning: Trying to access array offset on value of type bool in /var/www/vhosts/gmms.org.uk/httpdocs/libraries/kunena/external/nbbc/nbbc.php on line 2819
Warning: Trying to access array offset on value of type bool in /var/www/vhosts/gmms.org.uk/httpdocs/libraries/kunena/external/nbbc/nbbc.php on line 2819
Evening All,
I am not used to working in this gargantuan scale and have made some mistakes as a result, which I am not going to share as I am too ashamed to do so!! I have also been a bit frustrated at not being able to get things to work, so I have decided instead to try out an idea and make a proof of concept. If this does not work as I want it to I will have to think again. "This" being the other half of the wings - ie the solid bits.
I am using brass bar for the spars - they will be soldered to the cockpit frame in due course, but before I get too far I want to make sure that I can make the covered wing halves first. I am going to mould these using my well tried push moulding system, but I am not sure whether they are going to be too large, especially given the problems I had with the nacelle half. What follows is what I have learned so far.
I started by making the moulds for the upper and lower wing sections. As on most WW1 types these were concave sections, so I have to make two separate pieces and glue them together. I used basswood for the moulds as it is easy to work but provides a really strong former. To get the curvature right I used card formers:
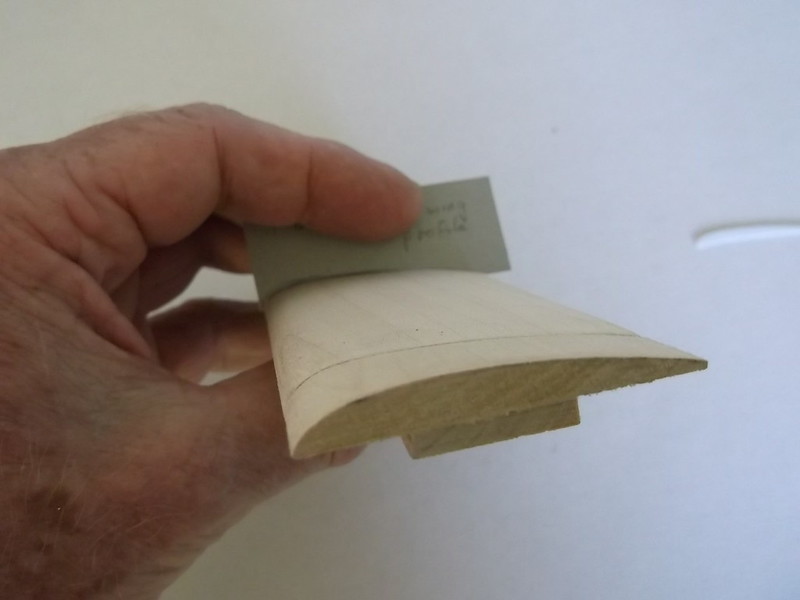
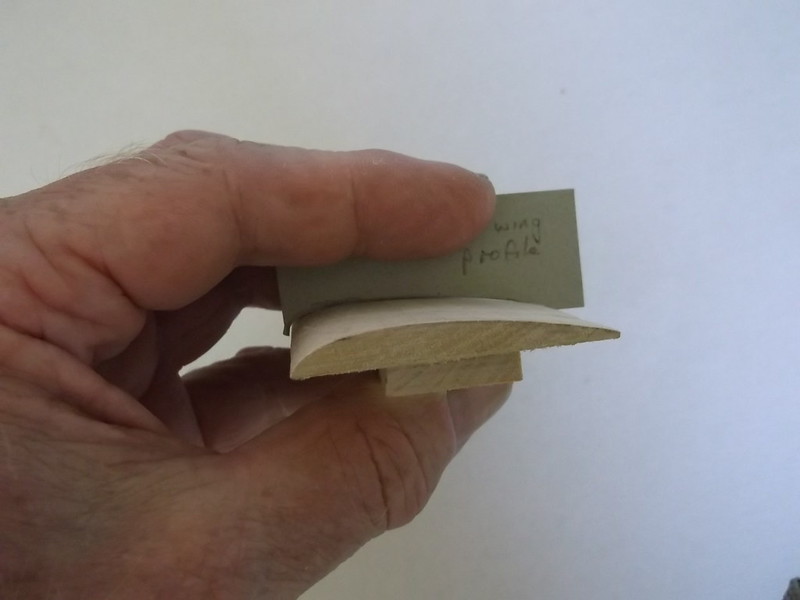
This is the upper surface of the wing and the former is at each end - the shape is close enough for me because it will vary a little during the moulding process, but at this scale nobody will see if its only 98% accurate, especially after the ribs and other details have been added.
So on to the moulding - a piece of plywood with a suitable hole cut in it, 30 thou card pinned to the plywood and the formers put ready:
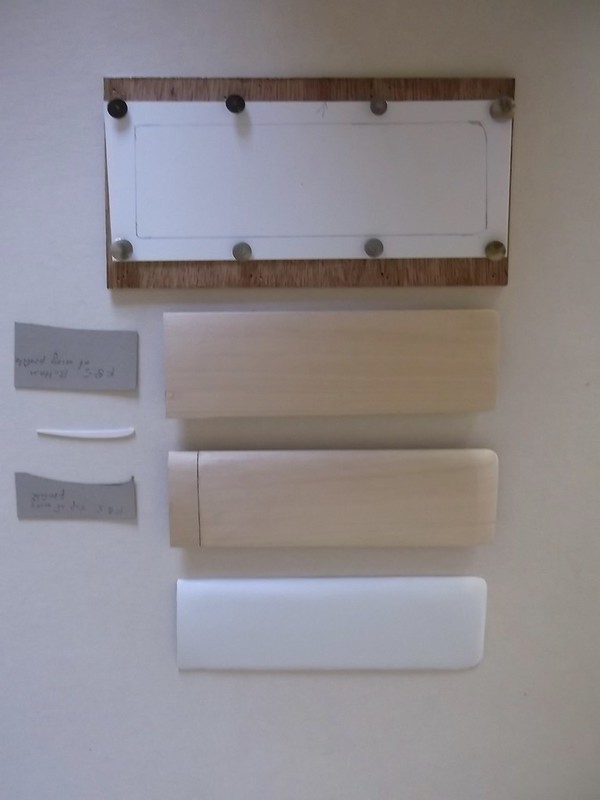
Also shown are the card formers, a rib which was used as a guide for the upper and lower surface card formers, and at the bottom - success a moulded wing surface. I found that because this moulding is so large that I had to heat the male moulds under the grill at the same time as I heated the plastic, otherwise I could not get the plastic to bend as required. After 4 aborted attempts I managed to get an acceptable upper and lower wing surface:
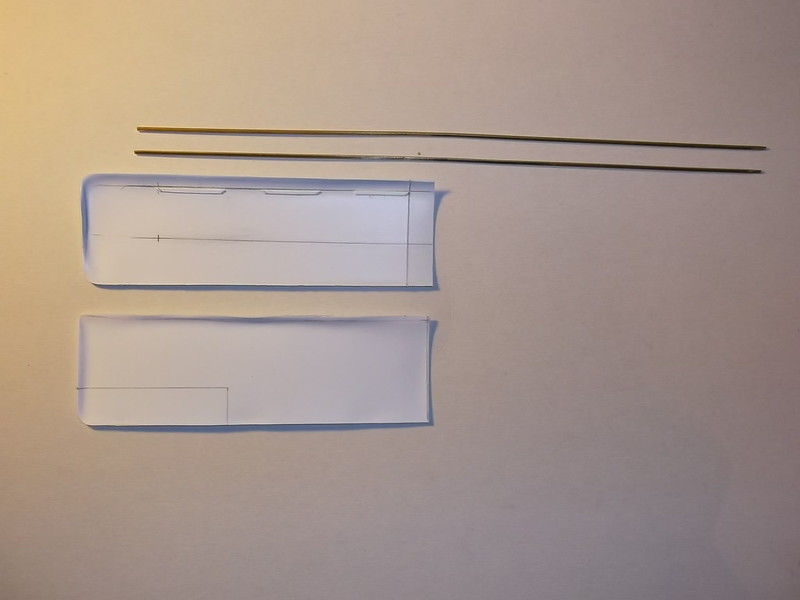
This will be a top wing half: the lower wing half is slightly shorter. The spars are shown ready to glue into place. I used epoxy glue to hold the spars which were attached to the upper half of the wing:

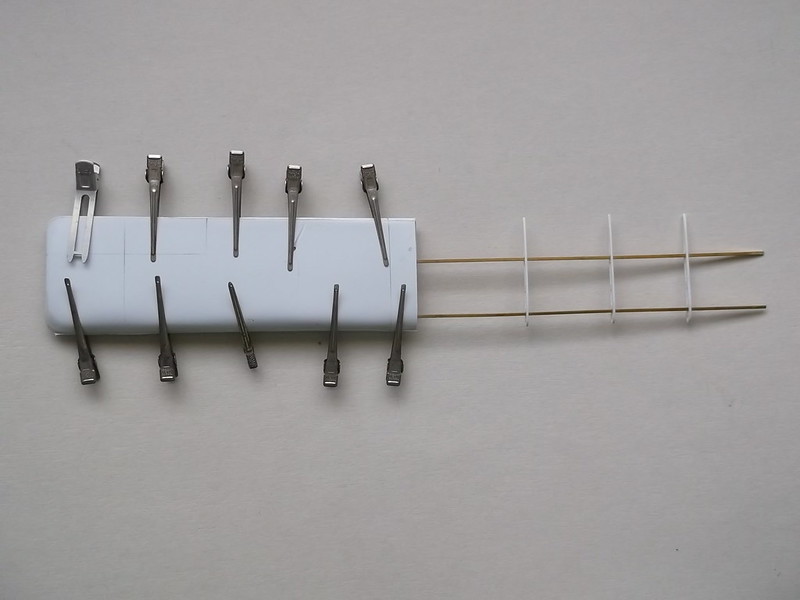
Getting the alignment right was a bit of a problem so to help things I used some ribs to hold the spars parallel and tape to hold it down while I applied the epoxy and allowed it to cure. After leaving this overnight I could glue the lower half of the wing into place and held it there while the glue set with my usual clamps - some of my late mother's hair grips:
Warning: Trying to access array offset on value of type bool in /var/www/vhosts/gmms.org.uk/httpdocs/libraries/kunena/external/nbbc/nbbc.php on line 2819
Warning: Trying to access array offset on value of type bool in /var/www/vhosts/gmms.org.uk/httpdocs/libraries/kunena/external/nbbc/nbbc.php on line 2819
Warning: Trying to access array offset on value of type bool in /var/www/vhosts/gmms.org.uk/httpdocs/libraries/kunena/external/nbbc/nbbc.php on line 2819
Warning: Trying to access array offset on value of type bool in /var/www/vhosts/gmms.org.uk/httpdocs/libraries/kunena/external/nbbc/nbbc.php on line 2819
Warning: Trying to access array offset on value of type bool in /var/www/vhosts/gmms.org.uk/httpdocs/libraries/kunena/external/nbbc/nbbc.php on line 2819
Warning: Trying to access array offset on value of type bool in /var/www/vhosts/gmms.org.uk/httpdocs/libraries/kunena/external/nbbc/nbbc.php on line 2819
Evening All,
I am not used to working in this gargantuan scale and have made some mistakes as a result, which I am not going to share as I am too ashamed to do so!! I have also been a bit frustrated at not being able to get things to work, so I have decided instead to try out an idea and make a proof of concept. If this does not work as I want it to I will have to think again. "This" being the other half of the wings - ie the solid bits.
I am using brass bar for the spars - they will be soldered to the cockpit frame in due course, but before I get too far I want to make sure that I can make the covered wing halves first. I am going to mould these using my well tried push moulding system, but I am not sure whether they are going to be too large, especially given the problems I had with the nacelle half. What follows is what I have learned so far.
I started by making the moulds for the upper and lower wing sections. As on most WW1 types these were concave sections, so I have to make two separate pieces and glue them together. I used basswood for the moulds as it is easy to work but provides a really strong former. To get the curvature right I used card formers:
This is the upper surface of the wing and the former is at each end - the shape is close enough for me because it will vary a little during the moulding process, but at this scale nobody will see if its only 98% accurate, especially after the ribs and other details have been added.
So on to the moulding - a piece of plywood with a suitable hole cut in it, 30 thou card pinned to the plywood and the formers put ready:
Also shown are the card formers, a rib which was used as a guide for the upper and lower surface card formers, and at the bottom - success a moulded wing surface. I found that because this moulding is so large that I had to heat the male moulds under the grill at the same time as I heated the plastic, otherwise I could not get the plastic to bend as required. After 4 aborted attempts I managed to get an acceptable upper and lower wing surface:
This will be a top wing half: the lower wing half is slightly shorter. The spars are shown ready to glue into place. I used epoxy glue to hold the spars which were attached to the upper half of the wing:
Getting the alignment right was a bit of a problem so to help things I used some ribs to hold the spars parallel and tape to hold it down while I applied the epoxy and allowed it to cure. After leaving this overnight I could glue the lower half of the wing into place and held it there while the glue set with my usual clamps - some of my late mother's hair grips:
Please Log in to join the conversation.
5 years 7 months ago #209
by Stevef
Warning: Trying to access array offset on value of type bool in /var/www/vhosts/gmms.org.uk/httpdocs/libraries/kunena/external/nbbc/nbbc.php on line 2819
Warning: Trying to access array offset on value of type bool in /var/www/vhosts/gmms.org.uk/httpdocs/libraries/kunena/external/nbbc/nbbc.php on line 2819
Warning: Trying to access array offset on value of type bool in /var/www/vhosts/gmms.org.uk/httpdocs/libraries/kunena/external/nbbc/nbbc.php on line 2819
Now the problems began to show - the moulds were not the best that I have made and trying to get the lower half of the wing to sit into the upper half was tricky and left some rather crude joints as these photos show: This is the leading edge of the wing:
and this is the trailing edge and tip:

Not WNW standard. However after a few hours of filing, filling and sanding I managed to get acceptable joints all the way along the edges and tips. I also drilled a hole in the upper surface where the boom will have to be fixed and found that when I inserted a piece of brass rod to represent the boom the end made direct contact with the rear spar, which means that I can use epoxy to make a firm joint there:

The pencil marks show the aileron position and where the struts will be fixed later. Just as I thought that this was going really well and that I might be able to use this prototype on the model I discovered that the spar spacing where the spars enter the wing is wrong!!! Somehow the *@#^* things had moved when I was adding the epoxy and I had not checked them against the plans! Lesson learned (I hope). However I have proved that my idea works, but I also think that I can make some better moulds if I use a vacuform machine. As I do not possess one of these high-tech instruments of torture I will have to see if I can use one at my former place of employment..... so a trip down the road to my former school will be taking place shortly and I will be begging a favour from an old colleague.
Thanks for looking.
Stevef.
Warning: Trying to access array offset on value of type bool in /var/www/vhosts/gmms.org.uk/httpdocs/libraries/kunena/external/nbbc/nbbc.php on line 2819
Warning: Trying to access array offset on value of type bool in /var/www/vhosts/gmms.org.uk/httpdocs/libraries/kunena/external/nbbc/nbbc.php on line 2819
Warning: Trying to access array offset on value of type bool in /var/www/vhosts/gmms.org.uk/httpdocs/libraries/kunena/external/nbbc/nbbc.php on line 2819
Now the problems began to show - the moulds were not the best that I have made and trying to get the lower half of the wing to sit into the upper half was tricky and left some rather crude joints as these photos show: This is the leading edge of the wing:
and this is the trailing edge and tip:
Not WNW standard. However after a few hours of filing, filling and sanding I managed to get acceptable joints all the way along the edges and tips. I also drilled a hole in the upper surface where the boom will have to be fixed and found that when I inserted a piece of brass rod to represent the boom the end made direct contact with the rear spar, which means that I can use epoxy to make a firm joint there:
The pencil marks show the aileron position and where the struts will be fixed later. Just as I thought that this was going really well and that I might be able to use this prototype on the model I discovered that the spar spacing where the spars enter the wing is wrong!!! Somehow the *@#^* things had moved when I was adding the epoxy and I had not checked them against the plans! Lesson learned (I hope). However I have proved that my idea works, but I also think that I can make some better moulds if I use a vacuform machine. As I do not possess one of these high-tech instruments of torture I will have to see if I can use one at my former place of employment..... so a trip down the road to my former school will be taking place shortly and I will be begging a favour from an old colleague.
Thanks for looking.
Stevef.
Please Log in to join the conversation.
5 years 7 months ago #210
by Stevef
Warning: Trying to access array offset on value of type bool in /var/www/vhosts/gmms.org.uk/httpdocs/libraries/kunena/external/nbbc/nbbc.php on line 2819
Warning: Trying to access array offset on value of type bool in /var/www/vhosts/gmms.org.uk/httpdocs/libraries/kunena/external/nbbc/nbbc.php on line 2819
Warning: Trying to access array offset on value of type bool in /var/www/vhosts/gmms.org.uk/httpdocs/libraries/kunena/external/nbbc/nbbc.php on line 2819
Warning: Trying to access array offset on value of type bool in /var/www/vhosts/gmms.org.uk/httpdocs/libraries/kunena/external/nbbc/nbbc.php on line 2819
Warning: Trying to access array offset on value of type bool in /var/www/vhosts/gmms.org.uk/httpdocs/libraries/kunena/external/nbbc/nbbc.php on line 2819
Warning: Trying to access array offset on value of type bool in /var/www/vhosts/gmms.org.uk/httpdocs/libraries/kunena/external/nbbc/nbbc.php on line 2819
Evening All,
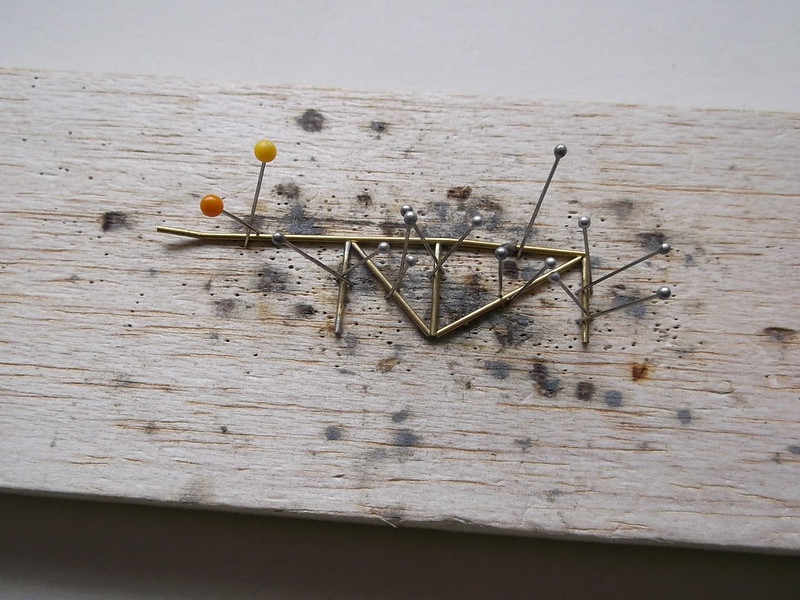
I have been back to soldering again because I needed to attach the lower wing spars to the fuselage nacelle frame. The wing spars are brass bar and the wings have a small amount of dihedral, so I had to bend the bar to get the correct angle. This was done by placing a bar on the front elevation of the plans, marking the inflection points of the dihedral and gently bending the bar with a pair of pliers. Having made one spar the second had to be made to exactly the same shape. Having achieved this I now had to solder the spars to the frame, a task which I had been putting off for some time, (which is one reason why I started on the top wing as described in the last post. Anything but solder the lower spars...). This is a pusher biplane which will be all struts, booms and wires when it is completed, and if anything is out of true it will show up like a sore thumb, so getting the spars dead square and at the correct angle of dihedral on each side of the nacelle is absolutely essential if the completed model is to look right. During the soldering process everything has to be rigid to prevent movement, but setting up a jig to hold things steady on a kitchen worktop is not easy. I am not one for fancy, (and sometimes expensive), jigs and tools - everything I do is a tribute to Heath-Robinson - and I firmly believe that much can be achieved with little. Except patience - you need a large amount of that when scratch-building.
So I set up my jig as follows:
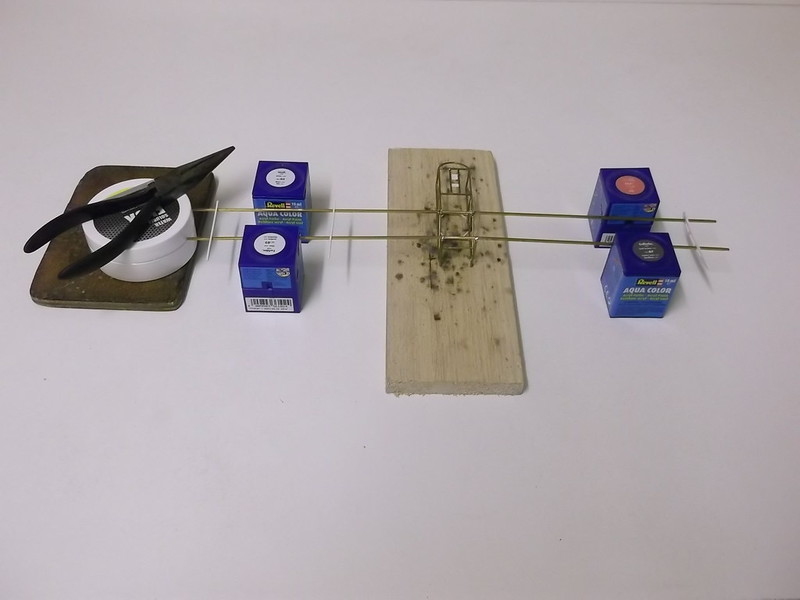
This is jig 1: it was designed to align the spars correctly on the base of the nacelle frame. The spars had been coated with solder paste to encourage them to stay in place long enough for me to be able to heat the joints with the tip of the soldering iron and make a stable, (but weak) joint. Now I could turn the assembly over and pin it to a block of balsa, (jig 2), so that it would not move while I really made a permanent joint with silver solder. This also shows how I added the frames between the spars - the left one is being held rigid and in place with pins:
Repeat the above on the other spar, clean up the joints with a file and I had this:

Or from another angle:
I added the frames between the spars at the bottom of the nacelle after the spars had been soldered in place. It did mean that I had to solder one joint three times because it came apart twice, but I got there eventually. The short white pieces on the top of the nacelle are plastic rod held in place with CA because these are too small to make from brass and solder into position. The nacelle and lower spar assembly is not quite complete - there are some pieces to be added to the nose but they will wait until later otherwise they will be in the way and get damaged easily. (Guess how I know?) I was delighted to find that when I checked this assembly against the plans everything lines up as it should - including the dihedral on the spars. I also tried out adding the ribs to the spars just to get a sneak preview of what they will look like on the completed model:
This model is turning into a "how-to-learn-from-mistakes" exercise. I realised that having made the ribs for the exposed wing sections, I would have to make some more because a number of ribs have three slots between the spars, and I had only made ribs with two! So back to the plastic strip and more filing, drilling and cutting....... However clouds have silver linings - well sometimes - in fairy tales and other works of fiction, don't they? In my case it was not fiction, it has really happened! I was soakling in my bath wondering how to extract the brass rods from the upper wing described in the last post when I thought that I would have one last check of the alignments of both sets of spars, including those on the fuselage frame. When I checked the top wing spars with the lower pair, I found that they align exactly!! The spars in the upper wing had not moved as I had thought, and my improvised jig for holding them in place while the epoxy resin cured had worked. Joy of joys!! This was the kind of "mistake" that I would like to repeat. Please do not ask how I came to believe that there was somthing wrong because I just do not know. But having discovered that I could use the wing assembly I proceeded to add ribs using 10 x 30 thou Evergreen strip and putting Mr Surfacer 500 and 1000 filler along the edges and sanding it all down. I also cut out the aileron and treated that in the same way. The happy result for me is that I have half of the top wing complete except for drilling the various holes for struts, rigging wires, pulleys, aileron hinges, etc which will adorn it when finished. I have started to work out how to represent the internal bracing wires which will extend from the centre of the wing to the uncovered section - more on that later.
On the other hand I have found that the nacelle half that I have moulded is not quite the right shape, so I am going to have to modify the male mould and make a new half. Another error! I have also got to think about how to finish the details of the cockpit and add them to the nacelle.
Thanks for looking.
Stevef.
Warning: Trying to access array offset on value of type bool in /var/www/vhosts/gmms.org.uk/httpdocs/libraries/kunena/external/nbbc/nbbc.php on line 2819
Warning: Trying to access array offset on value of type bool in /var/www/vhosts/gmms.org.uk/httpdocs/libraries/kunena/external/nbbc/nbbc.php on line 2819
Warning: Trying to access array offset on value of type bool in /var/www/vhosts/gmms.org.uk/httpdocs/libraries/kunena/external/nbbc/nbbc.php on line 2819
Warning: Trying to access array offset on value of type bool in /var/www/vhosts/gmms.org.uk/httpdocs/libraries/kunena/external/nbbc/nbbc.php on line 2819
Warning: Trying to access array offset on value of type bool in /var/www/vhosts/gmms.org.uk/httpdocs/libraries/kunena/external/nbbc/nbbc.php on line 2819
Warning: Trying to access array offset on value of type bool in /var/www/vhosts/gmms.org.uk/httpdocs/libraries/kunena/external/nbbc/nbbc.php on line 2819
Evening All,
I have been back to soldering again because I needed to attach the lower wing spars to the fuselage nacelle frame. The wing spars are brass bar and the wings have a small amount of dihedral, so I had to bend the bar to get the correct angle. This was done by placing a bar on the front elevation of the plans, marking the inflection points of the dihedral and gently bending the bar with a pair of pliers. Having made one spar the second had to be made to exactly the same shape. Having achieved this I now had to solder the spars to the frame, a task which I had been putting off for some time, (which is one reason why I started on the top wing as described in the last post. Anything but solder the lower spars...). This is a pusher biplane which will be all struts, booms and wires when it is completed, and if anything is out of true it will show up like a sore thumb, so getting the spars dead square and at the correct angle of dihedral on each side of the nacelle is absolutely essential if the completed model is to look right. During the soldering process everything has to be rigid to prevent movement, but setting up a jig to hold things steady on a kitchen worktop is not easy. I am not one for fancy, (and sometimes expensive), jigs and tools - everything I do is a tribute to Heath-Robinson - and I firmly believe that much can be achieved with little. Except patience - you need a large amount of that when scratch-building.
So I set up my jig as follows:
This is jig 1: it was designed to align the spars correctly on the base of the nacelle frame. The spars had been coated with solder paste to encourage them to stay in place long enough for me to be able to heat the joints with the tip of the soldering iron and make a stable, (but weak) joint. Now I could turn the assembly over and pin it to a block of balsa, (jig 2), so that it would not move while I really made a permanent joint with silver solder. This also shows how I added the frames between the spars - the left one is being held rigid and in place with pins:
Repeat the above on the other spar, clean up the joints with a file and I had this:
Or from another angle:
I added the frames between the spars at the bottom of the nacelle after the spars had been soldered in place. It did mean that I had to solder one joint three times because it came apart twice, but I got there eventually. The short white pieces on the top of the nacelle are plastic rod held in place with CA because these are too small to make from brass and solder into position. The nacelle and lower spar assembly is not quite complete - there are some pieces to be added to the nose but they will wait until later otherwise they will be in the way and get damaged easily. (Guess how I know?) I was delighted to find that when I checked this assembly against the plans everything lines up as it should - including the dihedral on the spars. I also tried out adding the ribs to the spars just to get a sneak preview of what they will look like on the completed model:
This model is turning into a "how-to-learn-from-mistakes" exercise. I realised that having made the ribs for the exposed wing sections, I would have to make some more because a number of ribs have three slots between the spars, and I had only made ribs with two! So back to the plastic strip and more filing, drilling and cutting....... However clouds have silver linings - well sometimes - in fairy tales and other works of fiction, don't they? In my case it was not fiction, it has really happened! I was soakling in my bath wondering how to extract the brass rods from the upper wing described in the last post when I thought that I would have one last check of the alignments of both sets of spars, including those on the fuselage frame. When I checked the top wing spars with the lower pair, I found that they align exactly!! The spars in the upper wing had not moved as I had thought, and my improvised jig for holding them in place while the epoxy resin cured had worked. Joy of joys!! This was the kind of "mistake" that I would like to repeat. Please do not ask how I came to believe that there was somthing wrong because I just do not know. But having discovered that I could use the wing assembly I proceeded to add ribs using 10 x 30 thou Evergreen strip and putting Mr Surfacer 500 and 1000 filler along the edges and sanding it all down. I also cut out the aileron and treated that in the same way. The happy result for me is that I have half of the top wing complete except for drilling the various holes for struts, rigging wires, pulleys, aileron hinges, etc which will adorn it when finished. I have started to work out how to represent the internal bracing wires which will extend from the centre of the wing to the uncovered section - more on that later.
On the other hand I have found that the nacelle half that I have moulded is not quite the right shape, so I am going to have to modify the male mould and make a new half. Another error! I have also got to think about how to finish the details of the cockpit and add them to the nacelle.
Thanks for looking.
Stevef.
Please Log in to join the conversation.
5 years 6 months ago #211
by Stevef
Warning: Trying to access array offset on value of type bool in /var/www/vhosts/gmms.org.uk/httpdocs/libraries/kunena/external/nbbc/nbbc.php on line 2819
Warning: Trying to access array offset on value of type bool in /var/www/vhosts/gmms.org.uk/httpdocs/libraries/kunena/external/nbbc/nbbc.php on line 2819
Warning: Trying to access array offset on value of type bool in /var/www/vhosts/gmms.org.uk/httpdocs/libraries/kunena/external/nbbc/nbbc.php on line 2819
Warning: Trying to access array offset on value of type bool in /var/www/vhosts/gmms.org.uk/httpdocs/libraries/kunena/external/nbbc/nbbc.php on line 2819
Warning: Trying to access array offset on value of type bool in /var/www/vhosts/gmms.org.uk/httpdocs/libraries/kunena/external/nbbc/nbbc.php on line 2819
Evening All,
First, as noted in the previous post, this is a model with a steep learning curve, so I will get the mistakes out of the way. I had been a bit concerned about the wing which I reported on in the last post, and decided that I would reject it after all as the curvature on the underside was not sufficient, and the tip was flat rather than curved. I had still to mould the lower wing so I decided to have another go at moulding a new set of wing sections for both the upper and lower wings. When I tried to do this before I found that I could not get a clean pair of mouldings, and I was going to try to use a vacform machine to make some new ones. However after giving the problem some thought, (my brain can accomplish such feats when I am not being distracted by other things....), I decided that I would have another try using my Kitchen Method (ie my gas-grill), on the grounds that a vacform machine is too sophisticated for the average modeller, i.e. me. I considered that the cause of the problem was that as these are relatively large mouldings, (they are the largest that I have attempted to date), I was not heating the plastic sheet and former enough, and the male mould was also not hot enough. In particular the male mould was probably cooling the plastic sheet sufficiently to prevent it from bending easily. Consequently I placed the male mould face up on the floor of the grill so that it was warming while I heated the plastic sheet. This I heated by holding the former at twice the normal distance from the gas flame i.e. approx 4inches (10cm) with the plastic facing away from the flame. This meant that the plastic did not curl and bubble while the wood former absorbed much more heat. Heating took two minutes and when I withdrew the former and mould to make the pressing I managed to get a good set of mouldings almost first time every time: actually I had to make 6 attempts to get 4 usable parts. Before I had made 10 attempts to get only 4 usable parts. I will describe in the next post the manufacture of the new wing halves as I am currently in the process of making them.
I also needed a new nacelle half as also explained in the last post, so I modified the existing male mould and made a new nacelle half at the same time as the wing sections. The cockpit openings and various holes for spars, struts, oil tank, rudder bar, etc were drilled or cut out and the new part painted. Before this I had been experimenting with the idea of using real metal for the upper decking and underside of the nacelle. Vickers Gunbus nacelles consisted of a steel tube frame covered with aluminium on the top, bottom and nose, and fabric sides, so I cut the ends off an old beer can and the split it down the middle:

Suitably sized and shaped pieces were cut from the can after the printed logos had been removed,
and I then tried to attach these to the old nacelle half which I was discarding because it was the wrong size and shape. It was at this point that I found that my good idea was not so good after all. I could not shape the pieces around the nose without causing creases in the metal. In addition the junction between the edges of the metal and the plastic which represents the fabric sides was much too proud. Finally the pieces around the nose also had horribly large and out-of-scale joints and I could not think of a way of making these less prominent. End of another good idea!
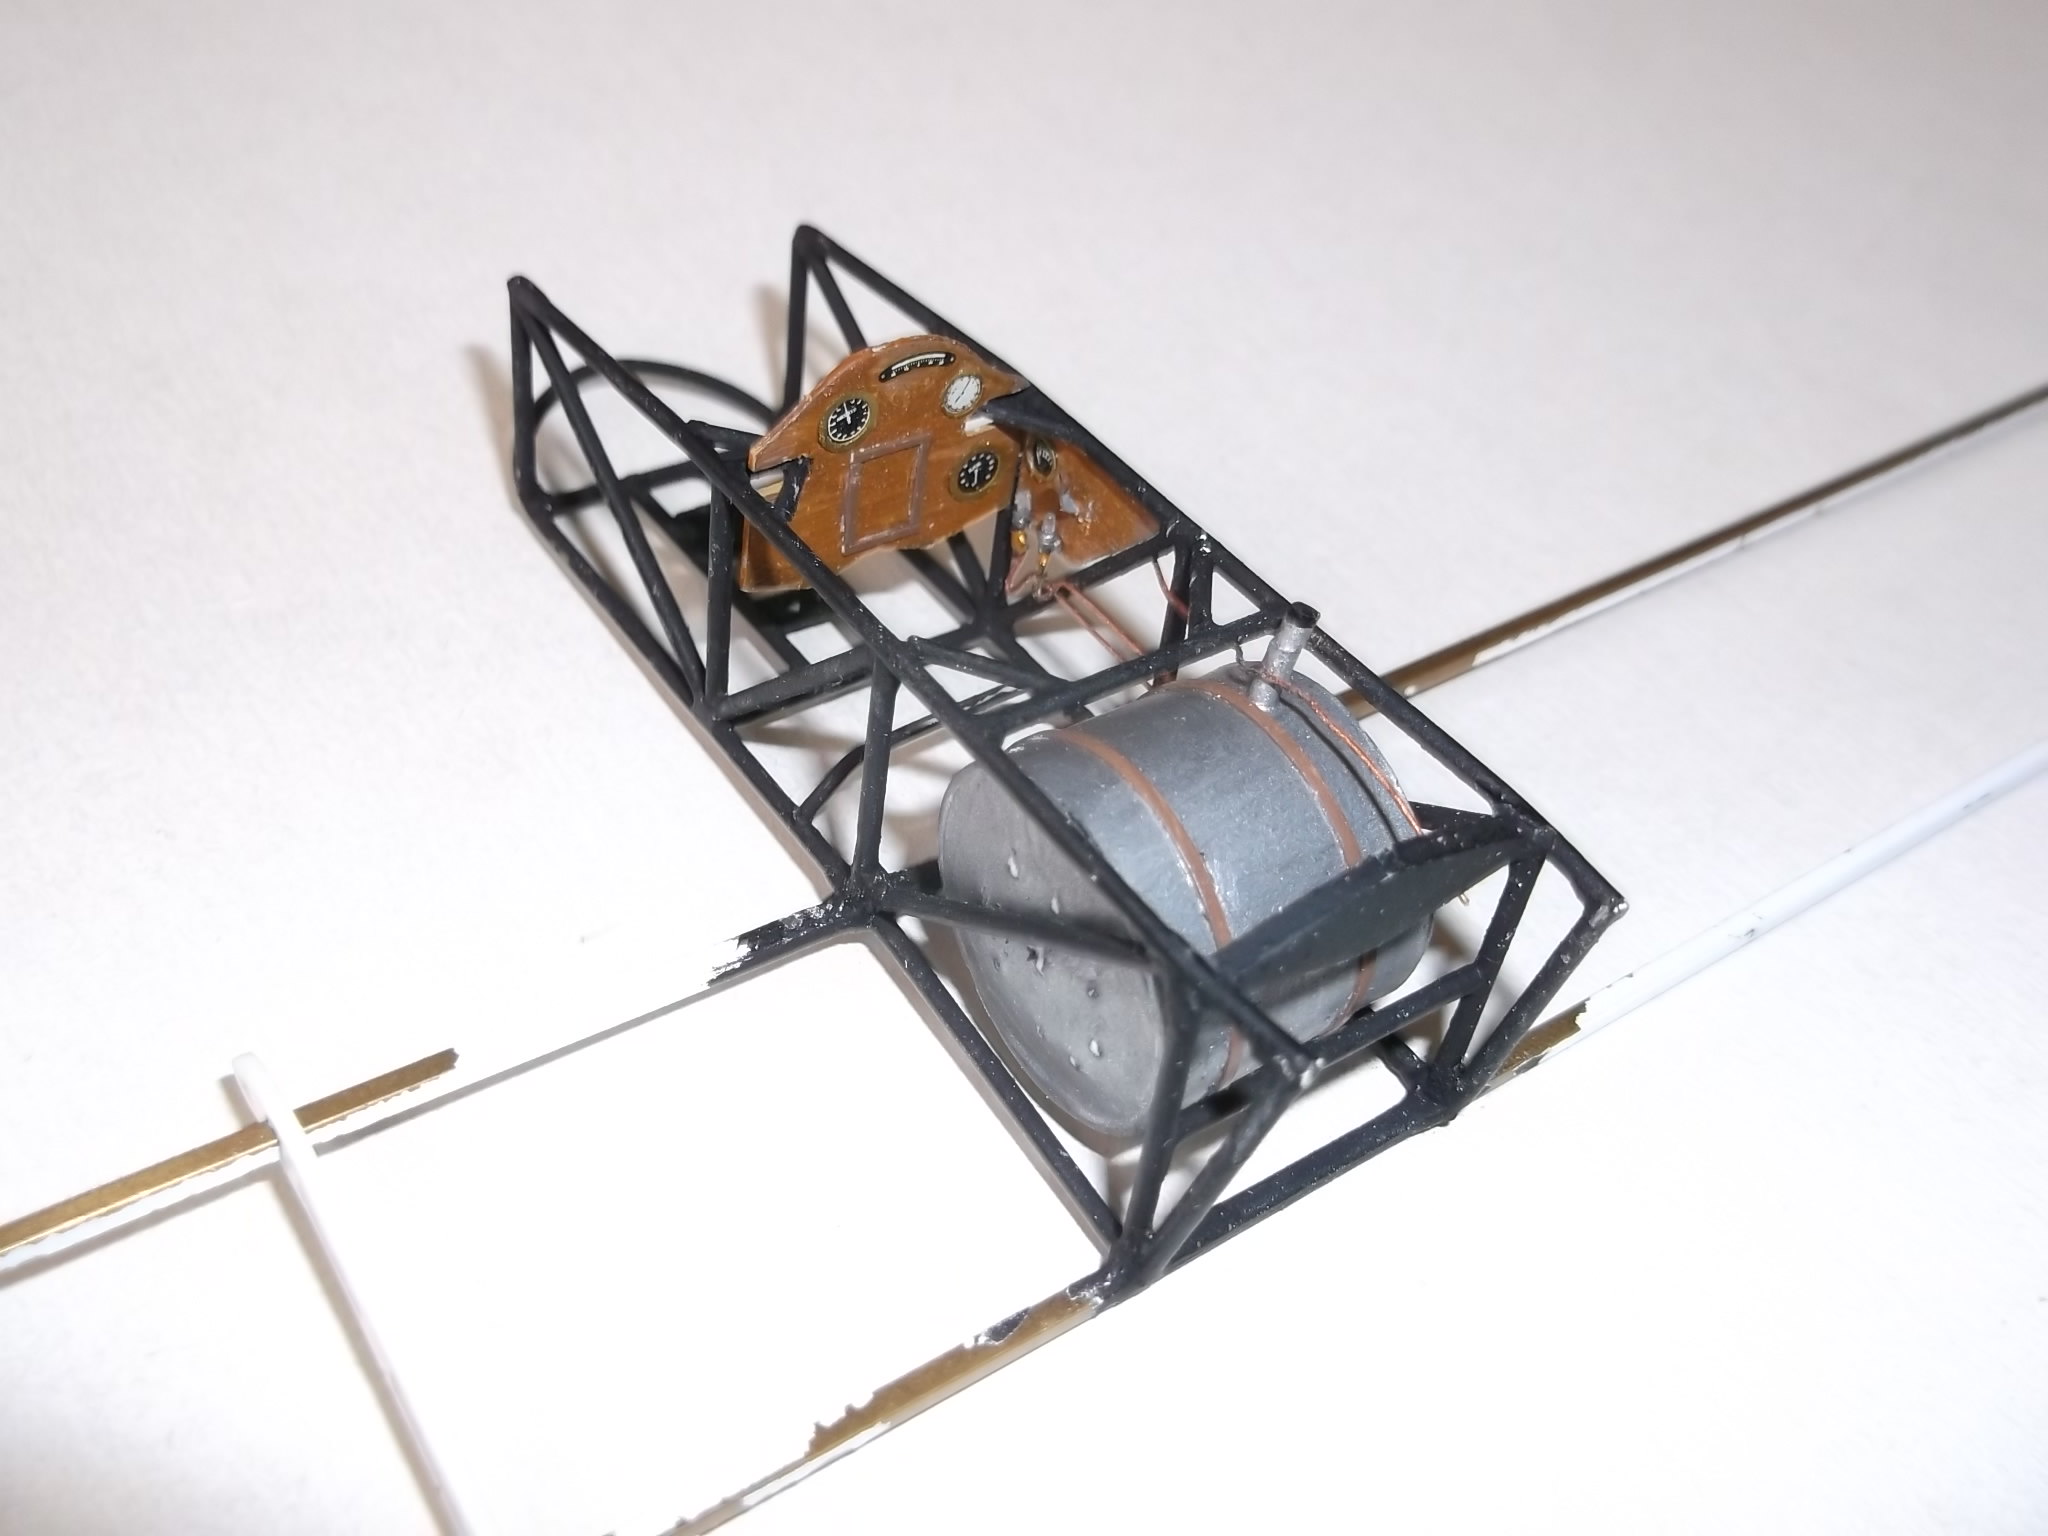
Many of the interior details of the nacelle had to be fitted before I could put on the nacelle side, so I added the fuel tank behind, and instrument panel in front of, the pilot, and the starboard wood side panel as this will be set against the solid nacelle half. This panel has the oil pulsometers (pumps), which were an aftermarket part from Taurus Models. They are very small but very finely detailed and I am glad that I have not had to try to make them from scratch.
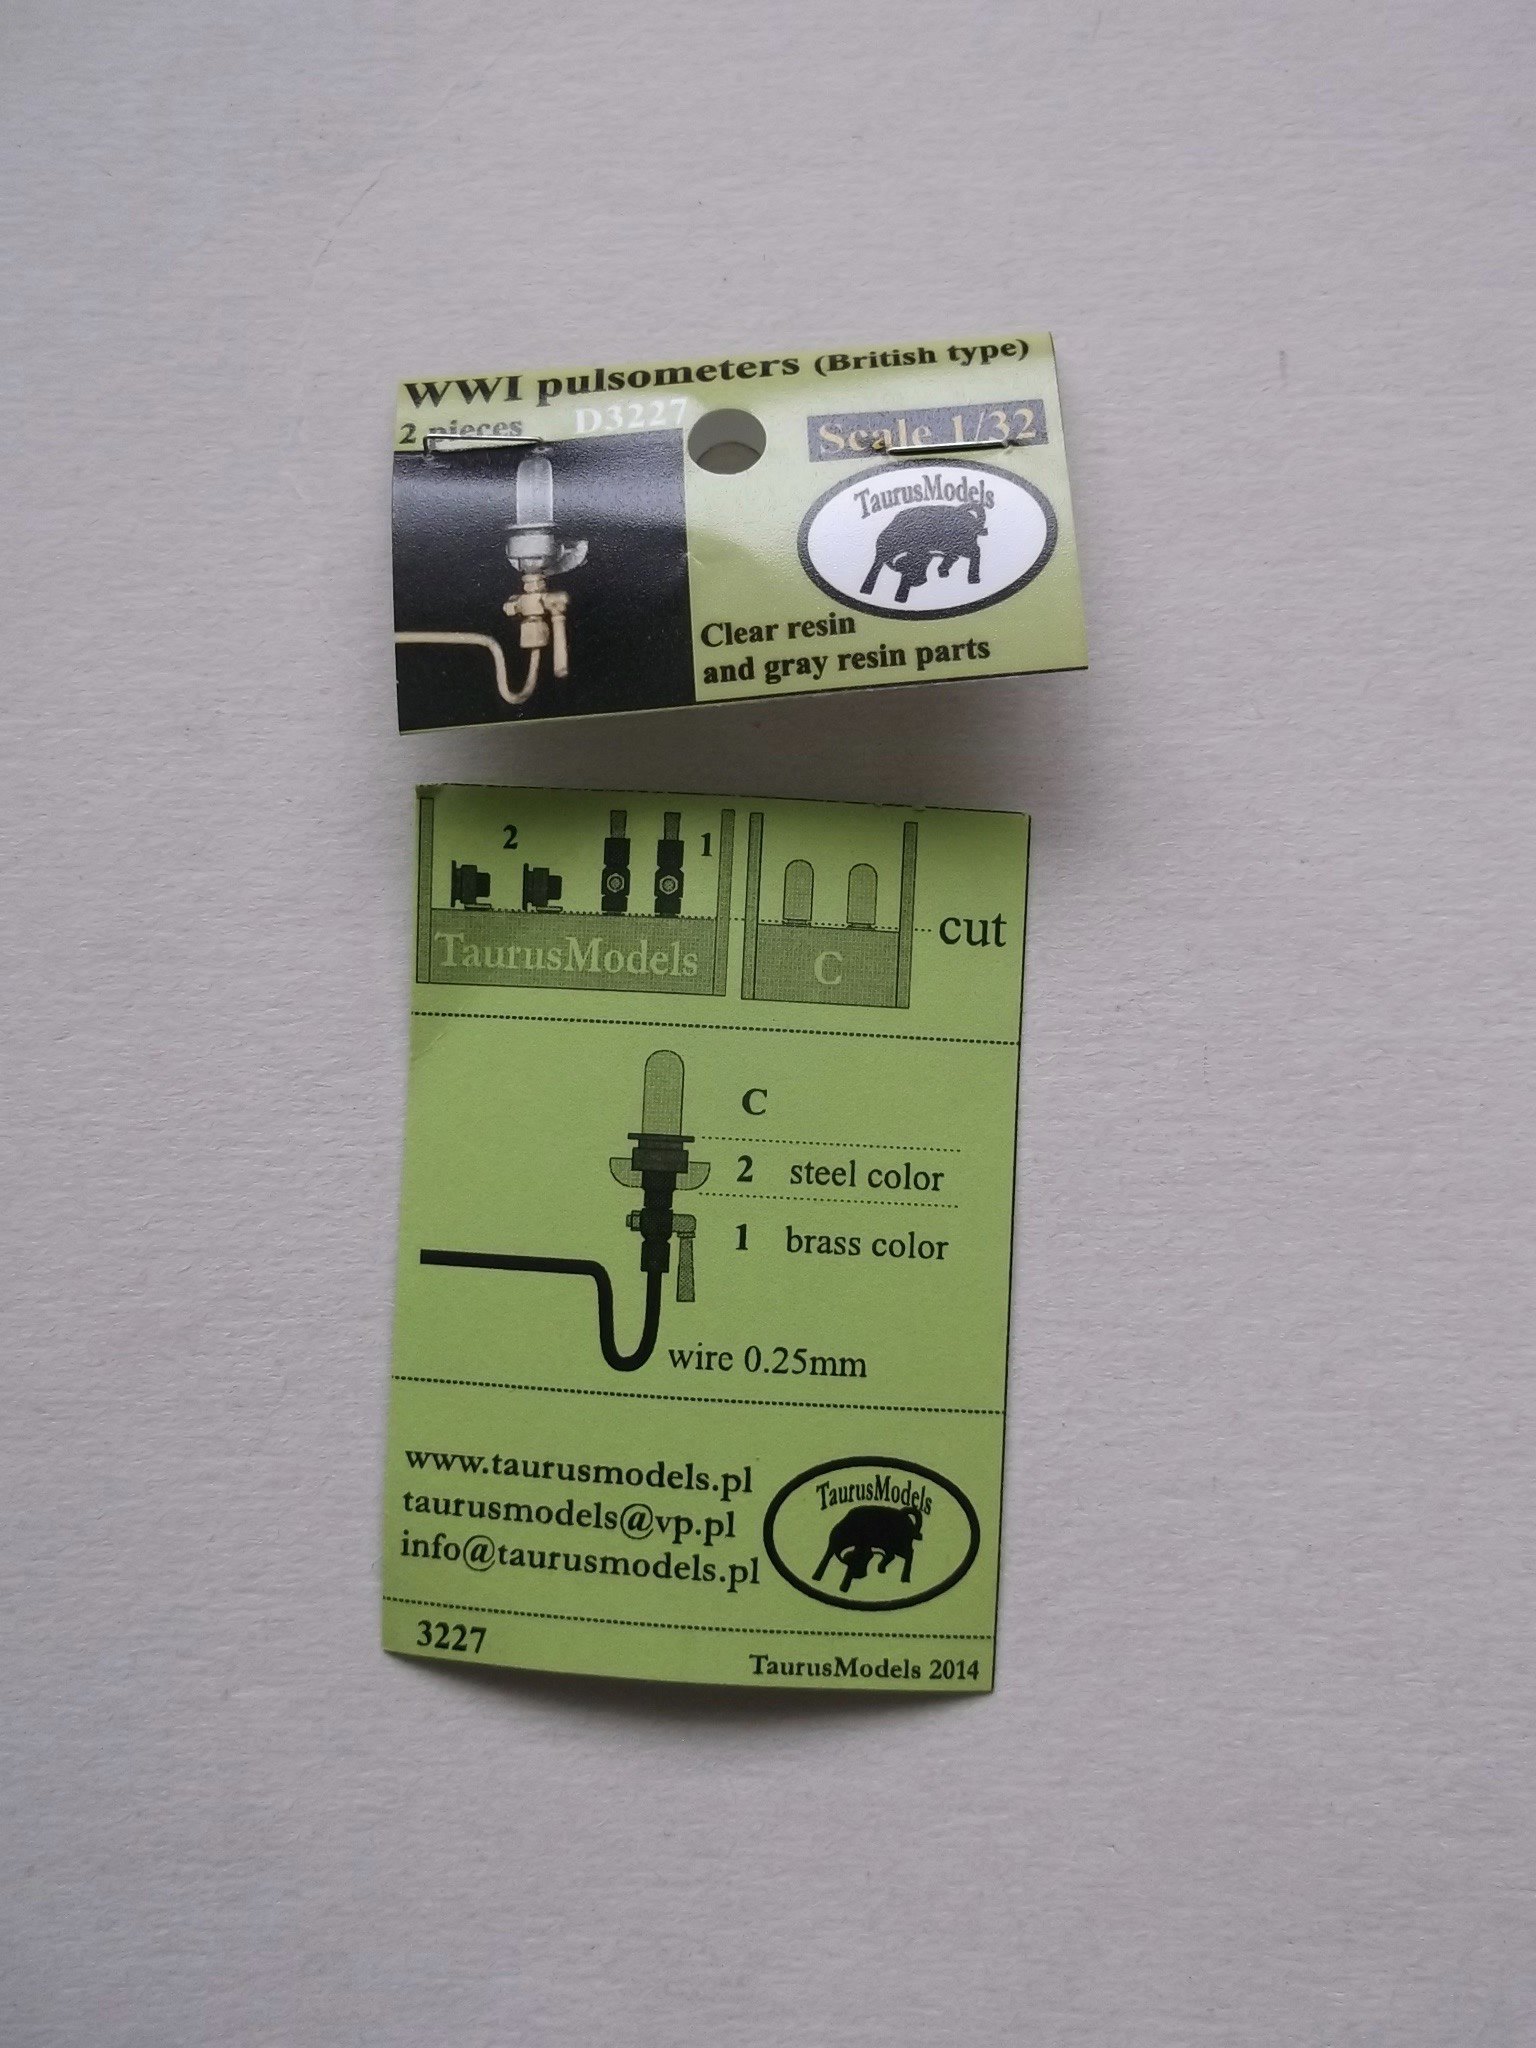
These were fixed to the panel before I attached the latter to the fuselage frame, and then I added two lengths of wire painted a copper colour from the pulsometers to the sides of the fuel tank where they disappear. In reality these would have been connected to the oil tank and then the inlet to the engine crankcase, but I cannot find any drawings or photos of this section of the aircraft, and anyway they would probably not be visible after the nacelle side is in place, so I am not bothering. I did add a fuel line which runs from the hand pump on the port side of the nacelle frame via the front of the instrument panel and behind the starboard side panel, over the top of the fuel tank to the engine - this would be seen when the nacelle half is in place. There is also a frame member behind the fuel tank - I think that it supports the end of the engine crankshaft:
Warning: Trying to access array offset on value of type bool in /var/www/vhosts/gmms.org.uk/httpdocs/libraries/kunena/external/nbbc/nbbc.php on line 2819
Warning: Trying to access array offset on value of type bool in /var/www/vhosts/gmms.org.uk/httpdocs/libraries/kunena/external/nbbc/nbbc.php on line 2819
Warning: Trying to access array offset on value of type bool in /var/www/vhosts/gmms.org.uk/httpdocs/libraries/kunena/external/nbbc/nbbc.php on line 2819
Warning: Trying to access array offset on value of type bool in /var/www/vhosts/gmms.org.uk/httpdocs/libraries/kunena/external/nbbc/nbbc.php on line 2819
Warning: Trying to access array offset on value of type bool in /var/www/vhosts/gmms.org.uk/httpdocs/libraries/kunena/external/nbbc/nbbc.php on line 2819
Evening All,
First, as noted in the previous post, this is a model with a steep learning curve, so I will get the mistakes out of the way. I had been a bit concerned about the wing which I reported on in the last post, and decided that I would reject it after all as the curvature on the underside was not sufficient, and the tip was flat rather than curved. I had still to mould the lower wing so I decided to have another go at moulding a new set of wing sections for both the upper and lower wings. When I tried to do this before I found that I could not get a clean pair of mouldings, and I was going to try to use a vacform machine to make some new ones. However after giving the problem some thought, (my brain can accomplish such feats when I am not being distracted by other things....), I decided that I would have another try using my Kitchen Method (ie my gas-grill), on the grounds that a vacform machine is too sophisticated for the average modeller, i.e. me. I considered that the cause of the problem was that as these are relatively large mouldings, (they are the largest that I have attempted to date), I was not heating the plastic sheet and former enough, and the male mould was also not hot enough. In particular the male mould was probably cooling the plastic sheet sufficiently to prevent it from bending easily. Consequently I placed the male mould face up on the floor of the grill so that it was warming while I heated the plastic sheet. This I heated by holding the former at twice the normal distance from the gas flame i.e. approx 4inches (10cm) with the plastic facing away from the flame. This meant that the plastic did not curl and bubble while the wood former absorbed much more heat. Heating took two minutes and when I withdrew the former and mould to make the pressing I managed to get a good set of mouldings almost first time every time: actually I had to make 6 attempts to get 4 usable parts. Before I had made 10 attempts to get only 4 usable parts. I will describe in the next post the manufacture of the new wing halves as I am currently in the process of making them.
I also needed a new nacelle half as also explained in the last post, so I modified the existing male mould and made a new nacelle half at the same time as the wing sections. The cockpit openings and various holes for spars, struts, oil tank, rudder bar, etc were drilled or cut out and the new part painted. Before this I had been experimenting with the idea of using real metal for the upper decking and underside of the nacelle. Vickers Gunbus nacelles consisted of a steel tube frame covered with aluminium on the top, bottom and nose, and fabric sides, so I cut the ends off an old beer can and the split it down the middle:
Suitably sized and shaped pieces were cut from the can after the printed logos had been removed,
and I then tried to attach these to the old nacelle half which I was discarding because it was the wrong size and shape. It was at this point that I found that my good idea was not so good after all. I could not shape the pieces around the nose without causing creases in the metal. In addition the junction between the edges of the metal and the plastic which represents the fabric sides was much too proud. Finally the pieces around the nose also had horribly large and out-of-scale joints and I could not think of a way of making these less prominent. End of another good idea!
Many of the interior details of the nacelle had to be fitted before I could put on the nacelle side, so I added the fuel tank behind, and instrument panel in front of, the pilot, and the starboard wood side panel as this will be set against the solid nacelle half. This panel has the oil pulsometers (pumps), which were an aftermarket part from Taurus Models. They are very small but very finely detailed and I am glad that I have not had to try to make them from scratch.
These were fixed to the panel before I attached the latter to the fuselage frame, and then I added two lengths of wire painted a copper colour from the pulsometers to the sides of the fuel tank where they disappear. In reality these would have been connected to the oil tank and then the inlet to the engine crankcase, but I cannot find any drawings or photos of this section of the aircraft, and anyway they would probably not be visible after the nacelle side is in place, so I am not bothering. I did add a fuel line which runs from the hand pump on the port side of the nacelle frame via the front of the instrument panel and behind the starboard side panel, over the top of the fuel tank to the engine - this would be seen when the nacelle half is in place. There is also a frame member behind the fuel tank - I think that it supports the end of the engine crankshaft:
Please Log in to join the conversation.
Time to create page: 0.174 seconds
- You are here:
-
Home

-
Forum
-
Work in progress
-
Airfield
- Scratch build partial stripdown Vickers FB 5 Gunbus 1/32 scale